
xenon projector retrofit on the W220
 10-05-2012, 03:18 PM
#1
Junior Member
Thread Starter

Join Date: Oct 2011
Location: Norway
Posts: 43
Likes: 0
Received 0 Likes
on
0 Posts
S320
xenon projector retrofit on the W220
Hi guys, the headlights on my car sucks, I have the non projector halogen lights.
So I'm gonna buy me som aftermarket clear lens projector headlights and retrofit a bixenon projector in them.
But I have a couple of questions though and was hoping someone else on here has done this, I found this while searching but it's a four year old thread...https://mbworld.org/forums/s-class-w...n-upgrade.html
1. Where is the ballast located on original xenon headlights and if you have done a retrofit, where did you place yours?
2. Am I going to get a "bulb out" warning? like do I need to get a canbus kit? (I'm buying all my parts from theretrofitsource.com)
3. How do I find out if I have auto leveling headlights so I can buy the correct aftermarket headlights? I'm guessing I don't have any auto leveling but It's good to know.
Thats it for now, I'll update this thread if I think of something else.
 10-08-2012, 03:23 PM
#2
Junior Member
Thread Starter
Join Date: Oct 2011
Location: Norway
Posts: 43
Likes: 0
Received 0 Likes
on
0 Posts
S320
Okay, done some researching and found some answers, so a little update 
1. Ballast is located on the underside of the headlight, so there is obviously room there, and is where I will place mine.
2. Bulb warning will come on. So I will need either ballasts with a built in resistor to trick the car, or I will need a "canbus" harness if using ballasts without this circuit.
3. Still not sure, but I'm almost certain I don't since my car is so old and has halogen lights....
Will update this thread once I get all the parts...
12-15-2012, 04:42 PM
#3
Junior Member
Thread Starter
Join Date: Oct 2011
Location: Norway
Posts: 43
Likes: 0
Received 0 Likes
on
0 Posts
S320
So this is what I've been doing this week.
The setup:
-Clear projector headlights bought on ebay.
-evox-r projectors
-morimoto 35w ballasts.
-H7 "canbus" wiring harness.
I had the halogen headlights on mine, old, faded, punctured, aimed to the ground and the previous owner had installed some "xenon" bulbs which had a horrible output. I actually drove the car 12km's with the highbeams on, met 11 cars and no one flashed at me... horrible... SO time to upgrade both looks and performance!
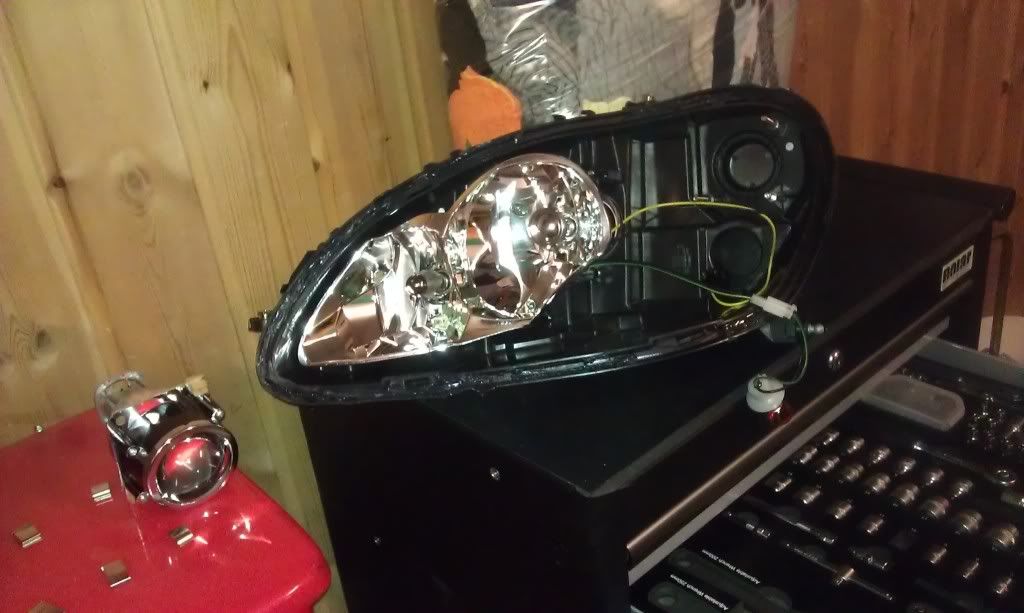
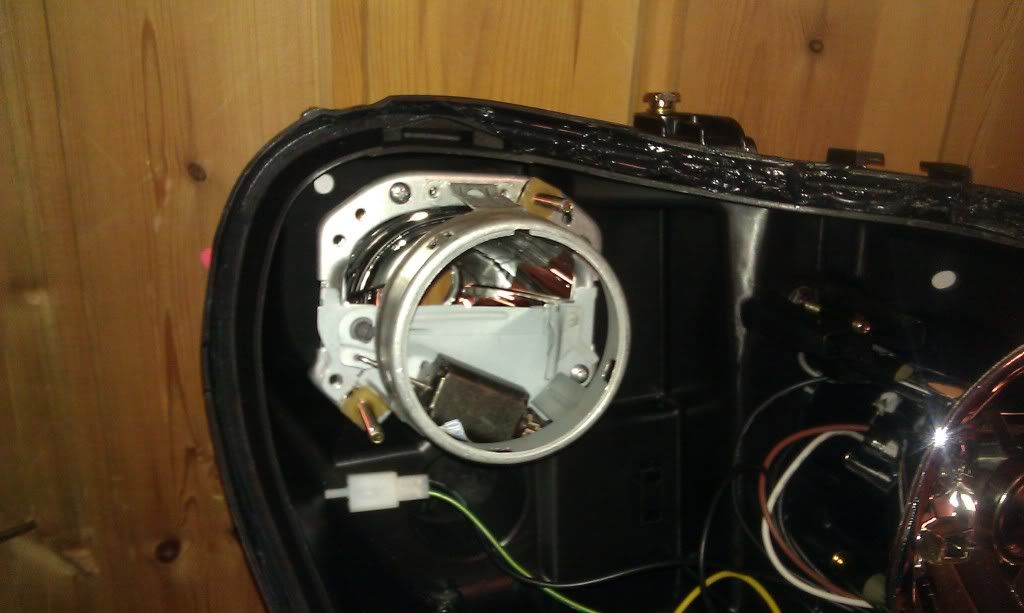
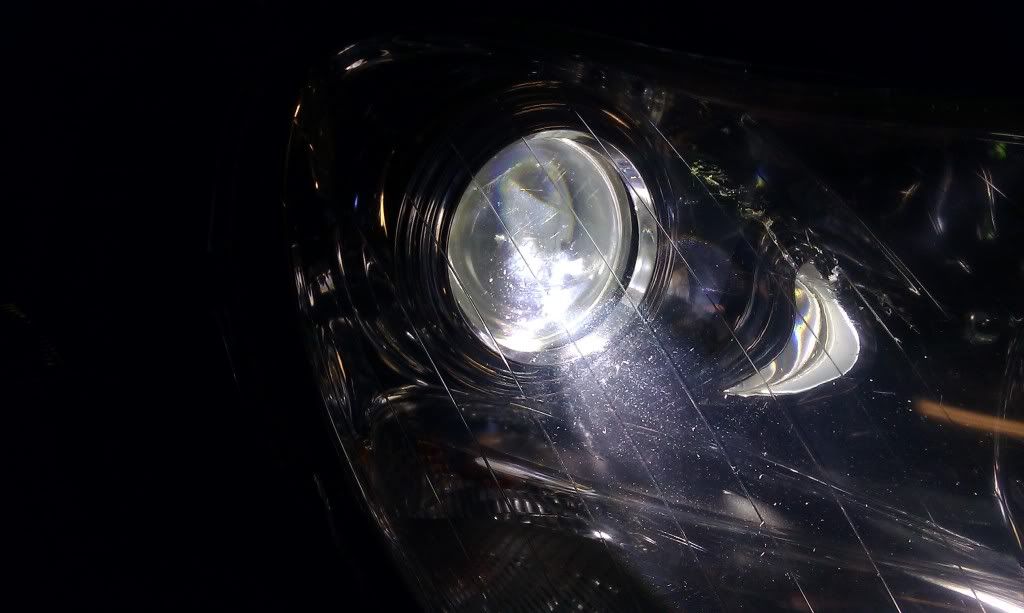
Enter the cheapo made in taiwan projector headlights:
The flash is reflecting of the projector.
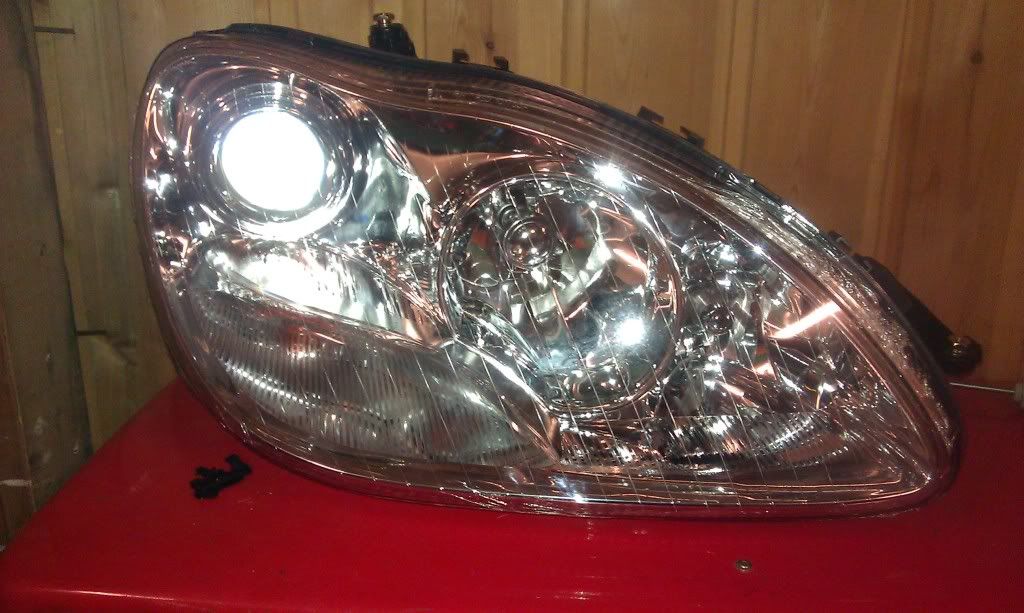
Had to use a heat gun to open them because they didn't fit in my oven. Funny how big the lights suddenly get when they're not mounted on a car....
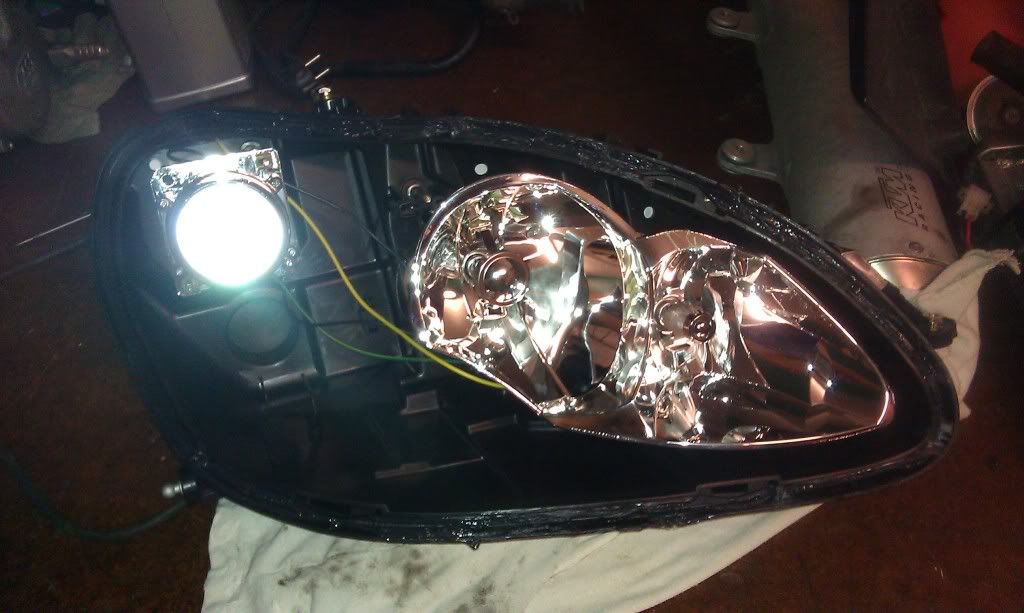
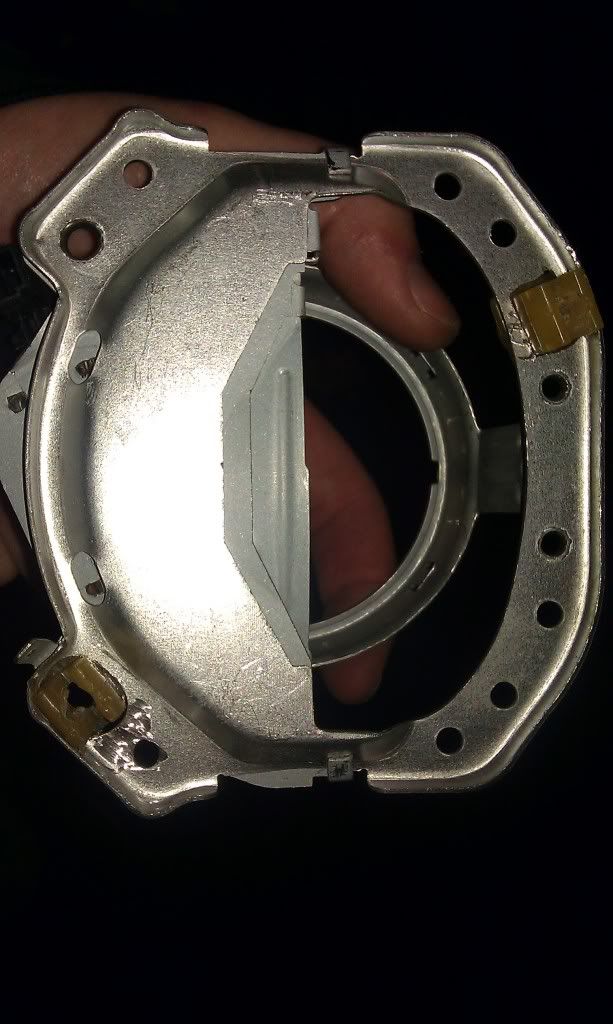
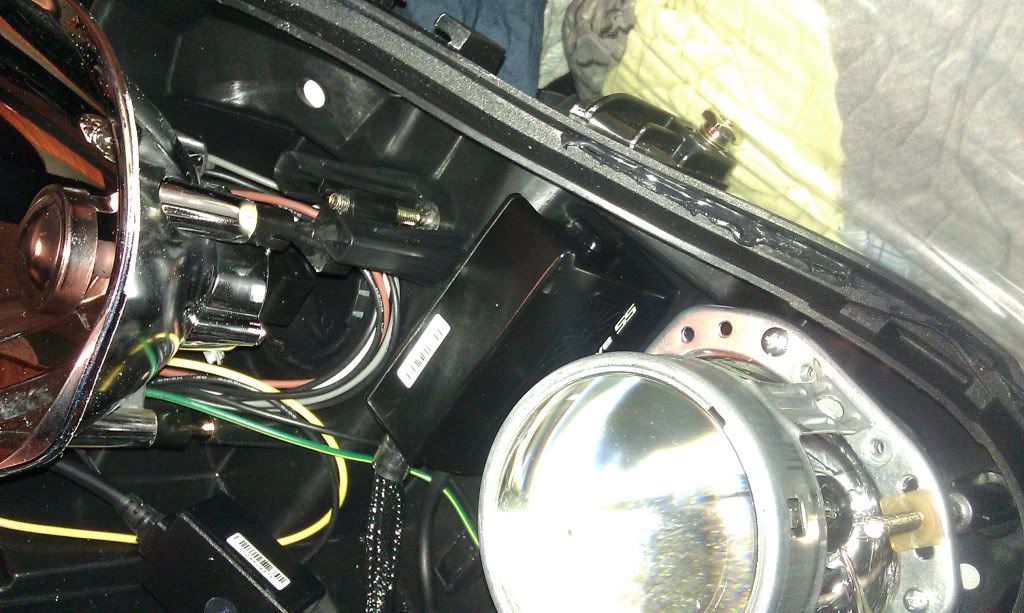
Here's the projector unit, looks like it would swap straight out for a mini H1 or mini D2S!
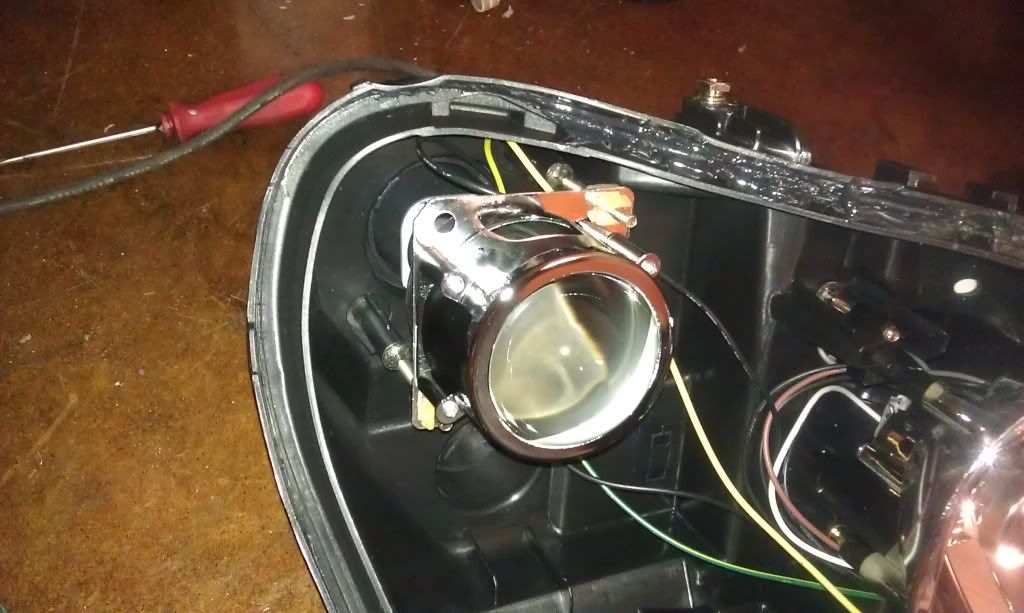
removed it to mock up the evox-r's
I got some output shots of the halogen projectors and highbeams...

and highbeams
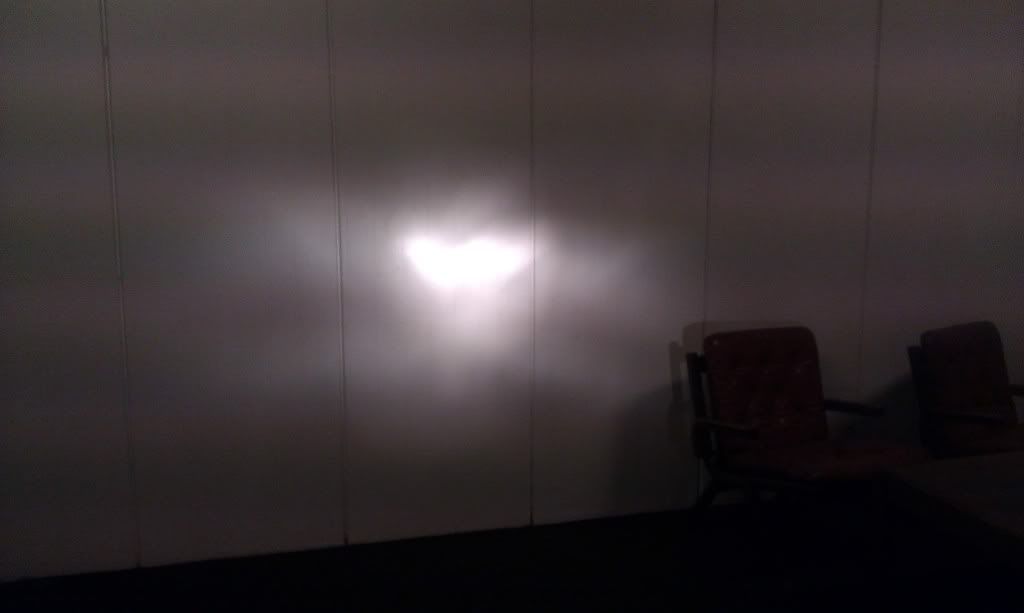
I would say the evo's are better
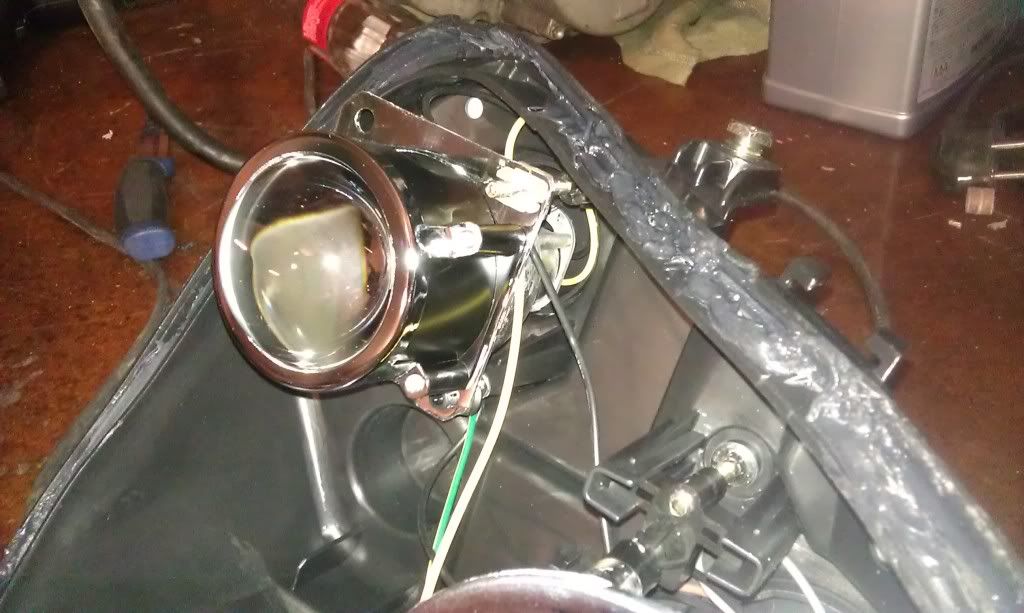
The adjusting screws where a close match to the evo's, I used a dremel to widen the holes so I could fit the plastic clip in nuts from the taiwan projectors:
The evo's where a bit bigger than the stock ones, but there was enough play in the adjusting screws so I didn't do anything with it.
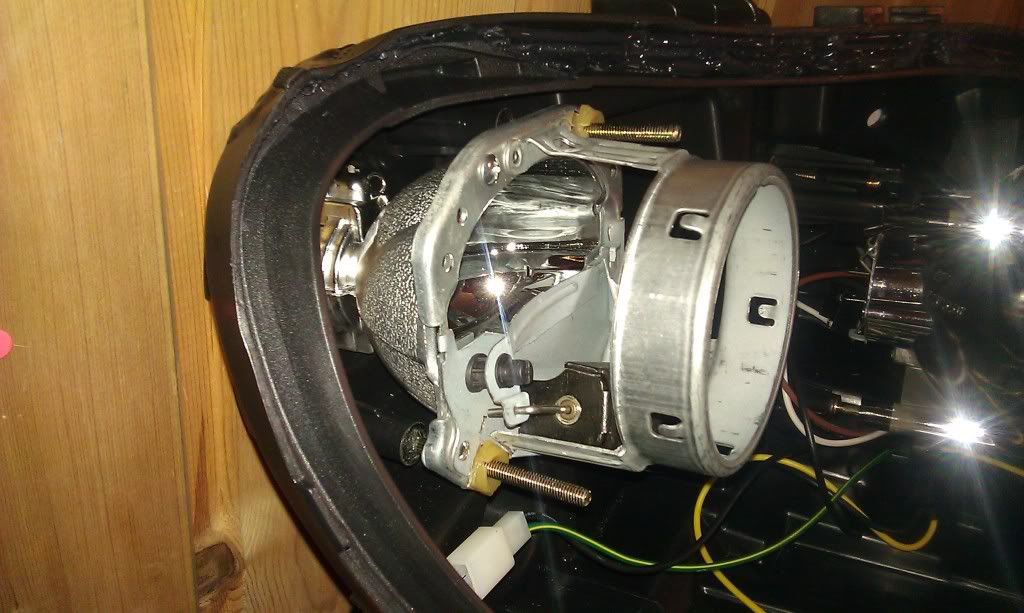
Fired them up to check alignment and to see if the bigger projectors would fit with the shroud and such
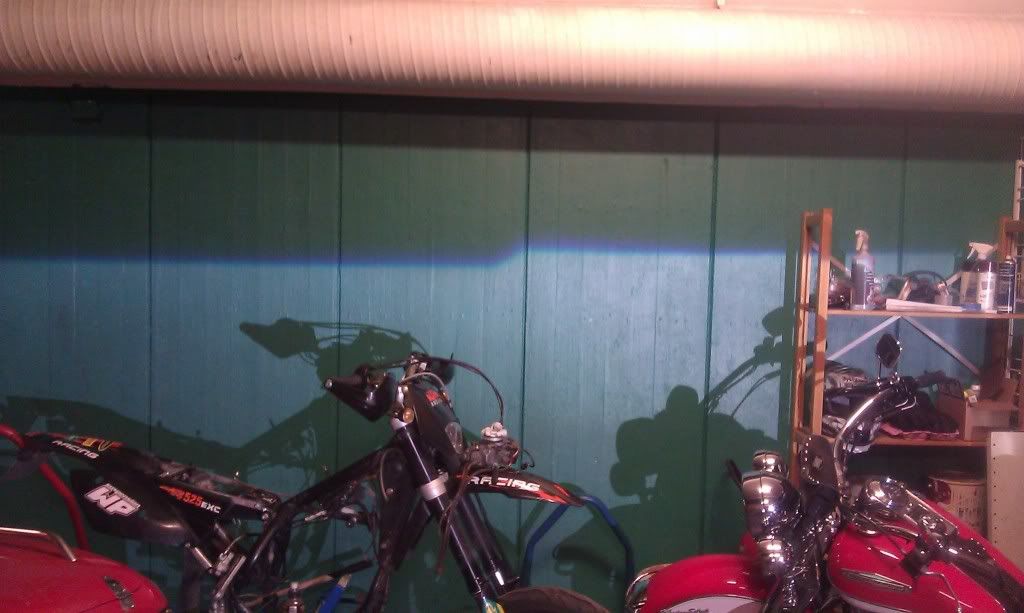
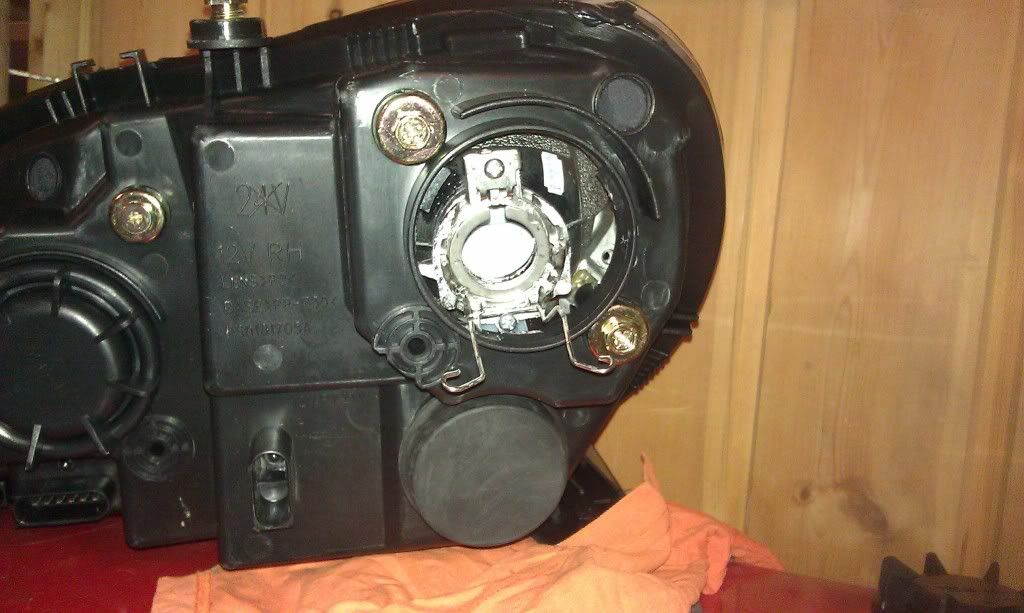
My original plan was to mount the ballasts they way they where mounted on a stock xenon merc, under the headlight with wires going in to the light, but realizing how big of a hole I would have to cut to slip the D2S connector and wiring in I started to look for another option. Good Thing these lights are big!
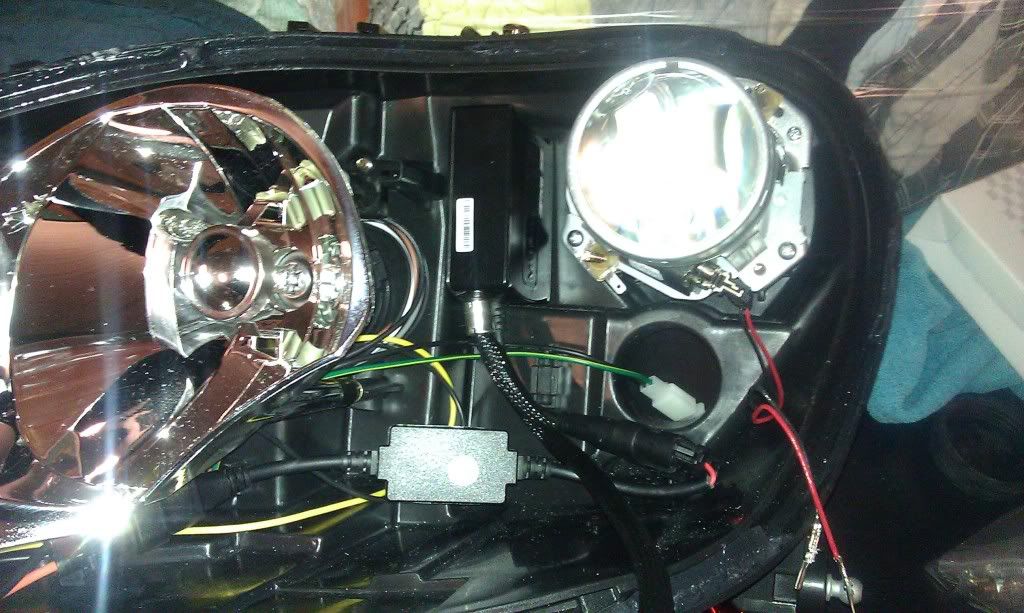
I took some doublesided tape to mount them, and I tucked the "canbus" wiring away under the highbeam and fog reflectors!
Here's the whole harness..

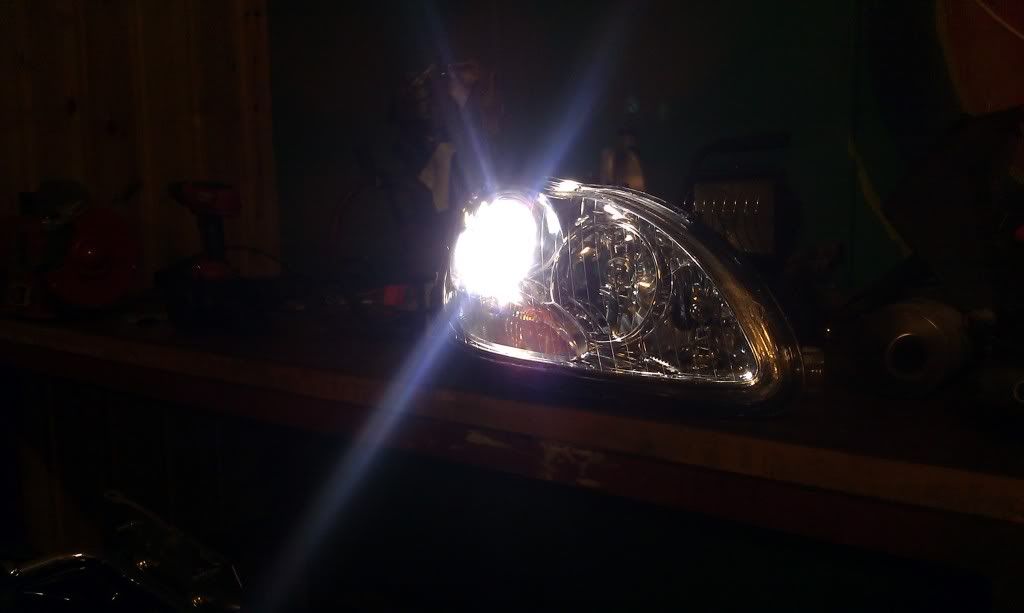
End results!

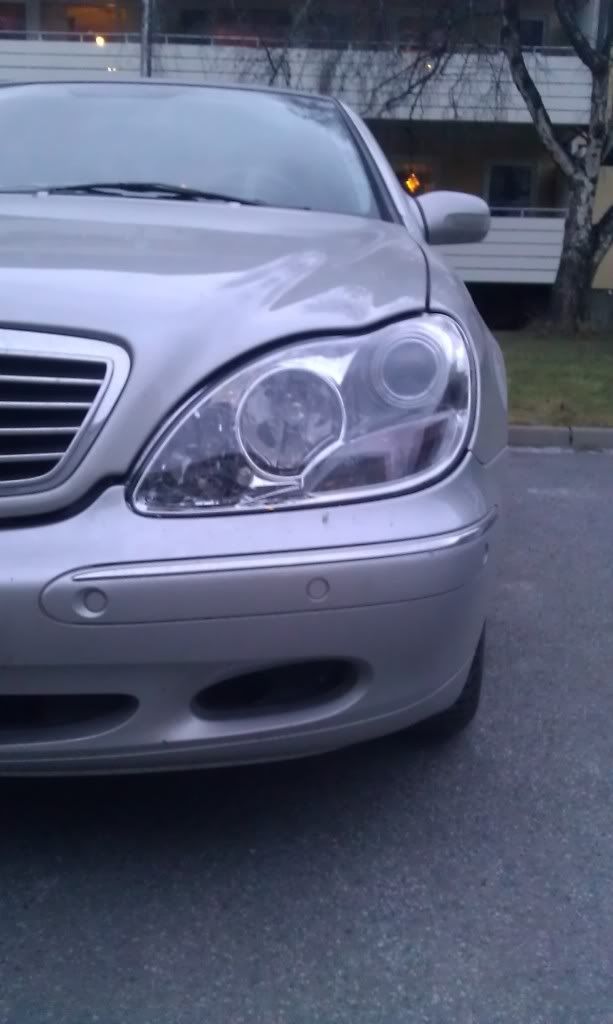
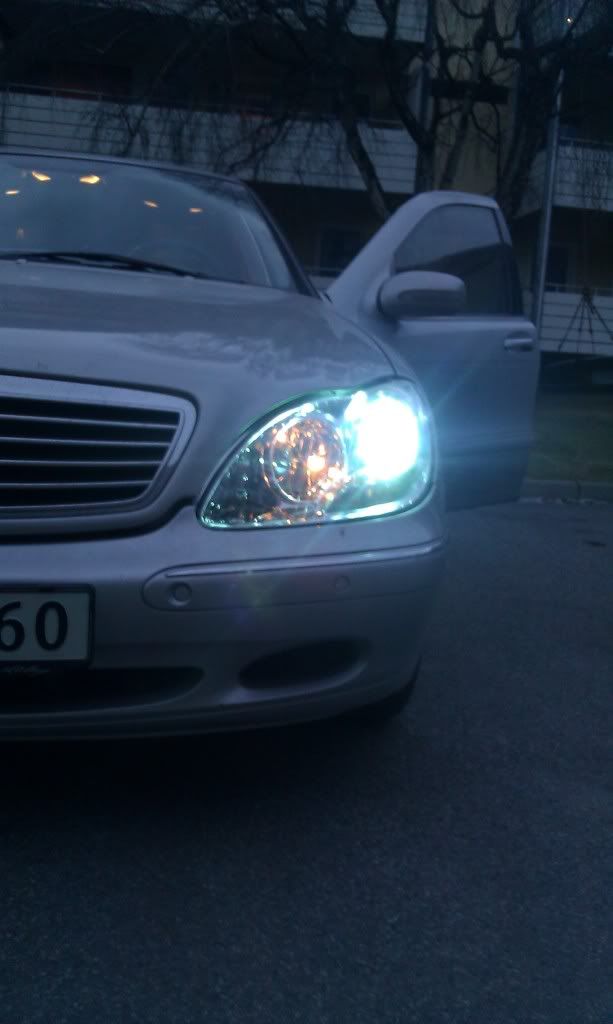
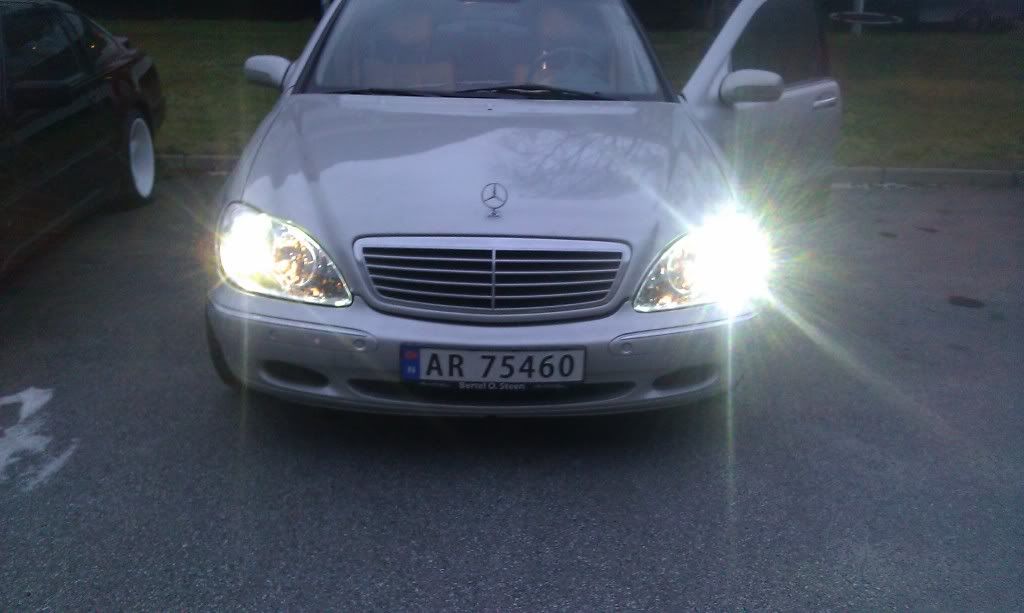
Pictures where taken with my mobile phone so yeah, looks like a crazy amount of glare coming from the lights but they're really not like that
The setup:
-Clear projector headlights bought on ebay.
-evox-r projectors
-morimoto 35w ballasts.
-H7 "canbus" wiring harness.
I had the halogen headlights on mine, old, faded, punctured, aimed to the ground and the previous owner had installed some "xenon" bulbs which had a horrible output. I actually drove the car 12km's with the highbeams on, met 11 cars and no one flashed at me... horrible... SO time to upgrade both looks and performance!
Enter the cheapo made in taiwan projector headlights:
The flash is reflecting of the projector.
Had to use a heat gun to open them because they didn't fit in my oven. Funny how big the lights suddenly get when they're not mounted on a car....
Here's the projector unit, looks like it would swap straight out for a mini H1 or mini D2S!
removed it to mock up the evox-r's
I got some output shots of the halogen projectors and highbeams...
and highbeams
I would say the evo's are better
The adjusting screws where a close match to the evo's, I used a dremel to widen the holes so I could fit the plastic clip in nuts from the taiwan projectors:
The evo's where a bit bigger than the stock ones, but there was enough play in the adjusting screws so I didn't do anything with it.
Fired them up to check alignment and to see if the bigger projectors would fit with the shroud and such
My original plan was to mount the ballasts they way they where mounted on a stock xenon merc, under the headlight with wires going in to the light, but realizing how big of a hole I would have to cut to slip the D2S connector and wiring in I started to look for another option. Good Thing these lights are big!
I took some doublesided tape to mount them, and I tucked the "canbus" wiring away under the highbeam and fog reflectors!
Here's the whole harness..
End results!
Pictures where taken with my mobile phone so yeah, looks like a crazy amount of glare coming from the lights but they're really not like that
12-15-2012, 05:54 PM
#4
MBWorld Fanatic!
Join Date: Dec 2008
Location: Bay Area, CA
Posts: 2,394
Likes: 0
Received 37 Likes
on
28 Posts
2007 SL55 AMG
Looks good! any shots of the beam pattern? Mounting the ballasts inside the headlight might cause them to overheat since its in a closed space, hopefully it won't be an issue.
12-16-2012, 05:58 AM
#5
Junior Member
Thread Starter
Join Date: Oct 2011
Location: Norway
Posts: 43
Likes: 0
Received 0 Likes
on
0 Posts
S320
I don't think overheating will be and issue here in Norway, even summers aren't that hot
 12-16-2012, 07:20 AM
#7
Junior Member
Thread Starter
Join Date: Oct 2011
Location: Norway
Posts: 43
Likes: 0
Received 0 Likes
on
0 Posts
S320
around $4-500 for everything(lights, ballasts, projectors, bulbs, wiring harness)
retrofit parts bought at www.theretrofitsource.com
headlights on ebay.
retrofit parts bought at www.theretrofitsource.com
headlights on ebay.
Trending Topics
12-17-2012, 03:49 PM
#8
Newbie

Join Date: Dec 2012
Posts: 7
Likes: 0
Received 0 Likes
on
0 Posts
2001 mercedes s320 cdi
w220 xenon upgrade
Hi mate, please can you list all the parts you bought for your car off the retrofitcentre website. I want to upgrade my lights as mine were just like yours. Many many thanks
12-17-2012, 04:56 PM
#10
Junior Member
Thread Starter
Join Date: Oct 2011
Location: Norway
Posts: 43
Likes: 0
Received 0 Likes
on
0 Posts
S320
H7 Canbus wiring harness
morimoto 35w ballasts
4300k D2S bulbs
Yes there is big difference in output. I will post output shots in a day or two...
 12-19-2012, 06:38 AM
#12
Junior Member
Thread Starter
Join Date: Oct 2011
Location: Norway
Posts: 43
Likes: 0
Received 0 Likes
on
0 Posts
S320
So, I tried to take some pics, but they all overexposed on the foreground looking like I have put a hid kit in my fog lights ")
So I'm gonna have to brake out my dslr camera too get some proper photos. Sorry for the delay
So I'm gonna have to brake out my dslr camera too get some proper photos. Sorry for the delay
12-24-2012, 06:45 PM
#13
Nice setup! I'm in the process of upgrading my lights too, after some research it does look like you want a "good" projector due to reflection in the light and also the lack of beam spread.
I saw this set posted in some other threads and it seems like it is probably the best bet for anyone going forward. For $469 shipped they include the bulbs and ballasts. I know you can get a set of projectors & HID's for ~$280shipped on ebay, but I think the light output will be incorrect as the OP states here.
http://www.ebay.com/itm/XENON-MODEL-...59ee34&vxp=mtr
01-17-2013, 11:39 AM
#14
Junior Member
Thread Starter
Join Date: Oct 2011
Location: Norway
Posts: 43
Likes: 0
Received 0 Likes
on
0 Posts
S320
Nice setup! I'm in the process of upgrading my lights too, after some research it does look like you want a "good" projector due to reflection in the light and also the lack of beam spread.
I saw this set posted in some other threads and it seems like it is probably the best bet for anyone going forward. For $469 shipped they include the bulbs and ballasts. I know you can get a set of projectors & HID's for ~$280shipped on ebay, but I think the light output will be incorrect as the OP states here.
http://www.ebay.com/itm/XENON-MODEL-...59ee34&vxp=mtr
I saw this set posted in some other threads and it seems like it is probably the best bet for anyone going forward. For $469 shipped they include the bulbs and ballasts. I know you can get a set of projectors & HID's for ~$280shipped on ebay, but I think the light output will be incorrect as the OP states here.
http://www.ebay.com/itm/XENON-MODEL-...59ee34&vxp=mtr
I can happily say my S-class now outperforms others and even newer cars with OEM xenon, that's with 4300K bulbs, why they include 8000k bulbs on ebay auctions I don't know as it doesn't put out white light and light output sucks compared to lesser kelvin bulbs...
11-17-2014, 05:40 PM
#15
Newbie

Join Date: Nov 2014
Location: SoCal - Los Angeles
Posts: 2
Likes: 0
Received 0 Likes
on
0 Posts
2004 S-430
How-To for my 2004 S-430 with Halogen projector headlight (non-Xenon)
Thanks for the thread gordys. I retro fitted my car this weekend because I was tired of the horrible light output of the halogen projector lights, it made it downright dangerous for me to drive and I refused to let me wife drive it because of the light output. I tried putting HID in the projectors, while improved did not reach good results. I knew this project was coming but in the mean time I placed a HID set in the fog lights. It achieved a great light output but I knew it was blinding oncoming drivers. I knew the Retrofit project was next. I contacted The Retrofit Source several times and ordered the E46 projectors. Unfortunately these were too big for the allowed space in the halogen projectors but supposedly are a swap in for the halogen reflector lights. I returned and swapped the E46 lights for the Morimoto mini H1 after reading this post. The mini H1 Morimotos fit in but need a custom bracket to install to the plastic housing. This is the how to retro fit the Mini H1 to my 2004 S430 Halogen projectors.
Before you attempt this retrofit I highly suggest you check out posts as noted in this thread. https://mbworld.org/forums/s-class-w...ofit-w220.html
This How-To assumes you have already installed HID and do not need help on how to install and run the HID wires through the sealed housing.
Materials used.
� Morimoto H1 Projectors (http://www.theretrofitsource.com/com...l#.VGpCEfnF_Yg)
� Industrial Heat gun
� A few sets of powder free latex gloves
� Isopropyl Alcohol and clean lint free towels
� Teflon taped large Flat Head screw driver
� Small needle nose pliers
� Assorted Torx bits and bit screwdriver
� 8MM and10MM sockets and Ratchet
� Dremel with cutting bits
� Drill with assorted drill bits
� Drill punch
� Clear Silicone and or adhesive
� 8 mending braces (found at your local hardware store)
� 8 small screw with locking nut
� Liquid Black electrical tape (optional)
1. Removed the headlights from the w220 by using this video:
2. Using the needle nose pliers and remove the four metal clips connecting the clear plastic to the assembly
3. My Oven is not big enough to house the large W220 headlight so I used an industrial heat gun on low and patiently warmed up the plastic and with a Teflon Flathead screw driver slowly pried the plastic off the headlight assembly
4. Remove the stock projector housing by heating the shroud with low heat and squeezing the clips to remove from the stock projector.
5. Using the same heat gun, on low heat, warm up the adhesive holding the reflective large shroud
6. Once warm carefully use the large Teflon screwdriver while press the
7. Remove the plastic water sealing housing on the back of the headlight assembly
8. Unplug and remove the HID or H7 Halogen bulbs
9. Use the Torx with screwdriver bit to remove the 4 screws and remove the projector through the rear area.-
10. From the front side of the assembly, remove the top and bottom clips that are held by the Torx screws.
11. To completely remove the plastic housing bracket, use the heat gun on low heat to warm up the pivot socket. Use your needle nose pliers to push back the clip and gently pull the bracket off the assembly.
12. This is where your mechanically inclined brain needs to kick in. Use the mending braces to create longer bracket holes to attach the Morimoto Mini H1�s to the plastic bracket you just removed. I used the dremel and Sharpie to draw out a template of where it could fit in.
13. Once the brackets are made use the small screws and nuts to attach the new projectors to the brackets
14. Attach the newly bracketed Mini H1 to the plastic piece you took off the assembly.
15. When reattaching the newly bracketed plastic assembly to the headlight be sure you�re newly bracket allows the movement of the projector. Meaning�. If the projector is not allowed to move without restriction, you will not be able to adjust the light output.
16. Install in reverse order and follow the YouTube video to reinstall the retrofitted headlight on your W220.
I had pictures set up on this assembly and of course my phone fell and cracked the screen. I fear they are lost forever. On that note feel free to PM should you have questions on your retrofit and if I can answer them I definitely will.
Good Luck! It will all be worth it!
-Whybarra
Before you attempt this retrofit I highly suggest you check out posts as noted in this thread. https://mbworld.org/forums/s-class-w...ofit-w220.html
This How-To assumes you have already installed HID and do not need help on how to install and run the HID wires through the sealed housing.
Materials used.
� Morimoto H1 Projectors (http://www.theretrofitsource.com/com...l#.VGpCEfnF_Yg)
� Industrial Heat gun
� A few sets of powder free latex gloves
� Isopropyl Alcohol and clean lint free towels
� Teflon taped large Flat Head screw driver
� Small needle nose pliers
� Assorted Torx bits and bit screwdriver
� 8MM and10MM sockets and Ratchet
� Dremel with cutting bits
� Drill with assorted drill bits
� Drill punch
� Clear Silicone and or adhesive
� 8 mending braces (found at your local hardware store)
� 8 small screw with locking nut
� Liquid Black electrical tape (optional)
1. Removed the headlights from the w220 by using this video:
3. My Oven is not big enough to house the large W220 headlight so I used an industrial heat gun on low and patiently warmed up the plastic and with a Teflon Flathead screw driver slowly pried the plastic off the headlight assembly
4. Remove the stock projector housing by heating the shroud with low heat and squeezing the clips to remove from the stock projector.
5. Using the same heat gun, on low heat, warm up the adhesive holding the reflective large shroud
6. Once warm carefully use the large Teflon screwdriver while press the
7. Remove the plastic water sealing housing on the back of the headlight assembly
8. Unplug and remove the HID or H7 Halogen bulbs
9. Use the Torx with screwdriver bit to remove the 4 screws and remove the projector through the rear area.-
10. From the front side of the assembly, remove the top and bottom clips that are held by the Torx screws.
11. To completely remove the plastic housing bracket, use the heat gun on low heat to warm up the pivot socket. Use your needle nose pliers to push back the clip and gently pull the bracket off the assembly.
12. This is where your mechanically inclined brain needs to kick in. Use the mending braces to create longer bracket holes to attach the Morimoto Mini H1�s to the plastic bracket you just removed. I used the dremel and Sharpie to draw out a template of where it could fit in.
13. Once the brackets are made use the small screws and nuts to attach the new projectors to the brackets
14. Attach the newly bracketed Mini H1 to the plastic piece you took off the assembly.
15. When reattaching the newly bracketed plastic assembly to the headlight be sure you�re newly bracket allows the movement of the projector. Meaning�. If the projector is not allowed to move without restriction, you will not be able to adjust the light output.
16. Install in reverse order and follow the YouTube video to reinstall the retrofitted headlight on your W220.
I had pictures set up on this assembly and of course my phone fell and cracked the screen. I fear they are lost forever. On that note feel free to PM should you have questions on your retrofit and if I can answer them I definitely will.
Good Luck! It will all be worth it!
-Whybarra


