


Rear Diffuser Removal & Refinish (Pics)

Thread Starter
MBWorld Fanatic!
Joined: May 2008
Posts: 7,653
Likes: 560
2016 C300
Rear Diffuser Removal & Refinish (Pics)
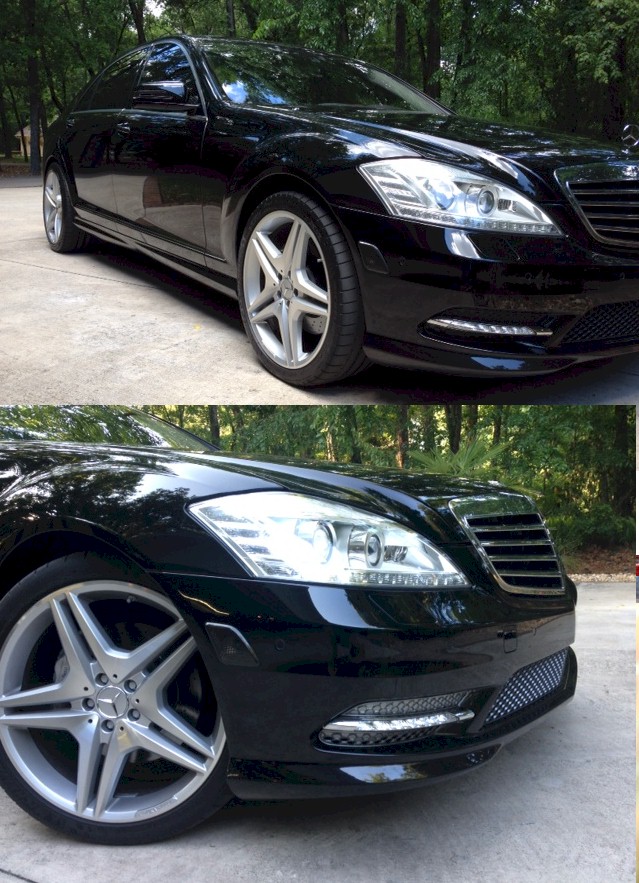
While I like black as a color for an S Class, it loses some of the contrast with the AMG body kit that a lighter color has. I decided to experiment with shooting the rear bumper diffuser a lighter shade of gray to distinguish it from the rest of the bumper.
Along the way I discovered how easy it is to remove the rear diffuser, after which it can be painted, or vinyl wrapped in carbon fiber or whatever.
The diffuser snaps into the bumper with molded-in tabs around the perimeter. Given how much of this car snaps together, I'm beginning to feel like I bought a $50,000 Lego Set. The tabs are very sturdy and require just a bit of effort to pop them out.
Before you get to the tabs around the perimeter, on the underside of the bumper there are two tabs on the diffuser that need to be pushed upward and outward. There are also two plastic clips (see hole in the pic of the bumper detail) that need to be pulled out.
It's easier to demonstrate with the parts removed. The first pic shows the "male" tabs on the underside of the diffuser, and the hole where a small plastic retaining clip lives.

This pic shows the location of the "female" side of the tabs on the underside, one near each tailpipe.
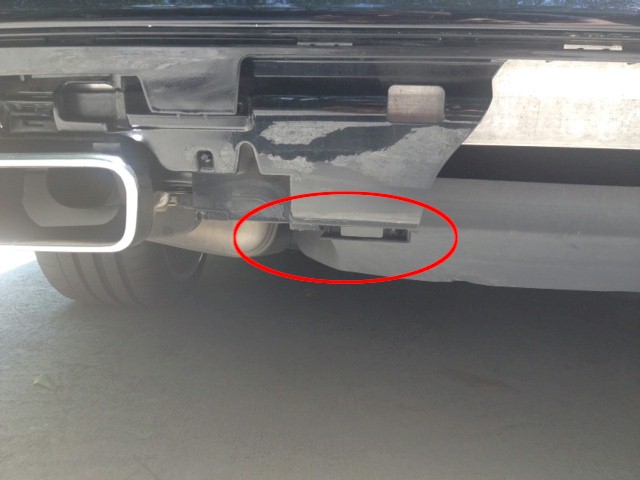
Once the two tabs and clips are released, just tug around the edges of the diffuser and it will pop right out. Mine had a nice V shaped gouge in it where some yahoo at Home Depot had backed something into it. I used a sanding block to even the surface out a bit.

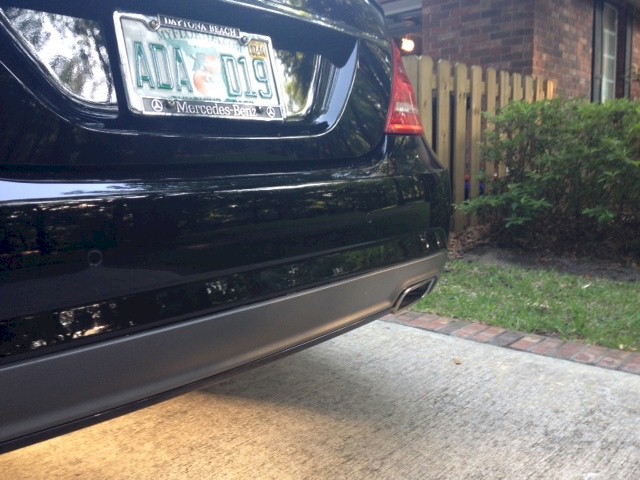
Reinstalled after refinishing. I used Krylon Universal spray paint made for plastic. First I sprayed an undercoat in a medium silver color for depth, then a finish coat in a charcoal color (Flat Iron).
It's a subtle change and still looks OEM, which I like. I think I'll try getting the carbon fiber wrap and see how that looks, but this is a good interim step.

The front grilles got the same treatment.
Along the way I discovered how easy it is to remove the rear diffuser, after which it can be painted, or vinyl wrapped in carbon fiber or whatever.
The diffuser snaps into the bumper with molded-in tabs around the perimeter. Given how much of this car snaps together, I'm beginning to feel like I bought a $50,000 Lego Set. The tabs are very sturdy and require just a bit of effort to pop them out.
Before you get to the tabs around the perimeter, on the underside of the bumper there are two tabs on the diffuser that need to be pushed upward and outward. There are also two plastic clips (see hole in the pic of the bumper detail) that need to be pulled out.
It's easier to demonstrate with the parts removed. The first pic shows the "male" tabs on the underside of the diffuser, and the hole where a small plastic retaining clip lives.
This pic shows the location of the "female" side of the tabs on the underside, one near each tailpipe.
Once the two tabs and clips are released, just tug around the edges of the diffuser and it will pop right out. Mine had a nice V shaped gouge in it where some yahoo at Home Depot had backed something into it. I used a sanding block to even the surface out a bit.
Reinstalled after refinishing. I used Krylon Universal spray paint made for plastic. First I sprayed an undercoat in a medium silver color for depth, then a finish coat in a charcoal color (Flat Iron).
It's a subtle change and still looks OEM, which I like. I think I'll try getting the carbon fiber wrap and see how that looks, but this is a good interim step.
The front grilles got the same treatment.
Last edited by Mike5215; Apr 28, 2014 at 12:39 PM.
Member
Joined: May 2013
Posts: 132
Likes: 0
S550
By the way are you a fan of these .thx
http://www.ebay.com/itm/DEPO-2010-2013-MERCEDES-W221-S-CLASS-WHITE-LED-CLEAR-BUMPER-SIDE-MARKER-LIGHT-/171310289102?pt=Motors_Car_Truck_Parts_Accessories&hash=item27e2e390ce&vxp=mtr
http://www.ebay.com/itm/DEPO-2010-2013-MERCEDES-W221-S-CLASS-WHITE-LED-CLEAR-BUMPER-SIDE-MARKER-LIGHT-/171310289102?pt=Motors_Car_Truck_Parts_Accessories&hash=item27e2e390ce&vxp=mtr
Thread Starter
MBWorld Fanatic!
Joined: May 2008
Posts: 7,653
Likes: 560
2016 C300
By the way are you a fan of these .thx
Depo 2010 2013 Mercedes W221 s Class White LED Clear Bumper Side Marker Light | eBay
Depo 2010 2013 Mercedes W221 s Class White LED Clear Bumper Side Marker Light | eBay
Start by pulling the outside of the lamp away from the bumper and you'll feel the tabs holding it to the backside of the lamp. Push them to release and then rotate the bulb to fully remove the lamp.
To install your new lamp you have to peel back the fender liner enough to get a hand in to the backside of the lamp retainer and hold it in place while you snap the new lamp in. Takes about 15 minutes total..
Trending Topics
MB World Stories
The Best of Mercedes & AMG

Manual Mercedes? 6 Times Sindelfingen Let Drivers Have All The Fun
Verdad Gallardo
Mercedes SLR McLaren 722 S Is Extremely Rare Example Modified by McLaren
Verdad Gallardo
8 Classic Boxy Mercedes Designs That Have Aged Like Fine Wine
Verdad Gallardo
Flawlessly Restored Mercedes 190E Evo II Heads to Auction
Verdad Gallardo
Electric Mercedes C-Class Unveiled: 11 Things You Need to Know
Verdad Gallardo
Mercedes EQS Gets A Major Update: Everything You Need to Know
Verdad Gallardo
5 Underrated Mercedes-Benz Models That Don't Get the Love They Deserve
Verdad Gallardo
Mercedes 300D Has Pushed Well Past 1 Million Miles and It Ain't Stopping
Verdad Gallardo
10 Most Reliable Mercedes-Benz Models You Can Buy Used
Verdad Gallardo
Thread Starter
MBWorld Fanatic!
Joined: May 2008
Posts: 7,653
Likes: 560
2016 C300
I think the idea is to make them disappear so there isn't anything distracting the eye from the car's lines so they need to blend into the surrounding paint color as closely as possible. On a light color car I'd just want a clear diffusing lense rather than a bunch of tiny LEDs exposed. In terms of quality there's not much to either the OEM or aftermarket pieces...just a plastic housing and a plastic lense. The units I bought on Ebay have the same look, feel and weight of the OEM pieces.
Thread Starter
MBWorld Fanatic!
Joined: May 2008
Posts: 7,653
Likes: 560
2016 C300

CsyF)g~~60_57.JPG)

MBWorld Fanatic!


Joined: Dec 2011
Posts: 4,373
Likes: 945
W212 FL
Hey, wait a minute I think I have found a better picture for you to judge


