


Rear Subframe Bushings
Thread Starter
Senior Member
Joined: Apr 2013
Posts: 323
Likes: 17
2002 E55
Rear Subframe Bushings
Five weeks or so ago I took my car on a 500+ mile roundtrip which is the furthest I've driven it since I bought it. About two-thirds of the way to my destination I started noticing what felt like the rear suspension wasn't working properly. It wasn't riding terribly, but it wasn't working like Ithought it should and how it had worked prior to this trip. It felt like the suspension travel was limited. It rode over bumps more harshly and skipped over bumps at times instead of absorbing them. It just felt unsettled and I hadn't experienced this before. Most of this was at 75+ MPH on the highway. At one point I transitioned from one highway to another using a circular exit/entry ramp. The car handled really badly. Whatever was happening affected the way the car steered through the relatively high speed ramp. When I arrived to my destination I could feel the same unsettled, rougher riding, bump-skipping characteristics at 35 MPH.
Obviously I was concerned because I was away from home and immediately started researching my problem online. The thing that I read about a few times that sounded exactly like what I was experiencing was the rear subframe support bushings. If they haven't been on your radar (they've never been on mine), there are four bushings that support the subframe. Two in the front and two different style bushings in the rear. They are relatively inexpensive so I decided I would replace them. I drove the 250 miles home, researched some more and ordered the bushings. Some of the R&R's that I read about online were some utilizing no special tools. Others used specialized removal and installation tools that made the job easier. I decided to buy the expensive tool because I wasn't in the mood to fight with the bushings without some aid. It took weeks for me to find the tool. Many sites had it listed and I placed two orders that were refunded because they didn't actually have the tool in stock. Evidently the folks that supply the tool to most retailers had a supply stuck in customs somewhere. Eventually I found one to go with the bushings that had arrived weeks earlier.
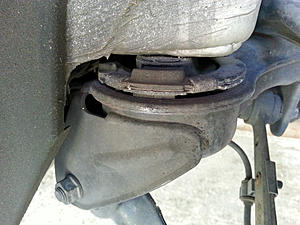
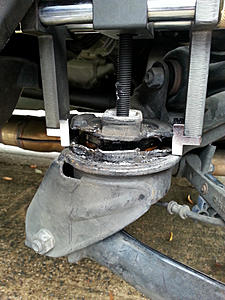
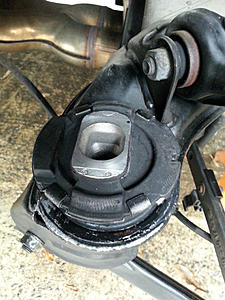
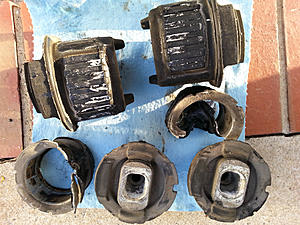
As some of you know I love pictures so I thought I would share some so you can get an idea of what is involved changing out these bushings. I jacked up the car from the side, removed the rear tire, and then removed the plastic cover from the bottom of the lower control arm. I then placed a jack stand under the control arm and lowered the jack until the control arm was barely touching the jack stand. The jack on the side was still holding up the car. These pics show the front and rear bushings:
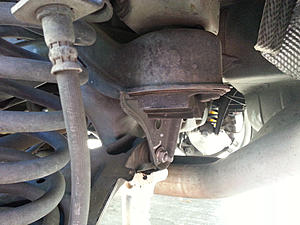
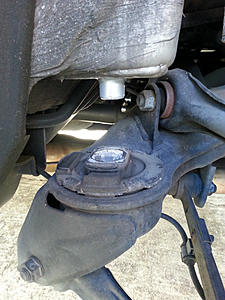
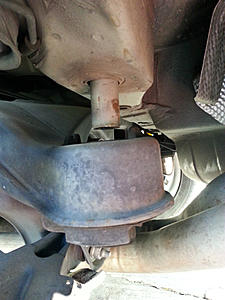
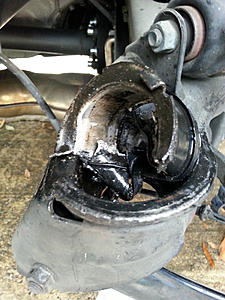
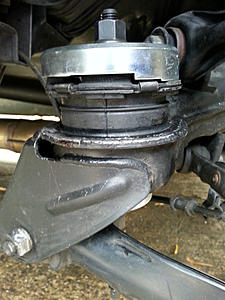
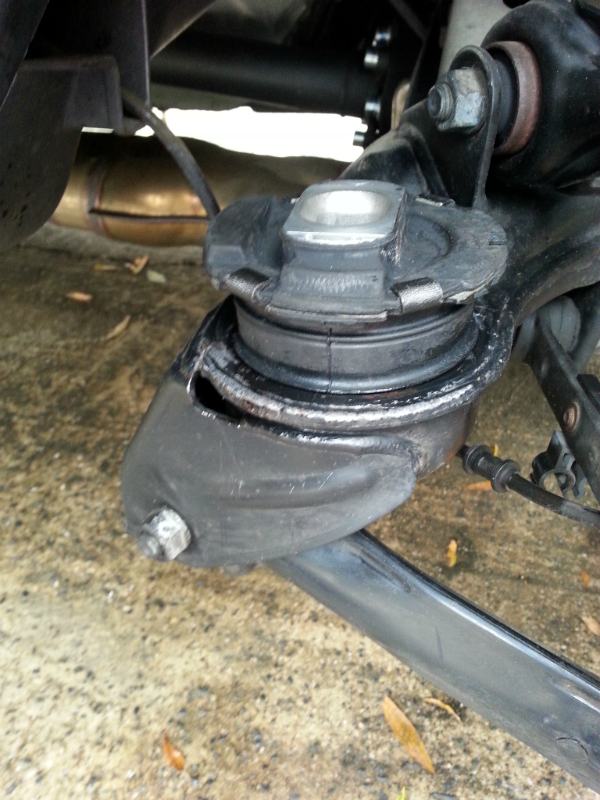
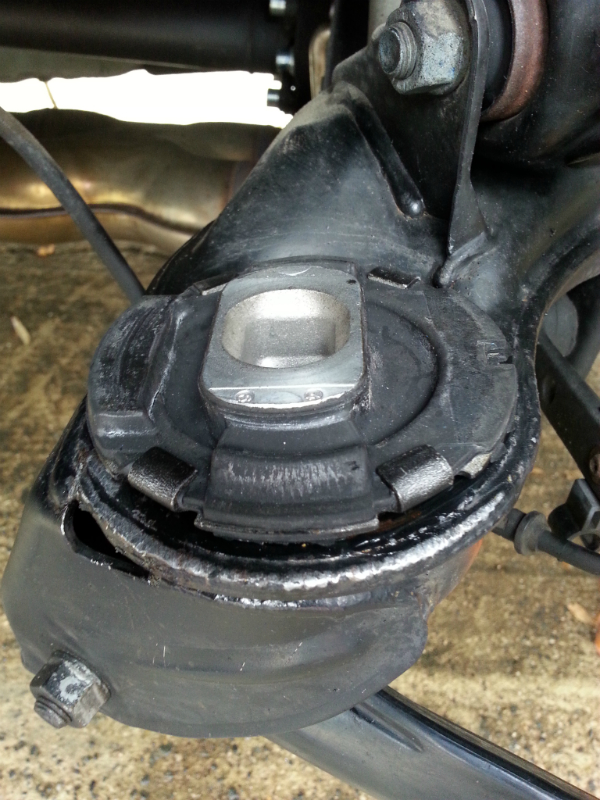
You are now ready to remove the bolts from underneath each bushing. When done you can jack the car up further from the side and the subframe will separate from the bottom of the car. This is necessary because the front bushing is removed and reinstalled from the top. The rear bushing is accessed from the bottom. Here are pics after the bolts were removed and the subframe separated from the bottom of the car:
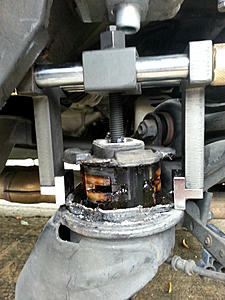
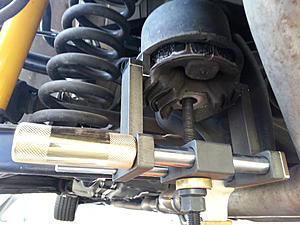
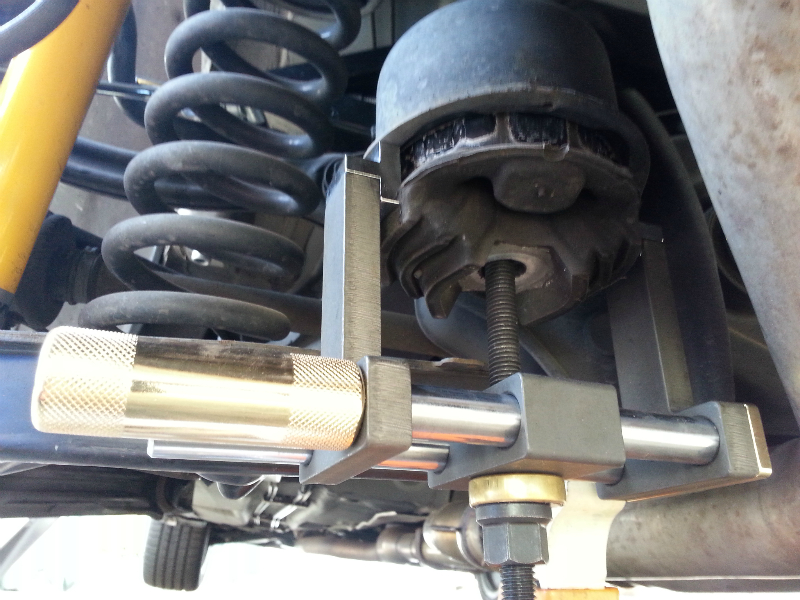
I then tackled the front bushing which was more involved based on the accounts that I had read about. Using the special tool you basically press the center section of the bushing up and out from the bushing pocket. The bushing is liquid filled so when you start pressing it upward the nasty fluid leaks out. Once it is out you have to force the outer metal perimeter of the bushing out. There isn't a special tool for this part of the operation. I used a chisel and a 4-pound sledge hammer to beat the crap out the outer casing. It is pretty tough. Once I had it bent out of shape a bit I used some pry tools to pry it out of the pocket. You want to be careful not to damage the pocket since your new bushing has to fit nicely in the circular pocket.
Once the outer shell was removed I cleaned all of the leaked fluid from the pocket and surrounding area. There's a flat area on the front of the bushing and the corresponding area of the pocket. Before placing the new bushing in I applied some silicone grease to the edges of the new bushing and inside the pocket. Utilizing the special tool the new bushing easily presses into place.


The rear bushings are easier to work with. They drop out from the bottom and come out in one piece. From most accounts, and my observations, they don't take as much abuse as the front bushings and probably aren't the problem. They are larger than the front bushings. I'm not sure if they are liquid filled since they come out in one piece. I opted to replace them since they aren't expensive and I had access.
You are now ready to lower the jack dropping the car back down to mate it with the subframe. The jack stand supports the subframe. The new bushings come with new hardware. When you remove the old bolts note the large washer/spacer on the front bushing so you can be sure to install the new one correctly. Torque down the new bolts (66 ft-lbs) and reinstall the plastic cover on the lower control arm and you are done with the left side. The right is the same except you need to remove the plastic cover that protects the headlight aim mechanism.
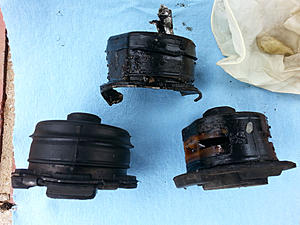
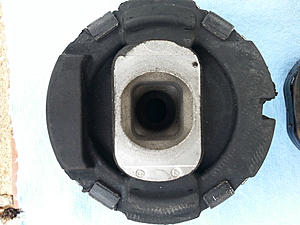
It is unfortunate that the front bushings are destroyed during the removal process. I still have them nonetheless and will have a closer look when I have some time. Here are some pics from the top of the new front bushing and one of the old bushing. Some of the damage on the old bushing I caused during the removal process.

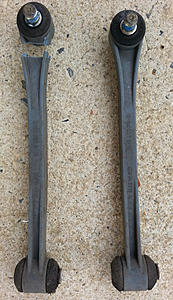
I managed to crack the ARB drop link on the right side while doing the work, so that delayed me a couple of days while I waited on a replacement pair.
I finally had a minute to test the car yesterday and went for a 20 mile drive. I could feel the difference backing out of my driveway! I did some 35/45MPH driving and some 60/70 MPH driving. It definitely solved my problem. The car feels better than it ever has. It is somewhat difficult to effectively explain the difference, but one word would be poised. I imagine this is close to how these cars felt new. The rear suspension feels so different. The shocks seem more responsive. I drove another 20 or so miles today and felt the same thing.
My car only has 70,000 miles and is pretty clean underneath. Some of the pictures of these bushings that I've seen online look 10x worse than mine. I know that doesn't really say anything about their condition. But I have to believe if you have a higher mileage car or drive in severe conditions you will benefit greatly by replacing these bushings. These things usually deteriorate so slowly you don't realize how bad they are until you replace them. I really don't understand what happened in my case but I am glad I tackled this job. I hope this information is useful to others.
ddb
Obviously I was concerned because I was away from home and immediately started researching my problem online. The thing that I read about a few times that sounded exactly like what I was experiencing was the rear subframe support bushings. If they haven't been on your radar (they've never been on mine), there are four bushings that support the subframe. Two in the front and two different style bushings in the rear. They are relatively inexpensive so I decided I would replace them. I drove the 250 miles home, researched some more and ordered the bushings. Some of the R&R's that I read about online were some utilizing no special tools. Others used specialized removal and installation tools that made the job easier. I decided to buy the expensive tool because I wasn't in the mood to fight with the bushings without some aid. It took weeks for me to find the tool. Many sites had it listed and I placed two orders that were refunded because they didn't actually have the tool in stock. Evidently the folks that supply the tool to most retailers had a supply stuck in customs somewhere. Eventually I found one to go with the bushings that had arrived weeks earlier.
As some of you know I love pictures so I thought I would share some so you can get an idea of what is involved changing out these bushings. I jacked up the car from the side, removed the rear tire, and then removed the plastic cover from the bottom of the lower control arm. I then placed a jack stand under the control arm and lowered the jack until the control arm was barely touching the jack stand. The jack on the side was still holding up the car. These pics show the front and rear bushings:


You are now ready to remove the bolts from underneath each bushing. When done you can jack the car up further from the side and the subframe will separate from the bottom of the car. This is necessary because the front bushing is removed and reinstalled from the top. The rear bushing is accessed from the bottom. Here are pics after the bolts were removed and the subframe separated from the bottom of the car:


I then tackled the front bushing which was more involved based on the accounts that I had read about. Using the special tool you basically press the center section of the bushing up and out from the bushing pocket. The bushing is liquid filled so when you start pressing it upward the nasty fluid leaks out. Once it is out you have to force the outer metal perimeter of the bushing out. There isn't a special tool for this part of the operation. I used a chisel and a 4-pound sledge hammer to beat the crap out the outer casing. It is pretty tough. Once I had it bent out of shape a bit I used some pry tools to pry it out of the pocket. You want to be careful not to damage the pocket since your new bushing has to fit nicely in the circular pocket.


Once the outer shell was removed I cleaned all of the leaked fluid from the pocket and surrounding area. There's a flat area on the front of the bushing and the corresponding area of the pocket. Before placing the new bushing in I applied some silicone grease to the edges of the new bushing and inside the pocket. Utilizing the special tool the new bushing easily presses into place.


The rear bushings are easier to work with. They drop out from the bottom and come out in one piece. From most accounts, and my observations, they don't take as much abuse as the front bushings and probably aren't the problem. They are larger than the front bushings. I'm not sure if they are liquid filled since they come out in one piece. I opted to replace them since they aren't expensive and I had access.
You are now ready to lower the jack dropping the car back down to mate it with the subframe. The jack stand supports the subframe. The new bushings come with new hardware. When you remove the old bolts note the large washer/spacer on the front bushing so you can be sure to install the new one correctly. Torque down the new bolts (66 ft-lbs) and reinstall the plastic cover on the lower control arm and you are done with the left side. The right is the same except you need to remove the plastic cover that protects the headlight aim mechanism.
It is unfortunate that the front bushings are destroyed during the removal process. I still have them nonetheless and will have a closer look when I have some time. Here are some pics from the top of the new front bushing and one of the old bushing. Some of the damage on the old bushing I caused during the removal process.


I managed to crack the ARB drop link on the right side while doing the work, so that delayed me a couple of days while I waited on a replacement pair.

I finally had a minute to test the car yesterday and went for a 20 mile drive. I could feel the difference backing out of my driveway! I did some 35/45MPH driving and some 60/70 MPH driving. It definitely solved my problem. The car feels better than it ever has. It is somewhat difficult to effectively explain the difference, but one word would be poised. I imagine this is close to how these cars felt new. The rear suspension feels so different. The shocks seem more responsive. I drove another 20 or so miles today and felt the same thing.
My car only has 70,000 miles and is pretty clean underneath. Some of the pictures of these bushings that I've seen online look 10x worse than mine. I know that doesn't really say anything about their condition. But I have to believe if you have a higher mileage car or drive in severe conditions you will benefit greatly by replacing these bushings. These things usually deteriorate so slowly you don't realize how bad they are until you replace them. I really don't understand what happened in my case but I am glad I tackled this job. I hope this information is useful to others.
ddb

Super Member
Joined: Dec 2009
Posts: 748
Likes: 93
From: Dhahran, KSA
2020 E 300 Coupe and 2019 GLS 400
Amazing Work my friend! Nicely done, Kudos to you.
But why with such low-moderate mileage ? Aren't the subframe bushings supposed to last long?
I have 94k miles, car has been stored mostly and rarely driven in winter, replacing the rear shocks is next on my list.
How much time did you spend from lifting up to lowering the car if the link hadn't broken?
Cheers
Faiz
Thread Starter
Senior Member
Joined: Apr 2013
Posts: 323
Likes: 17
2002 E55
Amazing Work my friend! Nicely done, Kudos to you.
But why with such low-moderate mileage ? Aren't the subframe bushings supposed to last long?
I have 94k miles, car has been stored mostly and rarely driven in winter, replacing the rear shocks is next on my list.
How much time did you spend from lifting up to lowering the car if the link hadn't broken?
Cheers
Faiz
But why with such low-moderate mileage ? Aren't the subframe bushings supposed to last long?
I have 94k miles, car has been stored mostly and rarely driven in winter, replacing the rear shocks is next on my list.
How much time did you spend from lifting up to lowering the car if the link hadn't broken?
Cheers
Faiz
Great questions. Unfortunately I don't have great answers. I would expect these bushings to last in excess of 100,000 miles. You don't read about them being replaced very often. No idea why mine seemed problematic at 70,000 miles. Am I temporarily masking something else (the root problem) by replacing them? Were mine defective? Am I more sensitive to changes in the suspension? I don't know.
The car feels great so for now I'm thrilled!
I work slowly. The first side was a learning experience and the second side went much quicker. I was interrupted a couple of times. I spent about 8 hours on it. I could probably do it now in 2-3 hours.
Last edited by ddb; Apr 10, 2015 at 09:18 AM.

Junior Member
Joined: May 2009
Posts: 39
Likes: 1
From: Dallas, TX
'07 SL55, '01 E55, '98 Acura NSX, '02 RAM 1500
Thanks for posting this. Very informitive.
From where did you source the special tool(s) and how much did it cost?
Do you have the part numbers handy for the bushings, and where did you source them?
My new to me '01 has abt 110K miles. I'm getting ready to do springs, shocks tires and pads. This might a good "while your in there" repair for me...
Last edited by MitchB; Nov 28, 2014 at 11:34 PM.
Thread Starter
Senior Member
Joined: Apr 2013
Posts: 323
Likes: 17
2002 E55
If you fo a search for 'W210 rear subframe bushing tool' you will see quite a few available. I saw them as low as $270 (+ $30 shipping) on eBay and higher. But none of the other vendors had them in stock. So I was happy to pay Technitool for it. I would encourage anyone looking to buy one to shop around. The supply problem I encountered is probably over and they are plentiful.
One of the reasons I decided to buy this expensive tool that I will probably use once is that I know I can sell it, or even rent it to recoup some of my money.
The part number for the forward bushings is: 210-350-58-08. The rears are: 210-350-59-08. Each part number comes with the two needed bushings. I went with OE Mercedes branded parts and purchased them from www.ecstuning.com. The fronts were $90.94 and the rears were $70.95. Shipping was $8.42 for a total of $170.31. This was my first time ordering from ECSTuning and I was impressed. The pricing was good and the delivery was quick. I will use them again.
Super Member
Joined: Dec 2009
Posts: 748
Likes: 93
From: Dhahran, KSA
2020 E 300 Coupe and 2019 GLS 400
I went with OE Mercedes branded parts and purchased them from www.ecstuning.com. The fronts were $90.94 and the rears were $70.95. Shipping was $8.42 for a total of $170.31. This was my first time ordering from ECSTuning and I was impressed. The pricing was good and the delivery was quick. I will use them again.
Bought DDin bracket, Idler pulley and several items.
Can you believe that a genuine Mercedes Hub is only $180!
Trending Topics
Super Member
Joined: Apr 2011
Posts: 998
Likes: 4
From: Central Connecticut
86 190D (Exported to the Nerderlands), 87 300TD (Sold), 82 Ford F150 3spd, 99 E300D (RIP), 02 E55
Awesome write-up It is a big job and nice pictures
 I'll definitely keep you in mind about renting the tool when I attempt this job. My car is currently in hibernation
It is a big job and nice pictures I'll definitely keep you in mind about renting the tool when I attempt this job. My car is currently in hibernation
MB World Stories
The Best of Mercedes & AMG

Manual Mercedes? 6 Times Sindelfingen Let Drivers Have All The Fun
Verdad Gallardo
Mercedes SLR McLaren 722 S Is Extremely Rare Example Modified by McLaren
Verdad Gallardo
8 Classic Boxy Mercedes Designs That Have Aged Like Fine Wine
Verdad Gallardo
Flawlessly Restored Mercedes 190E Evo II Heads to Auction
Verdad Gallardo
Electric Mercedes C-Class Unveiled: 11 Things You Need to Know
Verdad Gallardo
Mercedes EQS Gets A Major Update: Everything You Need to Know
Verdad Gallardo
5 Underrated Mercedes-Benz Models That Don't Get the Love They Deserve
Verdad Gallardo
Mercedes 300D Has Pushed Well Past 1 Million Miles and It Ain't Stopping
Verdad Gallardo
10 Most Reliable Mercedes-Benz Models You Can Buy Used
Verdad Gallardo
Former Vendor of MBWorld
Joined: Dec 2013
Posts: 3,044
Likes: 5
From: Wadsworth, Ohio
2012 SLS AMG
The part number for the forward bushings is: 210-350-58-08. The rears are: 210-350-59-08. Each part number comes with the two needed bushings. I went with OE Mercedes branded parts and purchased them from www.ecstuning.com. The fronts were $90.94 and the rears were $70.95. Shipping was $8.42 for a total of $170.31. This was my first time ordering from ECSTuning and I was impressed. The pricing was good and the delivery was quick. I will use them again.
Thank you for your order!
I am glad you had a good experience ordering from us! If there is anything you need in the future please let me know.
David
Former Vendor of MBWorld
Joined: Dec 2013
Posts: 3,044
Likes: 5
From: Wadsworth, Ohio
2012 SLS AMG
Junior Member
Joined: May 2009
Posts: 39
Likes: 1
From: Dallas, TX
'07 SL55, '01 E55, '98 Acura NSX, '02 RAM 1500
I'm very interested in doing my bushings. My car has almost 115K miles and likely is a good candidate...
I haven't ordered the bushes - yet, but likely will next week.
By chance, I saw this on ebay:
http://www.ebay.com/itm/Mercedes-Lower-Control-Arm-Bushing-Press-Tool-210-E320-E430-E55-AMG-E300-/350700106847?hash=item51a75af45f&item=350700106847&pt=Motors_Automotive_Tools&vxp=mtr
A different tool than used by the OP. Anyone used this tool..? Better / worse?
If it can press the fronts out without having to pound them out, I'm ready to buy...
Thread Starter
Senior Member
Joined: Apr 2013
Posts: 323
Likes: 17
2002 E55
MitchB,
Since that isn't the correct tool, I'm not sure how well it will work on subframe bushings. I don't see how it would help during removal, but possibly could help installing the new ones.
Have a look at this thread below. The author replaced his bushings without the tool. On post #11, another guy used the same tool that I used.
My advice would be to use the proper tool, or try it without the tool at all. If you want to work out an arrangement with me send me a PM.
ddb
http://www.benzworld.org/forums/w210...ount-rear.html
Junior Member
Joined: May 2009
Posts: 39
Likes: 1
From: Dallas, TX
'07 SL55, '01 E55, '98 Acura NSX, '02 RAM 1500
ddb -
You are correct sir! Didn't do my research...
I would like to take you up on your offer for the tool. First I will need to order / receive the bushings, then parse out some time to do the work.
I'll let you know via PM.
TIA
Mitch
You are correct sir! Didn't do my research...
I would like to take you up on your offer for the tool. First I will need to order / receive the bushings, then parse out some time to do the work.
I'll let you know via PM.
TIA
Mitch
Thread Starter
Senior Member
Joined: Apr 2013
Posts: 323
Likes: 17
2002 E55

Junior Member
Joined: Nov 2014
Posts: 27
Likes: 0
From: Halifax NS, Canada
1999 w210 E55T AMG
At the moment I'm have no handling problems what so ever but I have having some very loud creaking from my rear end. I can hear it every time I get in the car, I go over bumps, accelerate, and break.
Thread Starter
Senior Member
Joined: Apr 2013
Posts: 323
Likes: 17
2002 E55
A while back after changing the rear rotors and pads I failed to properly adjust the emergency brakes. When I would climb out or in the car it would create an annoying creaking noise. I could also too easily depress the e-brake pedal. I left it until I had time to pull off the wheels and adjust the e-brake tension, which solved the problem.
Maybe a worn bushing of some sort such as the ARB drop link bushings. Something worn enough to create the noise but not enough to noticeably degrade handling.
Hopefully some of the knowledgeable suspension folks will chime in.
Junior Member
Joined: Nov 2014
Posts: 27
Likes: 0
From: Halifax NS, Canada
1999 w210 E55T AMG
Any work done on or near the rear axle recently? How many miles on the car?
A while back after changing the rear rotors and pads I failed to properly adjust the emergency brakes. When I would climb out or in the car it would create an annoying creaking noise. I could also too easily depress the e-brake pedal. I left it until I had time to pull off the wheels and adjust the e-brake tension, which solved the problem.
Maybe a worn bushing of some sort such as the ARB drop link bushings. Something worn enough to create the noise but not enough to noticeably degrade handling.
Hopefully some of the knowledgeable suspension folks will chime in.
Thread Starter
Senior Member
Joined: Apr 2013
Posts: 323
Likes: 17
2002 E55
madmobman,
Maybe it is something specific to the Touring model. There are multiple threads specific to the Touring cars currently on the other forum. Maybe if you post your issue over there someone will have some helpful ideas.
Let us know what was causing the issue once you've figured it out.
Best of luck,
ddb
Junior Member
Joined: Nov 2014
Posts: 27
Likes: 0
From: Halifax NS, Canada
1999 w210 E55T AMG
madmobman,
Maybe it is something specific to the Touring model. There are multiple threads specific to the Touring cars currently on the other forum. Maybe if you post your issue over there someone will have some helpful ideas.
Let us know what was causing the issue once you've figured it out.
Best of luck,
ddb
Maybe it is something specific to the Touring model. There are multiple threads specific to the Touring cars currently on the other forum. Maybe if you post your issue over there someone will have some helpful ideas.
Let us know what was causing the issue once you've figured it out.
Best of luck,
ddb

Newbie
Joined: Aug 2012
Posts: 13
Likes: 0
2002 E55 AMG
I tried multiple places and only found one store with the tool in stock: www.technitool.com. It was $345 + $18 shipping for a total of $363. Shipping is pricey because it weighs 13 pounds. The part number is: M210-0143.
I tried the link to technitool above, but it brings up web sit for a mold construction company. Is that the right company?
Going to wait for the warmer weather before I tackle this. Any chance you consider selling or renting the tool?
Thanks
Glen
Thread Starter
Senior Member
Joined: Apr 2013
Posts: 323
Likes: 17
2002 E55
It looks like these tools are still in short supply. I'm sending you a PM.
Thanks,
ddb
MBWorld Fanatic!


Joined: Dec 2008
Posts: 2,396
Likes: 38
From: Bay Area, CA
2007 SL55 AMG
I definitely need to do this now. I was driving downtown a few days ago with 5 adults in the car and there was a truck stopped in my lane infront of me. I went around the guy while flooring the throttle and ran over some nasty ruts in the road. The car felt completely unstable after that. As I think that was the last straw for the bushings. It's tramlining all over the place and it wanders on the freeway now.
OP, do you still have the tool? Hoping we can work out some sort of deal.
OP, do you still have the tool? Hoping we can work out some sort of deal.


