

 Thank you for sharing and taking the time to do this. It's extremely helpful for us DYI guys. With that being said interesting findings....
New Differential Mounts (Bushings)
Thread Starter
Senior Member
Joined: Apr 2013
Posts: 323
Likes: 17
2002 E55
New Differential Mounts (Bushings)
Yesterday I installed new differential mounts in an effort to eliminate, or diminish some vibrations felt mostly in the shifter area, but some in the seat and steering wheel. Previously I've replaced many driveline parts attempting to fix this issue. They all helped, but didn't solve the problem totally. Removing the 4mm spacer from the vertical differential mount made a huge difference, and replacing the bushings, I hoped, would make a positive difference.
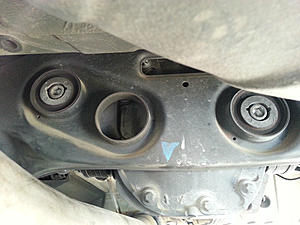
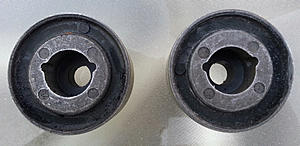
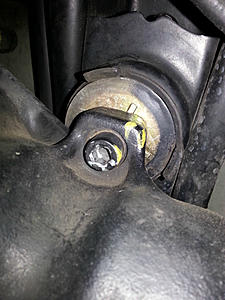
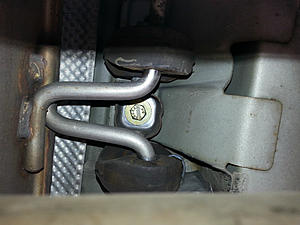
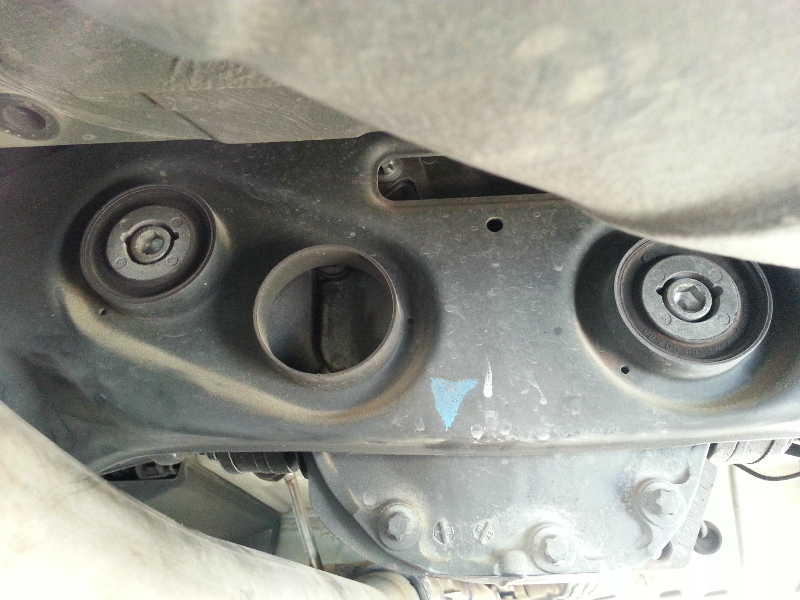
The differential is held in place by the 2 bushings that are pressed in the subframe from the differential side, and the vertical mount (where the 4mm spacer is located) that is near the flex disc.
You can see the two bushings in this pic:
I had purchased one bushing a year or so ago to try and compare it to the ones on the car in an effort to determine if mine were worn. I could see some wear on mine, but wasn't able to determine if they were problematic.
I was unable to find any helpful DIY's online covering replacing the bushings, especially W210 specific ones. There's more out there on W124 models, and I was able to get enough of an understanding to try the DIY knowing I may have to figure it out as I go.
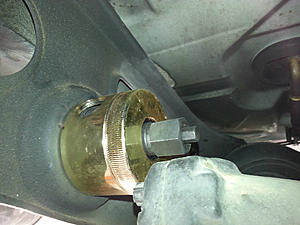
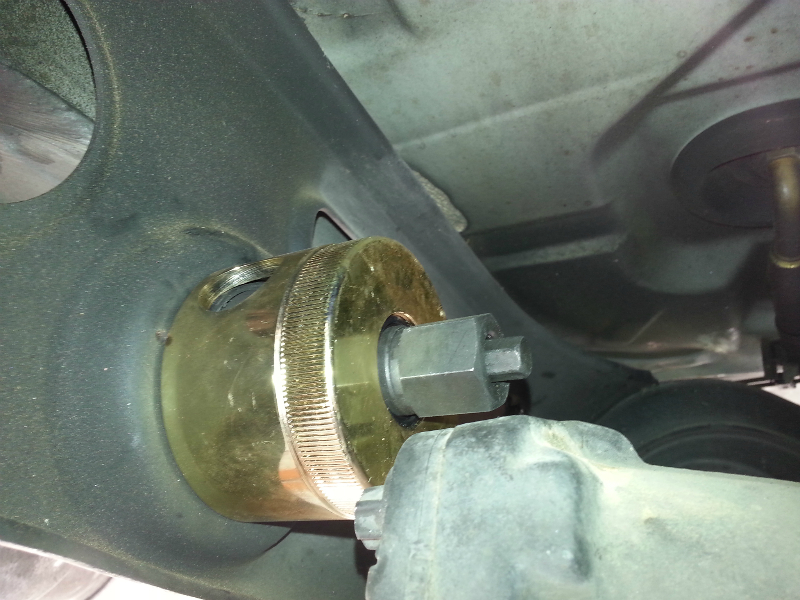
The one thing I was sure about it that I needed the tool to extract and press in the new bushings. I read some accounts of folks making their own tool and others removing and installing the bushings using less conventional methods. After doing the job yesterday I wouldn't attempt this job without the proper tool. I bought it from eBay shipped for $99.
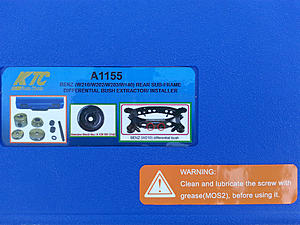
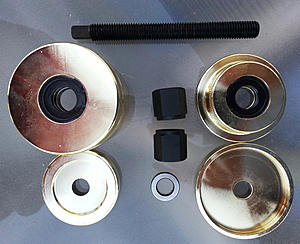
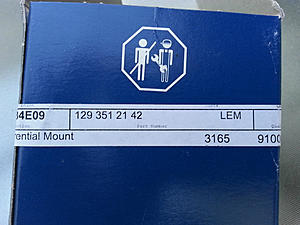
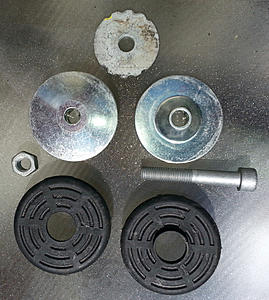
The case that the tool came in lists the MB part number for the bushings.
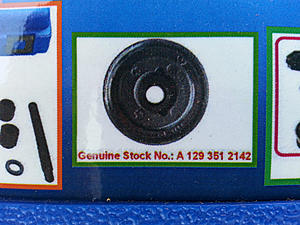
I purchased Lemforder bushings. I had one that I purchased more than a year ago and purchased the second one recently from ECS Tuning. They are ~ $15 plus shipping.
There's a front and back side to the bushings.

A year or so ago when I purchased the first bushing just to look at it I also purchased 1, 2, & 3mm spacers to try out as well as the rest of the parts that make up the vertical mount. I ordered these parts individually and don't remember the parts numbers or what I paid for them. I did however see that ECS Tuning has them available as a kit.
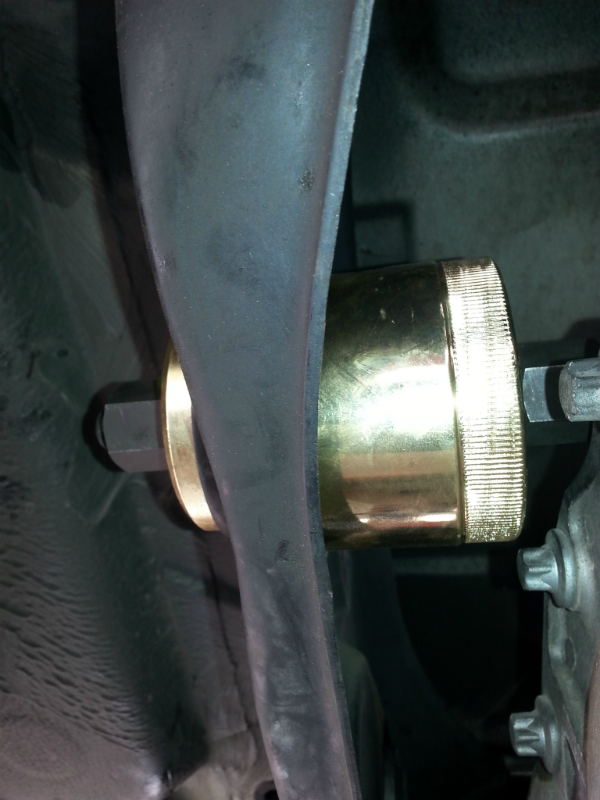
The difficult part about this job is that the bushings come out, and go in from the differential side of the subframe. So the differential is in the way and has to be moved to accomplish the R&R. There are several ways to get this done and I attempted to use the easiest method based on what I had read.
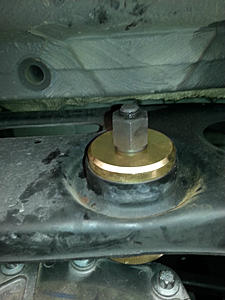
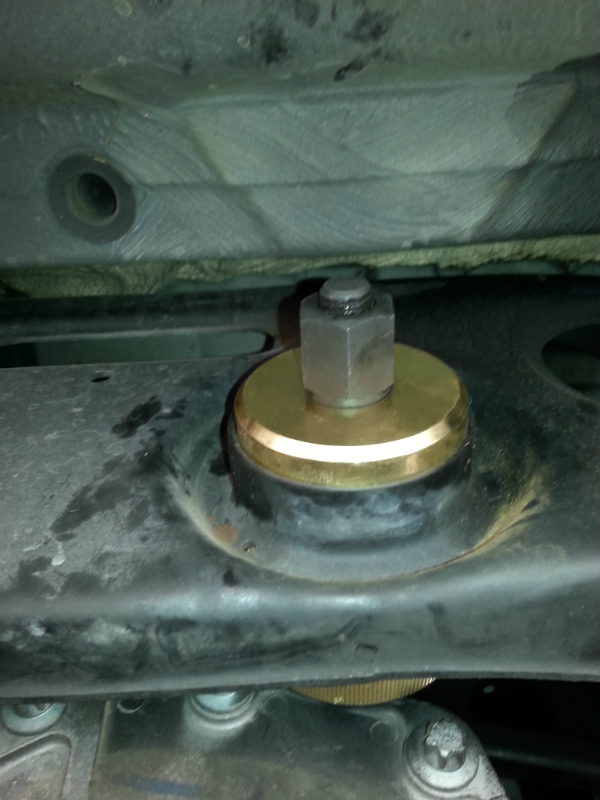
I started by removing the lower control arm covers so I could put the car on jack stands. I also removed the cover that protects the rear headlight aim mechanism as well as the bracket for added room. I also loosened the bolts that secure the center driveshaft support bearing hopefully to allow the driveshaft to move forward enough. I then placed my floor jack under the differential and removed the nut and bolt from the vertical mount where the 4mm spacer normally resides (it is not present in this pic).
I then removed the bolts that attach the subframe to the differential via the bushings. You need a 12mm hex bit socket to do this. My hex bit socket set only went up to a 10mm so I had to go buy a 12 mm hex bit socket.
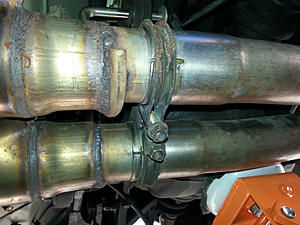
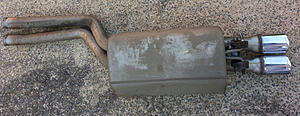
Once the bolts were removed the differential was free to move around. I lowered it a bit and checked for access to the bushings, which wasn't adequate. I couldn't lower the differential far enough because it was hitting the top of the rear section of the exhaust, so I removed this section of the exhaust, which was simple enough. It only required loosening two clamps at one end of the section to be removed (13mm) and one bolt near the tips (13mm) that attaches the rear hangers to the car. After some wiggling the section came right off. It is heavy and awkward to maneuver if you are working on the ground. I have a little mechanics stool with a height adjustable seat that I used to aid in the removal and installation of the exhaust.
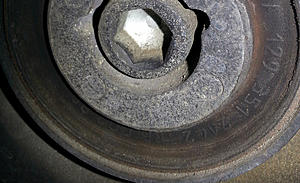
With the exhaust out of the way I could now lower the differential enough, I thought, to get enough access to the differential side of the bushings to extract them. If you look at the pic I included earlier in the post that shows both bushings you will notice that the one on the left side is higher than the one on the right side. The left side bushing was easily accessible and I extracted and pressed in the new one easily. Be aware of the bushing clocking before removing the old one and installing the new one. Note that there are two ears around 10 and 2 o'clock on one side and a small hole on the other side around 3 o'clock. I'm not sure of the importance of the clocking, but I tried to put in the new ones just like the old ones. I also cleaned the opening and applied some synthetic grease to the opening before installing the new bushings.
The right side bushing however was still too close to the differential for me to get the extractor parts in place to remove the bushing. I then disconnected the driveshaft from the differential and was able to move the differential forward enough to barely get enough access to R&R the bushing.

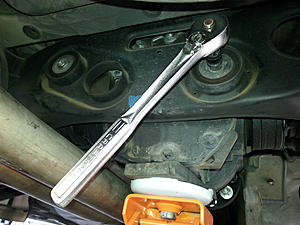
You are supposed to use new bolts, which I failed to order. I cleaned and reused the old bolts with blue thread lock torqued to 81 ft-lb. The vertical mount is torqued to 33 ft-lb. It was a little tricky lining up the bolts through the bushings back into the differential, but not too difficult.
I avoided removing the axle half shafts just because I didn't want to mess with them. In the long run, it may have been easier and quicker than the method I used to gain access to the bushings.
Drove the car at speed this morning with the 4mm spacer installed and it felt much better when compared to the ride with the 4mm spacer installed before the new bushings, which I tested recently. I do however think it may be better without the spacer. I'm going to remove it tomorrow and test it again.
When I removed the old parts from the vertical assembly I noticed 4 hash marks on each rubber support piece. I don't know if they correspond with the 4mm spacers or not, but the new pieces didn't have the 4 hash marks.
I will report my findings tomorrow after removing the 4mm spacer and a test ride.
The differential is held in place by the 2 bushings that are pressed in the subframe from the differential side, and the vertical mount (where the 4mm spacer is located) that is near the flex disc.
You can see the two bushings in this pic:
I had purchased one bushing a year or so ago to try and compare it to the ones on the car in an effort to determine if mine were worn. I could see some wear on mine, but wasn't able to determine if they were problematic.


I was unable to find any helpful DIY's online covering replacing the bushings, especially W210 specific ones. There's more out there on W124 models, and I was able to get enough of an understanding to try the DIY knowing I may have to figure it out as I go.
The one thing I was sure about it that I needed the tool to extract and press in the new bushings. I read some accounts of folks making their own tool and others removing and installing the bushings using less conventional methods. After doing the job yesterday I wouldn't attempt this job without the proper tool. I bought it from eBay shipped for $99.


The case that the tool came in lists the MB part number for the bushings.

I purchased Lemforder bushings. I had one that I purchased more than a year ago and purchased the second one recently from ECS Tuning. They are ~ $15 plus shipping.

There's a front and back side to the bushings.


A year or so ago when I purchased the first bushing just to look at it I also purchased 1, 2, & 3mm spacers to try out as well as the rest of the parts that make up the vertical mount. I ordered these parts individually and don't remember the parts numbers or what I paid for them. I did however see that ECS Tuning has them available as a kit.

The difficult part about this job is that the bushings come out, and go in from the differential side of the subframe. So the differential is in the way and has to be moved to accomplish the R&R. There are several ways to get this done and I attempted to use the easiest method based on what I had read.
I started by removing the lower control arm covers so I could put the car on jack stands. I also removed the cover that protects the rear headlight aim mechanism as well as the bracket for added room. I also loosened the bolts that secure the center driveshaft support bearing hopefully to allow the driveshaft to move forward enough. I then placed my floor jack under the differential and removed the nut and bolt from the vertical mount where the 4mm spacer normally resides (it is not present in this pic).
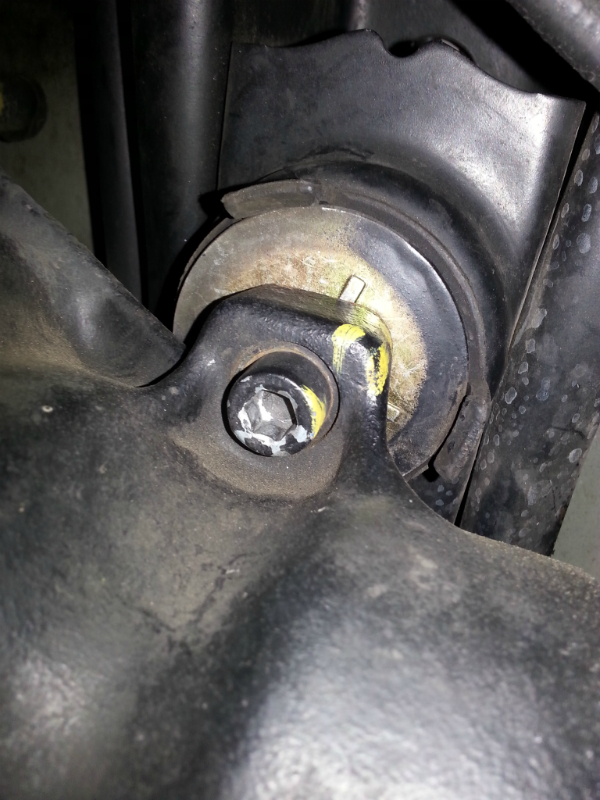
I then removed the bolts that attach the subframe to the differential via the bushings. You need a 12mm hex bit socket to do this. My hex bit socket set only went up to a 10mm so I had to go buy a 12 mm hex bit socket.

Once the bolts were removed the differential was free to move around. I lowered it a bit and checked for access to the bushings, which wasn't adequate. I couldn't lower the differential far enough because it was hitting the top of the rear section of the exhaust, so I removed this section of the exhaust, which was simple enough. It only required loosening two clamps at one end of the section to be removed (13mm) and one bolt near the tips (13mm) that attaches the rear hangers to the car. After some wiggling the section came right off. It is heavy and awkward to maneuver if you are working on the ground. I have a little mechanics stool with a height adjustable seat that I used to aid in the removal and installation of the exhaust.


With the exhaust out of the way I could now lower the differential enough, I thought, to get enough access to the differential side of the bushings to extract them. If you look at the pic I included earlier in the post that shows both bushings you will notice that the one on the left side is higher than the one on the right side. The left side bushing was easily accessible and I extracted and pressed in the new one easily. Be aware of the bushing clocking before removing the old one and installing the new one. Note that there are two ears around 10 and 2 o'clock on one side and a small hole on the other side around 3 o'clock. I'm not sure of the importance of the clocking, but I tried to put in the new ones just like the old ones. I also cleaned the opening and applied some synthetic grease to the opening before installing the new bushings.

The right side bushing however was still too close to the differential for me to get the extractor parts in place to remove the bushing. I then disconnected the driveshaft from the differential and was able to move the differential forward enough to barely get enough access to R&R the bushing.
You are supposed to use new bolts, which I failed to order. I cleaned and reused the old bolts with blue thread lock torqued to 81 ft-lb. The vertical mount is torqued to 33 ft-lb. It was a little tricky lining up the bolts through the bushings back into the differential, but not too difficult.
I avoided removing the axle half shafts just because I didn't want to mess with them. In the long run, it may have been easier and quicker than the method I used to gain access to the bushings.
Drove the car at speed this morning with the 4mm spacer installed and it felt much better when compared to the ride with the 4mm spacer installed before the new bushings, which I tested recently. I do however think it may be better without the spacer. I'm going to remove it tomorrow and test it again.
When I removed the old parts from the vertical assembly I noticed 4 hash marks on each rubber support piece. I don't know if they correspond with the 4mm spacers or not, but the new pieces didn't have the 4 hash marks.
I will report my findings tomorrow after removing the 4mm spacer and a test ride.
Last edited by ddb; May 10, 2015 at 04:16 PM.
Thread Starter
Senior Member
Joined: Apr 2013
Posts: 323
Likes: 17
2002 E55
I removed the 4mm spacer this morning and took a long test drive on the highway. Previously I felt the vibrations mostly in the 70 mph range and higher. Now, it feels great. The shifter area is smooth as well as the steering wheel and seat area.
There's also a new, subtle but sure, feel of solidity to the whole car. When you apply a lot of throttle, it feels different than it did before. It is somewhat difficult to describe, but I would say more refined or more new car-like.
If you're having vibration issues, I can't say definitively this is your cure. There's just too many things that can cause vibration issues. I would suggest you have a look at the bushings the next time you're under the car. You may or may not be able to judge the condition of them visually. I've seen some pics online where you can definitely see they are worn out. If you have a lot of miles (I'm around 72, 000) you will probably benefit from fresh differential bushings.
I still have a lot of suspension work to do: adjustable rear camber arms, adjustable front camber bolts, front lower control arm bushings, alignment, etc........
Thread Starter
Senior Member
Joined: Apr 2013
Posts: 323
Likes: 17
2002 E55
I agree, Armanie, these cars are interesting. Whenever you replaced one worn rubber piece underneath, the next worn part can become the next problem that will require attention. I'm glad I enjoy working on it!
MBWorld Fanatic!
Joined: Feb 2008
Posts: 1,280
Likes: 4
From: Bostonian Ma
2012 CLS63 AMG
Didn't you also replace the frame bushings as well? (4 Sides) I still have a little wiggle but better after I replaced inner/outer tie rods, flex disc, ball joints, sway bar links, upper control arms and the shim that sits in the rear. That just made me exhausted 
Armani
Armani
Trending Topics
Thread Starter
Senior Member
Joined: Apr 2013
Posts: 323
Likes: 17
2002 E55
Didn't you also replace the frame bushings as well? (4 Sides) I still have a little wiggle but better after I replaced inner/outer tie rods, flex disc, ball joints, sway bar links, upper control arms and the shim that sits in the rear. That just made me exhausted
Armani
Armani
I was on a road trip when I noticed the rear suspension felt like it wasn't working properly (at all). It felt like I had no springs or shocks. I also noticed the front end felt funny handling wise. After some research the subframe bushings seemed like the likely culprits and fortunately they were.
When you think about it, the four subframe bushings support and isolate the entire rear subframe where everything else in the back of the car is attached to. If they are worn, broken, or leaking, the other components won't work properly.
MB World Stories
The Best of Mercedes & AMG

Manual Mercedes? 6 Times Sindelfingen Let Drivers Have All The Fun
Verdad Gallardo
Mercedes SLR McLaren 722 S Is Extremely Rare Example Modified by McLaren
Verdad Gallardo
8 Classic Boxy Mercedes Designs That Have Aged Like Fine Wine
Verdad Gallardo
Flawlessly Restored Mercedes 190E Evo II Heads to Auction
Verdad Gallardo
Electric Mercedes C-Class Unveiled: 11 Things You Need to Know
Verdad Gallardo
Mercedes EQS Gets A Major Update: Everything You Need to Know
Verdad Gallardo
5 Underrated Mercedes-Benz Models That Don't Get the Love They Deserve
Verdad Gallardo
Mercedes 300D Has Pushed Well Past 1 Million Miles and It Ain't Stopping
Verdad Gallardo
10 Most Reliable Mercedes-Benz Models You Can Buy Used
Verdad Gallardo
Thread Starter
Senior Member
Joined: Apr 2013
Posts: 323
Likes: 17
2002 E55


Newbie
Joined: Jul 2011
Posts: 1
Likes: 0
w140
I removed the 4mm spacer this morning and took a long test drive on the highway. Previously I felt the vibrations mostly in the 70 mph range and higher. Now, it feels great. The shifter area is smooth as well as the steering wheel and seat area.
There's also a new, subtle but sure, feel of solidity to the whole car. When you apply a lot of throttle, it feels different than it did before. It is somewhat difficult to describe, but I would say more refined or more new car-like.
If you're having vibration issues, I can't say definitively this is your cure. There's just too many things that can cause vibration issues. I would suggest you have a look at the bushings the next time you're under the car. You may or may not be able to judge the condition of them visually. I've seen some pics online where you can definitely see they are worn out. If you have a lot of miles (I'm around 72, 000) you will probably benefit from fresh differential bushings.
I still have a lot of suspension work to do: adjustable rear camber arms, adjustable front camber bolts, front lower control arm bushings, alignment, etc........
There's also a new, subtle but sure, feel of solidity to the whole car. When you apply a lot of throttle, it feels different than it did before. It is somewhat difficult to describe, but I would say more refined or more new car-like.
If you're having vibration issues, I can't say definitively this is your cure. There's just too many things that can cause vibration issues. I would suggest you have a look at the bushings the next time you're under the car. You may or may not be able to judge the condition of them visually. I've seen some pics online where you can definitely see they are worn out. If you have a lot of miles (I'm around 72, 000) you will probably benefit from fresh differential bushings.
I still have a lot of suspension work to do: adjustable rear camber arms, adjustable front camber bolts, front lower control arm bushings, alignment, etc........


Newbie
Joined: Nov 2024
Posts: 1
Likes: 0
�98 e300 & �15 Sprinter
Hello ddb,
Excellent write up!
I need to do my differential bushings on my 1998, w210 but the tool, A1155 has been discontinued.
i’ve searched all over and can not find a replacement to do the job.
if you still have your tool, would it be possible to rent it from you? I would gladly take care of shipping costs both ways as well.
Thank you. Jeff—San Diego, CA

Newbie
Joined: Jan 2025
Posts: 1
Likes: 0
From: Norway
S55 AMG - 2001
A1155 tool
You can buy this tool from Taiwan or Cyprus:
https://www.ycautotools.com/shop/hcb-a1155/
https://www.hcbapp.com/products-cata...sh-extr-detail
https://www.ycautotools.com/shop/hcb-a1155/
https://www.hcbapp.com/products-cata...sh-extr-detail


