When you click on links to various merchants on this site and make a purchase, this can result in this site earning a commission. Affiliate programs and affiliations include, but are not limited to, the eBay Partner Network.
First things first. If you don�t like pain, just pay your dealer 500 bucks (quoted) in labor to do it for you.
A few weeks ago, my engine started making a whistling noise that was difficult to locate while running, and increased in pitch after the engine shut down, until it went away a few seconds later. After a bit of research I found the DTB below which seemed relevant, stating the cause to be a bad PCV Valve. Took it in for service and they agreed it was bad, but not covered by NAC Aftermarket warranty, so I took the opportunity to document the process.
DTB S-B-01.20/24 FEB09 ML63, C63, CLK63, E63, CL63, CLS63, S63, SL63, and R63 up to engine # 156698x 60 022000 - whistling sound from the engine compartment (in the area of the firewall) the cause may be a malfunctioning diaphragm in the pressure-regulating valve. The sound can also be heard for up to several seconds after the engine is switched off. The sound goes away when the engine dipstick is removed. To resolve, the valve is replaced.
I have access to WIS but never could find a documented procedure for replacing this, probably because MB refers to this part in many different ways. We know it as PCV (Positive Crankcase Ventilation), but Mercedes refers to it as the Breather Pipe in some cases, Crankcase Ventilation in others, and I also saw Breather Hose, and Pressure-Regulating Valve in the DTB above.
Had I found the correct instructions in WIS, I believe they would have said to remove the engine for this procedure, as the PCV Valve is attached to the pipe which runs from just below the left rubber air intake hose down to below the metal neck where the intakes converge, which is at the bottom rear of the engine. Bottom line is, you can't see down there and it's impossible to remove the pipe the way it was intended.
That being said, I wouldn't recommend doing this as a DIY simply because you can't get your fingers in there to squeeze the clamps to release the pipe. In my case, I used a razor blade and actually cut the clamp off by feel. Took a lot of patience to weld a razor blade without being able to see it, and you have to be careful of the rubber hose that sits right next to where you'd be cutting. That being said, once it's cut, the pipe does come off with some man-handling, and the new one just pops on with little fuss. Including all my failed attempts, this took about 6 hours, but I would estimate about an hour or less doing it this way. Don�t even think about trying it until your car has cooled off overnight.
So here goes with my photos and descriptions. Weistec also has some great pics of the back of the engine on their site showing the tube in place:
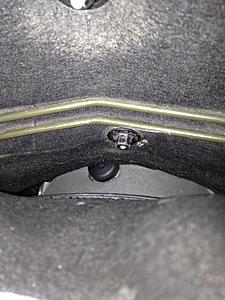
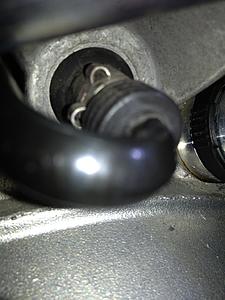
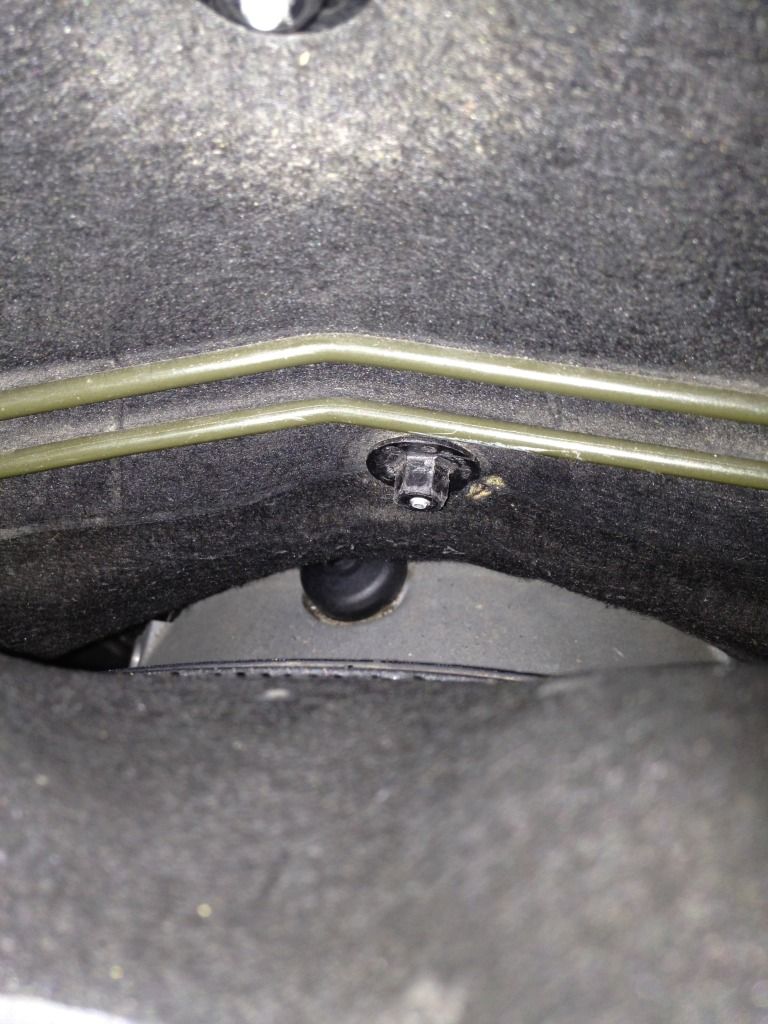
I�ll say it up front, you hand will hurt and your chest will hurt. You�re basically having to lay on the driver�s side engine bay to have enough reach to get back there, and it�s no pillow. The main pain though comes from this little plastic nut. Not so much the nut but the screw which comes from the other side of the firewall and is not removable. You can unscrew the plastic nut, but the bolt itself remains, so it�s less painful to just leave it blunt instead of pointy.
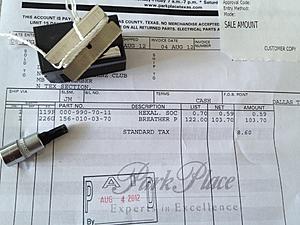
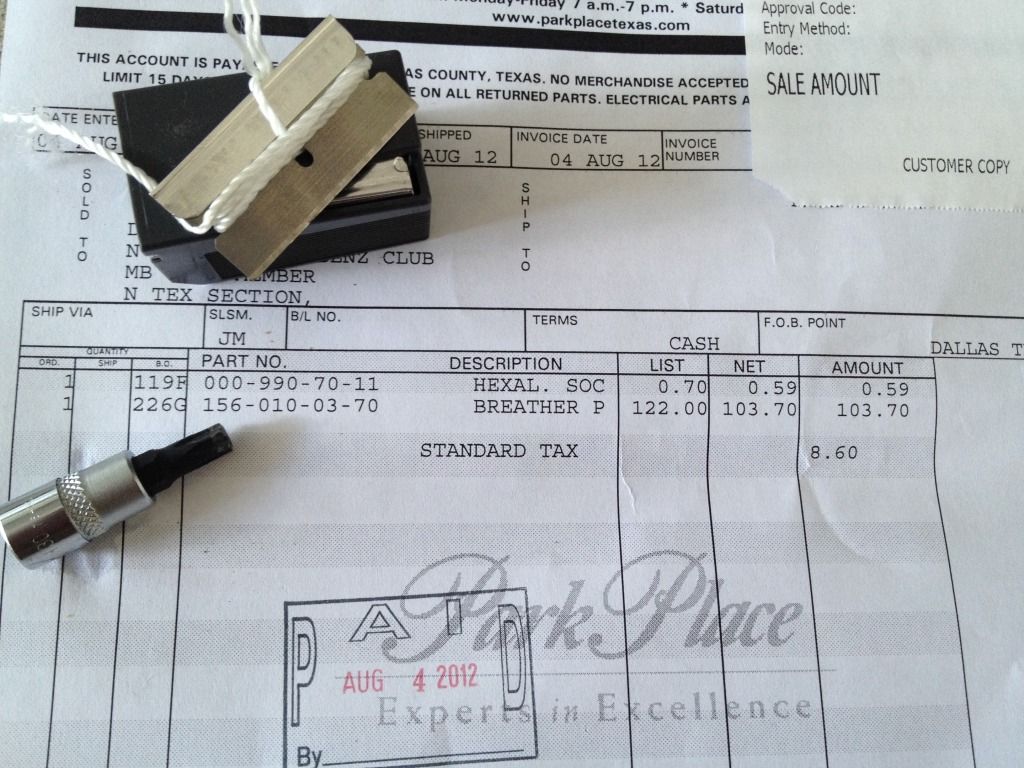
Tools you will need: I tried a lot of things but these are the ones that got the job done. You need a T30 Torx socket (which you can also use if you ever change the spark plugs), and a razor blade like in the pic. It�s easy to lose grip because you can only fit your hand back there flat, so I tied a string around it and around my wrist to keep from losing it down-hole. Part numbers shown are: Breather Pipe � A 156 010 03 70 and a Hexal Bolt A 000 990 70 11. MSRP is 122.70, my MB club discount saved me a few bucks.
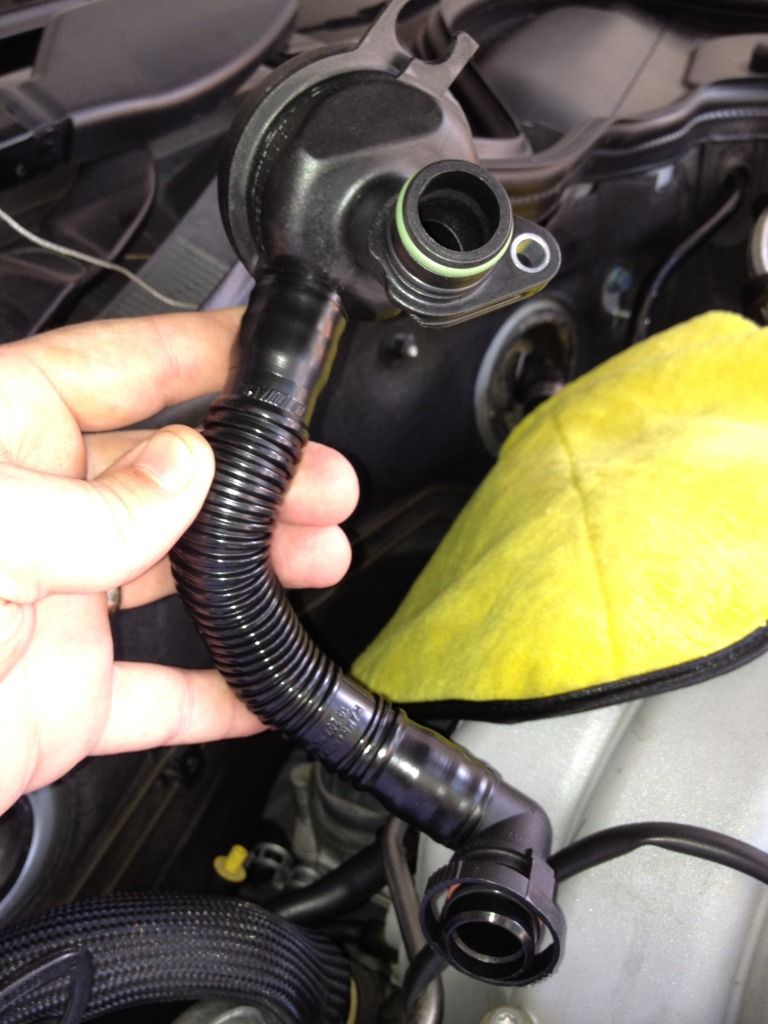
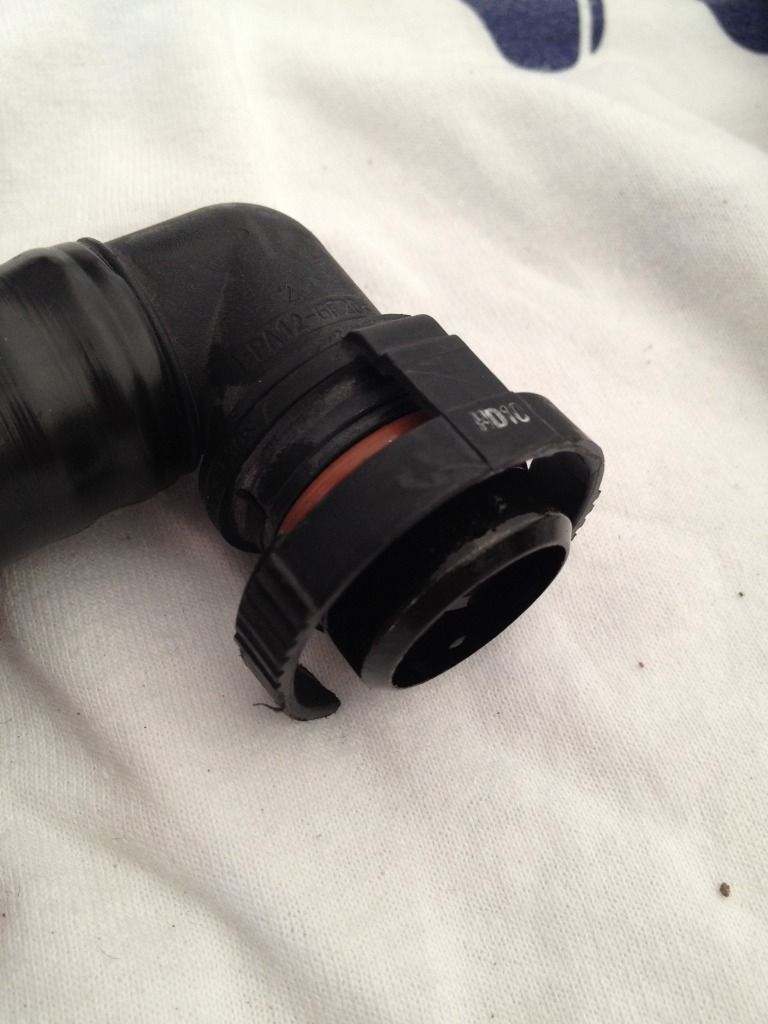
Pic of the new PCV Valve and hose (all one piece). The big part is what goes up top on the rear of the engine (passenger side):
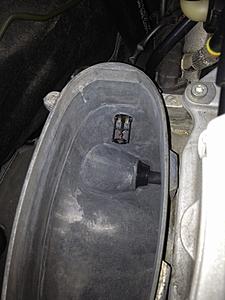
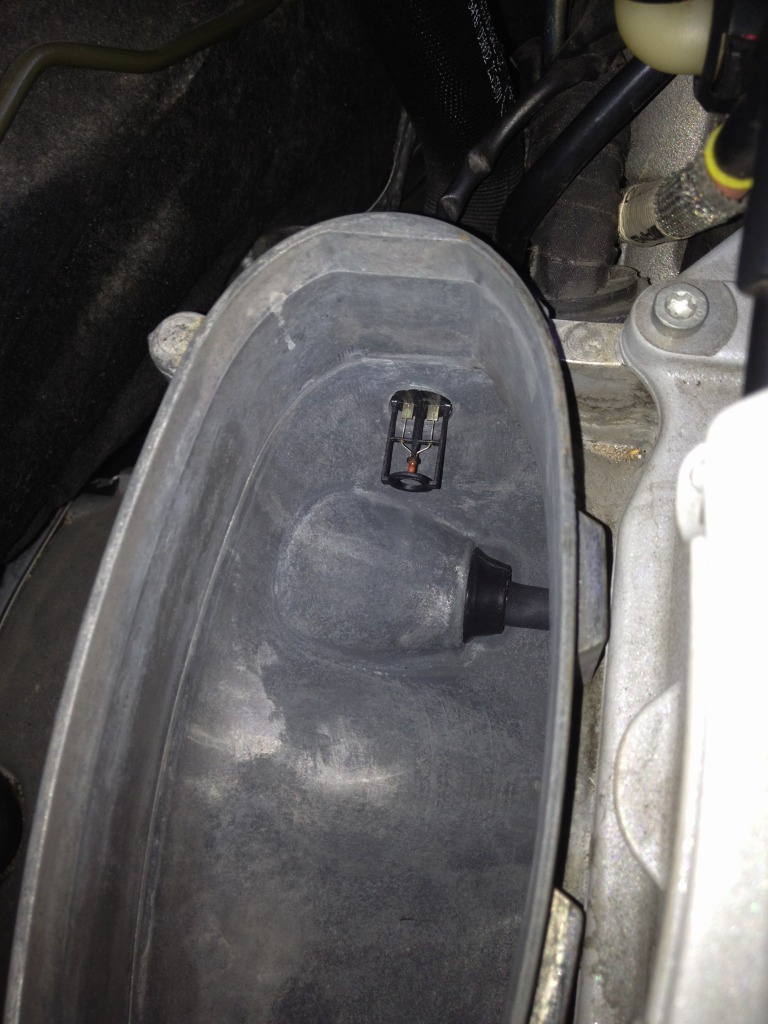
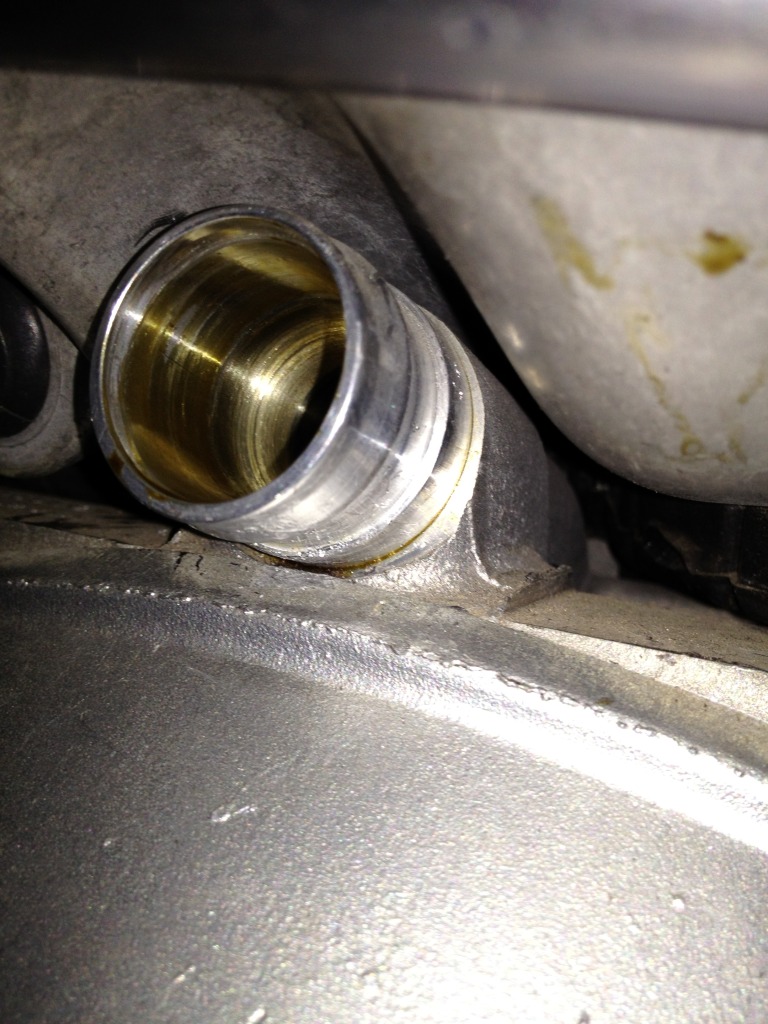
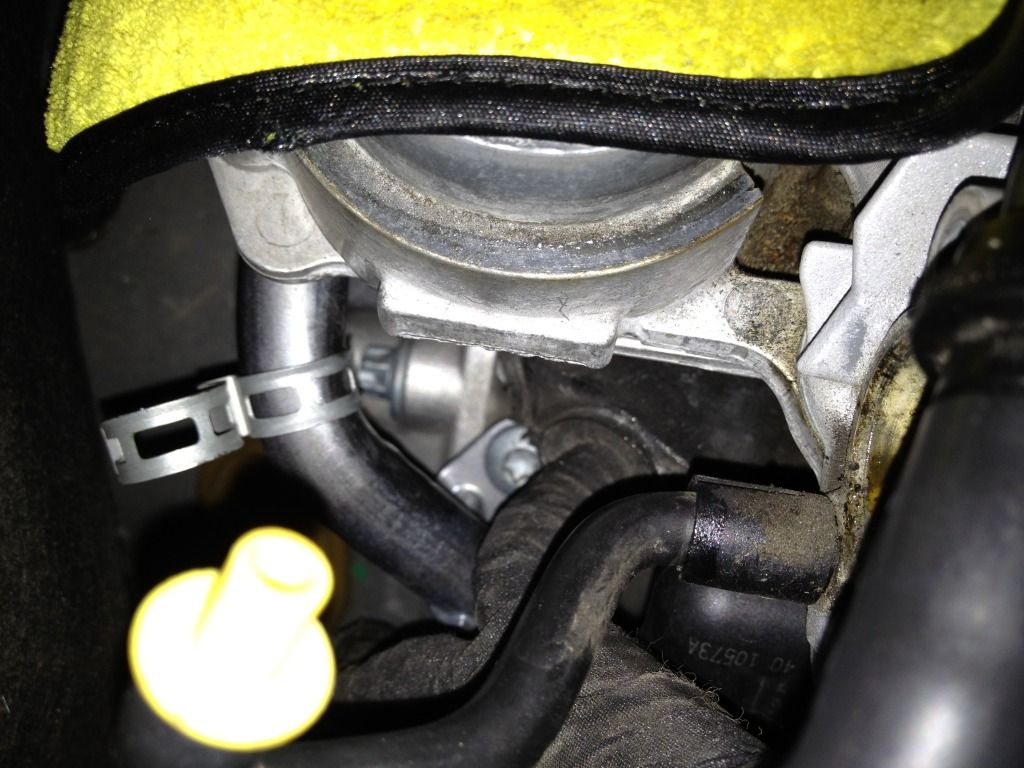
This shows roughly where the top of the valve is located, but this is with the valve removed. You can see the metal intake at the top of the photo:
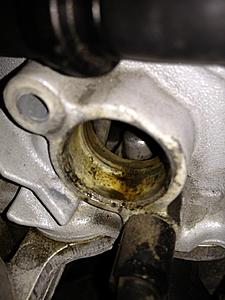
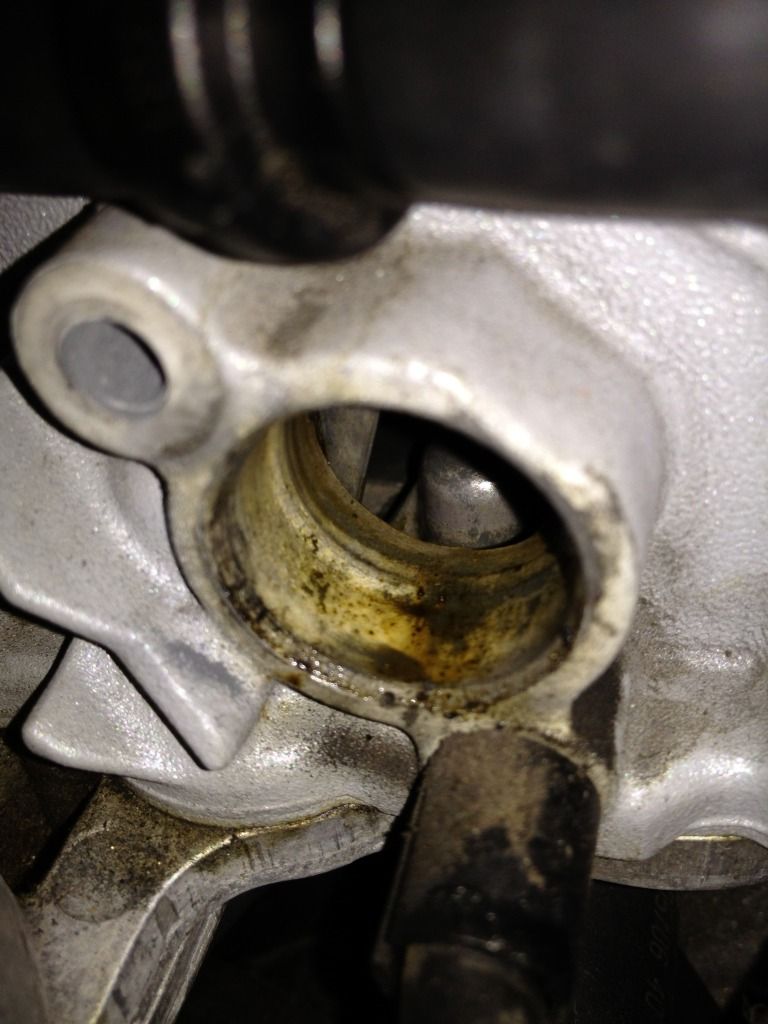
This is the top hole where the valve inserts. Obviously very dirty!! Not sure why they have just the one bolt to hold it in, it�s easy to see that it leaks. The hole for the bolt is the small one top left.
Also, when you�re stuffing the intake with cloth or however you plan on protecting it, watch out for the IAT sensor inside the intake. I laid a towel over the top. The raised part at the bottom of the intake is where the hose connects.
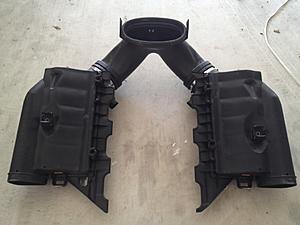
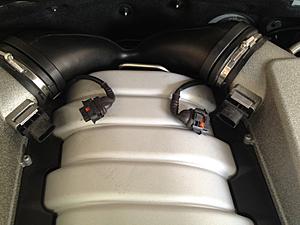
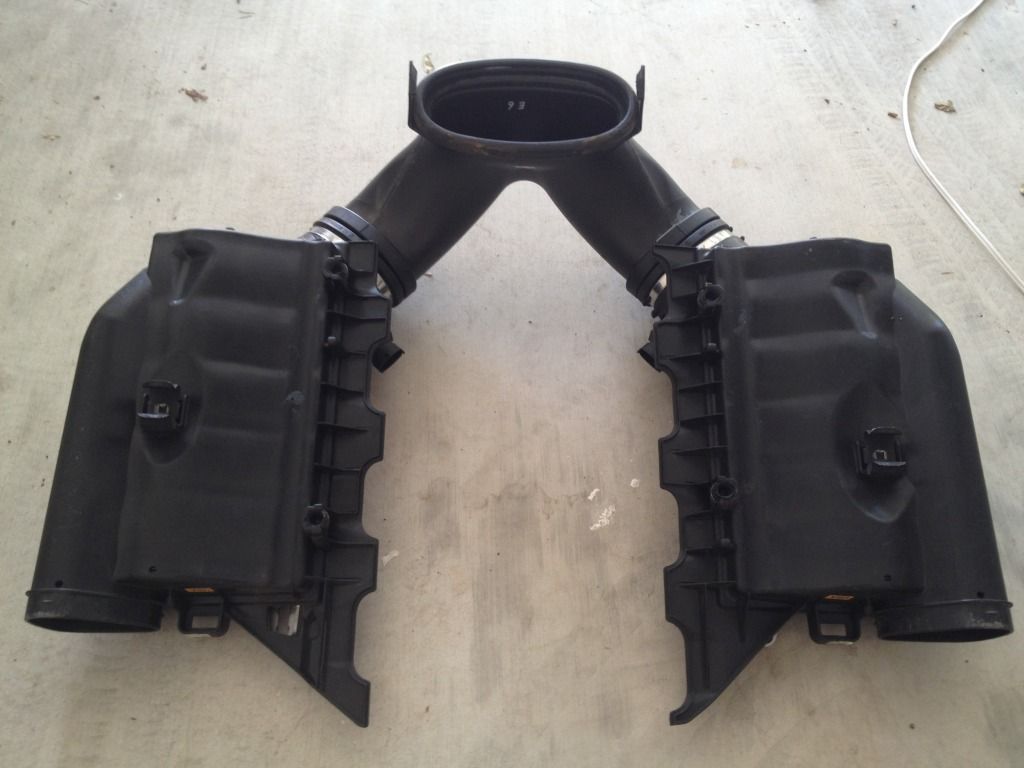
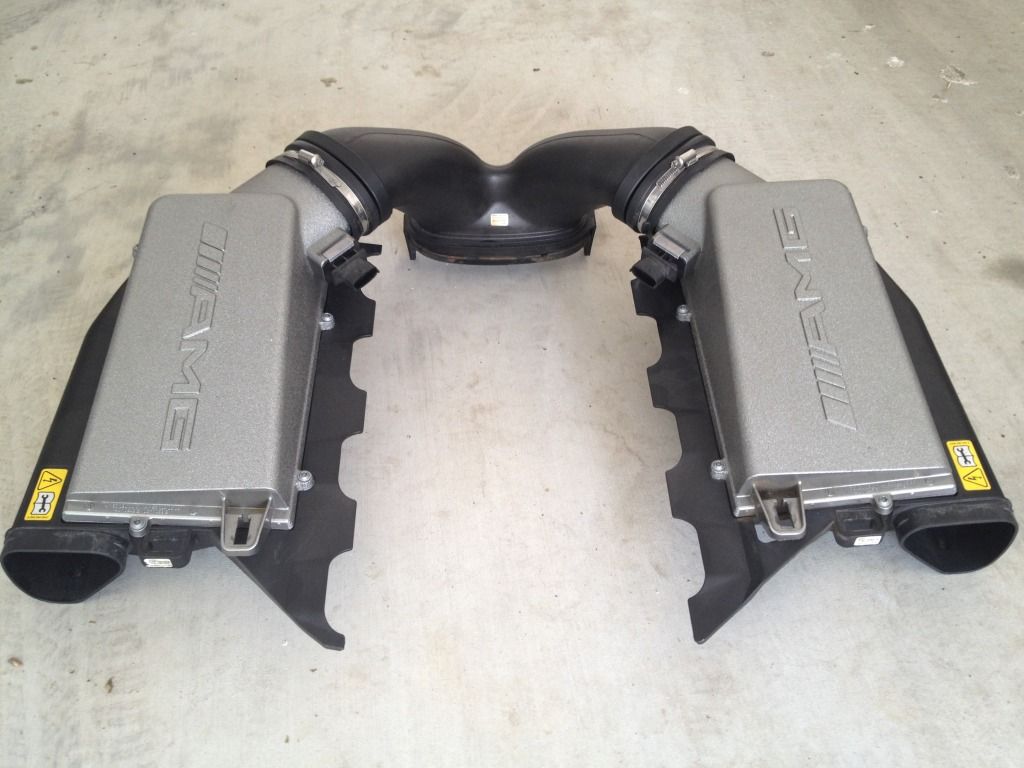
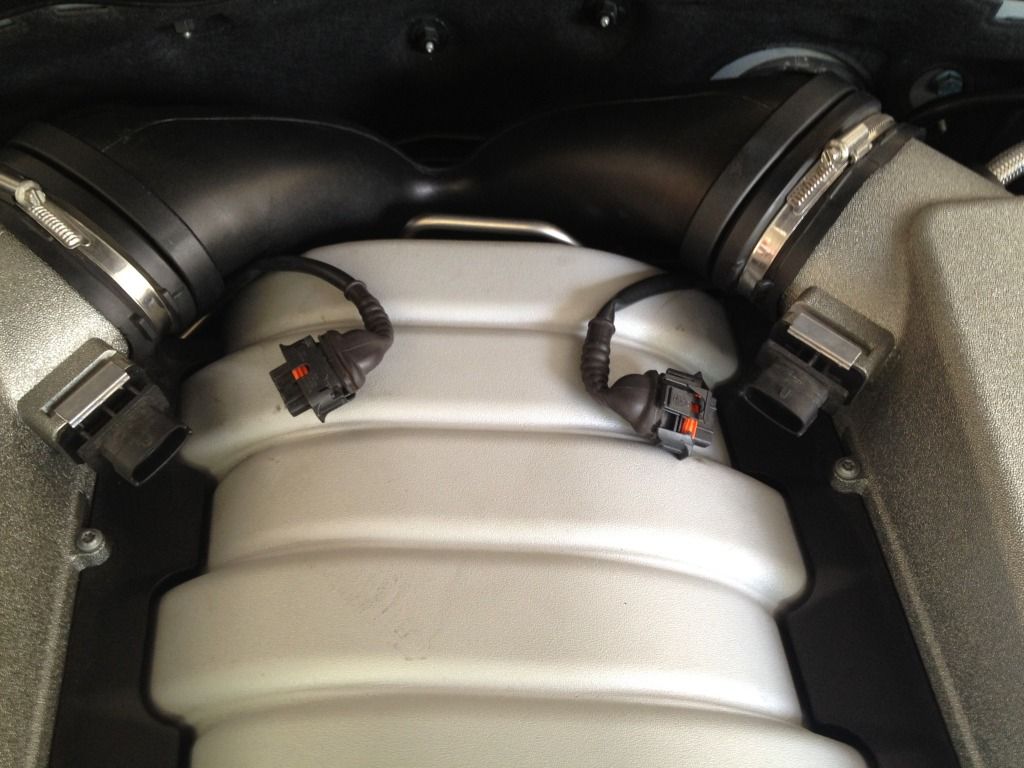
First step is to remove the air boxes. This can be done all at once, and is really simple. Unhook the two MAF sensors first. The rubber Y intake connects to the metal intake via two clamps (one on each side of the metal intake). The driver side clamp is easy to see and reach, not so much on the passenger side. I found it easiest to feel for the passenger side and unhook it first, then the drivers side. This way you can remove both filter housings and the rubber Y all at once. The first pic shows the underside of the filter boxes and the two clamps at the base of the Y. Next pic is top view:
Pretty much nothing else is removed to get the job done, just one small tube that locks into the top of the PCV valve which you can pop out. I didn�t get a pic of it, but it runs right along the top of the valve and easy to see.
Perform from the Passenger Side of the Engine Bay:
The actual valve is only held in by one bolt and pops out easily. Pop that out first and clean out the dirty hole shown above. This gives you some play in the hose for popping off the bottom part. There is a metal tube that runs alongside the breather pipe which I think may be a water line, but it doesn�t move and has a double metal clasp which also attaches to the breather pipe to keep it in place. It doesn�t actually clasp, it�s just two half circles the clamp around both breather pipe and water line. Unclasp it from the breather pipe which is on the bottom, and rotate it up and out of the way. It�ll spin around the metal pipe. Sorry no pic, but you�ll feel it. All the work from this point is most easily performed from the Drivers side of the engine.
Perform form the Driver Side of the Engine Bay:
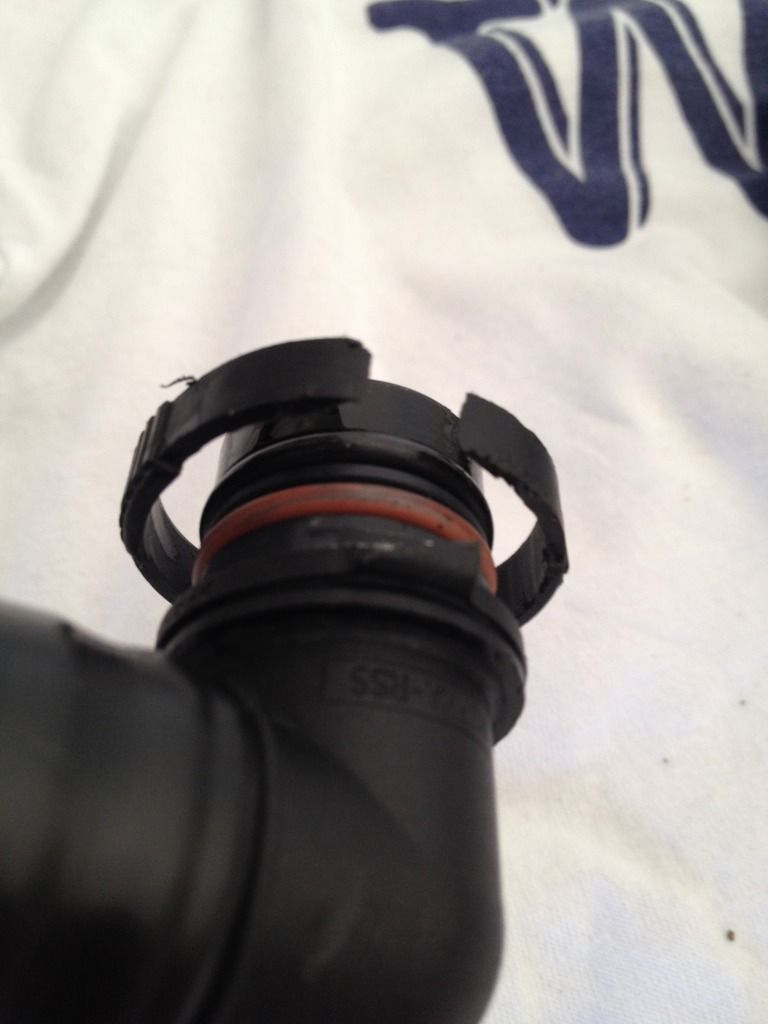
Spend a good minute or two feeling around down there so you are good and comfortable with how the hose connects, where it connects, where you�ll be cutting, etc. The hose is held onto the bottom port by way of a double plastic clamp. It�s meant to be squeezed at the grip points, but only one is accessible depending on which side of the engine you�re on, and good luck exerting enough pressure to make any difference (we�re talking you can�t even make a fist down there!!) I tried using a screwdriver to reach one side or the other, but you can�t get a big enough one down there, so then I tried shims from home depot, but those didn�t do any good and just made it impossible to remove. After studying the new tube and how it clamped on, I decided the easiest way was to use a razor blade and cut the plastic ring that held pressure on the clips. I sliced each side of the bottom clip since that�s the only one I could reach, and then used a really small short screwdriver to pry the clip up until it popped off.
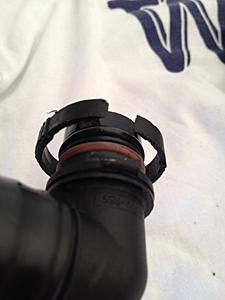
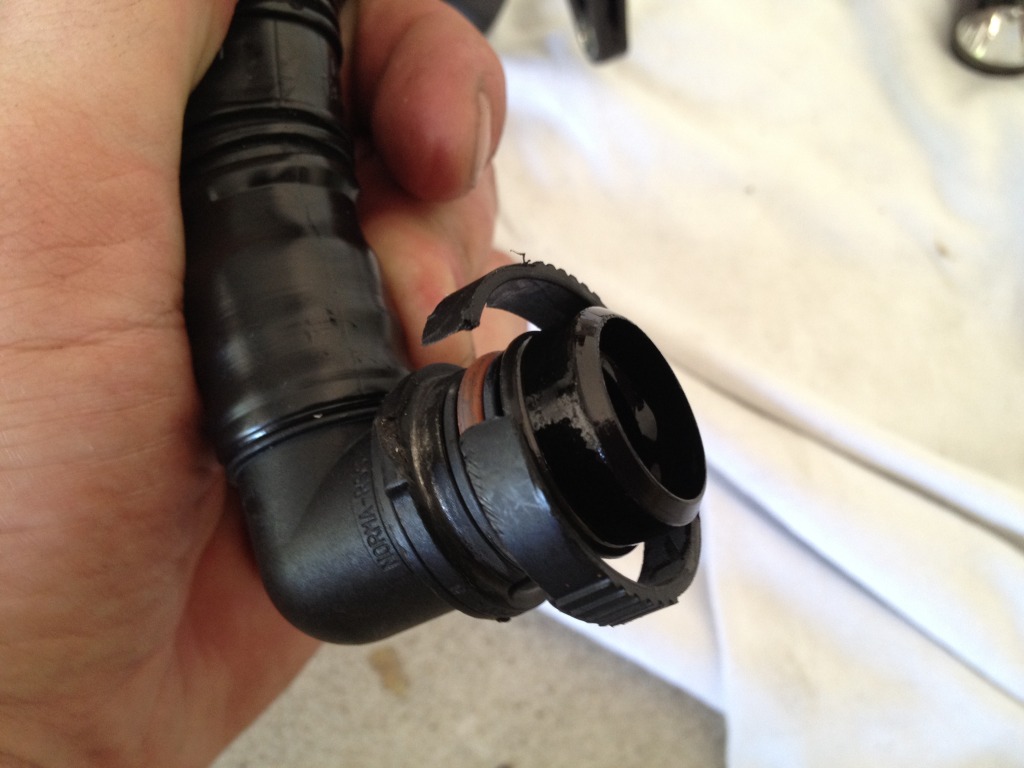
Here are some pics after I removed it, you can see the clip is gone:
Here�s the underside (the clip I couldn�t reach that�s still intact)
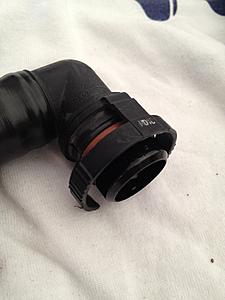
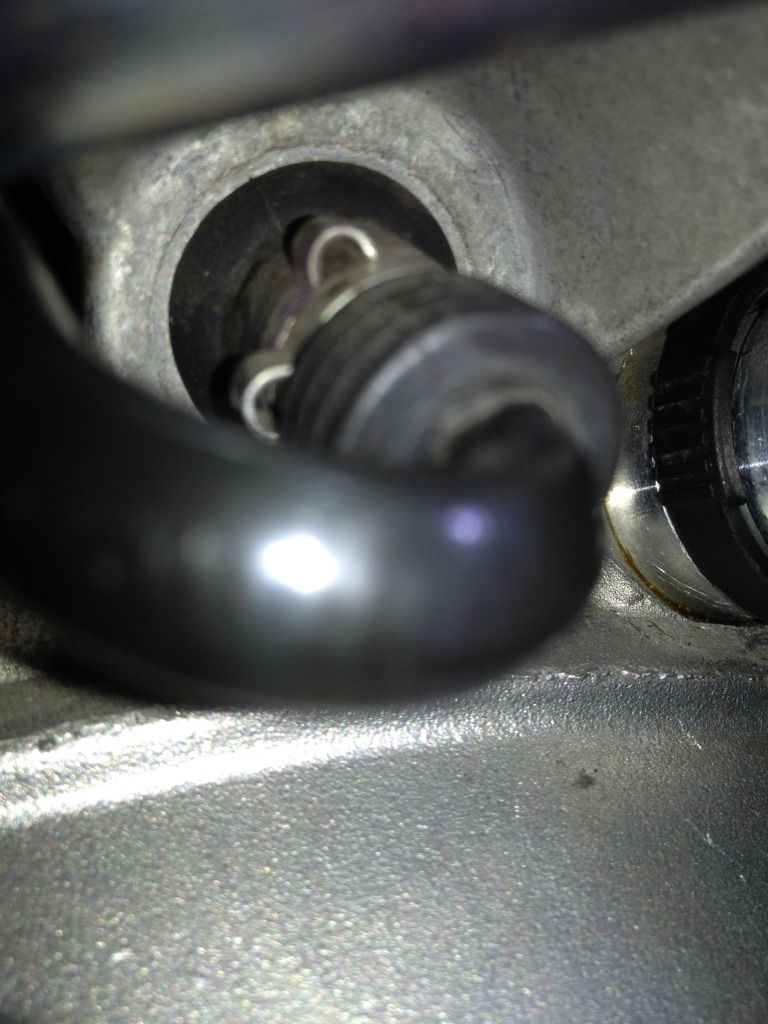
Be careful not to slice the wrong thing. This tube is right next to where the breather pipe connects:
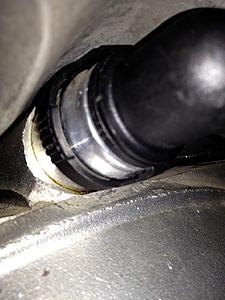
After you get it sliced and popped off, it pretty much releases, you just have to get creative and pain tolerant with jambing your fingers behind the neck of the pipe to pry it off the metal tube. Be patient, it does take a while and the back of your hand will look like a war zone because of the plastic nut mentioned earlier. Here�s the metal tube it actually connects to:
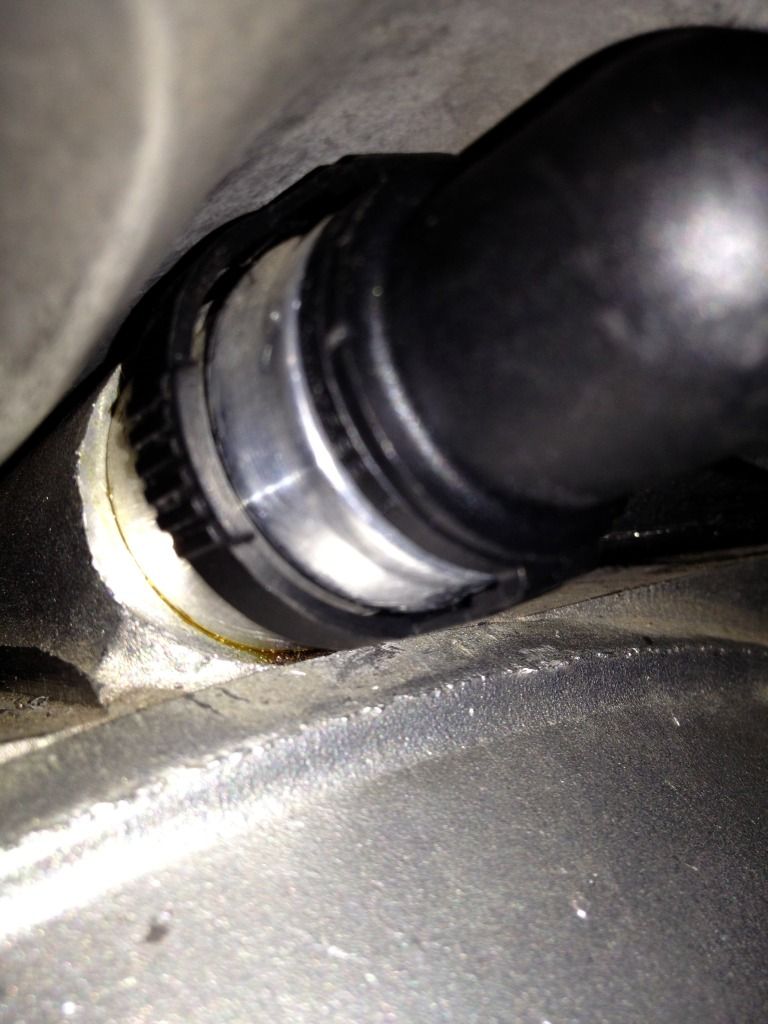
Once you get it popped off, just jimmy it a little until you get it all pulled out of the back of the engine. Once you get the new one in there and in place, just a little pushing and you�ll hear the plastic clamps click onto the metal tube. Here�s the best photo I could get of the new tube hooked back up:
Next, pop the actual valve back into the engine and use the bolt to keep it secure. Don�t forget to reconnect the little hose that runs across the top of the valve which you probably unhooked at the start of the project. You won�t miss it.
Finally, just pop the entire air box/rubber Y intake back into place, making sure the MAF sensor wires are positioned correctly for reattachment:
Hopefully this helps someone some day. If I had it to do over again, I would still do it, but you gotta have a good sense of feel. Tying the blade to my wrist helped a lot, as I could always just drop it and start over if I got confused as to which way it was facing. The good news is, it�s all metal back there except for the one other tube, so there�s not much chance of cutting anything by accident or messing anything else up.
Good luck.
Last edited by fly2nite; Aug 7, 2012 at 10:10 AM.
Reason: Added link to Weistec pics
Haha yeah out of 100 blurry precariously held iPhone pics these were the only ones that added value. I've used your DIYs in the past so thanks for the props. I get a thrill out of working on my car, it's one of the reasons I bought this over the Bimmer.
The space for fingers back there is unreasonably small, I don't even think with the engine raised 6 inches a finger could squeeze and remove the hose. It would take pliers or something else. Weistec also has some pics on their site that show the back of the engine with regards to the oil catch can they sell.
Great write up. My 63 is currently whistling at me once it gets up to temp and is idling. Pretty damn embarassing to sit at a stoplight and have your car just squealing away. Don't even get me started on the noise when you shut the car off. Ugh..
The "correct" way to replace this is to remove the intake manifold. You'll also need to replace the intake gaskets and bolts when you remove it.
Absolutely. Doing it this way makes the job about an hour, but of course it's about another $50 in parts. I suppose it all depends on what your time is worth. However, it is probably not a bad idea to change the intake gaskets and bolts, if you have never had it done. There is a "new" design on the bolts to help with leaks.
The black plastic hose is designed to be removed from the metal fitting, the problem here is you cannot get your hands or a pair of pliers in there to squeeze and release the lock tabs. You can break it apart, but I have found by the time you have done this, and the discomfort involved, it's really faster (at least for a skilled tech) to remove, or at least lift out of the way, the intake manifold.
greasemonkey.. thanks for the quick reply, but i think i need to clarify my question. I was wondering if that plastic elbow was removable from the flex-hose that connects the pcv to the elbow in the picture.
reason is because i am looking for an alternative location than the weistec oil catch can. If that hose separates from the elbow, i was going to install a oil catch can between the elbow and the hose.
I have a 07 e63 with 70K...what mileage did your PVC failed.
I do not have any sound but notice the dipstick pop up when I do a few WOT runs...is this a sign that the PVC is going bad. I was also told I need to buy new replacement dipstick the OEM has that problem of popping up...
I never had the intake bolts and gasket change so I might remove if need..
Finally, I found and resolved the problem with "Check Engine Light". In my case it was bad PCV Valve / Breather hose (part of emission system), part# A156 010 03 70 ($90.00). In regular maintenance routine, it needs to be changed every 70,000 miles.
Maybe this information will be helpful who have similar problem with M156 6.2 engine
Symptoms:
If the faults codes P0191 P2187 P0451 present, CEL is ON, can be white smoke from exhaust after cold start, no misfiring, engine oil around the PCV Valve, engine oil dipstick popping out, part# A156 010 03 70 must be replaced.
In some cases, it can be the Purge Valve, fault code P0444. Check if it pulsing by holding it, you will fill the vibration if it working good.
Bumping this old thread.
This actually happened to me where i would have the CEL on. Codes were P0101 for MAF, P0171 and P0172 for banks too lean. My engine would rev higher in idle when warm. So it was basically a vacuum leak.
MB told me they had to replace what they call the 'crankcase vent valve" in other words this exact PCV pipe. They charged 480$ for it which was covered by my extended warranty.
If i had seen that post earlier i would have probably isolated my issue. I was blaming my weistec oil catch can then my intake gasket for the leak. But when i put the car back to stock the problem was still there. Did the brake cleaner test to find the leak unsuccessfully. That is when i brought the car to the stealer.
Thanks for sharing
I think this might be the exact procedure we will need to perform on my brother's '09 S63 W221.
The dealer is recommending the entire intake manifold be replaced. We are getting P2187 and they want the entire manifold replaced. I couldn't disagree with them more. Thanks for this write up! This will help tons. I am having them check these exact parts you mention on this thread.
I think my car may have this issue right now. No CEL but I've noticed the whining noise for the past 6 months or so.
The whining sound goes away after a few seconds from shutting off the engine.
During a typical engine start, I also notice that the whining noise is more prominent when the transmission is in P versus D or R. Could this be due to a different engine idle RPM? Also, the noise dissipates when the RPM's increase.
Based on the images and experience from this thread, I'd rather just pay a reputable service center to fix it.
Any thoughts (e.g.Ignore and wait to CEL turns on to fix it)?
What's the worst that can happen if this part fails?
After studying this thread even more, why not just cut/saw off the valve from the hose then attach the new valve? Obviously, the valve would need to be cleanly cut off from the new part that was ordered.
The new valve could be re-attached to the existing hose on the car by some coupling method (appropriately sized ID rubber hose with clamps and maybe silicone adhesive). I would think that this could save a whole lot of time, money and effort?
Update: I bought a new one and its two way. It seems that its function is as a buffer or for pulse restriction. On research in most other models this is a one way valve.
***HELP***
Hello Gentlemen,
I've just finished replacing my PCV Valve on my 09 C63. I was just about to start reassembling when i noticed a disconnected rubber hose. For the life of me i can't seem to figure out where the heck it came from! Here are a few pictures of the hose. One side comes out of a T connector and the other side.... well i'm hoping one of you can help with that! the rubber hose has a white AMG sticker on it with the following ( A 156 070 09 38)
That is one of your vacuum lines that go around the intake manifold. I think this one connects to the top of your plastic Y pipe that links your aiboxes. Yours might have that little striped box in between. Some cars have it others don't. I never really knew its purpose.
I hope that helps.
First things first. If you don�t like pain, just pay your dealer 500 bucks (quoted) in labor to do it for you.
A few weeks ago, my engine started making a whistling noise that was difficult to locate while running, and increased in pitch after the engine shut down, until it went away a few seconds later. After a bit of research I found the DTB below which seemed relevant, stating the cause to be a bad PCV Valve. Took it in for service and they agreed it was bad, but not covered by NAC Aftermarket warranty, so I took the opportunity to document the process.
DTB S-B-01.20/24 FEB09 ML63, C63, CLK63, E63, CL63, CLS63, S63, SL63, and R63 up to engine # 156698x 60 022000 - whistling sound from the engine compartment (in the area of the firewall) the cause may be a malfunctioning diaphragm in the pressure-regulating valve. The sound can also be heard for up to several seconds after the engine is switched off. The sound goes away when the engine dipstick is removed. To resolve, the valve is replaced.
I have access to WIS but never could find a documented procedure for replacing this, probably because MB refers to this part in many different ways. We know it as PCV (Positive Crankcase Ventilation), but Mercedes refers to it as the Breather Pipe in some cases, Crankcase Ventilation in others, and I also saw Breather Hose, and Pressure-Regulating Valve in the DTB above.
Had I found the correct instructions in WIS, I believe they would have said to remove the engine for this procedure, as the PCV Valve is attached to the pipe which runs from just below the left rubber air intake hose down to below the metal neck where the intakes converge, which is at the bottom rear of the engine. Bottom line is, you can't see down there and it's impossible to remove the pipe the way it was intended.
That being said, I wouldn't recommend doing this as a DIY simply because you can't get your fingers in there to squeeze the clamps to release the pipe. In my case, I used a razor blade and actually cut the clamp off by feel. Took a lot of patience to weld a razor blade without being able to see it, and you have to be careful of the rubber hose that sits right next to where you'd be cutting. That being said, once it's cut, the pipe does come off with some man-handling, and the new one just pops on with little fuss. Including all my failed attempts, this took about 6 hours, but I would estimate about an hour or less doing it this way. Don�t even think about trying it until your car has cooled off overnight.
So here goes with my photos and descriptions. Weistec also has some great pics of the back of the engine on their site showing the tube in place:
I�ll say it up front, you hand will hurt and your chest will hurt. You�re basically having to lay on the driver�s side engine bay to have enough reach to get back there, and it�s no pillow. The main pain though comes from this little plastic nut. Not so much the nut but the screw which comes from the other side of the firewall and is not removable. You can unscrew the plastic nut, but the bolt itself remains, so it�s less painful to just leave it blunt instead of pointy.
Tools you will need: I tried a lot of things but these are the ones that got the job done. You need a T30 Torx socket (which you can also use if you ever change the spark plugs), and a razor blade like in the pic. It�s easy to lose grip because you can only fit your hand back there flat, so I tied a string around it and around my wrist to keep from losing it down-hole. Part numbers shown are: Breather Pipe � A 156 010 03 70 and a Hexal Bolt A 000 990 70 11. MSRP is 122.70, my MB club discount saved me a few bucks.
Pic of the new PCV Valve and hose (all one piece). The big part is what goes up top on the rear of the engine (passenger side):
This shows roughly where the top of the valve is located, but this is with the valve removed. You can see the metal intake at the top of the photo:
This is the top hole where the valve inserts. Obviously very dirty!! Not sure why they have just the one bolt to hold it in, it�s easy to see that it leaks. The hole for the bolt is the small one top left.
Also, when you�re stuffing the intake with cloth or however you plan on protecting it, watch out for the IAT sensor inside the intake. I laid a towel over the top. The raised part at the bottom of the intake is where the hose connects.
First step is to remove the air boxes. This can be done all at once, and is really simple. Unhook the two MAF sensors first. The rubber Y intake connects to the metal intake via two clamps (one on each side of the metal intake). The driver side clamp is easy to see and reach, not so much on the passenger side. I found it easiest to feel for the passenger side and unhook it first, then the drivers side. This way you can remove both filter housings and the rubber Y all at once. The first pic shows the underside of the filter boxes and the two clamps at the base of the Y. Next pic is top view:
Pretty much nothing else is removed to get the job done, just one small tube that locks into the top of the PCV valve which you can pop out. I didn�t get a pic of it, but it runs right along the top of the valve and easy to see.
Perform from the Passenger Side of the Engine Bay:
The actual valve is only held in by one bolt and pops out easily. Pop that out first and clean out the dirty hole shown above. This gives you some play in the hose for popping off the bottom part. There is a metal tube that runs alongside the breather pipe which I think may be a water line, but it doesn�t move and has a double metal clasp which also attaches to the breather pipe to keep it in place. It doesn�t actually clasp, it�s just two half circles the clamp around both breather pipe and water line. Unclasp it from the breather pipe which is on the bottom, and rotate it up and out of the way. It�ll spin around the metal pipe. Sorry no pic, but you�ll feel it. All the work from this point is most easily performed from the Drivers side of the engine.
Perform form the Driver Side of the Engine Bay:
Spend a good minute or two feeling around down there so you are good and comfortable with how the hose connects, where it connects, where you�ll be cutting, etc. The hose is held onto the bottom port by way of a double plastic clamp. It�s meant to be squeezed at the grip points, but only one is accessible depending on which side of the engine you�re on, and good luck exerting enough pressure to make any difference (we�re talking you can�t even make a fist down there!!) I tried using a screwdriver to reach one side or the other, but you can�t get a big enough one down there, so then I tried shims from home depot, but those didn�t do any good and just made it impossible to remove. After studying the new tube and how it clamped on, I decided the easiest way was to use a razor blade and cut the plastic ring that held pressure on the clips. I sliced each side of the bottom clip since that�s the only one I could reach, and then used a really small short screwdriver to pry the clip up until it popped off.
Here are some pics after I removed it, you can see the clip is gone:
Here�s the underside (the clip I couldn�t reach that�s still intact)
Be careful not to slice the wrong thing. This tube is right next to where the breather pipe connects:
After you get it sliced and popped off, it pretty much releases, you just have to get creative and pain tolerant with jambing your fingers behind the neck of the pipe to pry it off the metal tube. Be patient, it does take a while and the back of your hand will look like a war zone because of the plastic nut mentioned earlier. Here�s the metal tube it actually connects to:
Once you get it popped off, just jimmy it a little until you get it all pulled out of the back of the engine. Once you get the new one in there and in place, just a little pushing and you�ll hear the plastic clamps click onto the metal tube. Here�s the best photo I could get of the new tube hooked back up:
Next, pop the actual valve back into the engine and use the bolt to keep it secure. Don�t forget to reconnect the little hose that runs across the top of the valve which you probably unhooked at the start of the project. You won�t miss it.
Finally, just pop the entire air box/rubber Y intake back into place, making sure the MAF sensor wires are positioned correctly for reattachment:
Hopefully this helps someone some day. If I had it to do over again, I would still do it, but you gotta have a good sense of feel. Tying the blade to my wrist helped a lot, as I could always just drop it and start over if I got confused as to which way it was facing. The good news is, it�s all metal back there except for the one other tube, so there�s not much chance of cutting anything by accident or messing anything else up.
Good luck.
I know this is old but you have the best post on pcv. I have 2008 cls63. On my car it seems that there is a metal coolant pipe running right across the top of the pcv inlet from crankcase. I have everything apart, I don't want to cut the tabs yet unti I am sure the pcv will fit out from under that pipe. Did you have the same pipe basically touching the pcv nipple? Doesn't seem like the nipple will pull up and out with that pipe in the way. Any info would be great. Since I'm in the garage as I type this. Thanks. Ron, Long Island.
Mercedes SLR McLaren 722 S Is Extremely Rare Example Modified by McLaren
Slideshow: A one-of-one U.S.-spec Mercedes-Benz SLR McLaren Roadster became even rarer after a factory-backed transformation at McLaren's headquarters.


 Jun 10, 2015, 01:35 PM