


Super Member
Crissus
Super Member
close
Mar 2, 2022
- Join DateNov 2012
- LocationGermany
- Posts:698
-
iTrader Positive Feedback0
-
iTrader Feedback Score(0)
- Vehicle(s) I driveC215 CL55 AMG, W124 500E, W210 E430, W124 300E
-
Likes:102
-
Liked:16 Times in 13 Posts
Quote:
x2Originally Posted by PS94
What did you ever do about the oil pump chain playing chainsaw with the timing cover?
It was the "chaintensioner" of the pumps chain right? The metal "spring" kind of thing?

I replaced the tensioner and the chain with new parts from MB.
Quote:
Originally Posted by PS94
What did you ever do about the oil pump chain playing chainsaw with the timing cover?
These three parts will cure your clackity-clack. A least for a few years lol
Thank you! I'm trying to match all the chrome trim on the car to the satin Ti finish on the wheels now.
Thank you! Form=Function
Only one way to tell for sure, but my Kreskin's Krystal says "Yes"
Quote:
Originally Posted by novae500
Nice hre rims!!!!
Thank you! Form=Function
Quote:
 ...your taste in looks matches your ability to build engines.
It's a single 625 in the intake elbowOriginally Posted by Pjnash
those wheels ...your taste in looks matches your ability to build engines.
Quote:
Originally Posted by Denroll
What is the flow rate and location of your nozzle?
Only one way to tell for sure, but my Kreskin's Krystal says "Yes"
Quote:
Originally Posted by urbamworm
You mean it will break 120 in the 1/4 now?

Member
Quote:
Originally Posted by Sir-Boost-a-Lot
These three parts will cure your clackity-clack. A least for a few years lol
So, guide, spring, and chain? is the spring upgraded?
Since you've done this, do you feel it's possible with the engine still in the car?
You could probably do it without completely removing the engine from the car but it'd probably have to be hoisted up off it's mounts to access some of the bolts for the front cover and oil pans. If anyone else has more specific info please chime in.

Senior Member
It is Totally do-able in car. The front subframe will need to be lowered or removed so proper engine supports are crucial. I wish I thought of replacing at the very least the spring when I had my pans down to replace my oil pump. The sight of the chain chewing up my timing cover irks me. Also, that sound.
MB World Stories
The Best of Mercedes & AMG
Explore

Manual Mercedes? 6 Times Sindelfingen Let Drivers Have All The Fun
Verdad Gallardo
Mercedes SLR McLaren 722 S Is Extremely Rare Example Modified by McLaren
Verdad Gallardo
8 Classic Boxy Mercedes Designs That Have Aged Like Fine Wine
Verdad Gallardo
Flawlessly Restored Mercedes 190E Evo II Heads to Auction
Verdad Gallardo
Electric Mercedes C-Class Unveiled: 11 Things You Need to Know
Verdad Gallardo
Mercedes EQS Gets A Major Update: Everything You Need to Know
Verdad Gallardo
5 Underrated Mercedes-Benz Models That Don't Get the Love They Deserve
Verdad Gallardo
Mercedes 300D Has Pushed Well Past 1 Million Miles and It Ain't Stopping
Verdad Gallardo
10 Most Reliable Mercedes-Benz Models You Can Buy Used
Verdad Gallardo


Quote:
Like here?Originally Posted by Sir-Boost-a-Lot
It's a single 625 in the intake elbow

Quote:

Originally Posted by MindBend
Kelvin, for cooling mods has all it will ever need: a BIG meth nozzle!

Member
Everything about this is a win. Man, we have to get together soon!
Your best bet to fix the noise is to swap the tensioner spring and the guide and leave the chain, if you're going to try and do it in the car. Chances are the chain hasn't stretched much since its so small and has comparatively little tension on it. Take note the new chains come in a length, not a loop and you need the specific tool to crimp the copper link on in order to make it a loop.
Quote:
Originally Posted by 3BNick
It is Totally do-able in car. The front subframe will need to be lowered or removed so proper engine supports are crucial. I wish I thought of replacing at the very least the spring when I had my pans down to replace my oil pump. The sight of the chain chewing up my timing cover irks me. Also, that sound.
So back on track, I finally found time to attack this project for a solid week and had great results. Here's some of the pics I took and have a few "watch outs " in there for future hot rodders.
Starting with the block masterfully crafted by Steve @ RED in SoCal ,eliminating the factory alusil bores and installing Darton's MID wet ductile iron sleeves.
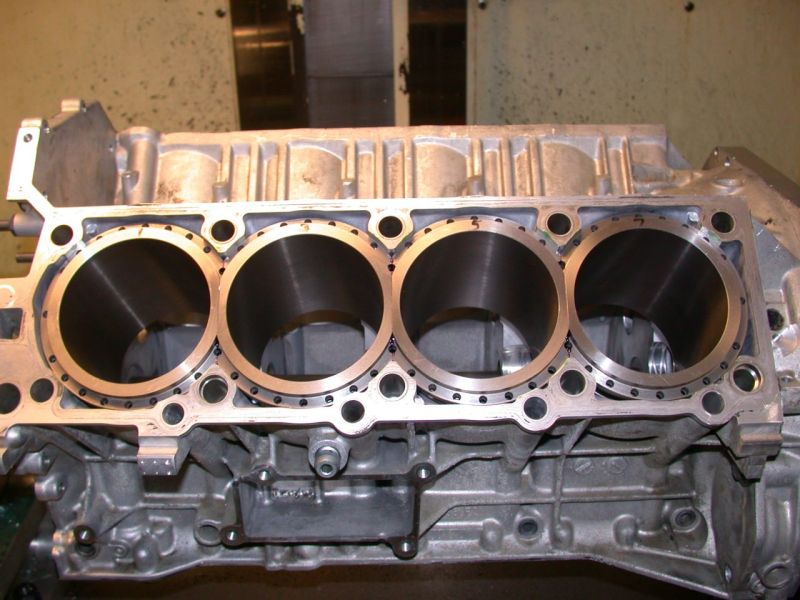
Here's sighting down the barrel of a bare sleeve before being loaded with its 98mm artillery.

And here's a few I took I thought would look cool framed on the wall. Most would have no idea what it is , and I've seen dumber s**t than this called art. Anybody who likes it you have my permission to do what you want with it


Starting with the block masterfully crafted by Steve @ RED in SoCal ,eliminating the factory alusil bores and installing Darton's MID wet ductile iron sleeves.
Here's sighting down the barrel of a bare sleeve before being loaded with its 98mm artillery.
And here's a few I took I thought would look cool framed on the wall. Most would have no idea what it is , and I've seen dumber s**t than this called art
. Anybody who likes it you have my permission to do what you want with it
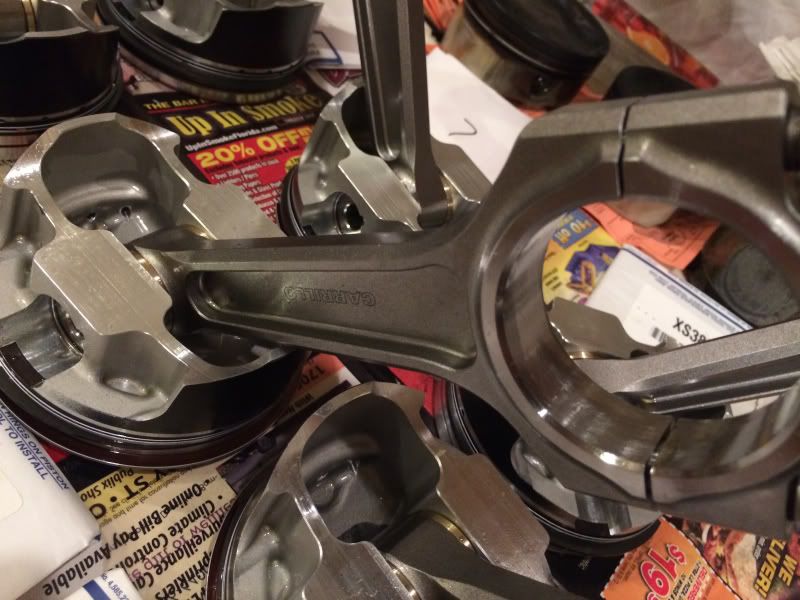
I designed the entire rotating assembly with the exception of the crankshaft which is already a really nice forged piece from Mercedes which was rebalanced to match the new components. The custom made rods use bearings made for ultra high output racing Hondas and allow for an infinite adjustability of bearing tolerances and materials while having the collateral benefit of being very affordable 
I also made specific changes to improve rod angle and side loading of the pistons under extreme load, ringland depth, ring material and size, and piston forging material.
I also made specific changes to improve rod angle and side loading of the pistons under extreme load, ringland depth, ring material and size, and piston forging material.
Here's the lower components going together again after being preassembled to ensure everybody was comfortable together.


And the top side of the new hardware.

And the top side of the new hardware.
ARP studs for the heads, here's the part numbers for those who want some.
You'll need 20 of each of these parts, one is the stud, one is the washer and one is the nut.
ATP6.600-2LUB * *
APN12-1 * * *
APW1316N *

The old chain guides didn't look bad, but they're not expensive to replace...

Don't forget to make sure you've got all the dowels in place! There's two on the front, two on each deck, and two on the rear for the cover, and two for the bellhousing.

You'll need 20 of each of these parts, one is the stud, one is the washer and one is the nut.
ATP6.600-2LUB * *
APN12-1 * * *
APW1316N *
The old chain guides didn't look bad, but they're not expensive to replace...
Don't forget to make sure you've got all the dowels in place! There's two on the front, two on each deck, and two on the rear for the cover, and two for the bellhousing.
My homegirl says it looks like a transformer now. I agree, it transforms capital into metal 

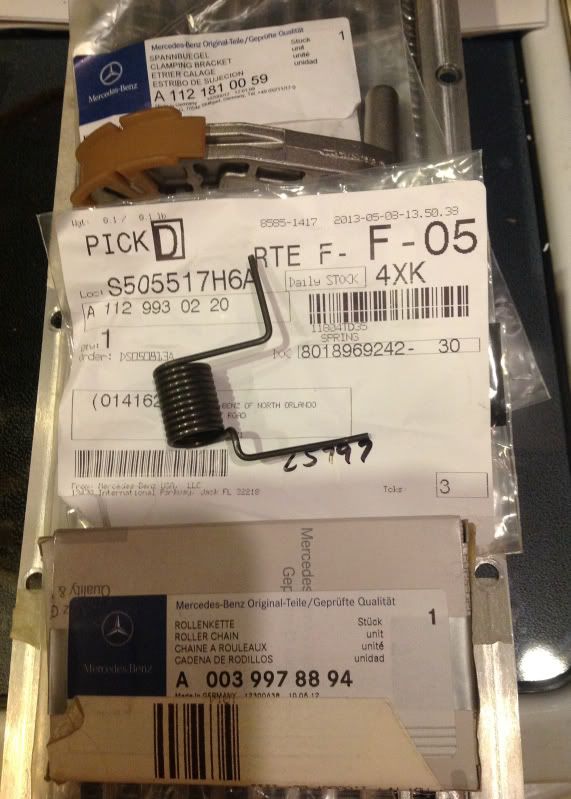
Here's the infamous Duramax spring, giving your 55k that coveted diesel clackity-clack. Replace these parts if you prefer smooth motor music.
I found the chains to be identical in length from 26k, 59k, and 80k mile engines, but the tensioner springs were signifigantly weakened with time regardless of the mileage.

I give the head gaskets a shot of copper spray. This is more important on parts that weren't freshly machined such as these but it's rarely a bad idea to use IMO


I found the chains to be identical in length from 26k, 59k, and 80k mile engines, but the tensioner springs were signifigantly weakened with time regardless of the mileage.
I give the head gaskets a shot of copper spray. This is more important on parts that weren't freshly machined such as these but it's rarely a bad idea to use IMO
ARP torque values are figured using their proprietary lube, so an ample slobbering on the threads of engagement is needed. The lower threads don't need the lube as they are stationary. Also remember not to use any force to install the bare studs into the threads,only finger tight.


And now it's got heads

And now it's got heads
The remainder of the cover and the associated components and hardware...


... And the rockers
Remember the cam bridge bolts and the cam gear bolts are a "one time use" TTY fastener


... And the rockers
Remember the cam bridge bolts and the cam gear bolts are a "one time use" TTY fastener
For the lower pans , just torque everything to spec and use red loctite on anything internal (optional)

It's a bit mundane aesthetically (for now) in comparison to the beautiful components inside!

It's a bit mundane aesthetically (for now) in comparison to the beautiful components inside!


Quote:
Is this the tool you're referring to?Originally Posted by Sir-Boost-a-Lot
Take note the new chains come in a length, not a loop and you need the specific tool to crimp the copper link on in order to make it a loop.

Ive never seen the tool so You tell me. I was on a roll and wanted to get it done, so I popped in a low mileage set that I had here which showed to be the same length as both the new chains and the 80k mile set I have also.
Quote:
Originally Posted by WANTED!!
Is this the tool you're referring to?
Good idea to check your plug gaps and also put a little anti-seize on the threads to make sure they don't gall the threads on your heads.


Here I guide the old engine out while Mikey Joe and Rick form the hoist and heckle crew


I did some cleaning so everything sparkles now under the lid


And Mike on the guiding end this time at 3am last Thursday morning and we're thinking...
" Hey, let's drive this to Baltimore in 36 hours and beat the s**tout of it"

I did some cleaning so everything sparkles now under the lid
And Mike on the guiding end this time at 3am last Thursday morning and we're thinking...
" Hey, let's drive this to Baltimore in 36 hours and beat the s**tout of it"


