

 06-10-2015, 12:03 PM
Last edit by: IB Advertising
See related guides and technical advice from our community experts:
- Mercedes-Benz E-Class: How to Replace Brake Line
Step by step instructions for do-it-yourself repairs

DIY Caliper Painting / Brake Fluid Change / SS Brake Lines
01-14-2015, 09:57 PM
#1
Senior Member
Thread Starter

Join Date: Feb 2014
Location: SC/NoVa
Posts: 420
Likes: 0
Received 3 Likes
on
3 Posts
13' E350 4matic, 08' E63
DIY Caliper Painting / Brake Fluid Change / SS Brake Lines
Thought I would put all this into one thread. This is for the E63 series WITHOUT SBC. I will list the caliper painting first, then go over the SS Brake Lines and then the Brake Fluid flush.
Caliper Painting - I wanted to match the SLS CC caliper color as close as possible. One of the forum sponsors does provide a great service by providing a set of calipers already painted whatever you want, and then you send them a your set when finished. The widely advertised paint code for as close as can be gotten to the CC color is Fresh Copper by Honda. I saw these in person in San Diego at this sponsor. I decided since I wanted to flush my system, fit the SS brake lines I would just do my own. This is my adventure. I decided to tweak the color to match the oem color better and am happy with the result. I took out a smidgen of some of the various metallics and added a smidgen of black to darken it up. This color difference in this picture is the difference of what I came up with and the VHT Burnt Copper which is also popular.

I first removed all 4 calipers and plugged the holes where the brake lines go. Second go around I would remove the brake lines where the lines fit into the steel lines so they stay on the calipers for painting. (your gonna throw those away anyway) The rear caliper bolts were a female T30 I think and wow they were tough. I then cleaned each caliper as best as possible and sanded them down with 300 grit sanding pad so the paint would adhere to them well. Here are some pictures of that process and then taped up each piston area.


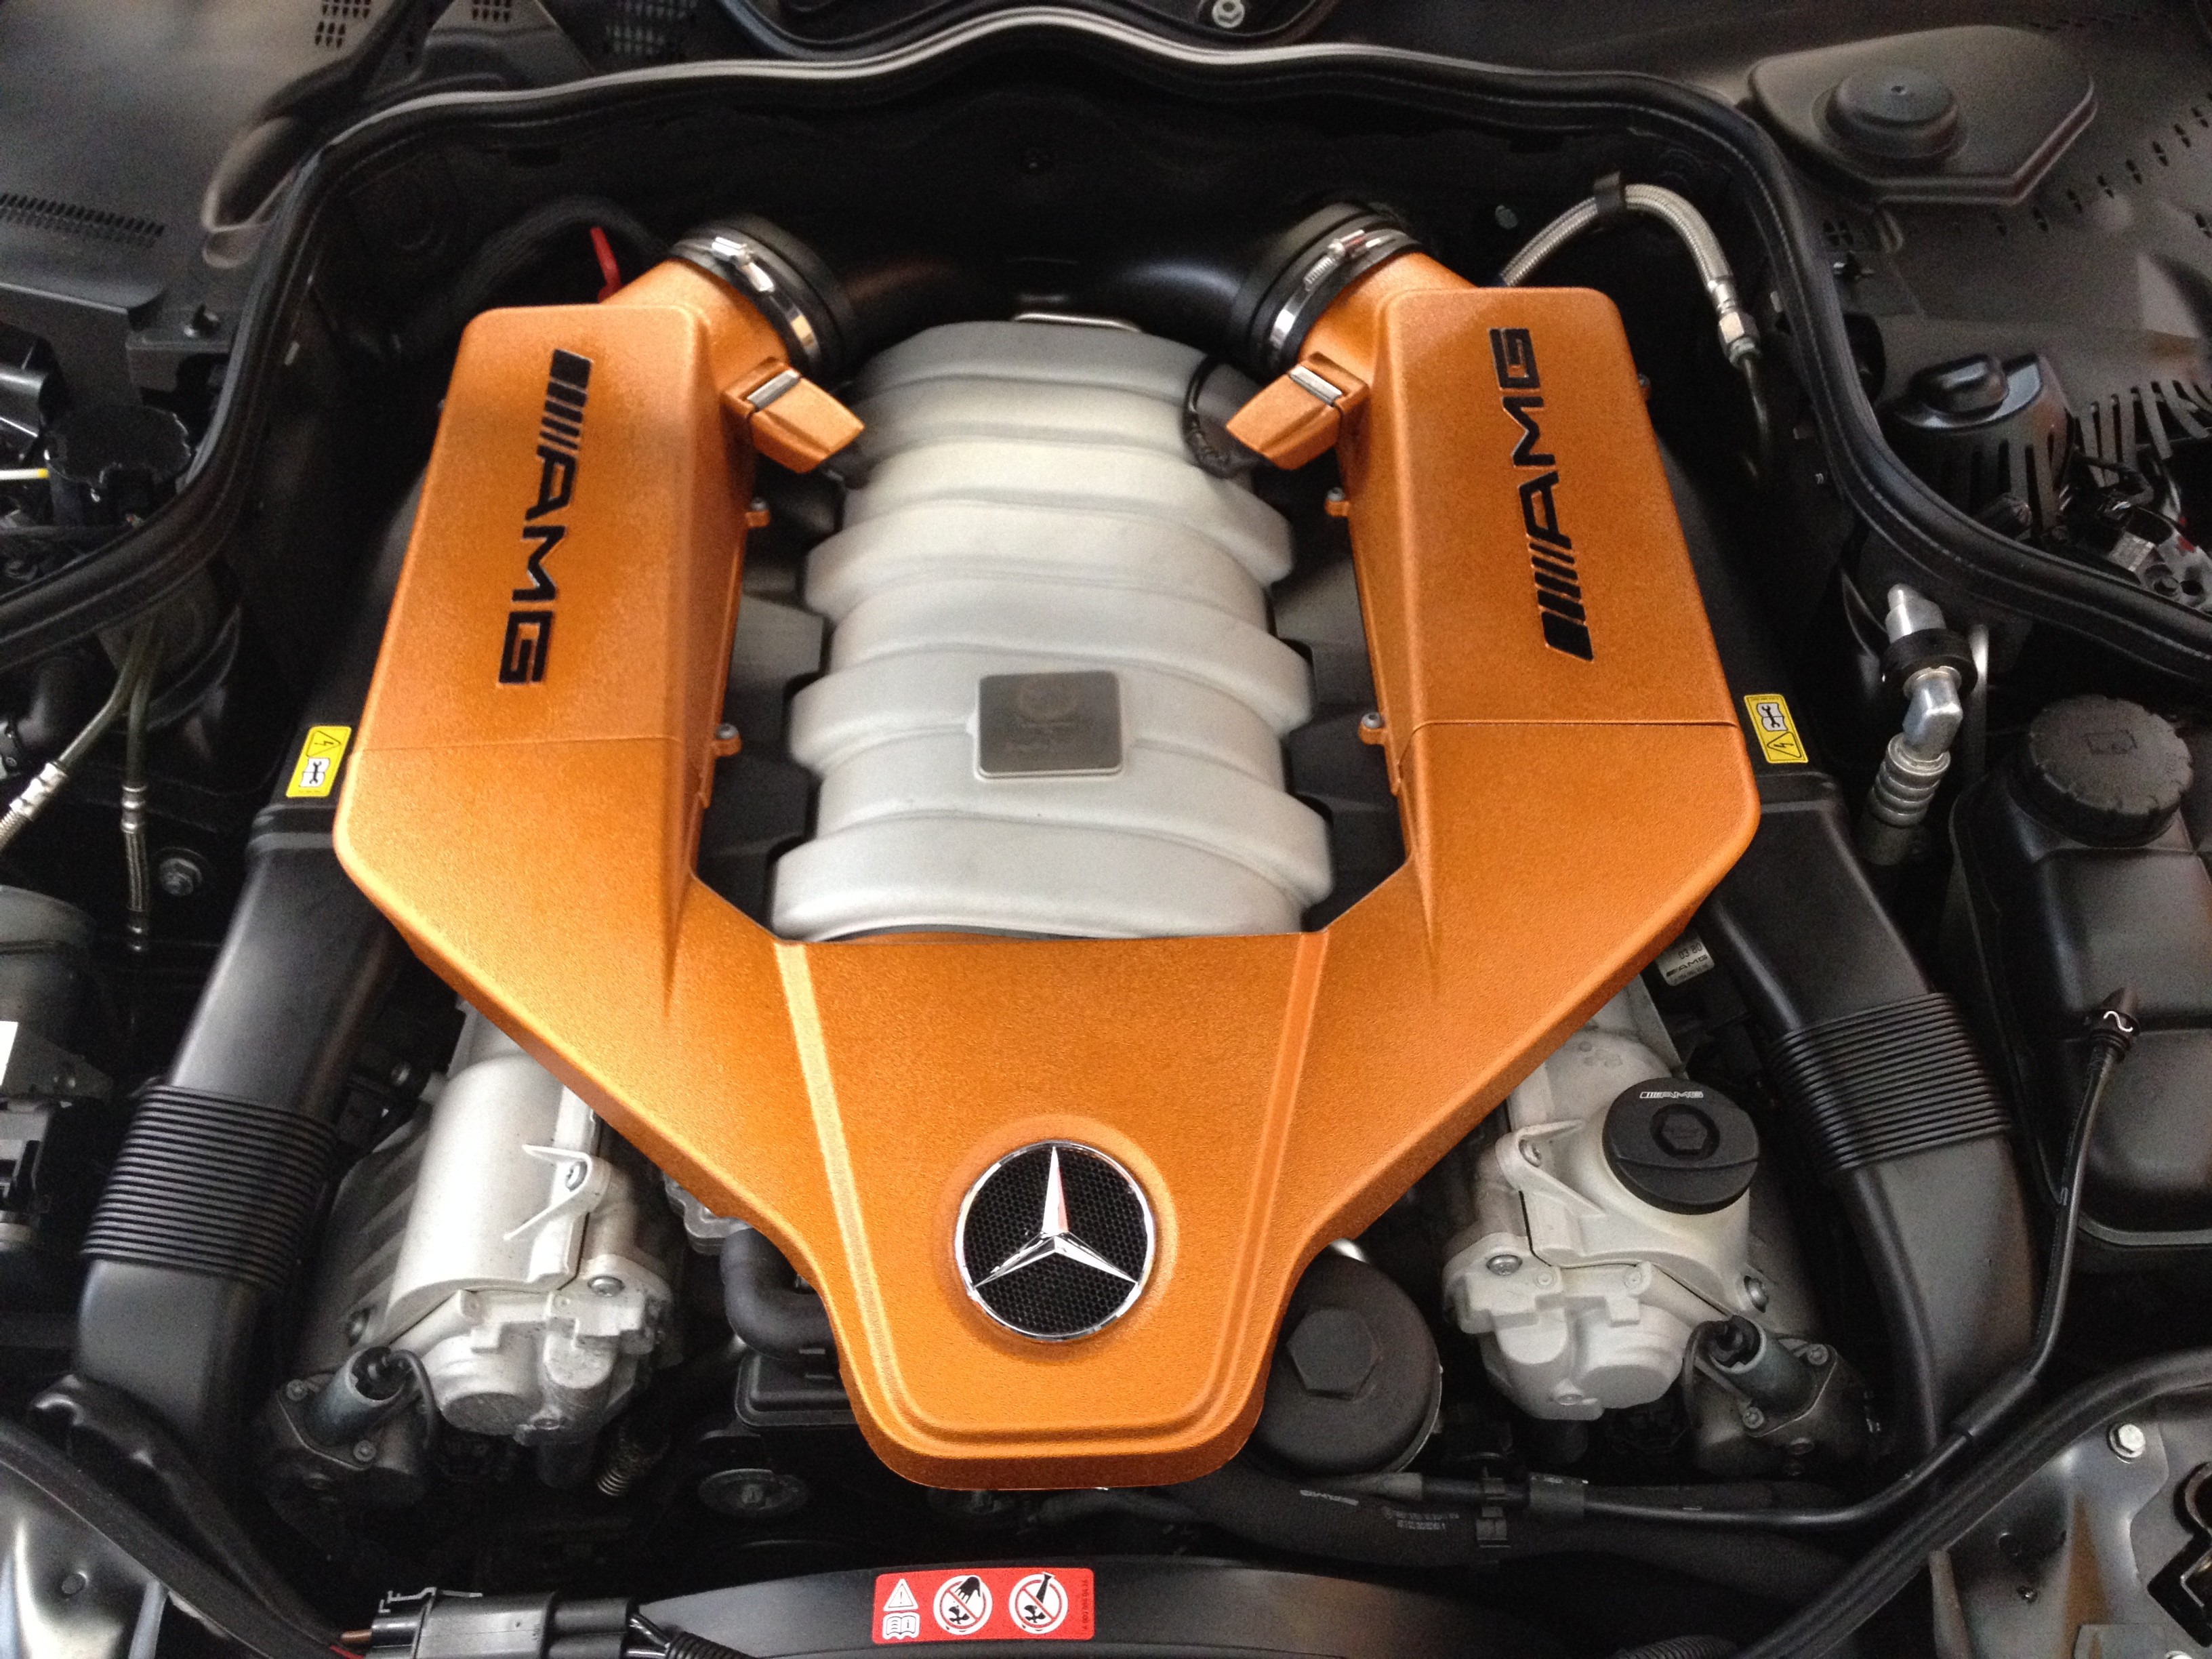
I also wanted to again paint my airboxes the exact same color as the calipers so prepped them the same way. Here are all the pieces during the process of being painted. Once the calipers were dry, I applied custom AMG curved logos that were slightly enlarged then Clear coated the calipers. These are the finished results.


PLEASE do not make this mistake when re-installing your calipers. I was in a hurry and ended up installing ALL calipers on the wrong side of the vehicle. The Brake bleeding nipples are supposed to be facing up, well as you can see in this picture it is upside down. This cost me about 1.5 hours in time to correct.

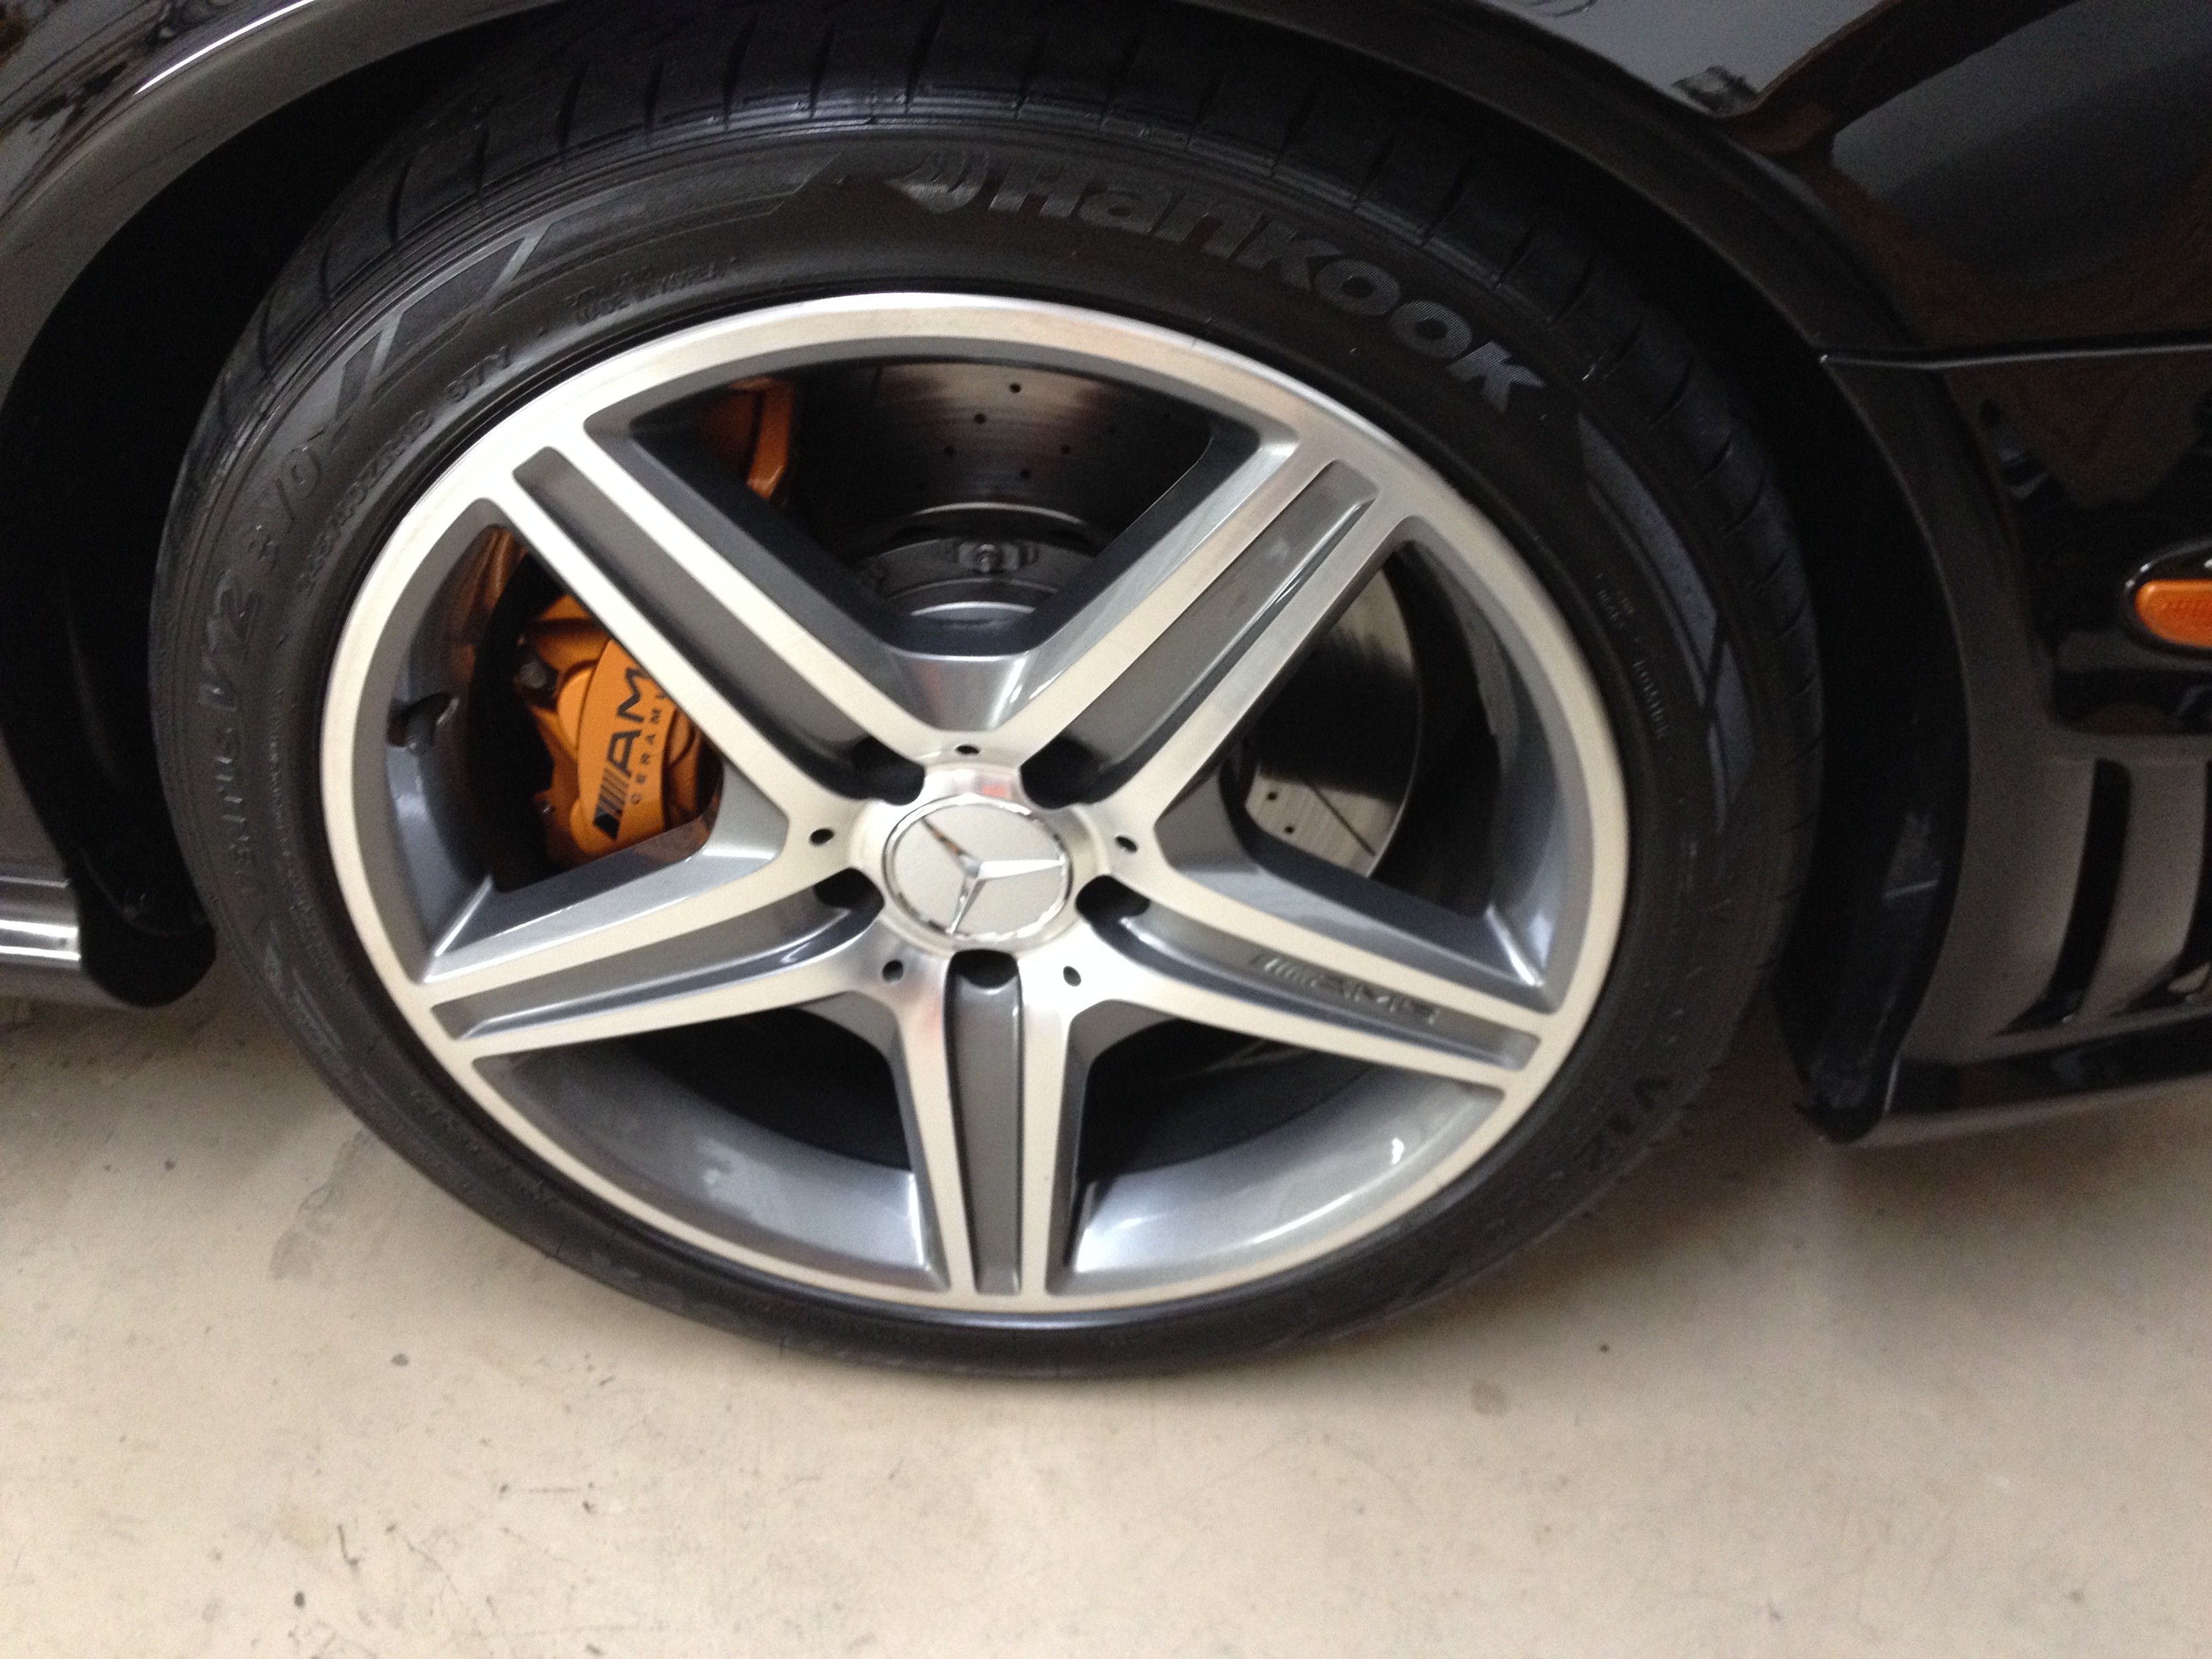
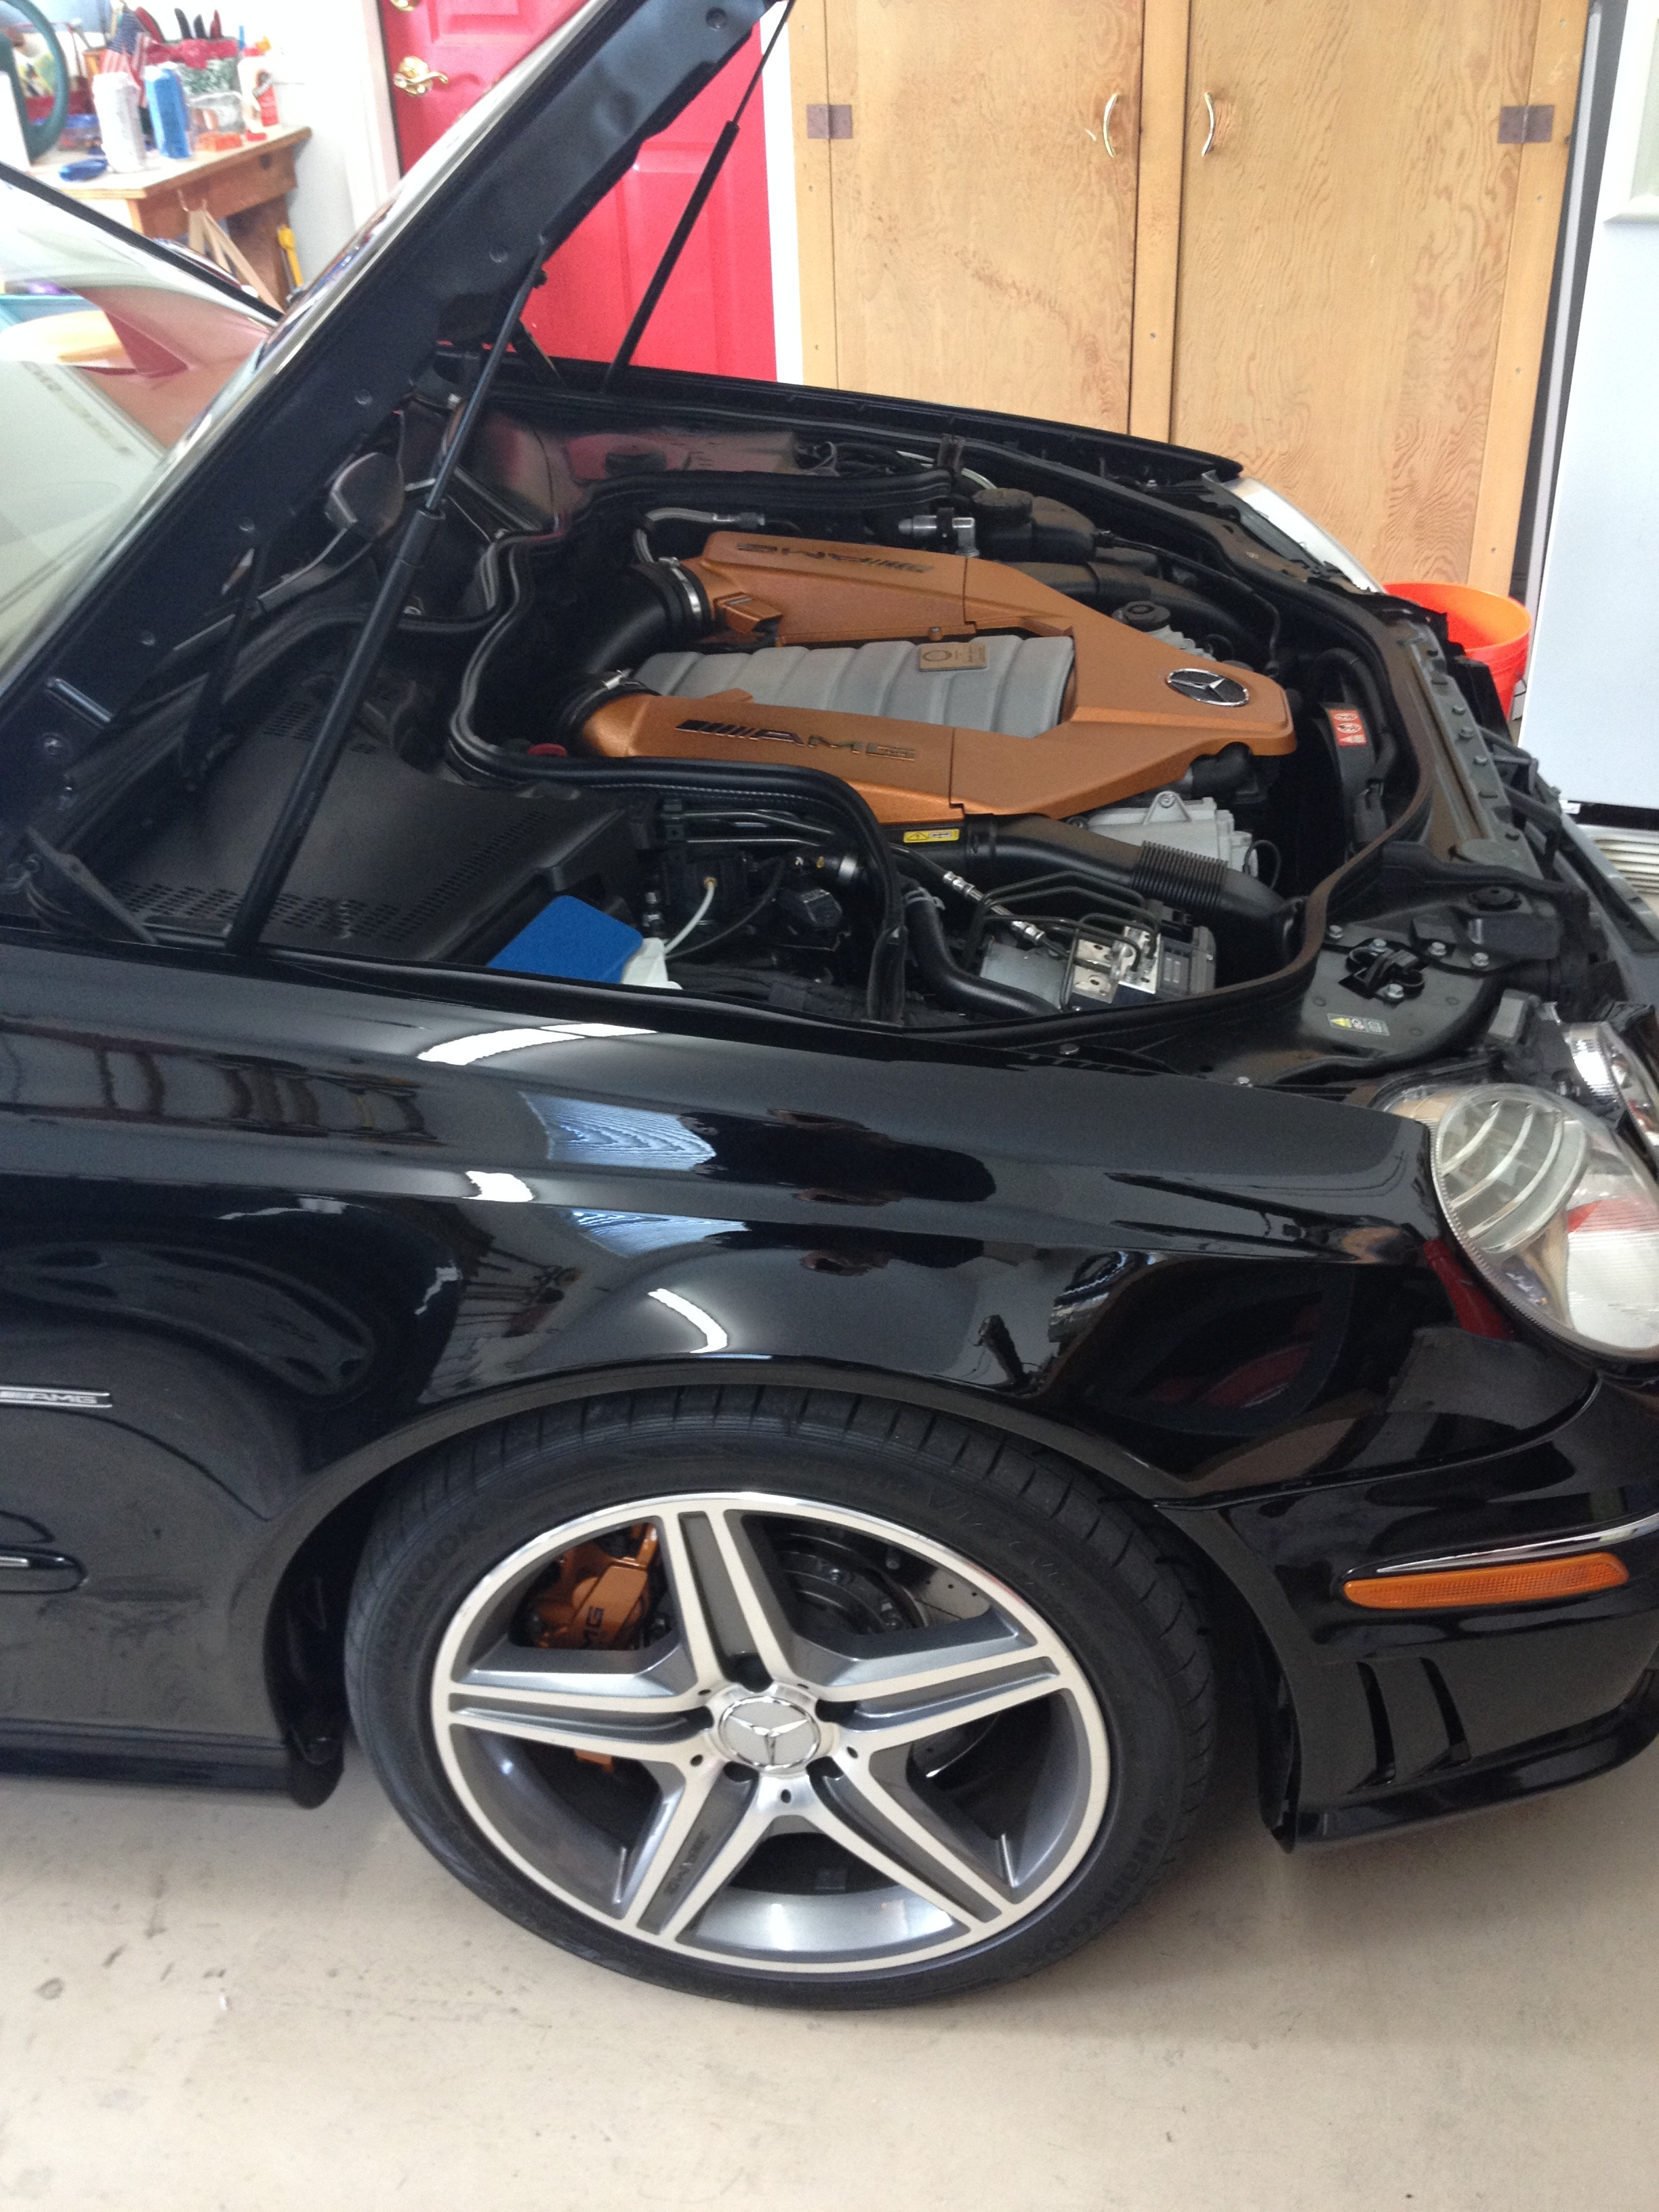
This is what the calipers looked like finished and installed, you can view them in daylight on the car in the DIY Wheel Well thread also.


The SS Brake line kit was about $135 shipped from Stoptech. The Lines fit perfectly and installed nice and easy. I basically screwed the one end into the caliper and then slid the other into the steel line on the vehicle and tightened the tie down nut. That was it. Here is a pic showing a front one, but that is all I have.

Next up was the Brake fluid flush. I decided to change everything over to the Castrol SRF racing fluid. Might be overkill but figured by me doing the work I saved enough to pay for it. I used the Motive Euro power bleeder suggested by other members here. I bought 2 Liters of fluid knowing it would take about 1.5 total. At $70 per bottle I only got 2. If doing Motul or another brand thats less than $20 per bottle I would get 2-3 just in case you need more for bleeding them down. The 63's don't have SBC so didn't need the Star comp, and pumped up the Motive after filling it with fluid and attaching it to 20psi. Started at Right Passenger Rear first and opened the nipple and started bleeding. You really need two people IMO and I had to pump the brake along with the Motive to get the fluid moving fairly well. A ton of bubbles came out. I filled about 1/2 liter before they slowed down. Now due to old fluid coming out this was put into a bottle to dispose of. I then went to the drivers rear and started there. Quite a lot came out of that one also. I then checked the Motive and had to add more fluid to it and re-pumped to 20psi. Drivers front was next and started on the outside nipple. Drained till clear fluid and no bubbles then moved to the inside one. Then moved to passenger front and did the same. Since the rear had so much air, I started the process over there and wow, a steady stream of small bubbles just wouldn't stop coming out. After using all 2l of fluid I obviously had to stop. There was decent pressure on the brake pedal so the car was drivable. I ordered 2 more bottles figuring whatever came out this time was fresh fluid and I could keep that for next time. I started right rear and bubble came out fast and furious. Stopped after about 3 ounces of fluid. Left rear had very little and the fronts had none. I wasn't thrilled but was happy it was done and taken care of. All in all the process was fun, I learned some things and fairly easy. Provided the rear caliper bolts come off. Suggestion------- take your car to any mechanic, pay him cash and have him break loose the caliper bolts before you work on it. It will save you time and hassle. You really need a 4-5ft breaker bar to break them loose. Another member also had stress fractures in his bolts and one broke while doing this. Might not be too expensive to get some new bolts before hand for this job. I didn't and all was fine on 2 E63's but I have a spare car and didn't need this one immediately if something happened. I hope this helps someone out with all aspects covered. If someone has something to add that I forgot please add it in additional posts. Thanks


Caliper Painting - I wanted to match the SLS CC caliper color as close as possible. One of the forum sponsors does provide a great service by providing a set of calipers already painted whatever you want, and then you send them a your set when finished. The widely advertised paint code for as close as can be gotten to the CC color is Fresh Copper by Honda. I saw these in person in San Diego at this sponsor. I decided since I wanted to flush my system, fit the SS brake lines I would just do my own. This is my adventure. I decided to tweak the color to match the oem color better and am happy with the result. I took out a smidgen of some of the various metallics and added a smidgen of black to darken it up. This color difference in this picture is the difference of what I came up with and the VHT Burnt Copper which is also popular.
I first removed all 4 calipers and plugged the holes where the brake lines go. Second go around I would remove the brake lines where the lines fit into the steel lines so they stay on the calipers for painting. (your gonna throw those away anyway) The rear caliper bolts were a female T30 I think and wow they were tough. I then cleaned each caliper as best as possible and sanded them down with 300 grit sanding pad so the paint would adhere to them well. Here are some pictures of that process and then taped up each piston area.
I also wanted to again paint my airboxes the exact same color as the calipers so prepped them the same way. Here are all the pieces during the process of being painted. Once the calipers were dry, I applied custom AMG curved logos that were slightly enlarged then Clear coated the calipers. These are the finished results.
PLEASE do not make this mistake when re-installing your calipers. I was in a hurry and ended up installing ALL calipers on the wrong side of the vehicle. The Brake bleeding nipples are supposed to be facing up, well as you can see in this picture it is upside down. This cost me about 1.5 hours in time to correct.
This is what the calipers looked like finished and installed, you can view them in daylight on the car in the DIY Wheel Well thread also.
The SS Brake line kit was about $135 shipped from Stoptech. The Lines fit perfectly and installed nice and easy. I basically screwed the one end into the caliper and then slid the other into the steel line on the vehicle and tightened the tie down nut. That was it. Here is a pic showing a front one, but that is all I have.
Next up was the Brake fluid flush. I decided to change everything over to the Castrol SRF racing fluid. Might be overkill but figured by me doing the work I saved enough to pay for it. I used the Motive Euro power bleeder suggested by other members here. I bought 2 Liters of fluid knowing it would take about 1.5 total. At $70 per bottle I only got 2. If doing Motul or another brand thats less than $20 per bottle I would get 2-3 just in case you need more for bleeding them down. The 63's don't have SBC so didn't need the Star comp, and pumped up the Motive after filling it with fluid and attaching it to 20psi. Started at Right Passenger Rear first and opened the nipple and started bleeding. You really need two people IMO and I had to pump the brake along with the Motive to get the fluid moving fairly well. A ton of bubbles came out. I filled about 1/2 liter before they slowed down. Now due to old fluid coming out this was put into a bottle to dispose of. I then went to the drivers rear and started there. Quite a lot came out of that one also. I then checked the Motive and had to add more fluid to it and re-pumped to 20psi. Drivers front was next and started on the outside nipple. Drained till clear fluid and no bubbles then moved to the inside one. Then moved to passenger front and did the same. Since the rear had so much air, I started the process over there and wow, a steady stream of small bubbles just wouldn't stop coming out. After using all 2l of fluid I obviously had to stop. There was decent pressure on the brake pedal so the car was drivable. I ordered 2 more bottles figuring whatever came out this time was fresh fluid and I could keep that for next time. I started right rear and bubble came out fast and furious. Stopped after about 3 ounces of fluid. Left rear had very little and the fronts had none. I wasn't thrilled but was happy it was done and taken care of. All in all the process was fun, I learned some things and fairly easy. Provided the rear caliper bolts come off. Suggestion------- take your car to any mechanic, pay him cash and have him break loose the caliper bolts before you work on it. It will save you time and hassle. You really need a 4-5ft breaker bar to break them loose. Another member also had stress fractures in his bolts and one broke while doing this. Might not be too expensive to get some new bolts before hand for this job. I didn't and all was fine on 2 E63's but I have a spare car and didn't need this one immediately if something happened. I hope this helps someone out with all aspects covered. If someone has something to add that I forgot please add it in additional posts. Thanks
Last edited by SheriffDep; 01-14-2015 at 10:00 PM.

The following users liked this post:
a100steaksauce (01-12-2017)


 01-18-2015, 12:30 PM
#6
Senior Member
Thread Starter
Join Date: Feb 2014
Location: SC/NoVa
Posts: 420
Likes: 0
Received 3 Likes
on
3 Posts
13' E350 4matic, 08' E63
This was my first E63 and I did all the painted work with VHT high Temp Burnt Copper rattle cans and VHT Clear high temp engine enamel. SO it is done all the time, just you have to be careful and do things right. Here are pics of my first one I did with the rattle can. I decided on my second one to go with the Fresh Copper and tweak it and do it professionally.
The following users liked this post:
zenman63 (08-10-2016)
01-19-2015, 02:50 AM
#7
You can, if you do it right. Mask off everything and cover everything else so you don't get overspray. Prep the caliper correctly, get your stickers, and paint, then apply stickers, then apply clear coat.
This was my first E63 and I did all the painted work with VHT high Temp Burnt Copper rattle cans and VHT Clear high temp engine enamel. SO it is done all the time, just you have to be careful and do things right. Here are pics of my first one I did with the rattle can. I decided on my second one to go with the Fresh Copper and tweak it and do it professionally.
This was my first E63 and I did all the painted work with VHT high Temp Burnt Copper rattle cans and VHT Clear high temp engine enamel. SO it is done all the time, just you have to be careful and do things right. Here are pics of my first one I did with the rattle can. I decided on my second one to go with the Fresh Copper and tweak it and do it professionally.
Trending Topics


 01-20-2015, 05:24 PM
#11
Senior Member
You can buy High Temp logo/stickers pre cut to your colour of choice on Ebay for a couple of dollars, I ordered some for my brakes, put them on after painting the colour coat/s and then spray some high temp gloss over the top
 01-20-2015, 10:14 PM
#13
Senior Member
Thread Starter
Join Date: Feb 2014
Location: SC/NoVa
Posts: 420
Likes: 0
Received 3 Likes
on
3 Posts
13' E350 4matic, 08' E63
 They are normal black gloss vinyl not the high temp stuff, but never had an issue with them yet. The paint I used this time, some vendors use, and others doesn't seem affected by the temps anyway. So not too worried about them. Should be just fine.
 The combination of the higher quality (you can use the MOTUL version fluid) of the SRF fluid and the SS lines is supposed to greatly improve the feel. My issue was what I posted. I went 3 weeks between the original, not correctly bled/ parked it drove a Bentley CGT for 2 weeks, then got more fluid and bled again. They may or may not be perfect now. The feel is solid, smooth, and immediate but I have some travel before they grab. When it grabs the harder I apply pressure the more they grab, which is normal but feels more solid. They are not mushy by any means, but when I get the rear Diff flushed by MB next week, I have having them bleed it again just in case. We will see how I did then. I feel for $130 MB flush for the brakes, why not buy better fluid, supply it to them and have them do it so there is not thought. If no caliper painting, then I would have maybe swapped the SS Lines, then immediately taken to MB for a flush and put the new fluid in it. Might work easier, unless they would only charge like $50 to put the new lines in. There is a price point where DIY makes not much difference. Oil is getting that way for me too, I supply the oil and filter and Jiffy Lube charges me 29.99 to change it. No mess, no cleanup, and no taking the old fluid to a store for disposal. For $30 why not. I get that done every 5k miles just for peace of mind.
01-20-2015, 10:26 PM
#14
Senior Member
Great write up, very informative! I am envious of all of the impeccable DIY work you do, SheriffDep. I am awful at DIY and the most I can do myself is an oil change and air filter change.
By the way, who is the forum sponsor who does the caliper swaps? I might be interested in that as an alternative...
By the way, who is the forum sponsor who does the caliper swaps? I might be interested in that as an alternative...
01-20-2015, 11:05 PM
#16
Junior Member
They do look good - BUT painting the pistons is a big No No... While most can't be bothered for a fully dis-assembly at least taping the pistons off is wise. Looking good is one thing, being functional is another.
01-20-2015, 11:23 PM
#17
Senior Member
Thread Starter
Join Date: Feb 2014
Location: SC/NoVa
Posts: 420
Likes: 0
Received 3 Likes
on
3 Posts
13' E350 4matic, 08' E63
Great write up, very informative! I am envious of all of the impeccable DIY work you do, SheriffDep. I am awful at DIY and the most I can do myself is an oil change and air filter change.
That is a start sir, Since I do on the side Paint Corrections and do fairly well at taking things apart and putting back together I try things. The Brake Flush I totally showed the issues that I had and what might prevent others from running into them like I did. Newbie issues maybe? I have a friend who is a body shop owner so this work was done in his shop so if I ran into trouble he could help. He helped me bleed them some. He left and I ran out of fluid so that was me. LOL If you follow the DIY threads on here, there are several for the same processes by diff members. Read them all!!!!!!!. You will figure it out, most of this stuff is not hard. Brake pad replacing is stupid simple. Brake bleeding is a pain. Rotor replacing is simple, but you can run into difficult rotors and that would make it very difficult. Plus popping off the caliper bolts can be impossible for some. (again take them to a shop and pay 40 or so to have them break them loose for you) Start small and work you way into larger DIY's. I cannot afford major break downs all the time like most members. So DIY helps me out greatly and provides a way for me to garner new items and also do maintenance upgrades like this.
By the way, who is the forum sponsor who does the caliper swaps? I might be interested in that as an alternative...
01-20-2015, 11:37 PM
#18
Junior Member
WHY oh WHY doesn't someone make just a plastic piece that pops in - you'd think it would be a simple mold - I took an old center cap and fitted it to the mesh - but it seems there is not way to stick it on or glue it that I am comfortable with - somebody make a mold!
01-20-2015, 11:41 PM
#19
Senior Member
Thread Starter
Join Date: Feb 2014
Location: SC/NoVa
Posts: 420
Likes: 0
Received 3 Likes
on
3 Posts
13' E350 4matic, 08' E63
The Rear trunk emblem will work just fine, Pop the three points through the mesh, but replacing the mesh is the issue. My plate was cracked anyway, just gonna replace it now rather then later. I do go to Cars and Coffee every now and then and people want to see the engine. So would be embarrassed to have that part missing. My philosophy - if you have to explain it, just go ahead and fix it now.
01-21-2015, 02:04 AM
#20
Junior Member
01-21-2015, 12:17 PM
#21
Member

Join Date: Feb 2014
Posts: 156
Likes: 0
Received 0 Likes
on
0 Posts
2005 e55
the pistons aren't hurt at all... the paint falls right off the rubber surrounding them and some paint being on the face will be smeared the first time the brakes are hit hard... its no different than the coating put on the metal part of the brake pads, ever notice how it is always bare metal in that spot where the piston rides... but appreciate you "schooling" me on proper brake caliper painting etiquette...
 01-22-2015, 10:33 PM
#23
Senior Member
Thread Starter
Join Date: Feb 2014
Location: SC/NoVa
Posts: 420
Likes: 0
Received 3 Likes
on
3 Posts
13' E350 4matic, 08' E63
Absolutely!!!!!!!!!!! You were super great with me in SD and I really appreciated that. I have directed several members to you for this service. For those who do not have the facilities this is a perfect way for them to get Professionally painted calipers. Its a good service you provide.
01-24-2015, 09:26 PM
#24
MBWorld Fanatic!

Very nicely done. The only thing I might recommend for others is to bleed the brakes with cheaper fluid first, then put the good stuff in. Two reasons:
1. don't waste $$ on bleeding with good fluid.
2. Pick one with slightly different color so you can see when the fresh fluid comes through
1. don't waste $$ on bleeding with good fluid.
2. Pick one with slightly different color so you can see when the fresh fluid comes through
Last edited by turbo97se; 01-24-2015 at 09:29 PM.
03-04-2016, 12:35 PM
#25
Senior Member
Join Date: Jul 2013
Location: Virginia
Posts: 308
Likes: 0
Received 5 Likes
on
3 Posts
S211 E350 wagon, w211 e550, 2023 glb250, 2013 Audi q7
I'm gonna be doing this soon and wanted to know about the rear caliper bolts when you say stress fractures wall bleeding the brakes please explain this to me thank you
Absolutely!!!!!!!!!!! You were super great with me in SD and I really appreciated that. I have directed several members to you for this service. For those who do not have the facilities this is a perfect way for them to get Professionally painted calipers. Its a good service you provide.


