MBWorld.org Forums
  • LOG IN
  • REGISTER
  • Forums
    • Getting Started
      • Site Announcements
      • New Members Check In!
      • MBWorld Featured Car of the Month Contest
    • Mercedes-Benz Hybrid / Electric Vehicles
      • CLA (EQ)
      • EQA
      • EQB (X243) SUV
      • EQC electric SUV
      • EQE (V295) Sedan
      • EQS
    • Mercedes-Benz AMG Vehicles
      • AMG Vendor Classifieds
      • A45, A35 AMG (W176, W177)
      • CLA 35, CLA 45 AMG (C117, C118)
      • C63, C43 AMG (W206)
      • C63s, C63 and C43 AMG (W205)
      • C63 AMG (W204)
      • C32 AMG, C55 AMG (W203)
      • C36 AMG, C43 AMG (W202)
      • CLK55 AMG, CLK63 AMG (W208, W209)
      • E55, E63, E53, E43 AMGs (W210, W211, W212, W213)
      • CLS63, CLS55, CLS53 AMG (C219, C218, C257)
      • S63 AMG, S63 AMG 4Matic, S65 AMG (W222, V222)
      • S63 AMG 4MATIC Coupe, S65 AMG Coupe (C217), Convert. (A217)
      • S55 AMG, S65 AMG , S63 AMG (W220, W221)
      • CL55 AMG, CL65 AMG, CL63 AMG (C215, C216)
      • SL55 AMG, SL63 AMG, SL65 AMG (R230)
      • SLS AMG Gullwing (C197, R197)
      • AMG GT: GT, GTS, GTC, GTR, GT-4door (C190 / R190)
      • AMG GT: GT, GTS, GTC, GTR, GT-4 door (C192 / R192)
      • SLK55 (R172)
      • SLK55 (R171)
      • SLK32 AMG (R170)
      • GLA45, GLA35 AMG (X156, H247)
      • GLC63s, GLC63, GLC43 AMG SUV and Coupe (X253, C253)
      • GLE63s, GLE63, GLE53 AMG SUV & Coupe (W166, W167)
      • GL63 AMG and GLS63 (X166, X167)
      • ML63 AMG (W166)
      • ML55 AMG, ML63 AMG (W163, W164)
      • G55 AMG (W463)
      • G63 AMG (W464)
      • R63 AMG (W251)
    • Mercedes-Benz Sedans
      • MB Sedan Vendor Classifieds
      • S-Class (W223)
      • S-Class (W222)
      • S-Class (W221)
      • S-Class (W220)
      • S-Class (W140)
      • S-Class (W126)
      • S-Class (W116)
      • E-Class (W214)
      • E-Class (W213)
      • E-Class (W212)
      • E-Class (W211)
      • E-Class (W210)
      • E-Class (W124)
      • E-Class (W123)
      • E-Class (W114/W115)
      • C-Class (W206)
      • C Class (W205)
      • C-Class (W204)
      • C-Class (W203)
      • C-Class (W202)
      • 190E (W201)
      • B-Class (W245, W246)
      • A-class (W168, W169,W176,W177)
    • Mercedes-Benz Coupes & Cabriolets
      • MB Coupes & Cabriolets Vendor Classifieds
      • S/CL-Class (W140) Coupe
      • CL-Class (W215)
      • CL-Class (W216)
      • S-Class (C217) Coupe & (A217) Cabrio
      • CLS Coupe (C218)
      • CLS Coupe (C219)
      • CLS Coupe (C257)
      • C-Class Coupe (C204)
      • C-Class Coupe (C205)
      • CLK-Class (W209)
      • CLK-Class (W208)
      • E-Class Coupe (C207) & Cabrio (A207)
      • E-Class Coupe (C238) & Cabrio (A238)
      • CLA Coupe (C117)
      • CLA Coupe (C118)
      • CLE Class Coupe (C236) & Cabrio (A236)
    • Mercedes-Benz SLR & SL Roadsters
      • MB SLR & SL Roadsters Vendor Classifieds
      • SLR McLaren (C199)
      • SL-Class (R232)
      • SL-Class (R231)
      • SL-Class (R230)
      • SL-Class (R129)
      • SL/SLC-Class (R107)
      • SLK-Class (R172)
      • SLK-Class (R171)
      • SLK-Class (R170)
    • Mercedes-Benz SUVs, Trucks, Vans, Diesels, Other
      • MB SUVs, Trucks, Vans, Diesels Vendor Classfieds
      • G Class Electric (G580)
      • G Class (W465/W463A)
      • G Class (W460, W461, W463)
      • GL Class (X166)
      • GL Class (X164)
      • GLC Class (X254)
      • GLC Class (X253)
      • GLK-Class (X204)
      • M-Class (W166)
      • M-Class (W164)
      • M-Class (W163)
      • GLA Class (H247)
      • GLA Class (X156)
      • GLB Class (X247)
      • GLE Class (V167)
      • GLE Class (W166)
      • GLS Class (X167)
      • GLS Class (X166)
      • R-Class (W251)
      • Smart Car
      • Maybach (W240)
      • V-Class
      • Diesel Forum
      • X-Class
    • Classic, Vintage Mercedes-Benz Vehicles, Other Cars
      • Classic, Vintage MB Vehicles Vendor Classifieds
      • Vintage Mercedes-Benz Owner Registry
      • General Discussion of Mercedes-Benz Classics
      • Classic Mercedes DIY tips and hints
      • Other Cars
    • Technical & Vehicle Assistance Forums
      • Technical Assistance Vendor Classifieds
      • Mercedes Tech Talk
      • Wheels, Tires, Suspension & Brakes Forum
      • Audio & Electronics
      • Performance Upgrades & Tuning
      • Detailing & Automotive Care
      • Automotive Leasing & Financing
      • Extended Warranty Discussions
      • European Delivery of Your New Car
    • Vendor Market Place
      • Vendor Announcements
      • Vendor Specials
      • Vendor Group Buys
      • Vendor Classifieds
    • General Forums
      • General Mercedes Discussion
      • Safety & Testimonials
      • Marketplace
      • Collectibles, Models and Literature
      • Newsletter Archive
      • Mercedes-Benz Motorsports & Racing
      • Events & Gatherings
      • Kill Stories
      • Lifestyle
    • Regional areas
      • US
      • Asia-Oceania
      • Canada
      • Europe
      • Middle East
    • Site & Forum Support
      • Suggestions & Feedback
      • Questions about how MBWorld.org works...not for car questions.
      • Test
  • News
  • Marketplace
    • Mercedes AMG Cars For Sale
    • Mercedes Wheels and Tires For Sale
    • Mercedes AMG Wheels and Tires For Sale
    • Vendor Directory
    • Become a Vendor
    • Site Store
    • Marketplace
  • New Posts
  • Tools
    • Car Payment Calculator
    • Tire Rim Calculator
    • Vin Decoder
    • Recalls
    • Technical Service Bulletins (TSBs)
    • Members List
    • Live Feed
  • How-Tos
  • Gallery
  • About
  • View Dark Mode
    • Please register or login to enable Dark Mode.
  • Log In
  • Register
MBWorld.org Forums
    • Threads
      • Advanced
Dark Mode

Please register or login to enable Dark Mode.

Log In

Forgot your Password?

By logging into your account, you agree to our Terms of Use and Privacy Policy, and to the use of cookies as described therein.
or
 
  • Recent
  • Commented
  • Albums
  • My Pictures

My Post Pictures

hecdog
December 31, 2023
 127
 0
Sort:
Default
  • Default
  • Most Recent
0 2024/01/22 10:53:37 hecdog
0 2024/01/22 10:53:41 hecdog
I pulled out the weather strip and reinstalled, leaving a small piece of stripping to cover that gap.
0 2024/01/22 11:03:26 hecdog
Again, weather stripping tucked into the panel gap
0 2024/01/22 11:03:31 hecdog
Notice the weatherstrip angles and tucks into this panel gap, leaving a gap for water to get in. This is how it was installed.
0 2024/01/22 11:03:35 hecdog
Also, all along the bottom of the opening, above the bumper, a small strip of weatherstripping covers this tiny gap.
0 2024/01/22 11:03:40 hecdog
🤮
🤮
0 2024/01/29 21:17:23 hecdog
0 2024/02/01 14:22:55 hecdog
0 2024/02/09 20:05:17 hecdog
0 2024/02/09 20:07:49 hecdog
Start by removing the storage bin under the seat. There are two screws. One on each side. Easy to see if you open the bin. Here’s the outer screw.
0 2024/02/09 20:09:08 hecdog
This is the inner screw. It’s a t25. Use a short screwdriver to remove.
0 2024/02/09 20:09:19 hecdog
 Next, you’ll loosen the seat bottom to move it out of the way, but you won’t console try detach it since it’s not necessary. It’s only held on by two screws under the front part of the seat, hidden by the storage bin you just removed. Here’s one of the screws. It’s attached to a C-clamp that wraps around a horizontal rod. It’s really easy to see when you remove the storage bin
Next, you’ll loosen the seat bottom to move it out of the way, but you won’t console try detach it since it’s not necessary. It’s only held on by two screws under the front part of the seat, hidden by the storage bin you just removed. Here’s one of the screws. It’s attached to a C-clamp that wraps around a horizontal rod. It’s really easy to see when you remove the storage bin
0 2024/02/09 20:11:09 hecdog
Here’s the second screw/C-clamp. My short screw driver was too long so I used a 1/4” socket and inserted the t25 bit into the 1/4” socket to unscrew this. Super easy but took some torque to loosen it.
0 2024/02/09 20:11:12 hecdog
Showing the inner screw from a different angle. My screw driver was almost short enough but I couldn’t torque enough without the lever from a ratchet.
0 2024/02/09 20:11:14 hecdog
Here’s the remaining C-Clamp once I good the screw out. I have already lifted the seat bottom to take this pic.
0 2024/02/09 20:11:17 hecdog
Showing the seat detached and raised.
0 2024/02/09 20:11:21 hecdog
Again. Seat detached and raised. There are a few connectors keeping me from totally removing the seat bottom. I have ventilated seats. No need to disconnect. This is enough room to remove the hidden screws.
0 2024/02/09 20:11:27 hecdog
0 2024/02/09 20:19:36 hecdog
This just detached easily.
0 2024/02/09 20:19:41 hecdog
The in er trim piece is long and extends to this part on the backside of the front seat. Just detach it.
0 2024/02/09 20:19:48 hecdog
Once detached, you’ll have to wriggle it out. It’s not too hard but careful to to break it.
0 2024/02/09 20:19:54 hecdog
Now it’s completed out. Set it aside and remember how it goes back in.
0 2024/02/09 20:20:00 hecdog
 Ext, remove this small curved inner trim. I used a plastic trim tool.
Ext, remove this small curved inner trim. I used a plastic trim tool.
0 2024/02/09 20:20:06 hecdog
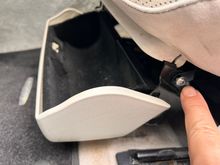
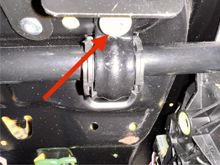
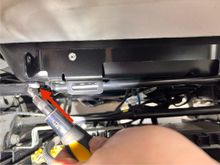
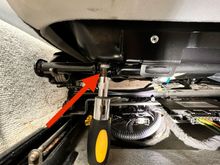
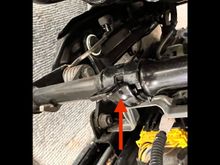
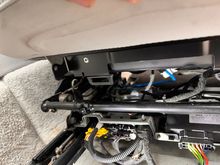
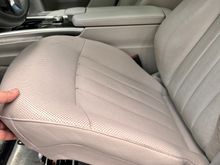
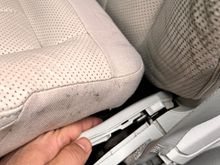
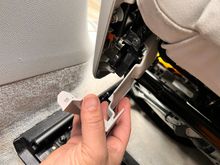
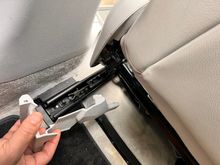
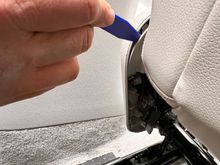
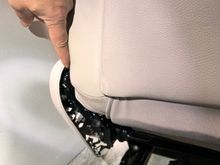
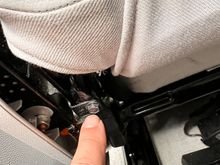
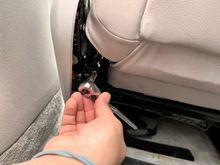
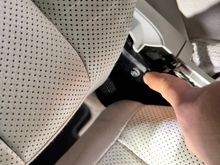
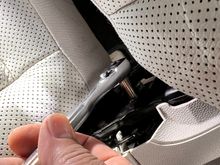
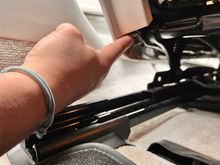
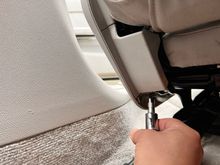
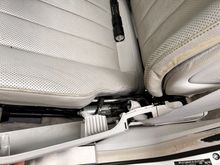
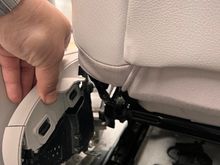
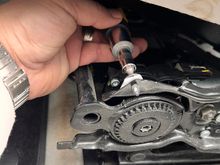
Once that piece is out, it exposes a small screw. I am pointing at it. If you want to remove the plastic outer trim, you’ll have to remove this screw. In order to remove this screw, you’ll have to detach the air bag from the seat frame since it is obscured by the seat back. It’s possible to remove it with an angled t25 tool, but I don’t have that. Removing the air bag is easy at this stage.
0 2024/02/09 20:20:13 hecdog
Here’s how to remove the airbag. Remove this 8mm screw. There is another one on the inner side of the seat bottom. Shown later.
0 2024/02/09 20:20:19 hecdog
Easily removed with a 8mm socket.
0 2024/02/09 20:20:25 hecdog
Here’s the second screw which was exposed by both the removal of the seat bottom and the removal of that inner seat trim piece.
0 2024/02/09 20:20:31 hecdog
Same 8mm socket removes this screw.
0 2024/02/09 20:20:36 hecdog
Next, remove the small screw at the rear of the seat trim piece.
0 2024/02/09 20:28:01 hecdog
Easy to remove.
Easy to remove.
0 2024/02/09 20:28:07 hecdog
0 2024/02/09 20:29:14 hecdog
I am pointing to that screw. Removing this screw will completely detach the trim piece. I did not do this part because all I wanted was to reseat the whole trim piece. 

There is a second screw you will have to remove before this whole assembly is detached from the seat. I’ll show you below. I didn’t have to do it because mine was broken loose.
I am pointing to that screw. Removing this screw will completely detach the trim piece. I did not do this part because all I wanted was to reseat the whole trim piece. There is a second screw you will have to remove before this whole assembly is detached from the seat. I’ll show you below. I didn’t have to do it because mine was broken loose.
0 2024/02/09 20:29:18 hecdog
Here is the front side of that trim piece already detached.
0 2024/02/09 20:29:24 hecdog
I slid it backwards toward the rear seats.
0 2024/02/09 20:29:30 hecdog
If yours isn’t broken like mine was, you’ll have to remove this second screw which holds the trim piece to the seat frame. So in summary, there are two 8mm screws holding the air bag to the seat frame, and 2 t25 screws holding the trim piece to the same seat frame.
0 2024/02/09 20:33:06 hecdog
Here I’m showing my minor repairs. Glued the broken pieces back together using E6000 glue and some clamps.
0 2024/02/09 20:34:54 hecdog
Gluing the part of the seat trim that came loose.
0 2024/02/09 20:34:59 hecdog
It’s a bit hard to understand in this pic, but if the reader performs this repair, it’ll make sense. The arrow is pointing to the part of the trim that slides onto a metal tab of the seat frame. Mine had come loose. Not sure how that happened since it requires loosening the trim to remove but it happened. Not sure how. 

I just glued a small crack it had and used a paper clamp to hold it together while the glue set.
It’s a bit hard to understand in this pic, but if the reader performs this repair, it’ll make sense. The arrow is pointing to the part of the trim that slides onto a metal tab of the seat frame. Mine had come loose. Not sure how that happened since it requires loosening the trim to remove but it happened. Not sure how. I just glued a small crack it had and used a paper clamp to hold it together while the glue set.
0 2024/02/09 20:35:01 hecdog
0 2024/02/09 20:35:07 hecdog
First
Page
2 of 4
Last
Go To
Page
  • 1
  • 2
  • 3
  • 4
2 of 4
Go To GO
Go to page of 4 pages
  • 1
  • 2
  • 3
  • 4

Top
MBWorld.org Forums
  • Contact Us
  • FAQ
  • Archive
  • Advertising
  • Cookie Policy
  • Privacy Statement
  • Terms of Service
  • About Us
  • Your Privacy Choices
  • Manage Preferences

© 2026 MH Sub I, LLC dba Internet Brands

Follow Us        


When you click on links to various merchants on this site and make a purchase, this can result in this site earning a commission. Affiliate programs and affiliations include, but are not limited to, the eBay Partner Network.