

 06-24-2015, 02:03 PM
Last edit by: IB Advertising
See related guides and technical advice from our community experts:
- Mercedes Benz E Class How to Replace Front Upper Control Arm
Step by step instructions for do-it-yourself repairs

DIY: Replacing lower ball joint in W211
 07-12-2010, 04:25 PM
#1
Senior Member
Thread Starter

Join Date: Jul 2007
Location: Bay Area
Posts: 421
Likes: 0
Received 14 Likes
on
8 Posts
2004 E500 CLK320
DIY: Replacing lower ball joint in W211
This 2004 E500 has 71k mi on it. At about 65k, some squeaking could be heard when the car was going over bumps. Now at 71k mi, it squeaks continuously when driven on uneven surfaces. Steering is not very precise during fast cornering, and the car drifts slightly at 80MPH on the freeway. So it’s time to check and replace the ball joint(s).
This is the first time for me replacing a ball joint on any car. I did some research online and read through some DIY threads and carefully examined the front suspension system of the car, and still couldn’t figure out some key details. But I decided to take on the project head on. I thought this whole job would take 2 hrs, as many people have claimed, but by the end of day, it had taken 8 hrs including a 3 hr lunch break and lots of sweating and cursing in between. If the dealer or an indy shop charges $300 labor for replacing one ball joint, it’s not unreasonable. If I do this job again, it may take me 3 hrs.
After installing the new ball joint, the car now handles like new again. Cornering is more precise and there’s absolutely no drift at highway speed.
So here goes the procedure:
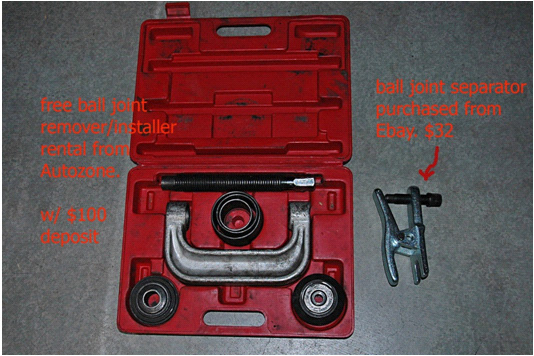
1. I rented the ball joint press from Autozone for free (with $100 deposit), and bought the ball joint separator from Ebay.
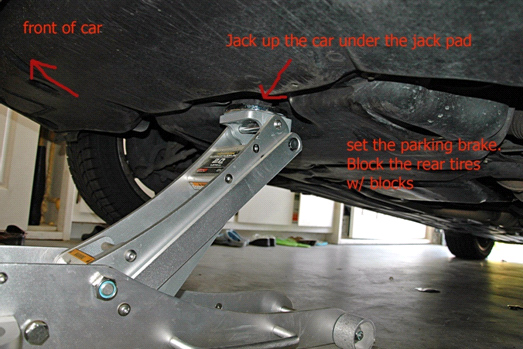
2. Jack up the car on the front. Block the rear tires. Picture below.
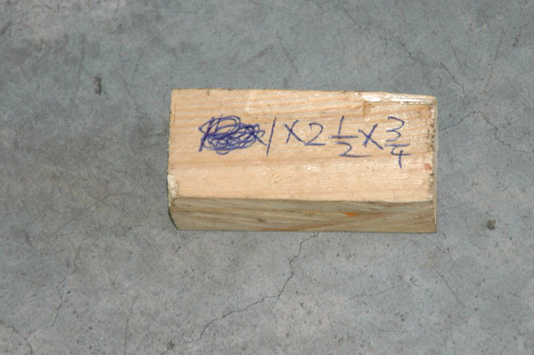
3. To protect the jack pads from the jack stands, I cut a couple of wood blocks (1”x2 �” x �”) and put them under the jack pads. Use strong solid wood.
4. Place the wood blocks under the jack pads and use tape to hold them in place.
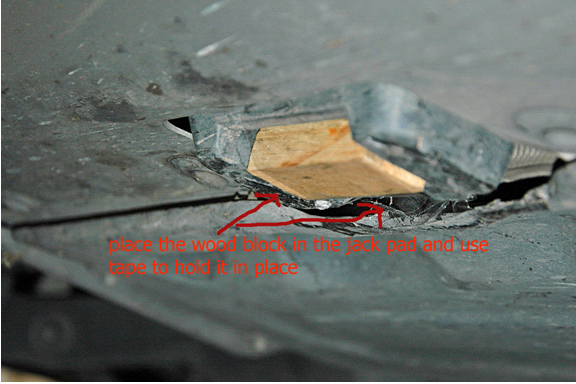
5. Slide the jack stand under the wood block/jack pad.
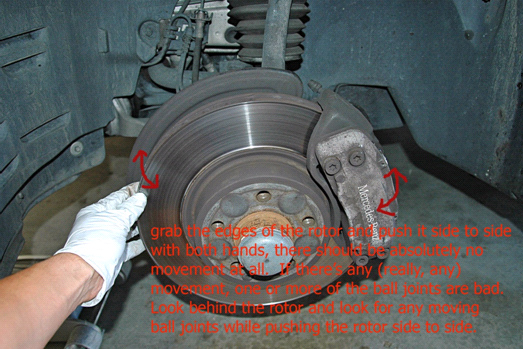
6. How to check a bad ball joint: Remove the wheel. See picture below. Grab the edges of the rotor and push it in and out with both hands, there should be absolutely no movement at all. If there’s any (I really mean any) movement or free play, then one or more of the ball joints are bad. Look behind the rotor (or so called steering knuckle assembly) and see if there’s any movement in the ball joints. Shown below is the driver side.
This is the first time for me replacing a ball joint on any car. I did some research online and read through some DIY threads and carefully examined the front suspension system of the car, and still couldn’t figure out some key details. But I decided to take on the project head on. I thought this whole job would take 2 hrs, as many people have claimed, but by the end of day, it had taken 8 hrs including a 3 hr lunch break and lots of sweating and cursing in between. If the dealer or an indy shop charges $300 labor for replacing one ball joint, it’s not unreasonable. If I do this job again, it may take me 3 hrs.
After installing the new ball joint, the car now handles like new again. Cornering is more precise and there’s absolutely no drift at highway speed.
So here goes the procedure:
1. I rented the ball joint press from Autozone for free (with $100 deposit), and bought the ball joint separator from Ebay.
2. Jack up the car on the front. Block the rear tires. Picture below.
3. To protect the jack pads from the jack stands, I cut a couple of wood blocks (1”x2 �” x �”) and put them under the jack pads. Use strong solid wood.
4. Place the wood blocks under the jack pads and use tape to hold them in place.
5. Slide the jack stand under the wood block/jack pad.
6. How to check a bad ball joint: Remove the wheel. See picture below. Grab the edges of the rotor and push it in and out with both hands, there should be absolutely no movement at all. If there’s any (I really mean any) movement or free play, then one or more of the ball joints are bad. Look behind the rotor (or so called steering knuckle assembly) and see if there’s any movement in the ball joints. Shown below is the driver side.
Last edited by SZMB; 07-12-2010 at 11:46 PM.
 07-12-2010, 04:29 PM
#2
Senior Member
Thread Starter
Join Date: Jul 2007
Location: Bay Area
Posts: 421
Likes: 0
Received 14 Likes
on
8 Posts
2004 E500 CLK320
7. Parts behind the knuckle assembly.
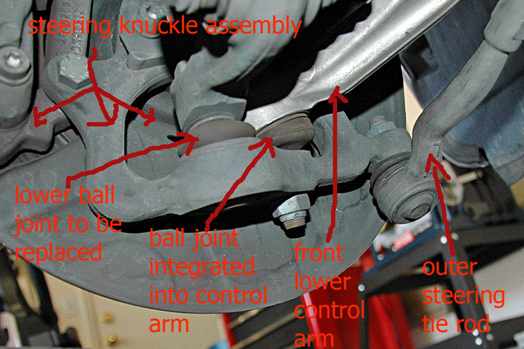
8. While the rotor is being pushed in and out, some movement (~1cm) is seen in the lower ball joint. The front lower control arm and the steering tie rod are ok. So I only need to replace the lower ball joint and leave the lower control arm and the tie rode alone.

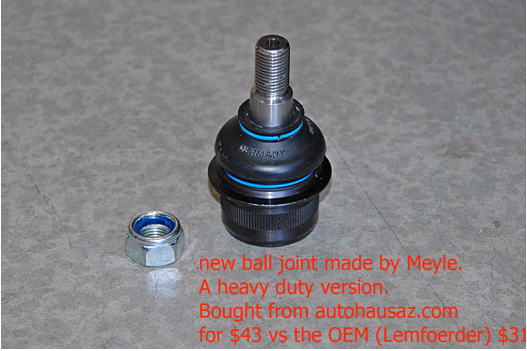
9. Picture of a new ball joint. Purchased from autohausaz.com for $43, it�s the heavy duty version from Meyle.
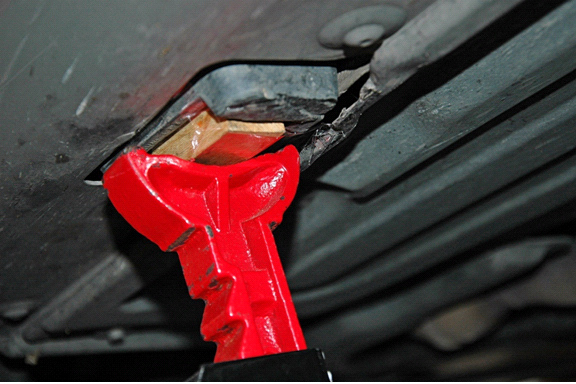
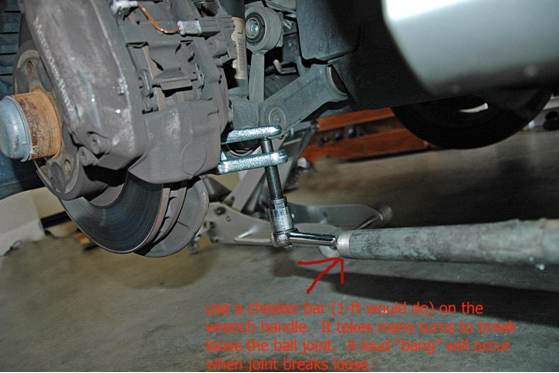
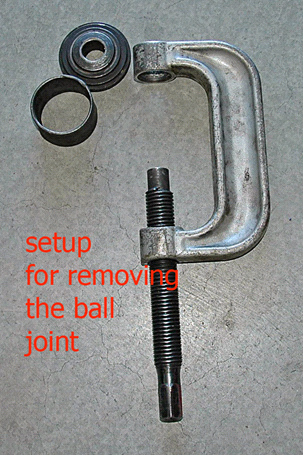
10. How to break loose the ball joint: Remove the 22mm nut on top. Slide in the ball point separator tool as shown below.

11. Slide in a cheater�s bar (basically a �� black gas pipe 12� in length from Homedepot) on the wrench�s handle and start turning the bolt. After countless turns, the ball joint finally breaks loose. You�ll hear a big �bang� when it breaks loose, like a shot gun goes off.
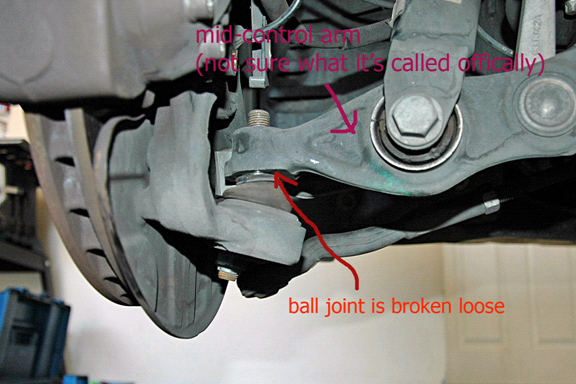
12. This is how the ball joint looks like after breaks loose from the socket.
8. While the rotor is being pushed in and out, some movement (~1cm) is seen in the lower ball joint. The front lower control arm and the steering tie rod are ok. So I only need to replace the lower ball joint and leave the lower control arm and the tie rode alone.
9. Picture of a new ball joint. Purchased from autohausaz.com for $43, it�s the heavy duty version from Meyle.
10. How to break loose the ball joint: Remove the 22mm nut on top. Slide in the ball point separator tool as shown below.
11. Slide in a cheater�s bar (basically a �� black gas pipe 12� in length from Homedepot) on the wrench�s handle and start turning the bolt. After countless turns, the ball joint finally breaks loose. You�ll hear a big �bang� when it breaks loose, like a shot gun goes off.
12. This is how the ball joint looks like after breaks loose from the socket.
Last edited by SZMB; 07-12-2010 at 04:50 PM.
The following users liked this post:
MACEDON (01-03-2018)
07-12-2010, 04:34 PM
#3
Senior Member
Thread Starter
Join Date: Jul 2007
Location: Bay Area
Posts: 421
Likes: 0
Received 14 Likes
on
8 Posts
2004 E500 CLK320
13. Now with the ball joint broken loose. There�s not enough wiggle room to move the ball joint out of this mid-control arm (see picture above). I moved the heavy knuckle assembly up and down, left and right, and still couldn�t get the ball joint out of the way. I�d been at it for about an hour, and I was already 2 � hrs into the job, and sweating like a mad dog in a garage that was 82oF.
14. Finally, there was light. I figured it out: Need to disconnect the upper control arm.
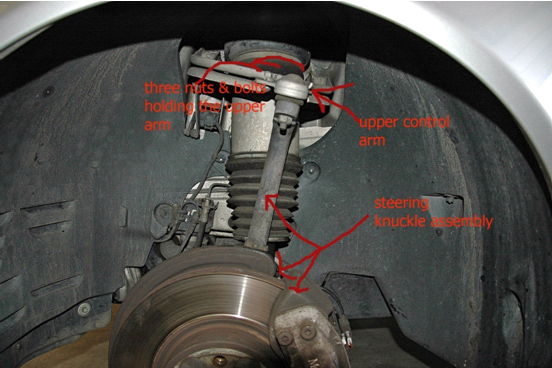
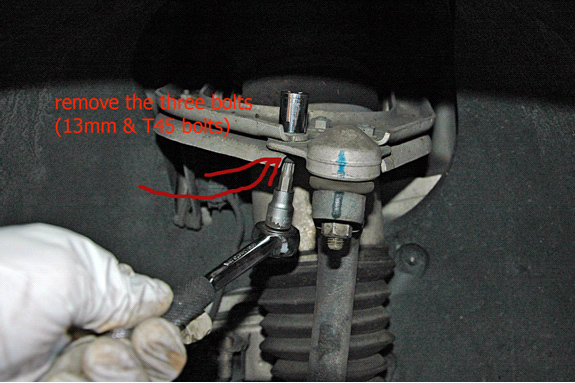
15. Loosen the 3 bolts holding the upper control arm. Bolt size is T45. Nut on top is 13mm.
16. Becareful. Once the upper control arm breaks loose, the knuckle assembly will swing out and it�s heavy. Use a jack stand or floor jack to support its weight.
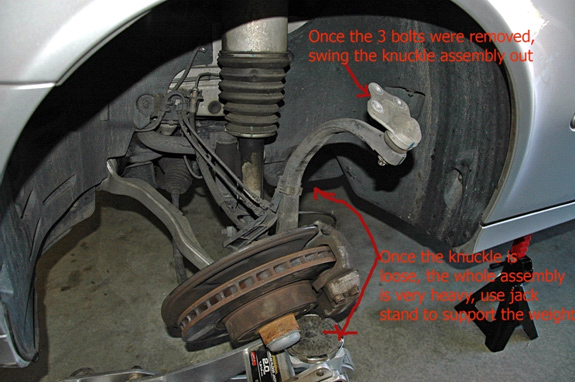
17. Now with the knuckle assembly loose and free. You now can move the ball joint out of the socket.
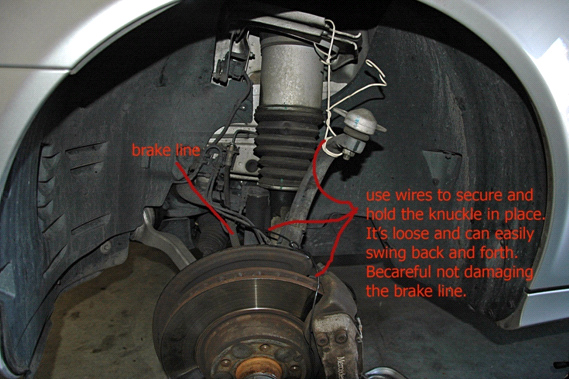
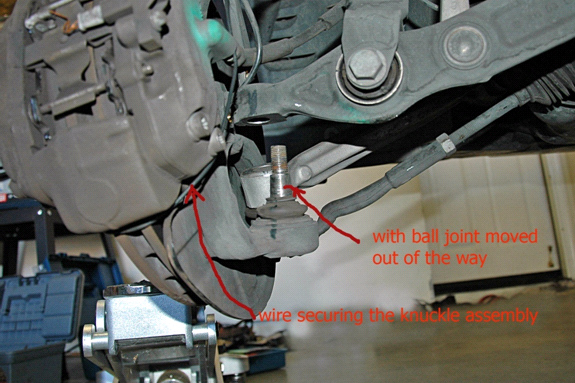
18. I also tied wires around the knuckle assembly to support its weight and prevent it from swinging side to side. Becareful with the brake line, don�t damage it. The knuckle is very heavy. If you have an assistant, the job would be much easier.
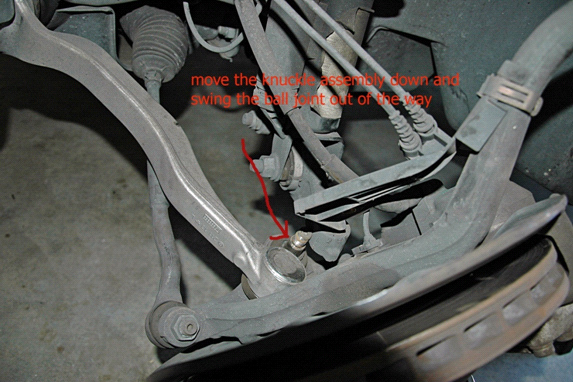
19. Picture showing that the ball joint is moved out of the way.
14. Finally, there was light. I figured it out: Need to disconnect the upper control arm.
15. Loosen the 3 bolts holding the upper control arm. Bolt size is T45. Nut on top is 13mm.
16. Becareful. Once the upper control arm breaks loose, the knuckle assembly will swing out and it�s heavy. Use a jack stand or floor jack to support its weight.
17. Now with the knuckle assembly loose and free. You now can move the ball joint out of the socket.
18. I also tied wires around the knuckle assembly to support its weight and prevent it from swinging side to side. Becareful with the brake line, don�t damage it. The knuckle is very heavy. If you have an assistant, the job would be much easier.
19. Picture showing that the ball joint is moved out of the way.
Last edited by SZMB; 07-12-2010 at 04:52 PM.
07-12-2010, 04:39 PM
#4
Senior Member
Thread Starter
Join Date: Jul 2007
Location: Bay Area
Posts: 421
Likes: 0
Received 14 Likes
on
8 Posts
2004 E500 CLK320
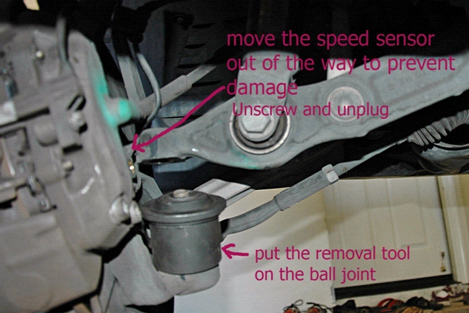
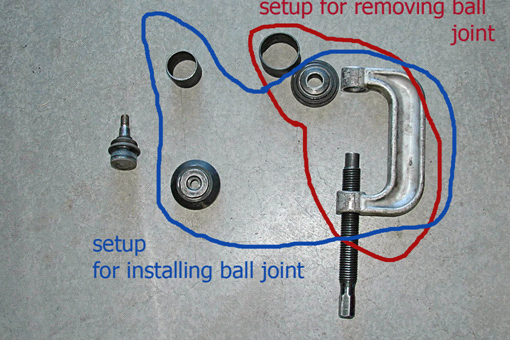
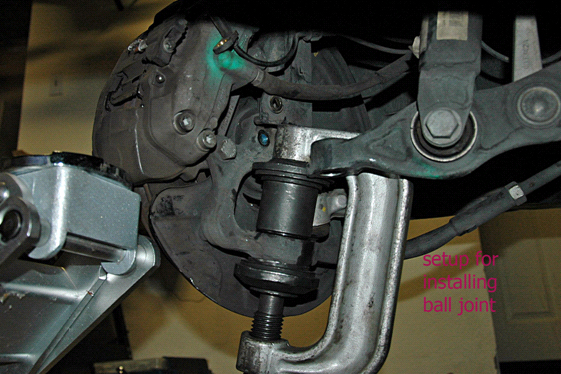
20. Tool setup for popping out the ball joint.
21. Place the tool over the ball joint. Move the speed senor out of the way.
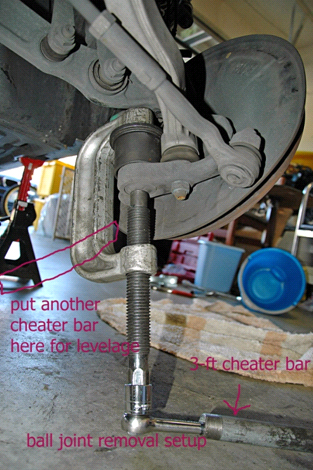
22. Put the clamp on and slowly pop out the ball joint. I used two 3-ft cheater�s bars for leverage. Having the cheater�s bars facing toward front of the car helps � you need the extra space to work.
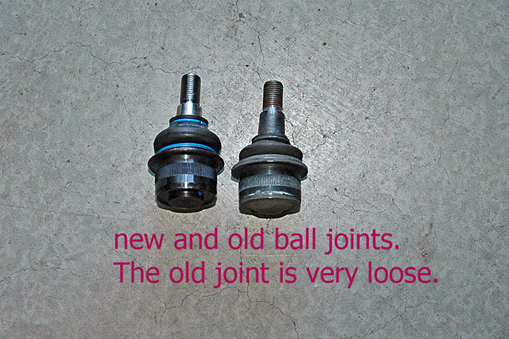
23. Ball joint is removed. New and old side by side. There�s a lot of movement on the old one.
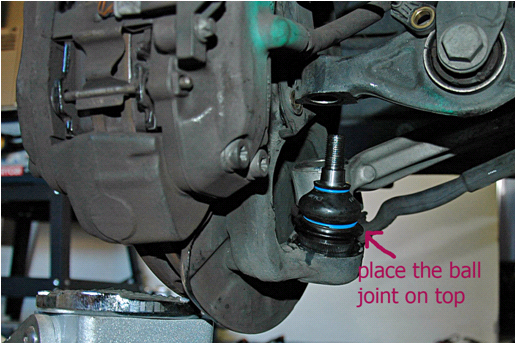
24. Place the new ball joint on top of the socket hole.
25. Tool setup for pressing in the new ball joint. See icture below.
21. Place the tool over the ball joint. Move the speed senor out of the way.
22. Put the clamp on and slowly pop out the ball joint. I used two 3-ft cheater�s bars for leverage. Having the cheater�s bars facing toward front of the car helps � you need the extra space to work.
23. Ball joint is removed. New and old side by side. There�s a lot of movement on the old one.
24. Place the new ball joint on top of the socket hole.
25. Tool setup for pressing in the new ball joint. See icture below.
Last edited by SZMB; 07-12-2010 at 04:55 PM.
The following users liked this post:
MACEDON (01-03-2018)
07-12-2010, 04:43 PM
#5
Senior Member
Thread Starter
Join Date: Jul 2007
Location: Bay Area
Posts: 421
Likes: 0
Received 14 Likes
on
8 Posts
2004 E500 CLK320
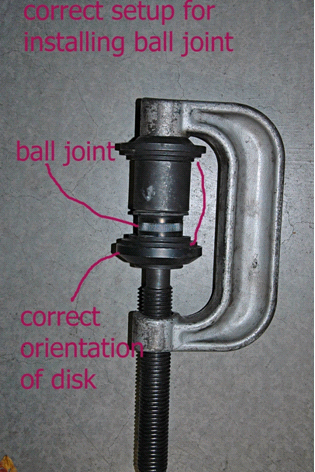
26. This is how the setup looks like for installing the ball joint. Note the orientation of the top and bottom disks.
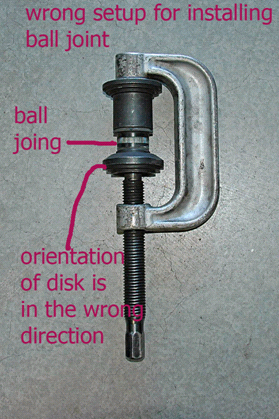
27. The following picture shows the wrong tool setup for installing the ball joint. Note the incorrect orientation of the lower disk. So don�t do this. How did I find out? Initially I had the setup exactly like this and couldn�t press the ball joint all the way in, and took me 2 hrs to find this out. I ended up broke the wrench that I had for 23 yrs by applying an incredible amount of force on the cheater�s bars.
28. Put the installing tool on the new ball joint.
29. Use cheater�s bars for leverage. Press in the new ball joint.
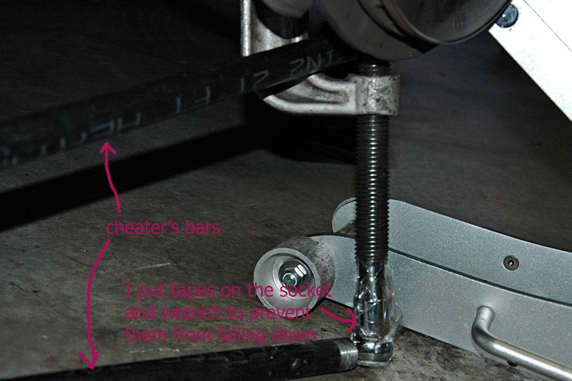
30. It takes a lot of turns to press in the ball joint. With the use of 3-ft cheater�s bars, you should be able to press in the ball joint effortlessly.
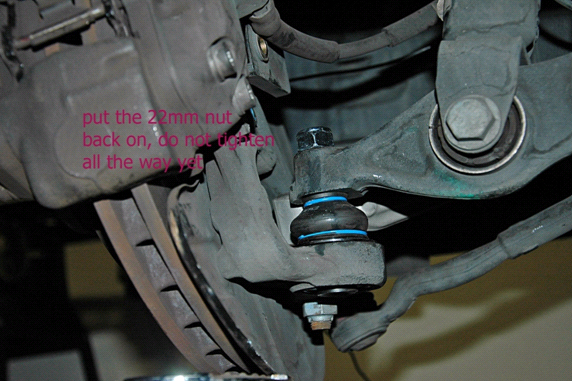
31. Muscle the ball joint back into place of the mid-control arm. Lightly tighten the 22mm nut, do not completely tighten it yet.
27. The following picture shows the wrong tool setup for installing the ball joint. Note the incorrect orientation of the lower disk. So don�t do this. How did I find out? Initially I had the setup exactly like this and couldn�t press the ball joint all the way in, and took me 2 hrs to find this out. I ended up broke the wrench that I had for 23 yrs by applying an incredible amount of force on the cheater�s bars.
28. Put the installing tool on the new ball joint.
29. Use cheater�s bars for leverage. Press in the new ball joint.
30. It takes a lot of turns to press in the ball joint. With the use of 3-ft cheater�s bars, you should be able to press in the ball joint effortlessly.
31. Muscle the ball joint back into place of the mid-control arm. Lightly tighten the 22mm nut, do not completely tighten it yet.
Last edited by SZMB; 07-12-2010 at 04:57 PM.
The following users liked this post:
MACEDON (01-03-2018)
07-12-2010, 05:02 PM
#6
Senior Member
Thread Starter
Join Date: Jul 2007
Location: Bay Area
Posts: 421
Likes: 0
Received 14 Likes
on
8 Posts
2004 E500 CLK320
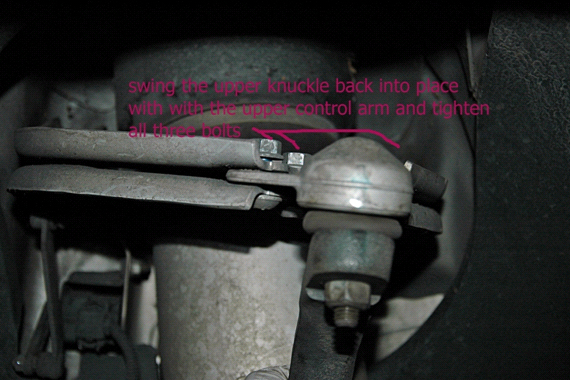
32. Put the upper knuckle back into place with the upper control arm. Tighten the three bolts.
33. Now tighten the 22mm nut on the ball joint. I used the 1-ft cheater�s bar for leverage. Put the speed sensor back into place.

34. Now go for a test drive. It�s recommended that wheel alignment should be performed after installing the ball joint.
33. Now tighten the 22mm nut on the ball joint. I used the 1-ft cheater�s bar for leverage. Put the speed sensor back into place.
34. Now go for a test drive. It�s recommended that wheel alignment should be performed after installing the ball joint.
The following 2 users liked this post by SZMB:
MACEDON (01-03-2018),
pretzelmeister (08-23-2020)
07-12-2010, 05:09 PM
#7
Senior Member
Thread Starter
Join Date: Jul 2007
Location: Bay Area
Posts: 421
Likes: 0
Received 14 Likes
on
8 Posts
2004 E500 CLK320
And finally here's the pdf version. The pictures are in somewhat low resolution. A high-res version is 8MB and this website does not allow uploading large files.
Hope this will help you out and save you a lot of frustration in figuring out the little details.
Hope you guys have fun in replacing the ball joints!!!
Hope this will help you out and save you a lot of frustration in figuring out the little details.
Hope you guys have fun in replacing the ball joints!!!
Trending Topics

The following users liked this post:
2MERKS (01-26-2020)
07-13-2010, 03:43 AM
#9
Super Member
Join Date: Dec 2003
Location: Newport Coast, CA
Posts: 613
Likes: 0
Received 3 Likes
on
3 Posts
makes your daughter horny
Great DIY!
1 CENTIMETER of play?! My lower ball joints have ~2mm and I'm thinking about changing them? Should I go ahead and do it or is 2mm fine?
The car makes a pretty loud squeaking over speed bumps but I think it may be the front swaybar? Or is it most likely the ball joints?
So you press in the new ball joint from the top downwards? Where is the tool pressing on exactly? The top threaded stud? Or is it pressing down on the flange (you call it the "metal plate of ball joint")?
Last edited by W Cole; 07-13-2010 at 03:51 AM.
 07-13-2010, 07:54 AM
#11
Super Member

Join Date: Apr 2005
Location: Boston, MA USA
Posts: 666
Likes: 0
Received 3 Likes
on
3 Posts
03 E320 -wife's car now; 07 Porsche Boxster S - my toy
SZMB,
Agree with others -- great write-up! When I replaced my lower ball joint, I used similar ideas:
1) In addition to the press from Autozone, I rented out their tie rod end pickle fork.
2) I didn't disassemble the suspension as you did -- I removed the wheel, caliper/mounting bracket, rotor, and hub. Also moved the wheel speed sensor out of the way so I wouldn't potentially damage it. This gave me the required clearance for access to the joint.
3) Unbolted the ball joint and used the pickle fork to loosen.
4) Used the press to remove/install and then reassemble everything.
5) I'm lucky to have impact tools and used the air wrench to work the press -- saved a lot of time!! Anybody who wants to attack this job should first make friends with someone who has air tools!!
Regards,
paul...
07-13-2010, 08:14 AM
#12
Member
Great DIY thread.... The pics and details are precise and easy to follow...

I've already had my ***** replaced (1.5yr ago), but I'm getting some squeaking from the driver's side one. Don't know if I'm up to a DIY job, but reading this thread makes me consider tackling-it myself.
Great write-up!!!!

I've already had my ***** replaced (1.5yr ago), but I'm getting some squeaking from the driver's side one. Don't know if I'm up to a DIY job, but reading this thread makes me consider tackling-it myself.
Great write-up!!!!
07-13-2010, 12:17 PM
#13
Senior Member
Thread Starter
Join Date: Jul 2007
Location: Bay Area
Posts: 421
Likes: 0
Received 14 Likes
on
8 Posts
2004 E500 CLK320
SZMB,
Agree with others -- great write-up! When I replaced my lower ball joint, I used similar ideas:
1) In addition to the press from Autozone, I rented out their tie rod end pickle fork.
2) I didn't disassemble the suspension as you did -- I removed the wheel, caliper/mounting bracket, rotor, and hub. Also moved the wheel speed sensor out of the way so I wouldn't potentially damage it. This gave me the required clearance for access to the joint.
3) Unbolted the ball joint and used the pickle fork to loosen.
4) Used the press to remove/install and then reassemble everything.
5) I'm lucky to have impact tools and used the air wrench to work the press -- saved a lot of time!! Anybody who wants to attack this job should first make friends with someone who has air tools!!
Regards,
paul...
Agree with others -- great write-up! When I replaced my lower ball joint, I used similar ideas:
1) In addition to the press from Autozone, I rented out their tie rod end pickle fork.
2) I didn't disassemble the suspension as you did -- I removed the wheel, caliper/mounting bracket, rotor, and hub. Also moved the wheel speed sensor out of the way so I wouldn't potentially damage it. This gave me the required clearance for access to the joint.
3) Unbolted the ball joint and used the pickle fork to loosen.
4) Used the press to remove/install and then reassemble everything.
5) I'm lucky to have impact tools and used the air wrench to work the press -- saved a lot of time!! Anybody who wants to attack this job should first make friends with someone who has air tools!!
Regards,
paul...
07-13-2010, 12:24 PM
#14
Senior Member
Thread Starter
Join Date: Jul 2007
Location: Bay Area
Posts: 421
Likes: 0
Received 14 Likes
on
8 Posts
2004 E500 CLK320
Great DIY!
1 CENTIMETER of play?! My lower ball joints have ~2mm and I'm thinking about changing them? Should I go ahead and do it or is 2mm fine?
The car makes a pretty loud squeaking over speed bumps but I think it may be the front swaybar? Or is it most likely the ball joints?
So you press in the new ball joint from the top downwards? Where is the tool pressing on exactly? The top threaded stud? Or is it pressing down on the flange (you call it the "metal plate of ball joint")?
1 CENTIMETER of play?! My lower ball joints have ~2mm and I'm thinking about changing them? Should I go ahead and do it or is 2mm fine?
The car makes a pretty loud squeaking over speed bumps but I think it may be the front swaybar? Or is it most likely the ball joints?
So you press in the new ball joint from the top downwards? Where is the tool pressing on exactly? The top threaded stud? Or is it pressing down on the flange (you call it the "metal plate of ball joint")?
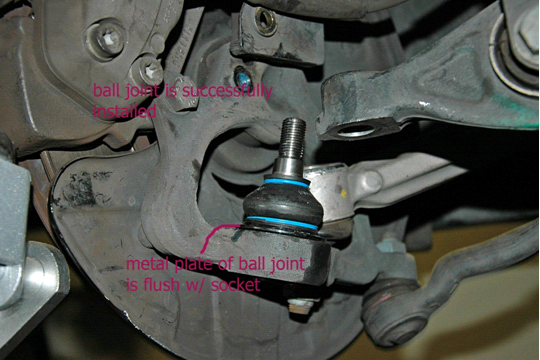
"So you press in the new ball joint from the top downwards?" yes.
"Where is the tool pressing on exactly? The top threaded stud? Or is it pressing down on the flange (you call it the "metal plate of ball joint")".
Pressing down on the flange of the ball joint; correct, I called it "metal plate of the ball joint".
Last edited by SZMB; 07-13-2010 at 12:28 PM.
07-13-2010, 06:08 PM
#15
Super Member
Join Date: Dec 2003
Location: Newport Coast, CA
Posts: 613
Likes: 0
Received 3 Likes
on
3 Posts
makes your daughter horny
It's probably more like 1/2 cm play in my case, bad enough that I have to hold on to the steering wheel at 80MPH. There should be absolutely no play at all if the joints are good. The passenge side on my car is fine, so I'm not replacing that side yet. If your car is squeaking over bumps, it'll get worst in the next couple of thousand miles. Follow steps 6-8 in my write up, you'll be able to find out if the ball joints are the problem.
"So you press in the new ball joint from the top downwards?" yes.
"Where is the tool pressing on exactly? The top threaded stud? Or is it pressing down on the flange (you call it the "metal plate of ball joint")".
Pressing down on the flange of the ball joint; correct, I called it "metal plate of the ball joint".
FYI, you can get the ball joint seperator tool very cheaply ($30?) at Harbor Freight. In my experience a pickle fork will destroy the Mercedes ball joints (don't ask how I know). I'm surprised others have had success with them. If you don't have the right tool I have seperated the ball joints before with a medium size sledge hammer but the tool makes everything 1000x easier.
07-14-2010, 04:19 AM
#16
MBWorld Fanatic!
Thanks for the writeup..very detailed and well put together.
I have a similar problem, when the car is parked I can shake my wheel left and right (very slightly) without the wheels moving. On the freeway it's even worse. This has to be the lower ball joint?
Thanks again
I have a similar problem, when the car is parked I can shake my wheel left and right (very slightly) without the wheels moving. On the freeway it's even worse. This has to be the lower ball joint?
Thanks again
07-14-2010, 08:20 AM
#17
Super Member
Join Date: Apr 2005
Location: Boston, MA USA
Posts: 666
Likes: 0
Received 3 Likes
on
3 Posts
03 E320 -wife's car now; 07 Porsche Boxster S - my toy
Having air tools would definitely save a lot of time and sweating. I thought about removing the rotor/caliper/hub assembly, but that would also require disconnecting the tie rod and the front lower control arm ball joint as well, so I didn't go this route since the lower control arm and the tie rod are just fine -- no free play.
Regards,
paul...
07-14-2010, 12:05 PM
#18
Senior Member
Thread Starter
Join Date: Jul 2007
Location: Bay Area
Posts: 421
Likes: 0
Received 14 Likes
on
8 Posts
2004 E500 CLK320
I've read that the original lower ball joint is not built to last and tends to fail after 50k mi. It's very lightly the lower ball joint if you can shake the wheel, but it could also be the front lower control arm's ball joint. Take off the wheel and take a look at these joints. Shake the rotor and if you see play in any of these ball joints, replace them.
08-16-2010, 11:34 AM
#19
Junior Member

Join Date: Jul 2010
Location: Alexandria, Virginia
Posts: 24
Likes: 0
Received 1 Like
on
1 Post
2005 E320 CDI
Great DIY!
1 CENTIMETER of play?! My lower ball joints have ~2mm and I'm thinking about changing them? Should I go ahead and do it or is 2mm fine?
The car makes a pretty loud squeaking over speed bumps but I think it may be the front swaybar? Or is it most likely the ball joints?
So you press in the new ball joint from the top downwards? Where is the tool pressing on exactly? The top threaded stud? Or is it pressing down on the flange (you call it the "metal plate of ball joint")?
1 CENTIMETER of play?! My lower ball joints have ~2mm and I'm thinking about changing them? Should I go ahead and do it or is 2mm fine?
The car makes a pretty loud squeaking over speed bumps but I think it may be the front swaybar? Or is it most likely the ball joints?
So you press in the new ball joint from the top downwards? Where is the tool pressing on exactly? The top threaded stud? Or is it pressing down on the flange (you call it the "metal plate of ball joint")?
 08-19-2010, 05:35 AM
#21
Junior Member

Join Date: Feb 2007
Location: Koblenz,Germany/Chicago Suburb,Illinois
Posts: 34
Likes: 0
Received 0 Likes
on
0 Posts
2002 S320-CDI
Great write-up!!!
What Torque values did you use for the nut? Step 1: 50nm, Step 2: Turn nut an additional 60 degrees (1/6th of a turn)????
What Torque values did you use for the nut? Step 1: 50nm, Step 2: Turn nut an additional 60 degrees (1/6th of a turn)????
08-19-2010, 11:42 AM
#22
Senior Member
Thread Starter
Join Date: Jul 2007
Location: Bay Area
Posts: 421
Likes: 0
Received 14 Likes
on
8 Posts
2004 E500 CLK320
I just tightened the nut using a 1-ft handle bar (1-ft pipe on the handle of the wrench) until I can't turn the nut anymore w/ "reasonable" amount of force.


