

 06-15-2015, 01:17 PM
Last edit by: IB Advertising
See related guides and technical advice from our community experts:
- Mercedes-Benz E-Class: How to Replace Third Brake Light
Step by step instructions for do-it-yourself repairs

Third Brake Light Unit (LED) Removal and Replacement
 06-02-2008, 09:12 AM
#1
Junior Member
Thread Starter

Join Date: Jun 2008
Location: England
Posts: 29
Likes: 0
Received 0 Likes
on
0 Posts
E-270 Avantgarde
Third Brake Light Unit (LED) Removal and Replacement
A basic guide on replacing the third LED brake light which is found on the boot/trunk lid.
The new part:
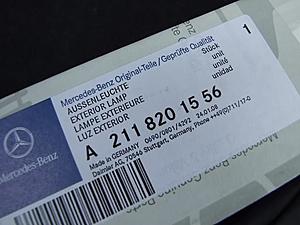
Part no: # A2118201256
Cost: Ł71.80 inc VAT (UK)
If you look at the third brake light unit, you'll notice it comes in two parts.
1. A black housing which has the PCB and the LEDs itself. This has two sliding black tabs which help it hook onto the red plastic bit. This is refered throughout the guide as black housing.
2. The outer red plastic bit (the visible part of the unit from outside the car). On the underside, it has grey plastic tabs which fit into the black housing. This is refered throughout the guide as red plastic bit.
The guide:
1. Open the boot/trunk lid.
2. Remove the Warning Triangle from it's braket.

3. Using a flathead screwdriver, pull out the small grommet pins then the grommets itself. Four in total, check picture for locations.
4. Using a flathead screwdriver (narrow head) or an allen key of the correct size, unscrew the six screws holding the plastic trim along the bottom of the boot/trunk lid. Six screws in total, check picture for locations. Remove the plastic trim.
5. Once the grommets (four) and screws (six) have been removed, unhook the carpet from where the plastic was located and pull back the carpet until you can see the third brake light housing at the top corner. You may need to unclip the power to the boot/trunk light to allow you to do this.

6. The image above is what you should see. There are two sliding tabs which need to be moved in the directions shown which will then unhook the black housing. Note: The left tab has been moved across and is unhooked. The right tab is in it's original position and still needs to be slid across. Now, slide the two tabs to unhook them. You will need to use moderate pressure, but they should move easily enough.
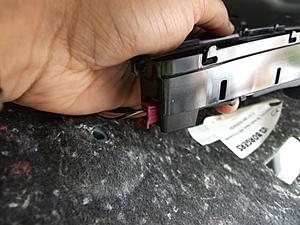
7. Here is the tricky bit. Once the two sliding tabs have been unhooked, using a kind of forward and back wiggling motion loosen the black housing. If you notice, the hole you're working through is smaller than the length of the housing. What you need to do is to push the black housing to the left, then once the right side is clear of the hole's edge on the right, pull it out. Pull out the black housing so you can see the power plug. Unclip the power plug (picture below) then the black housing will be free.
--- NOTE ---
Now at this point, I tried to install the new black housing to finish the job, but because of the tight space, there was no way for me to get the grey plastic tabs (from the red plastic bit of the light) into the slits in the black housing. I had no choice but to remove the red plastic bit.
--- END NOTE ---
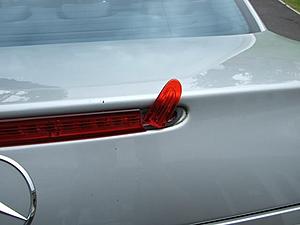
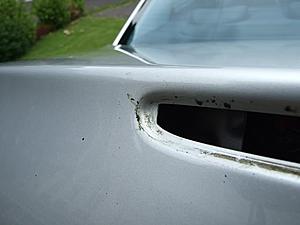
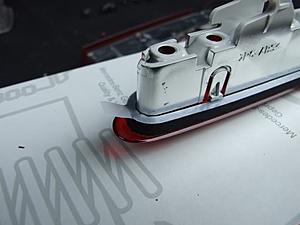
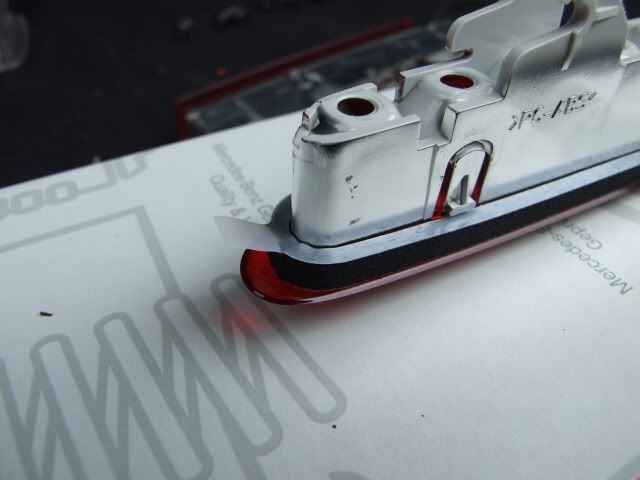
8. Now working on the outside of the boot/trunk lid, using a flathead screwdriver, lift up the red light from it's recess and slowly pull it out of the hole. There is a sticky foam strip which holds the part in place. If you can, pull that out and then the light should pull out with moderate effort. I broke my light as you can see. Since you have a new red light, you may as well snap yours apart (much easier!). See below.
9. Using white spirit and a cloth, wipe the grime left by dirt and glue from the recess. Otherwise the new sticky foam strip may not make a good contact.
10. Open your new part box and remove the new third brake light unit. Seperate the black housing and the red light bit from each other. Working back inside the boot/trunk lid, connect the power plug to the black housing unit.
11. Carefully put the left side of the black housing back inside the hole and position it as far left as you can until the right side can pop inside the hole. Then move the black housing to the centre of the hole.
12. Remove the backing paper from the sticky foam strip found on the underside of the red light bit.
13. Push the new red light bit through the hole on the outside of the car and press firmly into the recess.
15. Push the black housing onto the grey plastic tabs and then slide the black plastic tabs in the opposite directions as previously mentioned above. This should now lock the black housing in place. Once again, a moderate amount of force will be needed. You'll hear a 'click' for each tab once it's in place.
16. If you unplugged the boot/trunk light, reconnect it now.
17. Unfold the carpet back to how it should be and work backwards from instructions 5 to 1.
18. Check that you have no left over screws, grommets and grommet pins.
19. Close the boot/trunk lid and test your lights.
20. Victory dance.
Hopefully this will be of help to some of you.

The new part:
Part no: # A2118201256
Cost: Ł71.80 inc VAT (UK)

If you look at the third brake light unit, you'll notice it comes in two parts.
1. A black housing which has the PCB and the LEDs itself. This has two sliding black tabs which help it hook onto the red plastic bit. This is refered throughout the guide as black housing.
2. The outer red plastic bit (the visible part of the unit from outside the car). On the underside, it has grey plastic tabs which fit into the black housing. This is refered throughout the guide as red plastic bit.
The guide:
1. Open the boot/trunk lid.
2. Remove the Warning Triangle from it's braket.

3. Using a flathead screwdriver, pull out the small grommet pins then the grommets itself. Four in total, check picture for locations.
4. Using a flathead screwdriver (narrow head) or an allen key of the correct size, unscrew the six screws holding the plastic trim along the bottom of the boot/trunk lid. Six screws in total, check picture for locations. Remove the plastic trim.
5. Once the grommets (four) and screws (six) have been removed, unhook the carpet from where the plastic was located and pull back the carpet until you can see the third brake light housing at the top corner. You may need to unclip the power to the boot/trunk light to allow you to do this.

6. The image above is what you should see. There are two sliding tabs which need to be moved in the directions shown which will then unhook the black housing. Note: The left tab has been moved across and is unhooked. The right tab is in it's original position and still needs to be slid across. Now, slide the two tabs to unhook them. You will need to use moderate pressure, but they should move easily enough.
7. Here is the tricky bit. Once the two sliding tabs have been unhooked, using a kind of forward and back wiggling motion loosen the black housing. If you notice, the hole you're working through is smaller than the length of the housing. What you need to do is to push the black housing to the left, then once the right side is clear of the hole's edge on the right, pull it out. Pull out the black housing so you can see the power plug. Unclip the power plug (picture below) then the black housing will be free.

--- NOTE ---
Now at this point, I tried to install the new black housing to finish the job, but because of the tight space, there was no way for me to get the grey plastic tabs (from the red plastic bit of the light) into the slits in the black housing. I had no choice but to remove the red plastic bit.
--- END NOTE ---
8. Now working on the outside of the boot/trunk lid, using a flathead screwdriver, lift up the red light from it's recess and slowly pull it out of the hole. There is a sticky foam strip which holds the part in place. If you can, pull that out and then the light should pull out with moderate effort. I broke my light as you can see. Since you have a new red light, you may as well snap yours apart (much easier!). See below.

9. Using white spirit and a cloth, wipe the grime left by dirt and glue from the recess. Otherwise the new sticky foam strip may not make a good contact.

10. Open your new part box and remove the new third brake light unit. Seperate the black housing and the red light bit from each other. Working back inside the boot/trunk lid, connect the power plug to the black housing unit.
11. Carefully put the left side of the black housing back inside the hole and position it as far left as you can until the right side can pop inside the hole. Then move the black housing to the centre of the hole.
12. Remove the backing paper from the sticky foam strip found on the underside of the red light bit.

13. Push the new red light bit through the hole on the outside of the car and press firmly into the recess.
15. Push the black housing onto the grey plastic tabs and then slide the black plastic tabs in the opposite directions as previously mentioned above. This should now lock the black housing in place. Once again, a moderate amount of force will be needed. You'll hear a 'click' for each tab once it's in place.
16. If you unplugged the boot/trunk light, reconnect it now.
17. Unfold the carpet back to how it should be and work backwards from instructions 5 to 1.
18. Check that you have no left over screws, grommets and grommet pins.
19. Close the boot/trunk lid and test your lights.
20. Victory dance.
Hopefully this will be of help to some of you.
Last edited by ArcaneE270; 06-02-2008 at 09:29 AM.


 06-03-2008, 01:01 PM
#6
Out Of Control!!
Join Date: Jul 2003
Location: North Scottsdale, AZ
Posts: 15,903
Received 4,446 Likes
on
3,154 Posts
'71 Pinto
A basic guide on replacing the third LED brake light which is found on the boot/trunk lid.
The new part: Part no: # A2118201256 Cost: Ł71.80 inc VAT (UK)
 If you look at the third brake light unit, you'll notice it comes in two parts.
1. A black housing which has the PCB and the LEDs itself. This has two sliding black tabs which help it hook onto the red plastic bit. This is refered throughout the guide as black housing.
2. The outer red plastic bit (the visible part of the unit from outside the car). On the underside, it has grey plastic tabs which fit into the black housing. This is refered throughout the guide as red plastic bit.
The guide:
1. Open the boot/trunk lid.
2. Remove the Warning Triangle from it's braket.
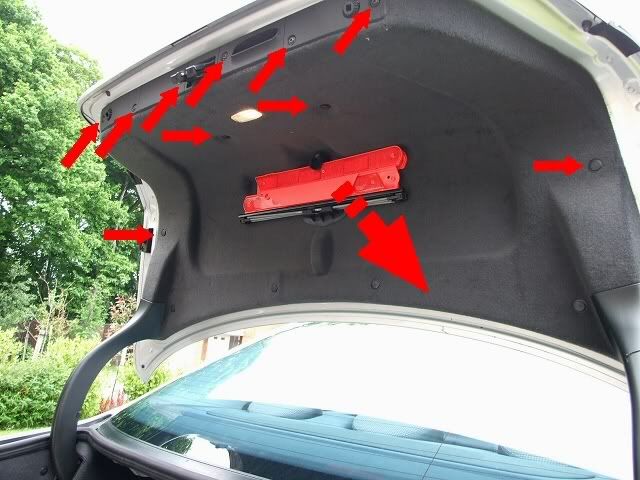 3. Using a flathead screwdriver, pull out the small grommet pins then the grommets itself. Four in total, check picture for locations.
4. Using a flathead screwdriver (narrow head) or an allen key of the correct size, unscrew the six screws holding the plastic trim along the bottom of the boot/trunk lid. Six screws in total, check picture for locations. Remove the plastic trim.
5. Once the grommets (four) and screws (six) have been removed, unhook the carpet from where the plastic was located and pull back the carpet until you can see the third brake light housing at the top corner. You may need to unclip the power to the boot/trunk light to allow you to do this.
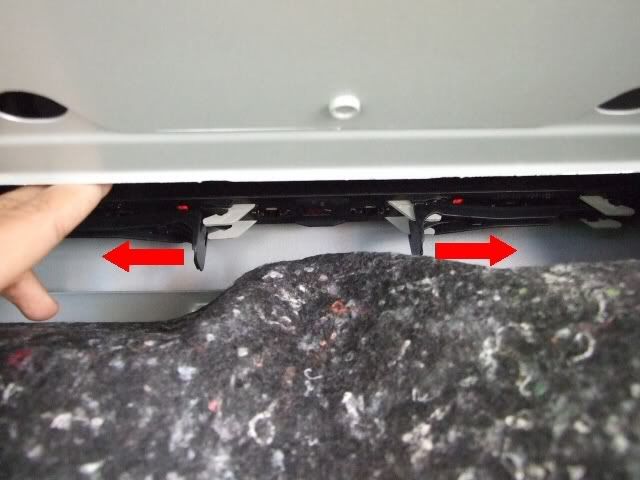 6. The image above is what you should see. There are two sliding tabs which need to be moved in the directions shown which will then unhook the black housing. Note: The left tab has been moved across and is unhooked. The right tab is in it's original position and still needs to be slid across. Now, slide the two tabs to unhook them. You will need to use moderate pressure, but they should move easily enough.
7. Here is the tricky bit. Once the two sliding tabs have been unhooked, using a kind of forward and back wiggling motion loosen the black housing. If you notice, the hole you're working through is smaller than the length of the housing. What you need to do is to push the black housing to the left, then once the right side is clear of the hole's edge on the right, pull it out. Pull out the black housing so you can see the power plug. Unclip the power plug (picture below) then the black housing will be free.
 --- NOTE ---
Now at this point, I tried to install the new black housing to finish the job, but because of the tight space, there was no way for me to get the grey plastic tabs (from the red plastic bit of the light) into the slits in the black housing. I had no choice but to remove the red plastic bit.
--- END NOTE ---
8. Now working on the outside of the boot/trunk lid, using a flathead screwdriver, lift up the red light from it's recess and slowly pull it out of the hole. There is a sticky foam strip which holds the part in place. If you can, pull that out and then the light should pull out with moderate effort. I broke my light as you can see. Since you have a new red light, you may as well snap yours apart (much easier!). See below.
9. Using white spirit and a cloth, wipe the grime left by dirt and glue from the recess. Otherwise the new sticky foam strip may not make a good contact.
 10. Open your new part box and remove the new third brake light unit. Seperate the black housing and the red light bit from each other. Working back inside the boot/trunk lid, connect the power plug to the black housing unit.
11. Carefully put the left side of the black housing back inside the hole and position it as far left as you can until the right side can pop inside the hole. Then move the black housing to the centre of the hole.
12. Remove the backing paper from the sticky foam strip found on the underside of the red light bit.
 13. Push the new red light bit through the hole on the outside of the car and press firmly into the recess.
15. Push the black housing onto the grey plastic tabs and then slide the black plastic tabs in the opposite directions as previously mentioned above. This should now lock the black housing in place. Once again, a moderate amount of force will be needed. You'll hear a 'click' for each tab once it's in place.
16. If you unplugged the boot/trunk light, reconnect it now.
17. Unfold the carpet back to how it should be and work backwards from instructions 5 to 1.
18. Check that you have no left over screws, grommets and grommet pins.
19. Close the boot/trunk lid and test your lights.
20. Victory dance.
Hopefully this will be of help to some of you.
The new part: Part no: # A2118201256 Cost: Ł71.80 inc VAT (UK)
If you look at the third brake light unit, you'll notice it comes in two parts.1. A black housing which has the PCB and the LEDs itself. This has two sliding black tabs which help it hook onto the red plastic bit. This is refered throughout the guide as black housing.
2. The outer red plastic bit (the visible part of the unit from outside the car). On the underside, it has grey plastic tabs which fit into the black housing. This is refered throughout the guide as red plastic bit.
The guide:
1. Open the boot/trunk lid.
2. Remove the Warning Triangle from it's braket.
3. Using a flathead screwdriver, pull out the small grommet pins then the grommets itself. Four in total, check picture for locations.4. Using a flathead screwdriver (narrow head) or an allen key of the correct size, unscrew the six screws holding the plastic trim along the bottom of the boot/trunk lid. Six screws in total, check picture for locations. Remove the plastic trim.
5. Once the grommets (four) and screws (six) have been removed, unhook the carpet from where the plastic was located and pull back the carpet until you can see the third brake light housing at the top corner. You may need to unclip the power to the boot/trunk light to allow you to do this.
6. The image above is what you should see. There are two sliding tabs which need to be moved in the directions shown which will then unhook the black housing. Note: The left tab has been moved across and is unhooked. The right tab is in it's original position and still needs to be slid across. Now, slide the two tabs to unhook them. You will need to use moderate pressure, but they should move easily enough.7. Here is the tricky bit. Once the two sliding tabs have been unhooked, using a kind of forward and back wiggling motion loosen the black housing. If you notice, the hole you're working through is smaller than the length of the housing. What you need to do is to push the black housing to the left, then once the right side is clear of the hole's edge on the right, pull it out. Pull out the black housing so you can see the power plug. Unclip the power plug (picture below) then the black housing will be free.
--- NOTE ---Now at this point, I tried to install the new black housing to finish the job, but because of the tight space, there was no way for me to get the grey plastic tabs (from the red plastic bit of the light) into the slits in the black housing. I had no choice but to remove the red plastic bit.
--- END NOTE ---
8. Now working on the outside of the boot/trunk lid, using a flathead screwdriver, lift up the red light from it's recess and slowly pull it out of the hole. There is a sticky foam strip which holds the part in place. If you can, pull that out and then the light should pull out with moderate effort. I broke my light as you can see. Since you have a new red light, you may as well snap yours apart (much easier!). See below.
9. Using white spirit and a cloth, wipe the grime left by dirt and glue from the recess. Otherwise the new sticky foam strip may not make a good contact.
10. Open your new part box and remove the new third brake light unit. Seperate the black housing and the red light bit from each other. Working back inside the boot/trunk lid, connect the power plug to the black housing unit.11. Carefully put the left side of the black housing back inside the hole and position it as far left as you can until the right side can pop inside the hole. Then move the black housing to the centre of the hole.
12. Remove the backing paper from the sticky foam strip found on the underside of the red light bit.
13. Push the new red light bit through the hole on the outside of the car and press firmly into the recess.15. Push the black housing onto the grey plastic tabs and then slide the black plastic tabs in the opposite directions as previously mentioned above. This should now lock the black housing in place. Once again, a moderate amount of force will be needed. You'll hear a 'click' for each tab once it's in place.
16. If you unplugged the boot/trunk light, reconnect it now.
17. Unfold the carpet back to how it should be and work backwards from instructions 5 to 1.
18. Check that you have no left over screws, grommets and grommet pins.
19. Close the boot/trunk lid and test your lights.
20. Victory dance.
Hopefully this will be of help to some of you.

Trending Topics
 07-07-2009, 11:18 AM
#9
I had to replace mine. Didnt get the 2004 one but the new facelift one with fewer, 12(?) LEDs fit fine.
I had a little corner of mine chip off and we are now in the midst of fairly heavy rain, my trunk was almost flooded and the carpet was getting real smelly!!!! I couldn't, for the love of God, figure out where the leak was from, but the culprit showed up when i took off the trunk lid lining!
I had a little corner of mine chip off and we are now in the midst of fairly heavy rain, my trunk was almost flooded and the carpet was getting real smelly!!!! I couldn't, for the love of God, figure out where the leak was from, but the culprit showed up when i took off the trunk lid lining!
07-25-2009, 02:31 PM
#10

Great post thanks, just few questions!
1. Where is the best place to buy A2118200156 or A2118201556 in the UK? dealer wants Ł70 for just the part!
2. what’s the difference between A2118200156 and A2118201556, my 2003 currently has A2118200156.
3. Does anyone have a circuit diagram for the led strip?
From the power connecter the first 4 LEDs are dim! Was hoping I could fix it!
06-17-2010, 10:04 PM
#11
Newbie

Join Date: Sep 2006
Posts: 8
Likes: 0
Received 0 Likes
on
0 Posts
FYI guys. I ordered and received today part number A2118201556. $108 shipped from UK to US. Stealership wants $200 plus tax in the SF bay area.
Here is the website I ordered from:
http://www.partsformercedes-benz.com
Good luck.
Here is the website I ordered from:
http://www.partsformercedes-benz.com
Good luck.
08-11-2010, 04:11 PM
#12
Junior Member

Join Date: Mar 2008
Posts: 17
Likes: 0
Received 0 Likes
on
0 Posts
E320 year 2004
I read the removal & replacement thread about third brake light for E320 MB, but what happened to the pictures that were mentions in the thread? can you please download those pictures.
thanks
thanks
08-11-2010, 06:31 PM
#14
Junior Member
Thread Starter
Join Date: Jun 2008
Location: England
Posts: 29
Likes: 0
Received 0 Likes
on
0 Posts
E-270 Avantgarde
 12-06-2010, 11:03 PM
#15
MBWorld Fanatic!

Join Date: Jul 2010
Location: Colorado
Posts: 1,477
Likes: 0
Received 1 Like
on
1 Post
07' SL65, 04' E55, 03' Evo8, 08' GSXR, DSM's...
Thanks for the informative post. I will more than likely be tackling this job soon as my third brake light just went out. I may try and purchase some similar led's and solder them on there first.
Aaron
Aaron
12-08-2010, 12:59 PM
#16
Newbie

Join Date: Nov 2009
Posts: 1
Likes: 0
Received 0 Likes
on
0 Posts
E 320cdi W211 Avantgarde
Hi all,
The leds can be replaced individually if you can handle a soldering iron. Have a look here:
http://www.mbfaq.com/viewtopic.php?f=36&t=109212
Regards
Ted
The leds can be replaced individually if you can handle a soldering iron. Have a look here:
http://www.mbfaq.com/viewtopic.php?f=36&t=109212
Regards
Ted
12-08-2010, 06:36 PM
#17
Member

Join Date: Sep 2010
Posts: 134
Likes: 0
Received 0 Likes
on
0 Posts
2006 E320 CDI 235 hp 420 ft tq
I replace mine and the gasket that let the water in to make the LED lights go out.
The part was $212 USD it was the whole 3rd brake light with the new gasket.
I could not find it any other way it.
The part was $212 USD it was the whole 3rd brake light with the new gasket.
I could not find it any other way it.
01-06-2011, 10:13 PM
#18
MBWorld Fanatic!
Join Date: Apr 2008
Location: Queens, NY
Posts: 1,762
Likes: 0
Received 1 Like
on
1 Post
04 w211 E55
I must say thank you very much !! I followed your 100% clear and accurate instructions and got my 3rd brake light in there and I'm not even that handy. Thanks again.
04-09-2011, 03:33 PM
#19
Newbie

Join Date: Jul 2007
Location: SoCal
Posts: 9
Likes: 0
Received 0 Likes
on
0 Posts
2014 E550, 2003 E500, 1999 GMC Sierra, 2012 Acura TL SH-AWD
Changing third brake light
Good instructions. Was an easy job. One note though, after prying the red lens off I was left wondering why I even need to remove the red lens at all. The LED's are in the black housing. Could have done it in half the time just snapping on the new housing and leaving the lens
04-09-2011, 03:39 PM
#20
Newbie
Join Date: Jul 2007
Location: SoCal
Posts: 9
Likes: 0
Received 0 Likes
on
0 Posts
2014 E550, 2003 E500, 1999 GMC Sierra, 2012 Acura TL SH-AWD
Changing third brake light
Hi all,
The leds can be replaced individually if you can handle a soldering iron. Have a look here:
http://www.mbfaq.com/viewtopic.php?f=36&t=109212
Regards
Ted
The leds can be replaced individually if you can handle a soldering iron. Have a look here:
http://www.mbfaq.com/viewtopic.php?f=36&t=109212
Regards
Ted
04-10-2011, 03:35 AM
#21
Junior Member
Thread Starter
Join Date: Jun 2008
Location: England
Posts: 29
Likes: 0
Received 0 Likes
on
0 Posts
E-270 Avantgarde
Good instructions. Was an easy job. One note though, after prying the red lens off I was left wondering why I even need to remove the red lens at all. The LED's are in the black housing. Could have done it in half the time just snapping on the new housing and leaving the lens
04-10-2011, 03:53 AM
#22
Member

Join Date: Jan 2008
Location: Chicago IL
Posts: 100
Likes: 0
Received 0 Likes
on
0 Posts
S550, E320 Sport Wagon and A170CDI :)
Do you guys know how to replace the third stop light in wagon?> I have the model before facelifting and wanted to change the third stop light to the wider one which is great!
hubi
hubi
 06-24-2013, 11:15 AM
#24
Member
Oh man, what am I getting into. I'm selling my e39 M5 today and buying a W211 E550 tomorrow. I just had to do this on my M5 and it took like 10 minutes. Granted, that light is at the base of the window vs. in the trunk, but geez.....
10-01-2013, 02:49 PM
#25

I love this place. Thanks for the help, smooth replacement and didnt need to change the cover. I did howeve rhave a wiring issue that I probably should have inspected first. Now Im pretty sure my original unit was working fine and it was just a wiring issue. Oh well you live and learn, now I have what I presume is an extra used but fully operational LED brake light and brand new cover sitting around.
Last edited by twowheelmarc; 10-03-2013 at 09:19 AM.


