


 . This should be a sticky or something.

 Jun 16, 2015, 01:38 PM
Last edit by: IB Advertising
See related guides and technical advice from our community experts:
Browse all: Steering and Suspension
- Mercedes Benz C Class How to Install Lowering Springs
Step by step instructions for do-it-yourself repairs
Browse all: Steering and Suspension

**DIY**Detailed H&R Spring install With Pictures & 20 Easy steps!!
Thread Starter
MBWorld Fanatic!


Joined: Nov 2009
Posts: 1,564
Likes: 6
AMG Fam
**DIY**Detailed H&R Spring install With Pictures & 20 Easy steps!!
This is just a Guide. Install at your own Risk.
Tools Needed:
-Floor Jack
-2 Jack stands
-Flat Blade Screwdriver
-Vise Grips
- Very Small Flat blade (For strut ring if MB tool is not handy)
-Zip Ties
-1/2 Sockets 18,19,21 (Socket wrench and or Impact)
-1/4 10mm Socket (1/4 Socket Wrench)
-18mm Gear wrench (If Handy)
-Allan Keys (3/8 drive allans are best)
-9/16 Wrench
-Patience.
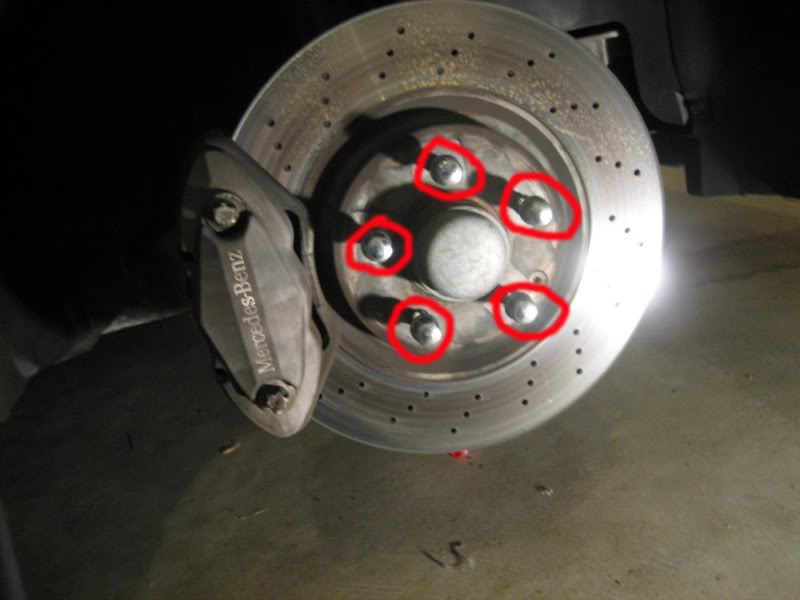
Step 1:
Star by Locating The Safe Lift points and jack the car up. Place jackstand's on the two front lift points as shown then remove the jack.

Step 2:
Remove Front Wheels, and Hand thread the Studs back on so you dont loose them as pictured
Step 3:
Place the floor jack on the Lower control arm right under the strut. Stay in the safe zone away from the rotor and dust sheild. Then Begin to raise the jack until the strut is fully compressed.

Step 4:
Loosten the 18mm Nut on the Sway bar link (you may need an 18mm wrench and an allan key to hold the stud while removing the nut.

Step 5: Once the nut is removed, SLOWLY lower the jack until you see the thredded stud straighten out once it does that Stop the jack ASAP. and pull the sway bar link out.

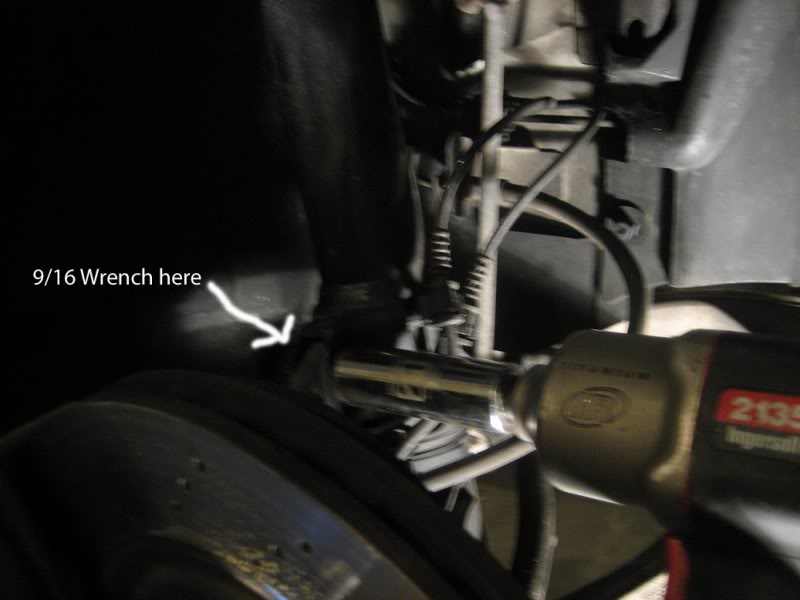
Step 6:
Using your 9/16's Wrench (dont worry if you dont have torx.) and your 21 mm on the other side break it loose and remove. the bolt and nut. Releasing the strut from the Wheel/Hub Assembly.
Step 7:
Now you have 2 more bolts to go before the strut is almost free. They are located on the back side of the strut and they are 19mm.

Step 8: It is not Necessary nor Recomended to mess with taking off a brake line. If it is Avoidable. So start by removing the abs cables from theirplastic holders
Step 9: Once you have the cables free cut the factory zip tie and pull it out of the way.

Step 10:
Using your Flat head Screwdriver place it inbetween the highlighted area and slightly start to pull the plastic holder away from the metal strut (do this easily and by hand if you can to avoid breaking it.

Step 11: Once that is Off the strut and out of the way make your way to the engine bay. Remove the Black plastic Cap That covers the 21mm Strut nut. Once removed, Using your impact remove the nut. Be carefull because there is a washer under the nut that is hard to spot if your not paying attention. Then Remove the Black metal "collar" going across the top of the strut rod.

Step 12: Pretty straight forward, Make your way back down the the base of the strut and as long as everything is out of the way, Start to pull it down. It may take a second, There is a rubber boot all the way around it at the top that keeps dirt and what not out of the strut bearing. The strut is now out!!
**Sorry for the missing pictures i forgot my camera before i left for the shop
 **
**Step13: If you don't feel safe its best just to leave this step to an expert. any shop that does suspension would gladly compress and swap the springs for you.
I went to a local Shop and used there wall mounted spring compressor myself (I use to work there)
Once the spring is compressed Completly, Take your Vise grips and attach the to the base at the top of the strut, Then using an allan key (If you have one on a 3/8 Drive thats best) insert it in the opening at the top and break it loose. Then Proceed to remove it while holding the bottom of the strut. and the strut will eventually be free Then just Pull it Out.
**There is a small circular ring that actually keeps this whole assembly together do not loose it. (I'ts located under the bearing once removed.
Step 14: Swap your spring out and once it is fully tensioned slip the strut through the bottom Lining up the end coils with there seats at the top and bottom of the strut. Then line the tophat up with the strut rod and slide it through. Holding the strut secure, Take that little ring i was telling you about and start to thread it on the threded part of the strut. Using a Small Flat blade almost like an eyeglasses repair blade use it to run the ring around the thredded strut. Until you have about an inch of threds showing (there is a Special Tool That can be purchased from MB as well to do this) If you do not use the special tool please be carefull not to mess up the threads on the strut. There are 2 indented grooves in the ring that face up. Thats what you use as leverage with the screwdriver.
Step 15: Un Tension the spring from the spring compressor and you should be good to go for Re-Assembly Make sure to RE check the coil seats and make sure they are seited properly. (You can get spring compressors from Auto zone i just dont trust them)
Step 16: Place the strut back in the upper strut mount and Tighten the 2 19mm bolts and the 21 mm nut and torx bolt. Place jack back under the Lower control arm and slowly jack up. Then move to the top place the "Collar across the strut lining up the grooves that lock it in place add you washer and tighten your nut down. Then work your way back down and lower the jack until you can slip the sway bar link back through the strut. **Add a washer before the bolt** and tighten. Repeat these steps on the other side and YOUR DONE with the front and more than half the battle!!!
Step 17: Place Floor jack on Rear diff and Jack up until you can slide your 2 floor jacks on the rear lift points. Once they are placed in the right position lower the jack.
Step 18: Locate the two 10mm Dust cover bolts and remove them then pull the cover off and place your jack under the 18mm Bolt on the lower control arm and snug your jack to it. Using a deep 18mm socket and wrench on the back nut, Impact the front 18mm off. Pull the Bolt out and SLOWLY lower the jack causing the lower control arm to come down enough to remove the stock spring.


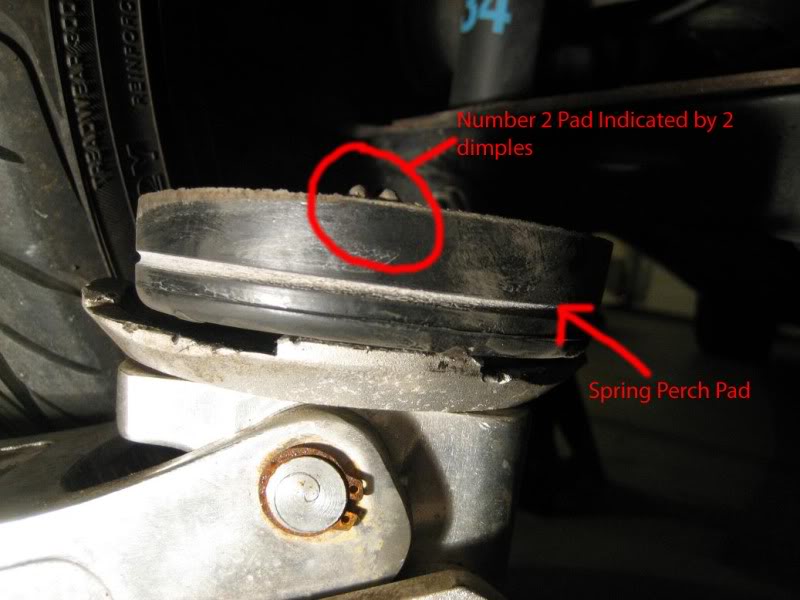
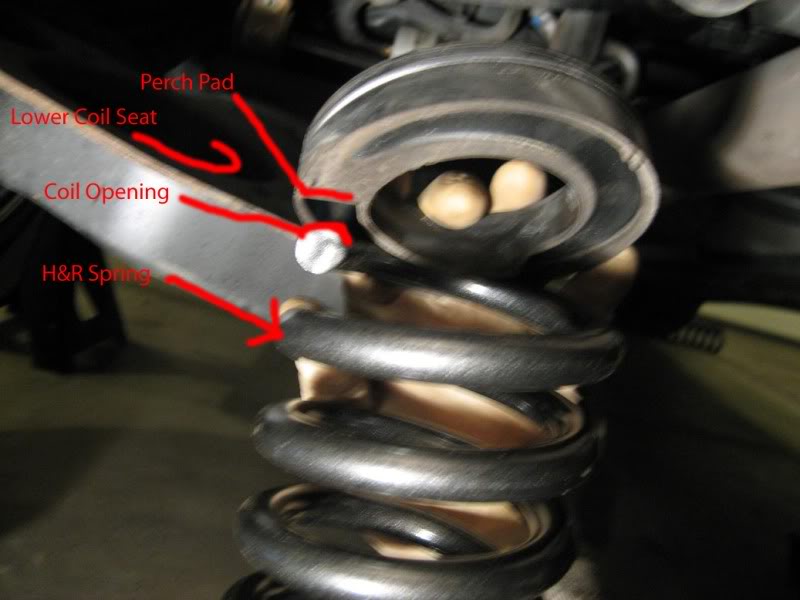
Step 19: Remove old spring, and replace it with the new H&R spring Lining up the upper and lower spring seats one on the rubber perch and one on the inside of the LCA. Either use your factory Spring perch (mine was a #2 from the factory.) they range form 1-4 1 being the lowest possibe drop. They can be identified by the dimples in the picture below.
Step 20: Once the spring is placed back in its orig. Position. Place the jack back under the LCA jack it up until you can slide the bolt through.
Then tighten the nut back onto the bolt. lower the jack and repeat on the other side YOUR DONE!!
I would like to thank the people that make this site possible. I have learned alot already on this site and would like to show something in return so enjoy guys!!
Evolution Of another W203 Thread to come!!!

Teaser right after install:

Last edited by Evolved8; Feb 21, 2010 at 01:13 AM.
Trending Topics
MB World Stories
The Best of Mercedes & AMG

Manual Mercedes? 6 Times Sindelfingen Let Drivers Have All The Fun
Verdad Gallardo
Mercedes SLR McLaren 722 S Is Extremely Rare Example Modified by McLaren
Verdad Gallardo
8 Classic Boxy Mercedes Designs That Have Aged Like Fine Wine
Verdad Gallardo
Flawlessly Restored Mercedes 190E Evo II Heads to Auction
Verdad Gallardo
Electric Mercedes C-Class Unveiled: 11 Things You Need to Know
Verdad Gallardo
Mercedes EQS Gets A Major Update: Everything You Need to Know
Verdad Gallardo
5 Underrated Mercedes-Benz Models That Don't Get the Love They Deserve
Verdad Gallardo
Mercedes 300D Has Pushed Well Past 1 Million Miles and It Ain't Stopping
Verdad Gallardo
10 Most Reliable Mercedes-Benz Models You Can Buy Used
Verdad Gallardo


Member
Joined: Jul 2009
Posts: 160
Likes: 0
From: Houston, Texas
2014 Mercedes Benz E350
man car looks great. how is the ride, do u scratch or rub?? and how long did ur car drop? i am also planning on getting some h&r springs but ya overall ur car looks great!
but ya overall ur car looks great!
Thread Starter
MBWorld Fanatic!
Joined: Nov 2009
Posts: 1,564
Likes: 6
AMG Fam
No rubbing or scratching. Obv a stiffer sport ride. Not stock but the body roll is gone I like how it rides. If you need the hook up on springs let me know a local shop here has the best pricing!!!
Super Moderator Alumni

Joined: Oct 2002
Posts: 8,692
Likes: 58
From: So Cal.
2019 GT3 RS, 2017 M3 30 Jahre


