


I'm getting that "clunk" in my steering when I wiggle the wheel left and right while the car is stopped, and there is a bit of slack when I go up curbs.
I've already replaced struts, mounts, control arms, sway bar links on the car. The tie rod ends seem solid. The sound is coming from right around the steering rack pinion gear area. There is no play in the steering movement that I can see ... so my suspicion is the steering rack bushings.
I would like to inspect the bushings and replace them if needed. Question is, can I do this with the rack still on the car or do I have to remove it? I have not tried taking off the bottom plate yet -- would like to do a bit more research on this first before I start pulling this area apart.
Thanks. John

Super Member
u have to remove the rack and need a press to install the bushes
u can physically look at the bushings and see if they dance when someone turns the wheel
u can physically look at the bushings and see if they dance when someone turns the wheel
Member
Hi John,
I am not sure if it is similar to my case, I had a clunk when going up a slope and turning right typically in a parking lot. It was a bit like a one knock at a time every time turning right at slow speed.
I have replaced lower and upper bushings, sway bar end links, no luck, the noise was even louder. So I changed a mechanic, they just tighten the front wheel bearing (it was loose), and the clunk is gone for $20 in my case.
Cheers,.
S.
For rack bushing info>
https://mbworld.org/forums/c-class-w...ing-wheel.html

to replace the steering rack bushing you do not need to remove the rack and the bushing does NOT get pressed in..
i did mines was a tough litle job beacuse i didnt have a lift..but once the bolts are remove you can lift the rack and replace the bushings..
i did mines was a tough litle job beacuse i didnt have a lift..but once the bolts are remove you can lift the rack and replace the bushings..
Quote:
I am not sure if it is similar to my case, I had a clunk when going up a slope and turning right typically in a parking lot. It was a bit like a one knock at a time every time turning right at slow speed.
I have replaced lower and upper bushings, sway bar end links, no luck, the noise was even louder. So I changed a mechanic, they just tighten the front wheel bearing (it was loose), and the clunk is gone for $20 in my case.
Thanks for the ideas ... but I've already checked the wheels and they are pretty snug. It's definitely the steering rack near the steering column that the noise is coming from. I'm hoping it's just the left-side bushing.Originally Posted by Song
Hi John,I am not sure if it is similar to my case, I had a clunk when going up a slope and turning right typically in a parking lot. It was a bit like a one knock at a time every time turning right at slow speed.
I have replaced lower and upper bushings, sway bar end links, no luck, the noise was even louder. So I changed a mechanic, they just tighten the front wheel bearing (it was loose), and the clunk is gone for $20 in my case.
Quote:
i did mines was a tough litle job beacuse i didnt have a lift..but once the bolts are remove you can lift the rack and replace the bushings..
Originally Posted by WaveyKat
to replace the steering rack bushing you do not need to remove the rack and the bushing does NOT get pressed in..i did mines was a tough litle job beacuse i didnt have a lift..but once the bolts are remove you can lift the rack and replace the bushings..
Yeah, looking at those bushings they seem like the type that, with a bit of silicone grease, might pop right in with a firm push. My son's Honda Accord rear sway bar link bushings I could actually press in by hand.
I suspected I might be able to leave the hydraulic lines connected at least. But do I need to disconnect the steering column coupler, or does that have a u-joint so I can twist the rack to raise it?
And can you give me more detail on how you got the old bushings out and the new ones in? Specifically what tools you used? Did you push or pull them out? Lube the new ones? Any specific angles you worked with? I'll have the car up on 8" ramps so I'm expecting to be in the same boat as you.
Thanks. John
hey sorry for the late reply.. i changed mines out last year.. umm i cant really remmeber
but i know once the Rack is loose you can push up on the rack then use the other hand or a friend to push out the bushhings mines was easy to come out and easy to go in just lube it. you dont need to disconnect any lines.
but i know once the Rack is loose you can push up on the rack then use the other hand or a friend to push out the bushhings mines was easy to come out and easy to go in just lube it. you dont need to disconnect any lines.
Thanks -- that's what I wanted to know. The bolts don't seem to be that much of a big deal. Now I just need to check for play (which is hopefully my problem and not a loose pinion), and buy some bushings if it needs it. If I do this I will post my results.
Oh, I forgot to ask, did you have to disconnect the steering shaft from the rack or is there a pivot on it?
Oh, I forgot to ask, did you have to disconnect the steering shaft from the rack or is there a pivot on it?

Newbie
I suspect I have the similar issue. Could somebody share the steering rack bushing replacement procedure? Thanks!
MB World Stories
The Best of Mercedes & AMG
Explore

Manual Mercedes? 6 Times Sindelfingen Let Drivers Have All The Fun
Verdad Gallardo
Mercedes SLR McLaren 722 S Is Extremely Rare Example Modified by McLaren
Verdad Gallardo
8 Classic Boxy Mercedes Designs That Have Aged Like Fine Wine
Verdad Gallardo
Flawlessly Restored Mercedes 190E Evo II Heads to Auction
Verdad Gallardo
Electric Mercedes C-Class Unveiled: 11 Things You Need to Know
Verdad Gallardo
Mercedes EQS Gets A Major Update: Everything You Need to Know
Verdad Gallardo
5 Underrated Mercedes-Benz Models That Don't Get the Love They Deserve
Verdad Gallardo
Mercedes 300D Has Pushed Well Past 1 Million Miles and It Ain't Stopping
Verdad Gallardo
10 Most Reliable Mercedes-Benz Models You Can Buy Used
Verdad GallardoFyi, I haven't done mine yet -- was actually thinking of doing it this weekend (I finally have some time). Here's my recollection of the procedure:
(Note -- this is for rear-drive only ... 4Matic is slightly different)
1. Car up on ramps, lift, jack stands. Give yourself as much wiggle room underneath as you can.
2. Remove both bottom engine/tranny covers.
3. Remove bottom rack retainer plate (black) by removing 8 screws and front two of the four bolts.
4. Remove the other two bolts that hold the steering rack in place. NOTE: all four bolts fasten to a top retainer plate above the rack ... note position of top plate for reinstallation
5. Rack should be loose enough to wiggle around and lift to remove lower bushings. Top bushings should just pry out. As noted above, lube up the new bushings (I'm going to use silicon grease) and press them in. Shouldn't require an excessive amount of force to get them in.
6. Replace two rear bolts that hold the rack. Hand tight for now. Make sure top retainer plate is oriented correctly.
7. Replace bottom retainer plate, two front bolts, and 8 screws.
8. Per Haynes manual, all four bolts torque to 63 ft-lbs (85 Nm). Screws just snug so the retainer plate is held firmly and doesn't rattle.
9. Replace bottom engine/tranny covers.
10. Confirm life insurance is up-to-date, and go for a test drive.
11. Since the new bushings may change the position of the rack and resulting tie-rod geometry ever so slightly, I suggest you take a quick toe-in measurement after your test drive. A simple tape measurement between two corresponding tread grooves on the backside and frontside of the tires should suffice. The rear spacing should be ~ 1/16 to 1/8" more than the front.
On paper this looks pretty simple, Huh? I guess I'll find out this weekend
Good luck -- please post results (and I will do the same).
Thanks. John
PS: As mentioned above, 4Matic is a bit different. My book says that instead of a top retainer plate there are individual nuts for each bolt and the torque settings are different. Not sure how that looks on top since the purpose of the retainer plate is to keep the top of the mounting bolts from moving laterally. If you have a 4Matic let me know and I can add more info from the book here).
MBWorld Fanatic!
Do post a comparison of old worn vs new fresh bushings 
Newbie
Wait for your actual result.
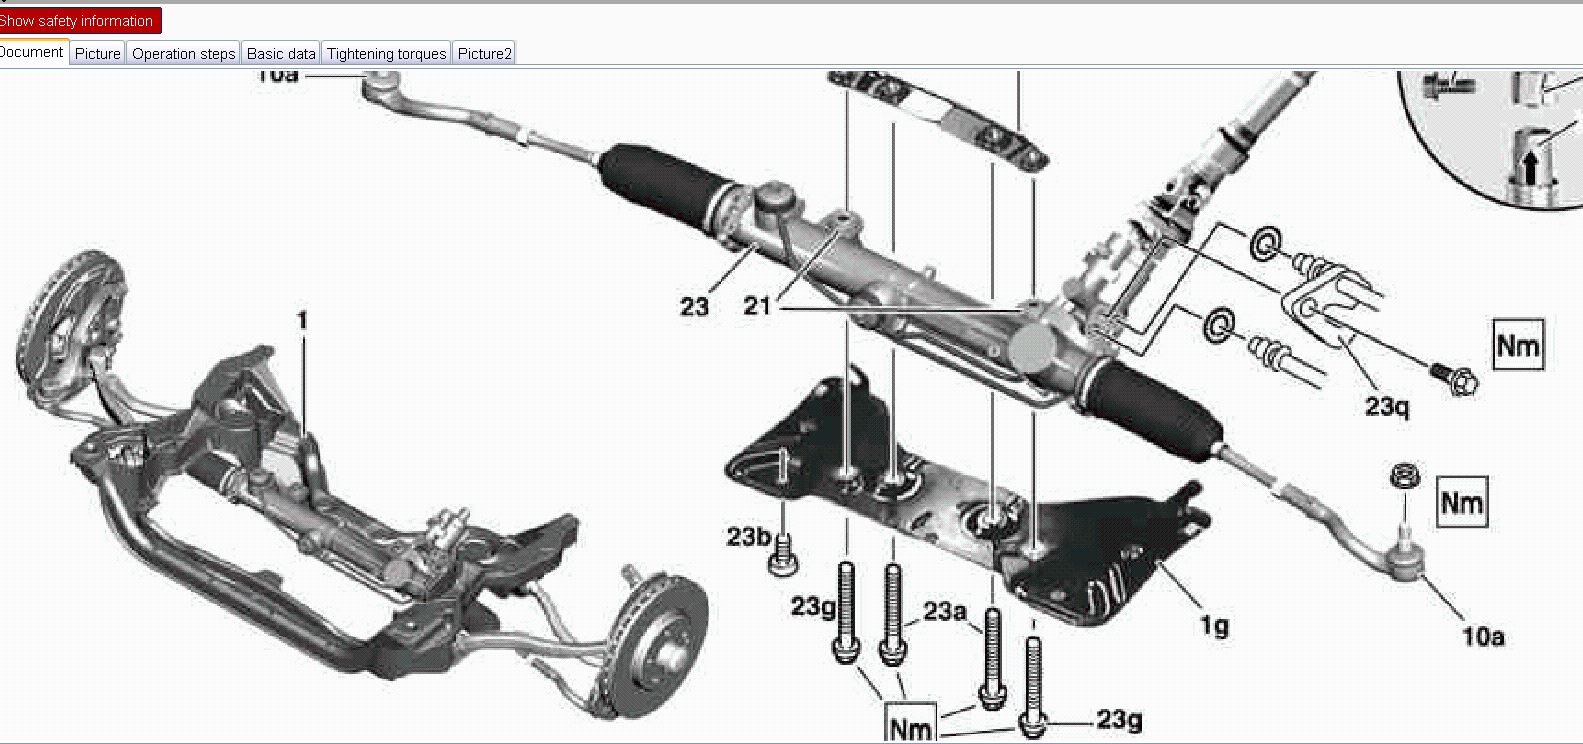
BTW, I checked the WIS for removing the steering rack and captured the following photo.
Removing the top rack retainer plate seems to be easier than removing the bottom rack retainer plate because I think the bottom retainer plate is mounted on axle carrier.
Would it be possible (and easier) to pry out the bottom bushing without removing the bottom rack retainer plate?
Quote:
....
3. Remove bottom rack retainer plate (black) by removing 8 screws and front two of the four bolts.
4. Remove the other two bolts that hold the steering rack in place. NOTE: all four bolts fasten to a top retainer plate above the rack ... note position of top plate for reinstallation
5. Rack should be loose enough to wiggle around and lift to remove lower bushings. Top bushings should just pry out. As noted above, lube up the new bushings (I'm going to use silicon grease) and press them in. Shouldn't require an excessive amount of force to get them in.
Originally Posted by jkowtko
....
3. Remove bottom rack retainer plate (black) by removing 8 screws and front two of the four bolts.
4. Remove the other two bolts that hold the steering rack in place. NOTE: all four bolts fasten to a top retainer plate above the rack ... note position of top plate for reinstallation
5. Rack should be loose enough to wiggle around and lift to remove lower bushings. Top bushings should just pry out. As noted above, lube up the new bushings (I'm going to use silicon grease) and press them in. Shouldn't require an excessive amount of force to get them in.
I think the bottom retainer plate hinders access a bit because it extends rearward behind the rack.
in any case, the bottom retainer plate (1g) isn't held on by anything ... it just falls out once you've removed the eight small torx screws (23b) and the two support bolts (23a). The two rack mount bolts (23g) should not be touching the bottom plate ... the plate's holes there are larger than the bolt head.
I should say that the chassis crossmember that this all mounts to looks like it's made out of aluminum, and the torx screws (which might also be aluminum) don't necessarily slip back in ... it's a tight fit. I broke the head off of one of those when reinstalling after I pulled the plate off for inspection. I would suggest when you put those screws back in that you be sensitive to resistance, and use some lubricant on the threads to ease it in if it seems difficult.
I also read somewhere that the top retainer plate one of those "replace" items. I'm not planning to replace mine, but I would suggest torquing the bolts carefully and gradually to make sure you don't strip threads trying to get to 63 ft-lbs.
done! The "clunk" that I was looking to eliminate didn't quite go away, but the last bit of squeamishness in the steering did.
So, although the bushings don't look worn out (in fact they still look brand new), they are.
I am a firm believer in replacing all rubber every several years. Each rubber component in the car that I have replaced (primarily the front suspension and rear tranny mount) has made a difference in sound and/or tightness of the operation of the vehicle.
I'm attaching two photos ... one comparing the old and new bushings (the new ones have a fatter collar and a powdery surface) ... and another of just the new bushings with a side view so you can see the shape. The rubber on the new ones basically hardened over time so it was not as pressurized inside the rack mount flange. The new one is fatter overall so is now under a lot of pressure in the car. Makes a difference in removing a 1mm or so "give" in the rack.
I took pics, so I'll make a separate post for the DIY.
- The car used to drift a bit to the left or right depending on the slant of the road ... now it stays straight.
- And tight turns at low speeds always felt like the wheel just wasn't as tight as it could be.
- And the squeamishness I would feel in the steering when coming to a stop on a wobbly road surface, may be gone now.
So, although the bushings don't look worn out (in fact they still look brand new), they are.
I am a firm believer in replacing all rubber every several years. Each rubber component in the car that I have replaced (primarily the front suspension and rear tranny mount) has made a difference in sound and/or tightness of the operation of the vehicle.
I'm attaching two photos ... one comparing the old and new bushings (the new ones have a fatter collar and a powdery surface) ... and another of just the new bushings with a side view so you can see the shape. The rubber on the new ones basically hardened over time so it was not as pressurized inside the rack mount flange. The new one is fatter overall so is now under a lot of pressure in the car. Makes a difference in removing a 1mm or so "give" in the rack.
I took pics, so I'll make a separate post for the DIY.


MBWorld Fanatic!
Nice, thanks for the info!
So do you think that clunk is indeed "by design" or do you suspect tie rods?
So do you think that clunk is indeed "by design" or do you suspect tie rods?
Newbie
Nice job!
Awaiting your lots of photo detailing the workflow and tools required. I wonder if pyring out the old bushing and install the new bushing needs strong force.
Awaiting your lots of photo detailing the workflow and tools required. I wonder if pyring out the old bushing and install the new bushing needs strong force.
Quote:
I am a firm believer in replacing all rubber every several years. Each rubber component in the car that I have replaced (primarily the front suspension and rear tranny mount) has made a difference in sound and/or tightness of the operation of the vehicle.
I'm attaching two photos ... one comparing the old and new bushings (the new ones have a fatter collar and a powdery surface) ... and another of just the new bushings with a side view so you can see the shape. The rubber on the new ones basically hardened over time so it was not as pressurized inside the rack mount flange. The new one is fatter overall so is now under a lot of pressure in the car. Makes a difference in removing a 1mm or so "give" in the rack.
I took pics, so I'll make a separate post for the DIY.
Originally Posted by jkowtko
done! The "clunk" that I was looking to eliminate didn't quite go away, but the last bit of squeamishness in the steering did. - The car used to drift a bit to the left or right depending on the slant of the road ... now it stays straight.
- And tight turns at low speeds always felt like the wheel just wasn't as tight as it could be.
- And the squeamishness I would feel in the steering when coming to a stop on a wobbly road surface, may be gone now.
I am a firm believer in replacing all rubber every several years. Each rubber component in the car that I have replaced (primarily the front suspension and rear tranny mount) has made a difference in sound and/or tightness of the operation of the vehicle.
I'm attaching two photos ... one comparing the old and new bushings (the new ones have a fatter collar and a powdery surface) ... and another of just the new bushings with a side view so you can see the shape. The rubber on the new ones basically hardened over time so it was not as pressurized inside the rack mount flange. The new one is fatter overall so is now under a lot of pressure in the car. Makes a difference in removing a 1mm or so "give" in the rack.
I took pics, so I'll make a separate post for the DIY.
Quote:
So do you think that clunk is indeed "by design" or do you suspect tie rods?
The service manual says that some lateral play is normal. I personally don't like it. Originally Posted by VVF
Nice, thanks for the info! So do you think that clunk is indeed "by design" or do you suspect tie rods?
If I continue to notice the clunk, at some point I'll pull the drivers' side boot where the noise was most prominent, to see if the inner tie rod ball joint has some play in it. However so far from feeling the tie rod movement, it doesn't feel like there is play in it ... I just feel a clunk as it moves. It's as if the mounting of the pinion gear inside the rack is a bit loose. But I don't think that's possible to fix.
Right now the problem is not operational, it's just a noise that I hear. Kind of like those small rattles in the dash ... not affecting anything -- they just drive you nuts ... :|
Quote:
Awaiting your lots of photo detailing the workflow and tools required. I wonder if pyring out the old bushing and install the new bushing needs strong force.
It was very easy to pry out the bushings. Even easier to press the new ones in by hand once they were lubed with silicone grease.Originally Posted by vr2whf
Nice job! Awaiting your lots of photo detailing the workflow and tools required. I wonder if pyring out the old bushing and install the new bushing needs strong force.
Quote:
If I continue to notice the clunk, at some point I'll pull the drivers' side boot where the noise was most prominent, to see if the inner tie rod ball joint has some play in it. However so far from feeling the tie rod movement, it doesn't feel like there is play in it ... I just feel a clunk as it moves. It's as if the mounting of the pinion gear inside the rack is a bit loose. But I don't think that's possible to fix.
Right now the problem is not operational, it's just a noise that I hear. Kind of like those small rattles in the dash ... not affecting anything -- they just drive you nuts ... :|
Hi John, thanks for the steering rack bushings diy. I am having the same symptoms you described at the beginning of this thread. I just replaced replaced the bushings earlier today hoping it would help, but no difference as far as the noise goes. Did you ultimately figure out what was causing the noise issue? Thanks! PaulOriginally Posted by jkowtko
The service manual says that some lateral play is normal. I personally don't like it.If I continue to notice the clunk, at some point I'll pull the drivers' side boot where the noise was most prominent, to see if the inner tie rod ball joint has some play in it. However so far from feeling the tie rod movement, it doesn't feel like there is play in it ... I just feel a clunk as it moves. It's as if the mounting of the pinion gear inside the rack is a bit loose. But I don't think that's possible to fix.
Right now the problem is not operational, it's just a noise that I hear. Kind of like those small rattles in the dash ... not affecting anything -- they just drive you nuts ... :|
Quote:
Hi,Originally Posted by wanderlust360
Hi John, thanks for the steering rack bushings diy. I am having the same symptoms you described at the beginning of this thread. I just replaced replaced the bushings earlier today hoping it would help, but no difference as far as the noise goes. Did you ultimately figure out what was causing the noise issue? Thanks! Paul
Wow, it's been over five years! and I haven't done a thing more on that steering rack
. Which means it's not that high a priority anymore. My attention most recently was to get the tuner on my Pioneer AVIC head unit fixed (just did that this month), then I have an exhaust header leak to fix (crack in the weld seam) and replace the AC Compressor pulley bushing. I've been working from home for the past few years so I haven't been driving much, therefore the reduced need to do my DIYs. It would be great to hear if someone else was able to fix something related to this clunk short of replacing the rack.
Thanks. John
Quote:
Wow, it's been over five years! and I haven't done a thing more on that steering rack. Which means it's not that high a priority anymore. My attention most recently was to get the tuner on my Pioneer AVIC head unit fixed (just did that this month), then I have an exhaust header leak to fix (crack in the weld seam) and replace the AC Compressor pulley bushing. I've been working from home for the past few years so I haven't been driving much, therefore the reduced need to do my DIYs.
It would be great to hear if someone else was able to fix something related to this clunk short of replacing the rack.
Thanks. John
Glad to hear your car is still holding up reasonably well. According to my local mechanic, the front shocks are worn out and shaking when turning the wheels. I still have the original ones at almost 200k, so it is no surprise. I will swap them out next week, and hopefully that will take care of the situation.Originally Posted by jkowtko
Hi,Wow, it's been over five years! and I haven't done a thing more on that steering rack
. Which means it's not that high a priority anymore. My attention most recently was to get the tuner on my Pioneer AVIC head unit fixed (just did that this month), then I have an exhaust header leak to fix (crack in the weld seam) and replace the AC Compressor pulley bushing. I've been working from home for the past few years so I haven't been driving much, therefore the reduced need to do my DIYs.It would be great to hear if someone else was able to fix something related to this clunk short of replacing the rack.
Thanks. John


Quote:
Not to criticize, but if the intent is to not have sloppy Steering, one would be wise to use dial soap and water to "lube" up the rubber Bushings in most situations because once installed, the water will dry up and be tight as compared to remaining "lubed" with silicone grease.Originally Posted by jkowtko
It was very easy to pry out the bushings. Even easier to press the new ones in by hand once they were lubed with silicone grease.
Quote:
The play is not from lack of friction of rubber against metal, it is from the reduced diameter of the barrel of the bushing itself from age and hardening of the rubber. Once installed the rubber barrel of the bushing should be pressing hard against the the inside of the mounting holes ... it is the lateral movement you want to avoid and that should be taken care of by having new rubber bushings of the appropriate diameter squeezed into those holes. Up/down movement wouldn't matter as much, but that is taken care of anyway by the bushing flanges which press against the top and bottom of the mounting plate around the holes. ...Originally Posted by E63007
Not to criticize, but if the intent is to not have sloppy Steering, one would be wise to use dial soap and water to "lube" up the rubber Bushings in most situations because once installed, the water will dry up and be tight as compared to remaining "lubed" with silicone grease.


