


W203 M271 Ultimate Timing Chain DIY

Thread Starter
Senior Member


Joined: Feb 2010
Posts: 250
Likes: 15
From: Miami, FL
2009 E63
W203 M271 Ultimate Timing Chain DIY
Hello all!
Today I will start the timing chain DIY on my 2005 SS C230K. I have 113k miles on the car and follow specific 5 to 7k oil changes on the car. As we all know there seems to be quite a few of these cars with stretching/failing timing chains.
I have done some heavy investigation on what might be going on, and based on my findings I concluded that there has been a change in timing chains from the beginning of production of the W203 to the current timing chain made available to this M271 engine. This leads me to believe that some design or manufacturing defect has been found, and updated since. It was quite hard to find, and some dealers actually deny that there has been a preceding part to the current timing chain. Also, it is widely known that there has been updates to the timing chain tensioner as well. On Hoggers thread I have cleared up as much as I know as far as part numbers.
Back on topic, tools. The necessary tools are:
I will update this as I progress with the job so please bare with me as this list becomes populated.
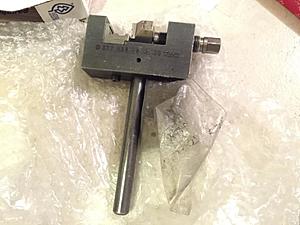
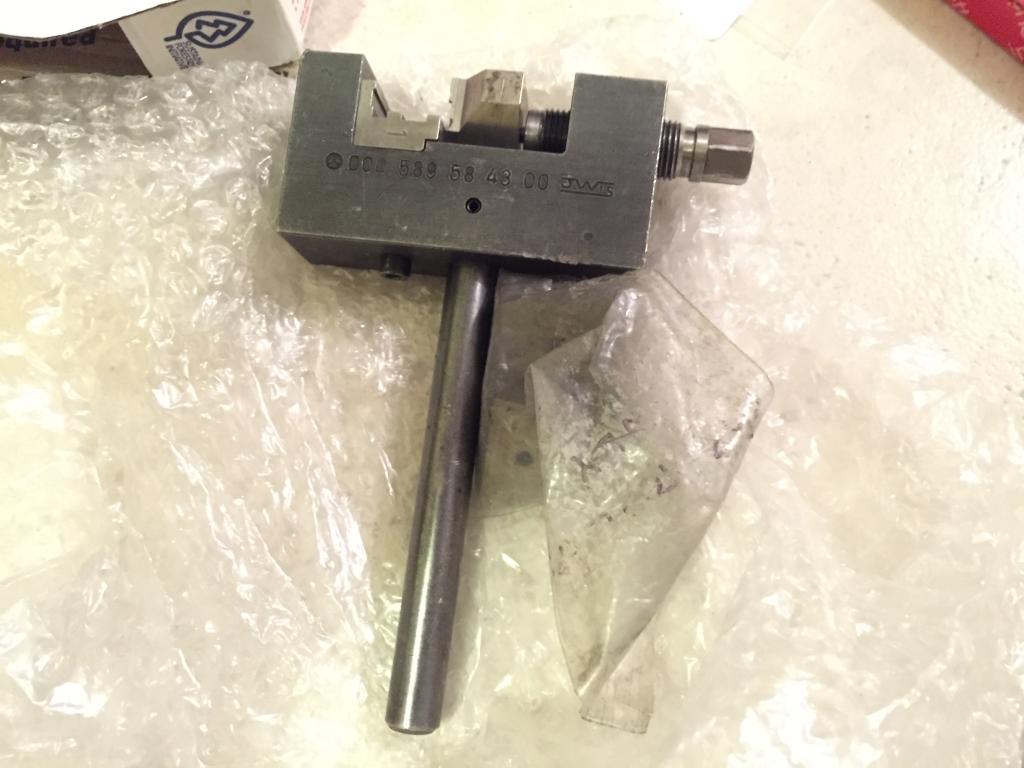
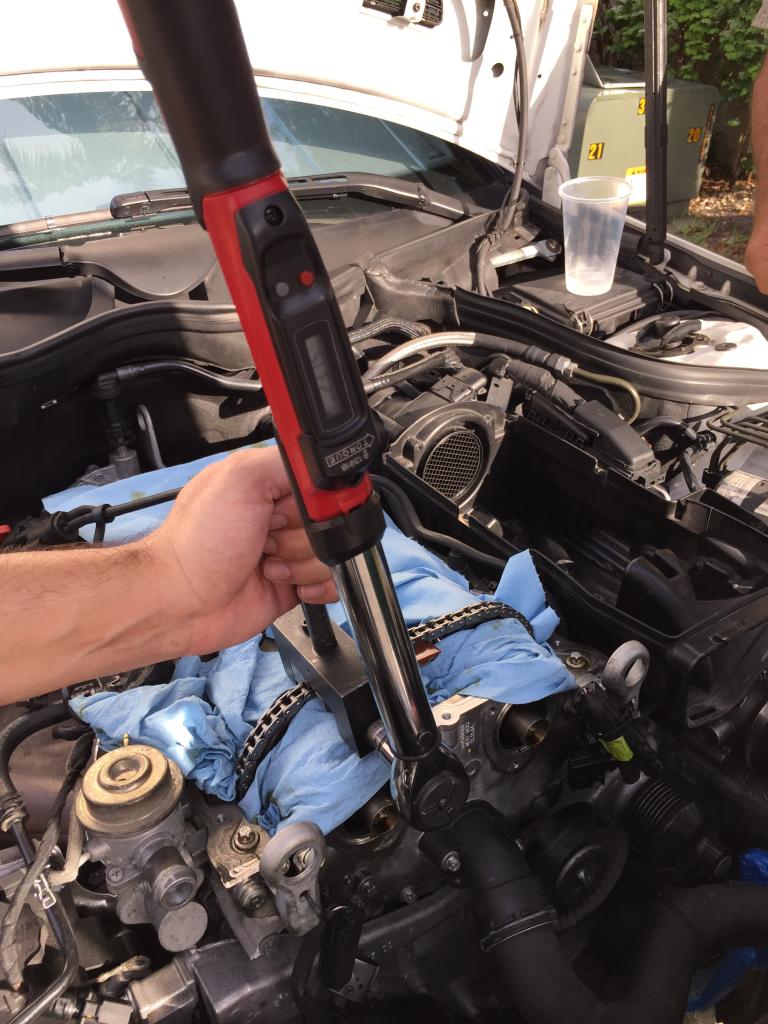
I have rented the timing chain crimper from a fellow member from peachparts.com forum. The tool cost was $20 and deposit was $200. The tool arrived at my house two days after I had sent him the funds through paypal. I can make this information available for those that are interested. I received the tool, and it is the original MB timing chain crimper.
I will not use the chain breaker used by mercedes, instead I plan on using a dremel with a steel bit to remove the lock pin.
This job will be completed between my brother, dad and me; therefore, I will not need the cam holder tool.
Today I will tackle the removal of the alternator to replace the timing chain tensioner and also the removal of the valve cover; however, I will not replace the tensioner until the new chain has been guided through. I then plan on tackling the timing chain removal and guidance of new one and rebuild of the parts taken apart tomorrow morning in hopes of finishing noon. This is of course, if all goes as planned.
I will provide the steps once the valve cover has been removed and images as I go by.
I will update this thread in real time, so for those who want to be tuned in, I plan on starting around 6:30 PM tonight.
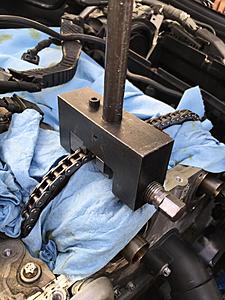
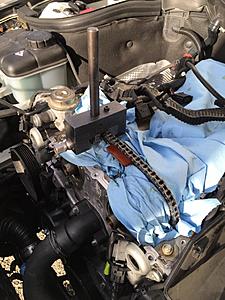
First off, the goodies!
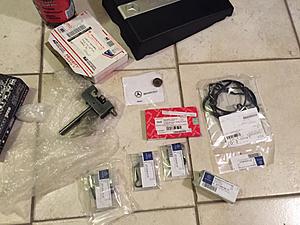
Timing chain crimper
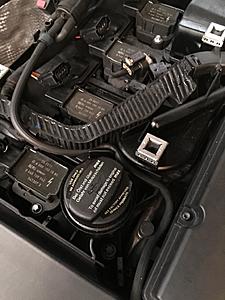
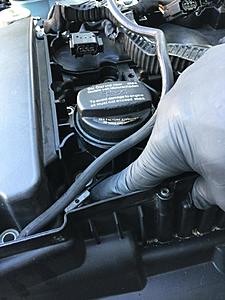
Removing what I think is the intercooler muffler

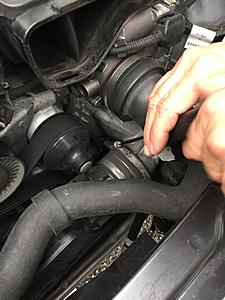
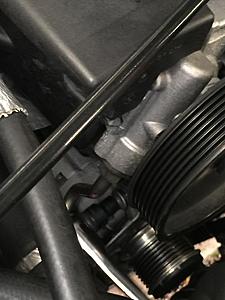
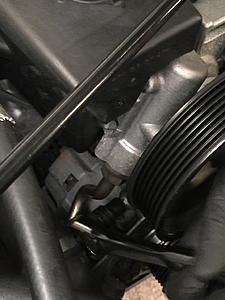
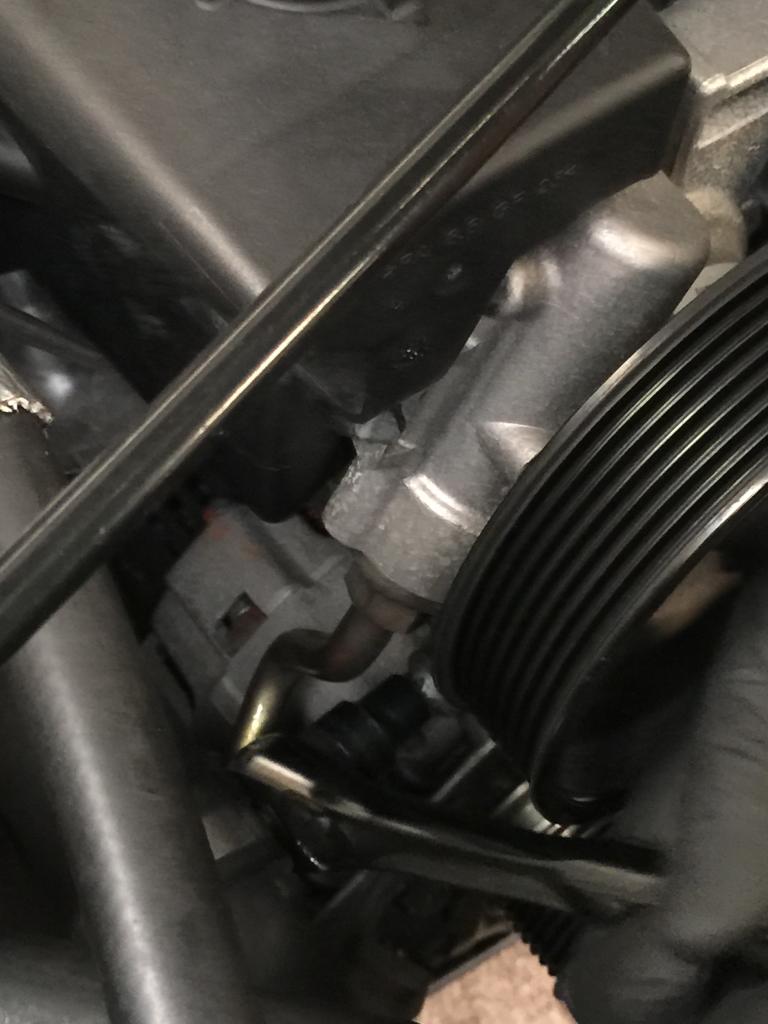
Releasing the tension

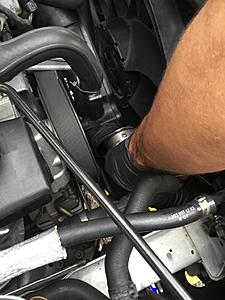
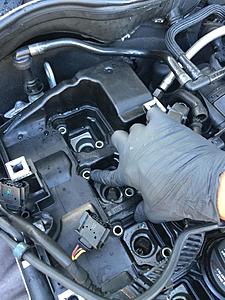
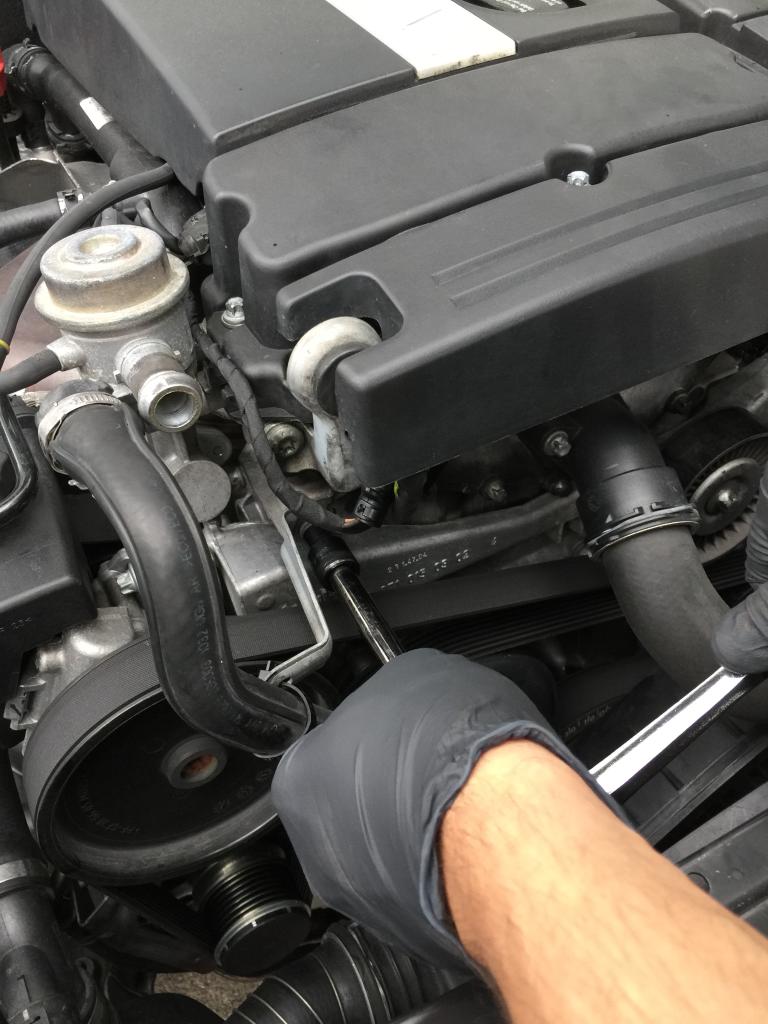
After releasing the tension. The alternator removal actually isn't that hard. I removed the intercooler muffler to have space to maneuver the alternator out once lose. You do not need to release any coolant line whatsoever. Remove lower coverings under the car, remove intercooler muffler as previously shown, remove bracket holding upper air/oil line from the muffler. Once this is removed, disconnect the electrical plug from the alternator which is clipped on. After using a 15mm open end wrench remove the bolt holding the positive connector. Then simply remove the 4 T14 reverse torx bolts holding the alternator, no special tools here to be honest. Once done just pull the alternator out from the top.
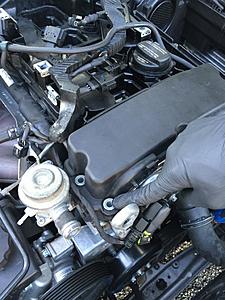
Removing the upper and lower bolts
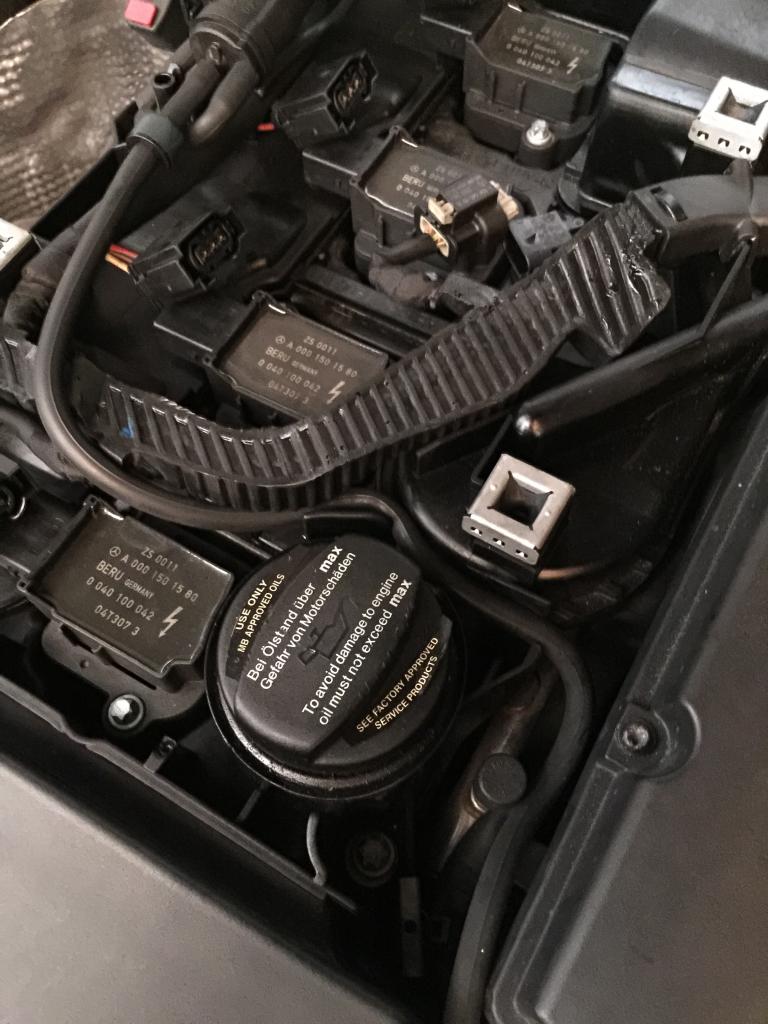
After removing the alternator, cleared off all wires from the valve cover.
Kinda tired right now, tomorrow I will take more pics of hoses that need to be removed from the valve cover.
Today's task was to remove the alternator and take out everything on top of the valve cover to make tomorrow's focus on the timing chain, tensioner and rebuild.
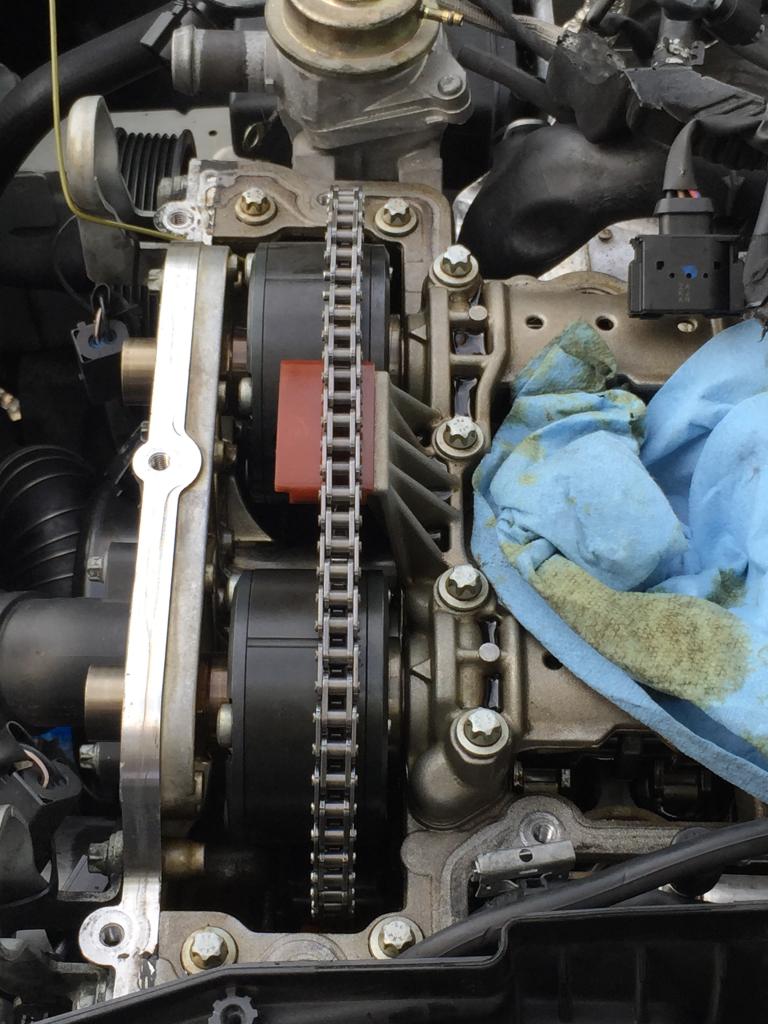
Update: Removal of cam cover
Valve cover removed:
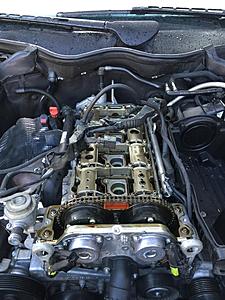
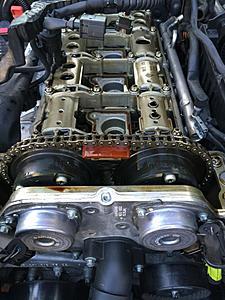

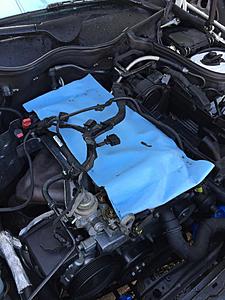
From there I basically used a dremel with a tungsten carbide round tip and shaved down the pins. Making sure everything is completely covered with towels so no shavings fall off. Once broken I tied the new chain to the new one in the way I explained in the following pages of this thread.

Today I will start the timing chain DIY on my 2005 SS C230K. I have 113k miles on the car and follow specific 5 to 7k oil changes on the car. As we all know there seems to be quite a few of these cars with stretching/failing timing chains.
I have done some heavy investigation on what might be going on, and based on my findings I concluded that there has been a change in timing chains from the beginning of production of the W203 to the current timing chain made available to this M271 engine. This leads me to believe that some design or manufacturing defect has been found, and updated since. It was quite hard to find, and some dealers actually deny that there has been a preceding part to the current timing chain. Also, it is widely known that there has been updates to the timing chain tensioner as well. On Hoggers thread I have cleared up as much as I know as far as part numbers.
Back on topic, tools. The necessary tools are:
I will update this as I progress with the job so please bare with me as this list becomes populated.
I have rented the timing chain crimper from a fellow member from peachparts.com forum. The tool cost was $20 and deposit was $200. The tool arrived at my house two days after I had sent him the funds through paypal. I can make this information available for those that are interested. I received the tool, and it is the original MB timing chain crimper.
I will not use the chain breaker used by mercedes, instead I plan on using a dremel with a steel bit to remove the lock pin.
This job will be completed between my brother, dad and me; therefore, I will not need the cam holder tool.
Today I will tackle the removal of the alternator to replace the timing chain tensioner and also the removal of the valve cover; however, I will not replace the tensioner until the new chain has been guided through. I then plan on tackling the timing chain removal and guidance of new one and rebuild of the parts taken apart tomorrow morning in hopes of finishing noon. This is of course, if all goes as planned.
I will provide the steps once the valve cover has been removed and images as I go by.
I will update this thread in real time, so for those who want to be tuned in, I plan on starting around 6:30 PM tonight.
First off, the goodies!

Timing chain crimper
Removing what I think is the intercooler muffler


Releasing the tension

After releasing the tension. The alternator removal actually isn't that hard. I removed the intercooler muffler to have space to maneuver the alternator out once lose. You do not need to release any coolant line whatsoever. Remove lower coverings under the car, remove intercooler muffler as previously shown, remove bracket holding upper air/oil line from the muffler. Once this is removed, disconnect the electrical plug from the alternator which is clipped on. After using a 15mm open end wrench remove the bolt holding the positive connector. Then simply remove the 4 T14 reverse torx bolts holding the alternator, no special tools here to be honest. Once done just pull the alternator out from the top.

Removing the upper and lower bolts
After removing the alternator, cleared off all wires from the valve cover.
Kinda tired right now, tomorrow I will take more pics of hoses that need to be removed from the valve cover.
Today's task was to remove the alternator and take out everything on top of the valve cover to make tomorrow's focus on the timing chain, tensioner and rebuild.
Update: Removal of cam cover


Valve cover removed:


From there I basically used a dremel with a tungsten carbide round tip and shaved down the pins. Making sure everything is completely covered with towels so no shavings fall off. Once broken I tied the new chain to the new one in the way I explained in the following pages of this thread.


Last edited by jpman; Oct 10, 2014 at 03:07 PM.

Member
Joined: Sep 2013
Posts: 139
Likes: 4
From: Finland, Europe
W203 C200CDI
DIYs are always appreciated here 
Did you experience some problems with your chain or just change it for piece of mind? My chain has never been replaced according to service book and now over 240k miles on the clock...
Did you experience some problems with your chain or just change it for piece of mind? My chain has never been replaced according to service book and now over 240k miles on the clock...
Thread Starter
Senior Member
Joined: Feb 2010
Posts: 250
Likes: 15
From: Miami, FL
2009 E63
Sorry guys I have not been able to bring updates, currently stuck. I have the new chain in and pressed the new link. The cam lines are perfectly lining up and the crank pully is at 0. I put the new tensioner back in and tried to rotate the engine and it get stuck after rotating about 90 degrees on the crank. It seems like its interfering, but I don't understand why. The marks all line up. Open to suggestions...
One odd notation. It appears that when the pulley is at 0 degrees the first piston is not at the top. I keep running the pulley up to about 60 degrees and then the piston finally reaches the top. I don know what could be happening right now... Really confused at the moment.
One odd notation. It appears that when the pulley is at 0 degrees the first piston is not at the top. I keep running the pulley up to about 60 degrees and then the piston finally reaches the top. I don know what could be happening right now... Really confused at the moment.
Last edited by jpman; Oct 4, 2014 at 07:22 PM.
Senior Member

Joined: Jul 2011
Posts: 408
Likes: 40
From: Hawaii
2017 GLA 250, 2011 C63 P31 (p30 w/ lsd) (in repair), 2005 C230 Sport Eurocharged, 2003 C320~sold
Did u put the valve cover on before putting the tensioner in?
Do u have WIS?
If not what is your vin and I will look up the timing alignment procedure
Do u have WIS?
If not what is your vin and I will look up the timing alignment procedure
Thread Starter
Senior Member
Joined: Feb 2010
Posts: 250
Likes: 15
From: Miami, FL
2009 E63
Hi krazzdav, No I did not put the valve cover back in before rotating the engine manually. I wanted to check the timing marks after giving it a couple of spins.
Trending Topics
Senior Member
Joined: Jul 2011
Posts: 408
Likes: 40
From: Hawaii
2017 GLA 250, 2011 C63 P31 (p30 w/ lsd) (in repair), 2005 C230 Sport Eurocharged, 2003 C320~sold
pretty sure you are supposed to put your vc on first or the chain will be too tight....doesn't sound like your problem...i think the crank isn't supposed to be at 0 too but will pull the docs off wis right now for u
MB World Stories
The Best of Mercedes & AMG

Manual Mercedes? 6 Times Sindelfingen Let Drivers Have All The Fun
Verdad Gallardo
Mercedes SLR McLaren 722 S Is Extremely Rare Example Modified by McLaren
Verdad Gallardo
8 Classic Boxy Mercedes Designs That Have Aged Like Fine Wine
Verdad Gallardo
Flawlessly Restored Mercedes 190E Evo II Heads to Auction
Verdad Gallardo
Electric Mercedes C-Class Unveiled: 11 Things You Need to Know
Verdad Gallardo
Mercedes EQS Gets A Major Update: Everything You Need to Know
Verdad Gallardo
5 Underrated Mercedes-Benz Models That Don't Get the Love They Deserve
Verdad Gallardo
Mercedes 300D Has Pushed Well Past 1 Million Miles and It Ain't Stopping
Verdad Gallardo
10 Most Reliable Mercedes-Benz Models You Can Buy Used
Verdad Gallardo
Super Member
Joined: Oct 2013
Posts: 527
Likes: 20
From: Carolinas
2005 C230K SS
Did you rotate the engine before or after you installed the tensioner? Without the tensioner, the chain is too slack and will skip teeth, which is what happened to me during my chain job. Luckily I hadn't crimped it..If your #1 piston is not at TDC when the crank mark is at 0 then your crank is out of alignment, did you remove the crank bolt?
With the cam marks aligned and the crank pulley at 0 there should be no inteference.
With the cam marks aligned and the crank pulley at 0 there should be no inteference.
Senior Member
Joined: Jul 2011
Posts: 408
Likes: 40
From: Hawaii
2017 GLA 250, 2011 C63 P31 (p30 w/ lsd) (in repair), 2005 C230 Sport Eurocharged, 2003 C320~sold
Sorry I was wrong...I think I was talking about the M272 but here are some of the pertinent docs for the M271. Lmk if you need others
M271 Replace timing chain.pdf
M271 Draw in timing chain.pdf
M271 Check basic position of camshafts.pdf
M271 Set basic position of camshafts.pdf
M271 Replace timing chain.pdf
M271 Draw in timing chain.pdf
M271 Check basic position of camshafts.pdf
M271 Set basic position of camshafts.pdf
Thread Starter
Senior Member
Joined: Feb 2010
Posts: 250
Likes: 15
From: Miami, FL
2009 E63
Did you rotate the engine before or after you installed the tensioner? Without the tensioner, the chain is too slack and will skip teeth, which is what happened to me during my chain job. Luckily I hadn't crimped it..If your #1 piston is not at TDC when the crank mark is at 0 then your crank is out of alignment, did you remove the crank bolt?
With the cam marks aligned and the crank pulley at 0 there should be no inteference.
With the cam marks aligned and the crank pulley at 0 there should be no inteference.
From what I could see, even if the crank pulley bolt has been removed, wouldn't it not make a difference since it has a notch for the pulley to slide in, making the position of the crank pulley only able to go in only one way?
Thread Starter
Senior Member
Joined: Feb 2010
Posts: 250
Likes: 15
From: Miami, FL
2009 E63
Sorry I was wrong...I think I was talking about the M272 but here are some of the pertinent docs for the M271. Lmk if you need others
Attachment 296073
Attachment 296074
Attachment 296075
Attachment 296076
Attachment 296073
Attachment 296074
Attachment 296075
Attachment 296076
krazzdav thanks much for the documents! All my procedures have been straight on par with these documents. Stuck at the moment wondering if something is up with my crank pulley.
Senior Member
Joined: Jul 2011
Posts: 408
Likes: 40
From: Hawaii
2017 GLA 250, 2011 C63 P31 (p30 w/ lsd) (in repair), 2005 C230 Sport Eurocharged, 2003 C320~sold
Dang bro that sucks.....yup sounds like the balancer spun. If you see cracking on the elastometer or empty spaces is an indication it is bad. (between the inner mounting surface and outer band w/ timing marks)
Part# is A2710300003
Here is docs for that
M271 Remove_install belt pulley_vibration damper.pdf
M271 Pull off belt pulley _ vibration damper.pdf
M271 Install front crankshaft radial seal.pdf
Part# is A2710300003
Here is docs for that
M271 Remove_install belt pulley_vibration damper.pdf
M271 Pull off belt pulley _ vibration damper.pdf
M271 Install front crankshaft radial seal.pdf
MBWorld Fanatic!
Joined: Sep 2011
Posts: 1,657
Likes: 35
From: Austin, TX
2005 C230K(sold), Mk7 Jetta
But how would that be possible if it was OK before and he didn't mess with the crank pulley??...
Jpman, did you check if the key-hole is opposite the O|T mark on the pulley?
Jpman, did you check if the key-hole is opposite the O|T mark on the pulley?
Last edited by VVF; Oct 5, 2014 at 04:43 PM.
Thread Starter
Senior Member
Joined: Feb 2010
Posts: 250
Likes: 15
From: Miami, FL
2009 E63
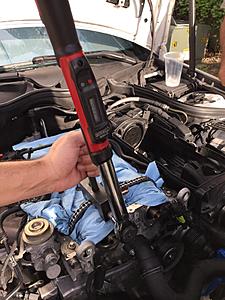
Spun the chain without moving the cam gears by just rotating the crank pulley as I ran the new chain through. Once the new chain had been drawn in I set the crank to 0 and thought the piston was at is highest point while flashing a light inside the hole, but actually trusting that nothing was wrong with the pulley. and proceeded to bring the cam gears into timing with two 1 and 1/16 sockets and torque wrenches to bring them in. I got the marks dead on and closed the timing chain and crimped the master link. Once that happened I brought in the new timing chain tensioner in and tried rotating. It rotated however, at about 60 or 90 degrees a turn, the crank got really hard and stopped immediately and brought it back a little. So here I am.
After trying to break my head I decided to put a 3/8 12 inch extension in the spark plug hole and realized as I cranked the engine more it kept on going up , past 40 degree mark on the pulley. I saw it finally stop going up and started coming down at around the 60 degree mark on the pulley.
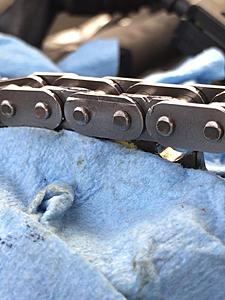
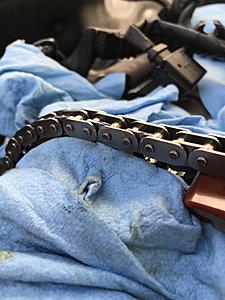
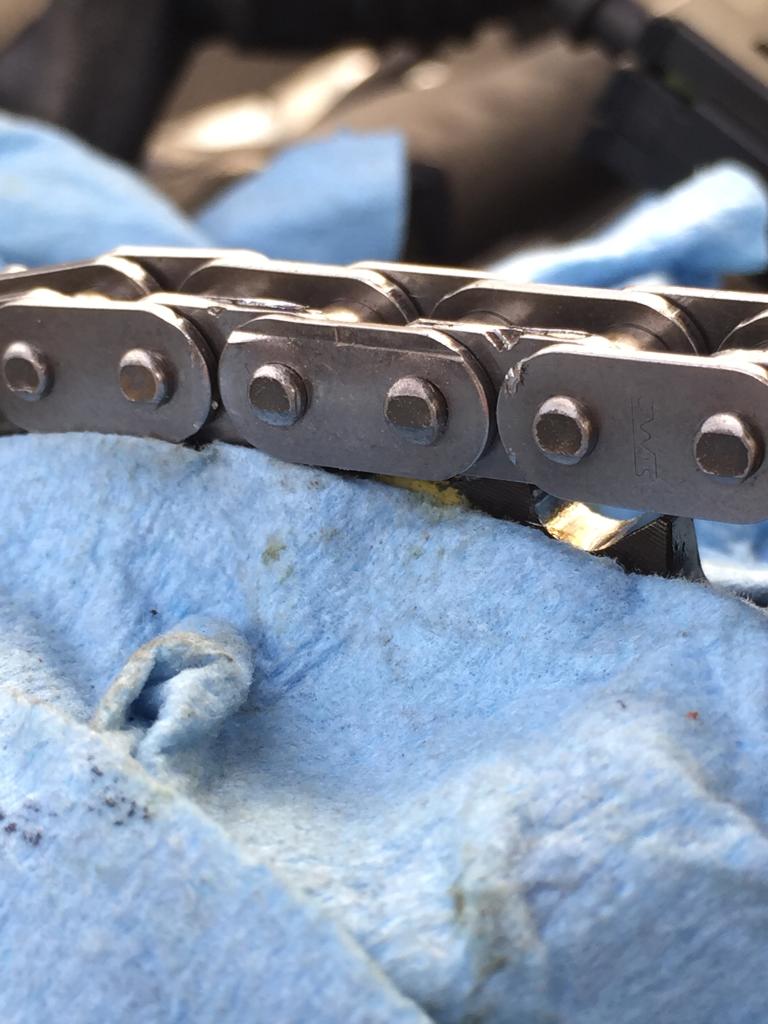
By the way, If its worth mentioning I measured the distance across both chains and it seems that if the old one was stretched it wasn't by more one fourth of an inch. So that makes me feel more comfortable.
Now I'm staring to consider if it is the crank pulley to just take it to a shop and have them replace the pulley and put it all back together. This should have been a simple job but is starting to go south from here, loosing a little faith in this project.
I really wanted to bring some information onto this forum and have tons of pics, but I am a little disheartened at this moment with this road block.
Last edited by jpman; Oct 5, 2014 at 05:27 PM.
Thread Starter
Senior Member
Joined: Feb 2010
Posts: 250
Likes: 15
From: Miami, FL
2009 E63
Senior Member
Joined: Jul 2011
Posts: 408
Likes: 40
From: Hawaii
2017 GLA 250, 2011 C63 P31 (p30 w/ lsd) (in repair), 2005 C230 Sport Eurocharged, 2003 C320~sold

Senior Member
Joined: Jul 2011
Posts: 408
Likes: 40
From: Hawaii
2017 GLA 250, 2011 C63 P31 (p30 w/ lsd) (in repair), 2005 C230 Sport Eurocharged, 2003 C320~sold

Thread Starter
Senior Member
Joined: Feb 2010
Posts: 250
Likes: 15
From: Miami, FL
2009 E63
Super Member
Joined: Oct 2013
Posts: 527
Likes: 20
From: Carolinas
2005 C230K SS
Spun the chain without moving the came gears by just rotating the crank pulley as I ran the new chain through. Once the new chain had been drawn in I set the crank to 0 and thought the piston was at is highest point while flashing a light inside the hole, but actually trusting that nothing was wrong with the pulley. and proceeded to bring the cam gears into timing with two 1 and 1/16 sockets and torque wrenches to bring them in. I got the marks dead on and closed the timing chain and crimped the master link. Once that happened I brought in the new timing chain tensioner in and tried rotating. It rotated however, at about 60 or 90 degrees a turn, the crank got really hard and stopped immediately and brought it back a little. So here I am
I'm guessing the car was running before you started this job. When you removed the tensioner, did you rotate engine by hand or did you jog the starter? I can't figure out how this can happen...
Last edited by RWDlifer; Oct 5, 2014 at 05:25 PM.
Thread Starter
Senior Member
Joined: Feb 2010
Posts: 250
Likes: 15
From: Miami, FL
2009 E63
Something isn't right. Thats what I'm thinking. Before I started this job, the car ran perfectly fine, not one hiccup. Could it be possible that when I was rotating the crank the valves were at their highest point? meaning furthest possible from the piston? I never felt resistance rotating the crank, at least not as much as what I feel now. Ever since I started the job, on Friday the engine has not been turned by the starter, it has all been rotated by hand by means of the crank pulley nut.
Senior Member
Joined: Jul 2011
Posts: 408
Likes: 40
From: Hawaii
2017 GLA 250, 2011 C63 P31 (p30 w/ lsd) (in repair), 2005 C230 Sport Eurocharged, 2003 C320~sold
And RWDlifer has a good point about the interference of the piston and valves. You will find out if any damage was done after getting the TDC aligned back up.
You let the cams go all together correct? Maybe you got lucky and the cams "at rest" position had just enough room for the pistons to clear them all.
Don't take it to a shop :P You came so far haha Now all you need is a puller for the crank pulley, and the seal installer (or a huge socket that will clear the crank shaft) and redo the timing chain alignment

Senior Member
Joined: Jul 2011
Posts: 408
Likes: 40
From: Hawaii
2017 GLA 250, 2011 C63 P31 (p30 w/ lsd) (in repair), 2005 C230 Sport Eurocharged, 2003 C320~sold
Something isn't right. Thats what I'm thinking. Before I started this job, the car ran perfectly fine, not one hiccup. Could it be possible that when I was rotating the crank the valves were at their highest point? meaning furthest possible from the piston? I never felt resistance rotating the crank, at least not as much as what I feel now. Ever since I started the job, on Friday the engine has not been turned by the starter, it has all been rotated by hand by means of the crank pulley nut.


