


DIY - setting up the AUX input for iPod, mp3 player, etc.
Junior Member
Joined: Mar 2008
Posts: 58
Likes: 0
From: Australia
C200K Jul 2004
The FM sound is reasonable and it has volume control. I am still interested in the KCA-430 but this is a very good option for now
 and fits quite nicely in the ashtray. I got it from eBay from eBayer savecash4u it's the 4.3" model# 2410 I think. I initially got it just for the GPS but currently using it for FM transmission too!
Pix now attached.
Where did you see KCA-430 for 120�?
Last edited by ram_rtg; Oct 6, 2008 at 12:02 AM.
Super Member
Joined: Apr 2008
Posts: 786
Likes: 0
From: So. Cal.
MK IV .:R32
So I took a look to see if I had the conncector and I found this....
[IMG] [/IMG]
[IMG] [/IMG]
I'm pretty sure that it will work....right?
it looks different from the other pics, so I wanted to be sure
thanks
[IMG]
[/IMG][IMG]
[/IMG]I'm pretty sure that it will work....right?
it looks different from the other pics, so I wanted to be sure
thanks

Senior Member
Joined: Oct 2008
Posts: 312
Likes: 3
From: Las Vegas, NV
C230 Kompressor Sport Sedan

Member
Joined: Aug 2002
Posts: 203
Likes: 0
From: NY
2015 ML350 4Matic
AUX Input Cable - Connection not available in 2007 C280
I purchased the Aux Input Cable after checking the CDC button on my stereo and looking at the pre-cut circle cutout on my glove box.
It turns out that the cable connection is not available on my car.
Does anyone know of an alternative way to connect the aux in on this car with a HK sound system.
It turns out that the cable connection is not available on my car.
Does anyone know of an alternative way to connect the aux in on this car with a HK sound system.

Newbie
Joined: Nov 2008
Posts: 1
Likes: 0
2007 C230 Sport
Re: Ipod Integration
This is a great site. Very helpful.
I recently purchased a used C230 Sport. My first Mercedes. I have been searching through posts on this site about ipod integration using the Aux Input harness.
I do have the "Aux Imput Active" message appearing when I hold in the CDC button. I have read that there may be a part that will allow me to connect to the "Aux Input Harness". It appears that the harness appears in some 2007 C230 models but not in others. Looking for an alternative to the costly mercedes connection kit.
Is there anyone out there that has found the location of this harness in the 2007 model and the know the part number that connects to it?
Thank you.
MB World Stories
The Best of Mercedes & AMG

Manual Mercedes? 6 Times Sindelfingen Let Drivers Have All The Fun
Verdad Gallardo
Mercedes SLR McLaren 722 S Is Extremely Rare Example Modified by McLaren
Verdad Gallardo
8 Classic Boxy Mercedes Designs That Have Aged Like Fine Wine
Verdad Gallardo
Flawlessly Restored Mercedes 190E Evo II Heads to Auction
Verdad Gallardo
Electric Mercedes C-Class Unveiled: 11 Things You Need to Know
Verdad Gallardo
Mercedes EQS Gets A Major Update: Everything You Need to Know
Verdad Gallardo
5 Underrated Mercedes-Benz Models That Don't Get the Love They Deserve
Verdad Gallardo
Mercedes 300D Has Pushed Well Past 1 Million Miles and It Ain't Stopping
Verdad Gallardo
10 Most Reliable Mercedes-Benz Models You Can Buy Used
Verdad Gallardo

Newbie
Joined: Nov 2008
Posts: 6
Likes: 0
2006 C230
2006 Model Change
I'm about to do the install in my 2006 C230 - when I ordered the part, they asked for the last 8 digits of my VIN. Apparently there are two possible cables - a $45 version for older '06 models (mine included) and a $22 version for newer models.
I'm going to guess that the newer version for '06 is the same one as for all of the '07 models. I wonder if these models lack the passenger-side wiring harness that is described in this forum, and need to get installed directly into the back of the head unit. So, a cheaper part but a much more complex installation...
I'm going to guess that the newer version for '06 is the same one as for all of the '07 models. I wonder if these models lack the passenger-side wiring harness that is described in this forum, and need to get installed directly into the back of the head unit. So, a cheaper part but a much more complex installation...

MBWorld Fanatic!
Joined: Jan 2008
Posts: 1,321
Likes: 0
C300 Sport/Palladium Silver on Black/P2
Question - I know from experience on W204s, the AUX input is *significantly* quieter than the other audio sources, and the iPod kit is too unless you have the amp fix.
What about on the W203? Does the AUX input volume sound as loud as the other audio sources?
What about on the W203? Does the AUX input volume sound as loud as the other audio sources?
Newbie
Joined: Nov 2008
Posts: 6
Likes: 0
2006 C230
DIY Install - iPod dock connector in the centre armrest, 2006 C230
Hello all,
I thought I would share my success & steps for installing an iPod Dock Connector in my centre armrest. I mounted it in a 2006 C230 with the standard Audio 20 sound system and the old style aux in cable (apparently they switched designs in mid year - mine is the same as 2005 models).
The DIY described below has the following features:
- Audio and power through a single dock connector cable
- Line levels out (vs. headphone jack)
- Dock connector cable comes out through the centre armrest's cellphone cradle
- Everything else (cables, power supply etc...) stays hidden at the bottom of the centre armrest
- Charges both legacy iPods and iPhones (iPhones need 5v via USB)
Note that this does not allow song changes etc... through the steering wheel controls (only volume works). You'll need to choose songs/playlists on the iPod itself, but I prefer it that way. Total cost was about $120 plus a few hours of labour. There are a few fiddly steps but nothing too challenging.
Tools required:
- Torx #10 screwdriver for dismantling the armrest
- Needle nose pliers for grabbing wires
- Scissors for cutting tape/rip ties/wire
- Dremel tool for cutting a notch in the plastic cell phone cover plate (optional)
- Beer (optional but recommended)
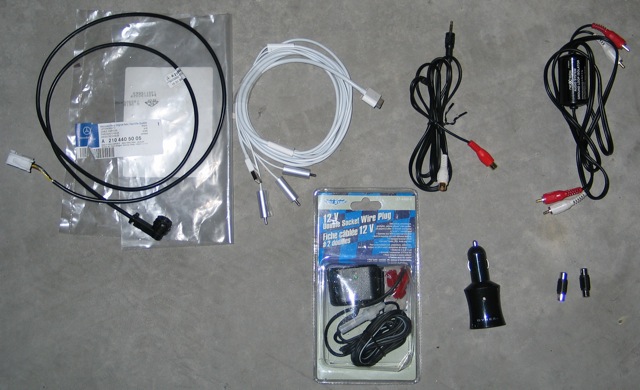
Materials required (all prices Canadian):
- MB's Aux in cable (in my case, A 210 440 50 05). Cost was $45 and took a day to arrive at the dealer
- Apple Composite AV Cable, $59
- 12v USB charger, $18
- Car power port with tap-in connectors (solderless), $10
- Ground loop isolator kit with RCA connectors at one end and a 3.5mm headphone jack at the other, $25
- Two female-female RCA adapters, $2
- Electrical tape and rip ties for securing cables
Step 1 - Find the wiring harness (no tools required):
- Open your first beer
- Lift the plastic kick plate on the passenger side door frame with your fingers
- Pull back the carpet. You should find a bunch of wires hidden behind a black plastic panel, including the Aux In harness (there are lots of photos of this in the thread, so will skip)
- Plug the Aux In cable into the wiring harness
- Test your cables before installing everything (Harness -> MB's Aux In cable -> Ground Loop isolator -> RCA F-F adapters -> Apple AV Cable -> iPod AND existing cigarette lighter port -> USB charger -> Apple AV Cable). Attach an iPod and hold down CDC button to activate Aux In. Your iPod should charge and should be able to hear the iPod without any buzzing or feedback (this is why you need the ground loop isolator)
- Assuming everything works ok, move on to Step 2
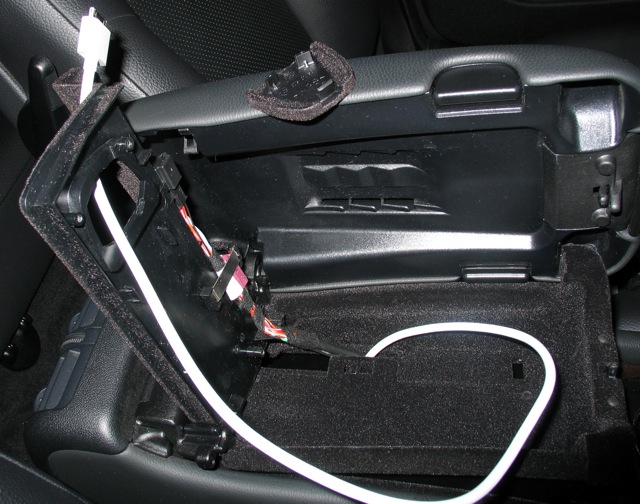
Step 2 - Run a cable from the centre armrest to the Aux In cable:
- There is a ventilation grille inside the centre armrest, beside the passenger seat. Notice how the plastic trim flares out to let in air. Poke out enough of the grill to squeeze the Ground Loop Isolator's headphone jack through from the inside
- Pull back the passenger side carpet to reveal the bottom of the car
- Pull the Ground Loop's cable through the ventilation grill and into the cabin. When you have enough pulled through, tuck it up under the plastic trim and run it forward until you get to where the main carpet is pulled back.
- Feed the cable under the heating vent and connect it to the MB Aux In cable (the end that's supposed to be mounted in the glove compartment)
- Tape the connection together with electrical tape
- Tuck the excess cable into the space with all of the other cables, and replace the carpet & kick plate
- Test the cable. If everything is good, go for beer #2 and move to Step 3
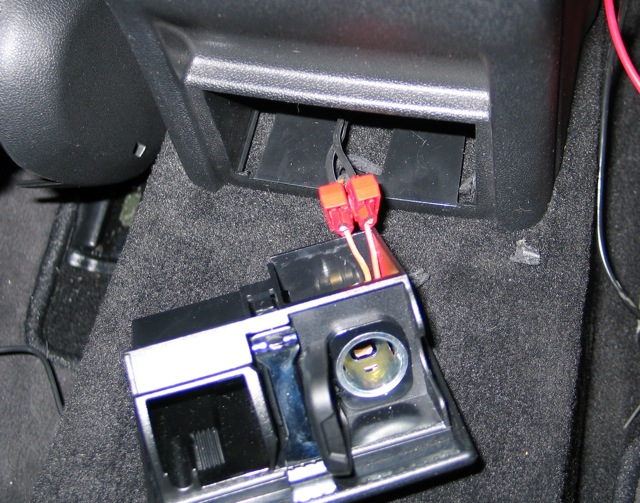
Step 3 - wire the Power Port
- Go to the back of the centre armrest and pull out the passenger ash tray/power port by pushing down on the silver tab
- Break off the cover plate at the rear passenger side of the armrest (opposite where the cell phone wires come in) and feed the aftermarket power port's wires through (it's a bit fiddly but there's room)
- Once you've pulled most of the cable through, use the tap in connectors to clamp the wires onto the existing rear power supply's wires (you will need to peel back some of the protective tape. IMPORTANT: Make sure you get the polarity right)
- Tape the new wires to the existing ones, to prevent someone from pulling on the tap-ins
- There won't be a lot of room back there when the door is re-attached & closed, so make sure that everything is positioned properly
- Test the new power port, and re-install the ashtray
Step 4 - Run the dock connector into the cell phone cradle:
- This is the trickiest part of the process
- The lid opens in two stages - the upper compartment (accessed by opening the lid from the side) is what I'm calling the cell phone cradle
- Open the armrest and remove the bottom cover of the lid assembly. There is a single Torx screw - once it's removed, the bottom plate should slide down and then out (bayonet style)
- You should now see the closing mechanism and the cell phone pre-wiring cables. Remove the three Torx screws that are holding in the floor of the cell phone cradle
- Close the lid and open just the cell phone cradle (i.e. when the lid opens from the side) You should now be able to remove the entire floor of the cell phone cradle (I found it easier to poke it out from the bottom, which you can do by opening the lid from the side and then pushing down on the main latch with my finger to lift up the entire assembly)
- Pop out the cell phone cover plate and put it aside
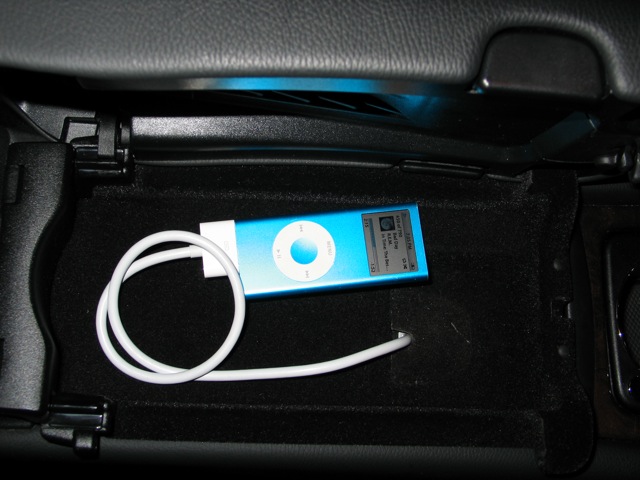
- Run the dock connector cable so that it follows the same path as the cell phone wires, then up and through the now-open cell phone cover plate hole
- Ensure that you have exactly the right amount of cable pulled through to follow the path of the cell phone cable so that the dock connector cable splits into USB, audio & video just below the lid's support arm (otherwise it will get in the way when opening & closing the lid)
- Tape the dock connector cable to the cell phone cable. Note how it needs to move with the cell phone cable as the lid opens and closes. You need to make sure that it can do this, and that there is enough room to re-attach the bottom plate. I had to play with the tape a bit to make it work
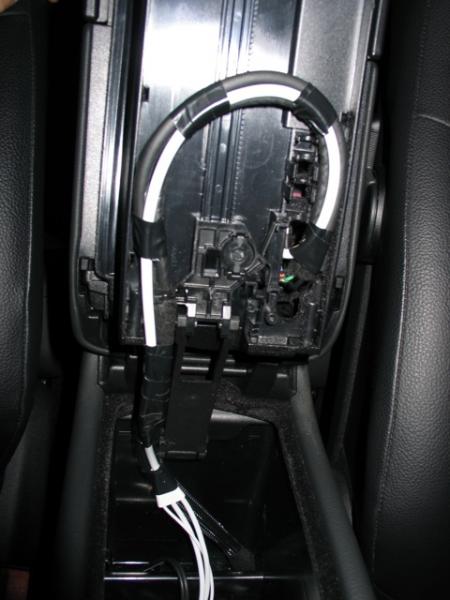
- Re-position the floor of the cell phone cradle by pressing it into place and putting the three torx screws back in. Make sure that the cable is pulled through and centered where comes through the cell phone cover plate hole (once the bottom gets re-attached you won't be able to move the cable)
- Re-attach the bottom plate of the lid assembly and replace the last screw. This is tricky, as you don't have much room for error. Make sure that the lid opens & closes properly once you're done
- Take the dremel tool and cut a notch out of the cell phone cover plate for the dock connector cable. Pop the cover plate back into place
Step 5 - Clean up:
- Tie up all of the cables lying in the bottom of the armrest and use electrical tape to tape up all of the connections
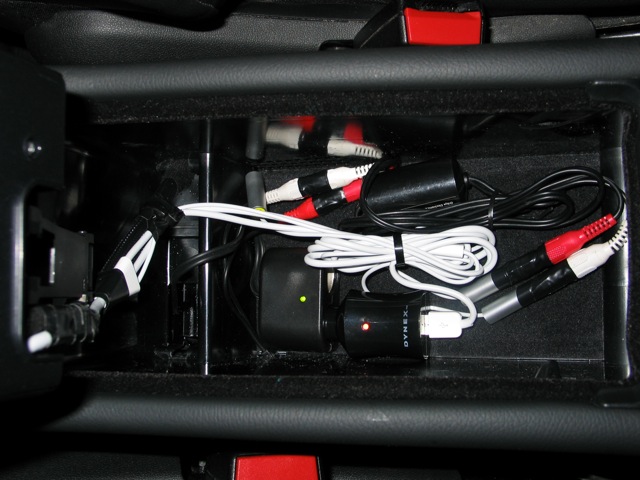
- You will still have the AV cable's video jack empty, but everything else should be connected
- Enjoy your iPod-enabled car!
Hope you found this helpful - cheers!
I thought I would share my success & steps for installing an iPod Dock Connector in my centre armrest. I mounted it in a 2006 C230 with the standard Audio 20 sound system and the old style aux in cable (apparently they switched designs in mid year - mine is the same as 2005 models).
The DIY described below has the following features:
- Audio and power through a single dock connector cable
- Line levels out (vs. headphone jack)
- Dock connector cable comes out through the centre armrest's cellphone cradle
- Everything else (cables, power supply etc...) stays hidden at the bottom of the centre armrest
- Charges both legacy iPods and iPhones (iPhones need 5v via USB)
Note that this does not allow song changes etc... through the steering wheel controls (only volume works). You'll need to choose songs/playlists on the iPod itself, but I prefer it that way. Total cost was about $120 plus a few hours of labour. There are a few fiddly steps but nothing too challenging.
Tools required:
- Torx #10 screwdriver for dismantling the armrest
- Needle nose pliers for grabbing wires
- Scissors for cutting tape/rip ties/wire
- Dremel tool for cutting a notch in the plastic cell phone cover plate (optional)
- Beer (optional but recommended)
Materials required (all prices Canadian):
- MB's Aux in cable (in my case, A 210 440 50 05). Cost was $45 and took a day to arrive at the dealer
- Apple Composite AV Cable, $59
- 12v USB charger, $18
- Car power port with tap-in connectors (solderless), $10
- Ground loop isolator kit with RCA connectors at one end and a 3.5mm headphone jack at the other, $25
- Two female-female RCA adapters, $2
- Electrical tape and rip ties for securing cables
Step 1 - Find the wiring harness (no tools required):
- Open your first beer
- Lift the plastic kick plate on the passenger side door frame with your fingers
- Pull back the carpet. You should find a bunch of wires hidden behind a black plastic panel, including the Aux In harness (there are lots of photos of this in the thread, so will skip)
- Plug the Aux In cable into the wiring harness
- Test your cables before installing everything (Harness -> MB's Aux In cable -> Ground Loop isolator -> RCA F-F adapters -> Apple AV Cable -> iPod AND existing cigarette lighter port -> USB charger -> Apple AV Cable). Attach an iPod and hold down CDC button to activate Aux In. Your iPod should charge and should be able to hear the iPod without any buzzing or feedback (this is why you need the ground loop isolator)
- Assuming everything works ok, move on to Step 2
Step 2 - Run a cable from the centre armrest to the Aux In cable:
- There is a ventilation grille inside the centre armrest, beside the passenger seat. Notice how the plastic trim flares out to let in air. Poke out enough of the grill to squeeze the Ground Loop Isolator's headphone jack through from the inside
- Pull back the passenger side carpet to reveal the bottom of the car
- Pull the Ground Loop's cable through the ventilation grill and into the cabin. When you have enough pulled through, tuck it up under the plastic trim and run it forward until you get to where the main carpet is pulled back.
- Feed the cable under the heating vent and connect it to the MB Aux In cable (the end that's supposed to be mounted in the glove compartment)
- Tape the connection together with electrical tape
- Tuck the excess cable into the space with all of the other cables, and replace the carpet & kick plate
- Test the cable. If everything is good, go for beer #2 and move to Step 3
Step 3 - wire the Power Port
- Go to the back of the centre armrest and pull out the passenger ash tray/power port by pushing down on the silver tab
- Break off the cover plate at the rear passenger side of the armrest (opposite where the cell phone wires come in) and feed the aftermarket power port's wires through (it's a bit fiddly but there's room)
- Once you've pulled most of the cable through, use the tap in connectors to clamp the wires onto the existing rear power supply's wires (you will need to peel back some of the protective tape. IMPORTANT: Make sure you get the polarity right)
- Tape the new wires to the existing ones, to prevent someone from pulling on the tap-ins
- There won't be a lot of room back there when the door is re-attached & closed, so make sure that everything is positioned properly
- Test the new power port, and re-install the ashtray
Step 4 - Run the dock connector into the cell phone cradle:
- This is the trickiest part of the process
- The lid opens in two stages - the upper compartment (accessed by opening the lid from the side) is what I'm calling the cell phone cradle
- Open the armrest and remove the bottom cover of the lid assembly. There is a single Torx screw - once it's removed, the bottom plate should slide down and then out (bayonet style)
- You should now see the closing mechanism and the cell phone pre-wiring cables. Remove the three Torx screws that are holding in the floor of the cell phone cradle
- Close the lid and open just the cell phone cradle (i.e. when the lid opens from the side) You should now be able to remove the entire floor of the cell phone cradle (I found it easier to poke it out from the bottom, which you can do by opening the lid from the side and then pushing down on the main latch with my finger to lift up the entire assembly)
- Pop out the cell phone cover plate and put it aside
- Run the dock connector cable so that it follows the same path as the cell phone wires, then up and through the now-open cell phone cover plate hole
- Ensure that you have exactly the right amount of cable pulled through to follow the path of the cell phone cable so that the dock connector cable splits into USB, audio & video just below the lid's support arm (otherwise it will get in the way when opening & closing the lid)
- Tape the dock connector cable to the cell phone cable. Note how it needs to move with the cell phone cable as the lid opens and closes. You need to make sure that it can do this, and that there is enough room to re-attach the bottom plate. I had to play with the tape a bit to make it work
- Re-position the floor of the cell phone cradle by pressing it into place and putting the three torx screws back in. Make sure that the cable is pulled through and centered where comes through the cell phone cover plate hole (once the bottom gets re-attached you won't be able to move the cable)
- Re-attach the bottom plate of the lid assembly and replace the last screw. This is tricky, as you don't have much room for error. Make sure that the lid opens & closes properly once you're done
- Take the dremel tool and cut a notch out of the cell phone cover plate for the dock connector cable. Pop the cover plate back into place
Step 5 - Clean up:
- Tie up all of the cables lying in the bottom of the armrest and use electrical tape to tape up all of the connections
- You will still have the AV cable's video jack empty, but everything else should be connected
- Enjoy your iPod-enabled car!
Hope you found this helpful - cheers!

Newbie
Joined: May 2008
Posts: 4
Likes: 0
A car
I have caught myself in a couple "oh cr@p" moments when I switch between aux input and CD/radio.
Newbie
Joined: May 2008
Posts: 4
Likes: 0
A car
Hello all,
I thought I would share my success & steps for installing an iPod Dock Connector in my centre armrest. I mounted it in a 2006 C230 with the standard Audio 20 sound system and the old style aux in cable (apparently they switched designs in mid year - mine is the same as 2005 models).
...
Hope you found this helpful - cheers!


Newbie
Joined: Dec 2008
Posts: 5
Likes: 0
c230
c230 2002 dosn't have plug
i just checked my 2002 c230 mb and it dosen't have the white plug, it has a k7 HU with a 6CD box in the glove compartment. so i was thinking of upgrading my console to the 2005 look. i have everything ( cd HU, AC control, & flash buttons) the new ac control and flash buttons have the same connections as the2002 model. but the new CD HU connection plug is very different. I was wondering if anybody adapted the 2002 plug to be able to connect the 2005 CD HU.
thank you
thank you


Almost a Member!
Joined: Dec 2008
Posts: 35
Likes: 0
From: Bellevue, WA
'06 C230
Hello all,
I thought I would share my success & steps for installing an iPod Dock Connector in my centre armrest. I mounted it in a 2006 C230 with the standard Audio 20 sound system and the old style aux in cable (apparently they switched designs in mid year - mine is the same as 2005 models).
The DIY described below has the following features:
- Audio and power through a single dock connector cable
- Line levels out (vs. headphone jack)
- Dock connector cable comes out through the centre armrest's cellphone cradle
- Everything else (cables, power supply etc...) stays hidden at the bottom of the centre armrest
- Charges both legacy iPods and iPhones (iPhones need 5v via USB)
Note that this does not allow song changes etc... through the steering wheel controls (only volume works). You'll need to choose songs/playlists on the iPod itself, but I prefer it that way. Total cost was about $120 plus a few hours of labour. There are a few fiddly steps but nothing too challenging.
Tools required:
- Torx #10 screwdriver for dismantling the armrest
- Needle nose pliers for grabbing wires
- Scissors for cutting tape/rip ties/wire
- Dremel tool for cutting a notch in the plastic cell phone cover plate (optional)
- Beer (optional but recommended)
Materials required (all prices Canadian):
- MB's Aux in cable (in my case, A 210 440 50 05). Cost was $45 and took a day to arrive at the dealer
- Apple Composite AV Cable, $59
- 12v USB charger, $18
- Car power port with tap-in connectors (solderless), $10
- Ground loop isolator kit with RCA connectors at one end and a 3.5mm headphone jack at the other, $25
- Two female-female RCA adapters, $2
- Electrical tape and rip ties for securing cables
Step 1 - Find the wiring harness (no tools required):
- Open your first beer
- Lift the plastic kick plate on the passenger side door frame with your fingers
- Pull back the carpet. You should find a bunch of wires hidden behind a black plastic panel, including the Aux In harness (there are lots of photos of this in the thread, so will skip)
- Plug the Aux In cable into the wiring harness
- Test your cables before installing everything (Harness -> MB's Aux In cable -> Ground Loop isolator -> RCA F-F adapters -> Apple AV Cable -> iPod AND existing cigarette lighter port -> USB charger -> Apple AV Cable). Attach an iPod and hold down CDC button to activate Aux In. Your iPod should charge and should be able to hear the iPod without any buzzing or feedback (this is why you need the ground loop isolator)
- Assuming everything works ok, move on to Step 2
Step 2 - Run a cable from the centre armrest to the Aux In cable:
- There is a ventilation grille inside the centre armrest, beside the passenger seat. Notice how the plastic trim flares out to let in air. Poke out enough of the grill to squeeze the Ground Loop Isolator's headphone jack through from the inside
- Pull back the passenger side carpet to reveal the bottom of the car
- Pull the Ground Loop's cable through the ventilation grill and into the cabin. When you have enough pulled through, tuck it up under the plastic trim and run it forward until you get to where the main carpet is pulled back.
- Feed the cable under the heating vent and connect it to the MB Aux In cable (the end that's supposed to be mounted in the glove compartment)
- Tape the connection together with electrical tape
- Tuck the excess cable into the space with all of the other cables, and replace the carpet & kick plate
- Test the cable. If everything is good, go for beer #2 and move to Step 3
Step 3 - wire the Power Port
- Go to the back of the centre armrest and pull out the passenger ash tray/power port by pushing down on the silver tab
- Break off the cover plate at the rear passenger side of the armrest (opposite where the cell phone wires come in) and feed the aftermarket power port's wires through (it's a bit fiddly but there's room)
- Once you've pulled most of the cable through, use the tap in connectors to clamp the wires onto the existing rear power supply's wires (you will need to peel back some of the protective tape. IMPORTANT: Make sure you get the polarity right)
- Tape the new wires to the existing ones, to prevent someone from pulling on the tap-ins
- There won't be a lot of room back there when the door is re-attached & closed, so make sure that everything is positioned properly
- Test the new power port, and re-install the ashtray
Step 4 - Run the dock connector into the cell phone cradle:
- This is the trickiest part of the process
- The lid opens in two stages - the upper compartment (accessed by opening the lid from the side) is what I'm calling the cell phone cradle
- Open the armrest and remove the bottom cover of the lid assembly. There is a single Torx screw - once it's removed, the bottom plate should slide down and then out (bayonet style)
- You should now see the closing mechanism and the cell phone pre-wiring cables. Remove the three Torx screws that are holding in the floor of the cell phone cradle
- Close the lid and open just the cell phone cradle (i.e. when the lid opens from the side) You should now be able to remove the entire floor of the cell phone cradle (I found it easier to poke it out from the bottom, which you can do by opening the lid from the side and then pushing down on the main latch with my finger to lift up the entire assembly)
- Pop out the cell phone cover plate and put it aside
- Run the dock connector cable so that it follows the same path as the cell phone wires, then up and through the now-open cell phone cover plate hole
- Ensure that you have exactly the right amount of cable pulled through to follow the path of the cell phone cable so that the dock connector cable splits into USB, audio & video just below the lid's support arm (otherwise it will get in the way when opening & closing the lid)
- Tape the dock connector cable to the cell phone cable. Note how it needs to move with the cell phone cable as the lid opens and closes. You need to make sure that it can do this, and that there is enough room to re-attach the bottom plate. I had to play with the tape a bit to make it work
- Re-position the floor of the cell phone cradle by pressing it into place and putting the three torx screws back in. Make sure that the cable is pulled through and centered where comes through the cell phone cover plate hole (once the bottom gets re-attached you won't be able to move the cable)
- Re-attach the bottom plate of the lid assembly and replace the last screw. This is tricky, as you don't have much room for error. Make sure that the lid opens & closes properly once you're done
- Take the dremel tool and cut a notch out of the cell phone cover plate for the dock connector cable. Pop the cover plate back into place
Step 5 - Clean up:
- Tie up all of the cables lying in the bottom of the armrest and use electrical tape to tape up all of the connections
- You will still have the AV cable's video jack empty, but everything else should be connected
- Enjoy your iPod-enabled car!
Hope you found this helpful - cheers!

Newbie
Joined: Dec 2008
Posts: 3
Likes: 0
Mercedes C200 CDi
Want to connect Ipod without using FM transmitter
Have checked all sites and I think your instructions are the best. I can't see any photos it got the photos crossed. I have a C class W203 on 55 plate (2005).
I don't know the first thing about getting one of these in. What would equipnment would I need? How much would it cost? Can the Ipod be controlled by my cd player or only from the Ipod? From what I have seen so far you only need a lead that connects from Ipod to the cd player. is that correct?
Thanks in advance. Email me if you require.
Newbie
Joined: Nov 2008
Posts: 6
Likes: 0
2006 C230
That's correct - you still need to control the iPod via the iPod's interface (works well since I prefer it that way). The big advantage is being able to charge & play without a big mess of cables.

Senior Member
Joined: Sep 2005
Posts: 281
Likes: 0
I've had this set up for the past 3 years and I play my Creative Zen Vision M 30gb with no problem. Yesterday I tried to hook the auxiliary cable to the iPhone's headphone jack like I do with my Zen and it sounds like absolute crap. I had to turn the volume on my stereo all the way up and still, it sounded muffled. Does anyone else have this problem?
EDIT: I'm using a standard Radio Shack 3.5mm male-male jack.
EDIT: I'm using a standard Radio Shack 3.5mm male-male jack.
Last edited by Zillarpillow23; Jan 7, 2009 at 07:15 PM.

Newbie
Joined: Jan 2009
Posts: 1
Likes: 0
C230 Sport Coupe mod.>04
hello from Greece. Do you know for sure if the white plug exists in European Models? I have a MB sport coupe c230 6/2004 facelift with Audio-20 and the ability to change from CDC to Aux-in but without the Aux-in plug inside the glove box. I order this adapter in order to put it on the 12pin connector behind the Audio-20 but i don't know if there is a 12-pin port. Waiting for your opinions.
Thanks in advance.
Thanks in advance.
Last edited by gharar; Jan 15, 2009 at 08:24 AM.


