
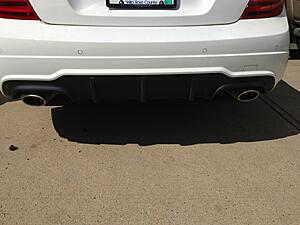
C63 Diffuser install for 2012+ W204 (Pics)
 08-17-2013, 03:37 PM
#1
Super Member
Thread Starter

C63 Diffuser install for 2012+ W204 (Pics)
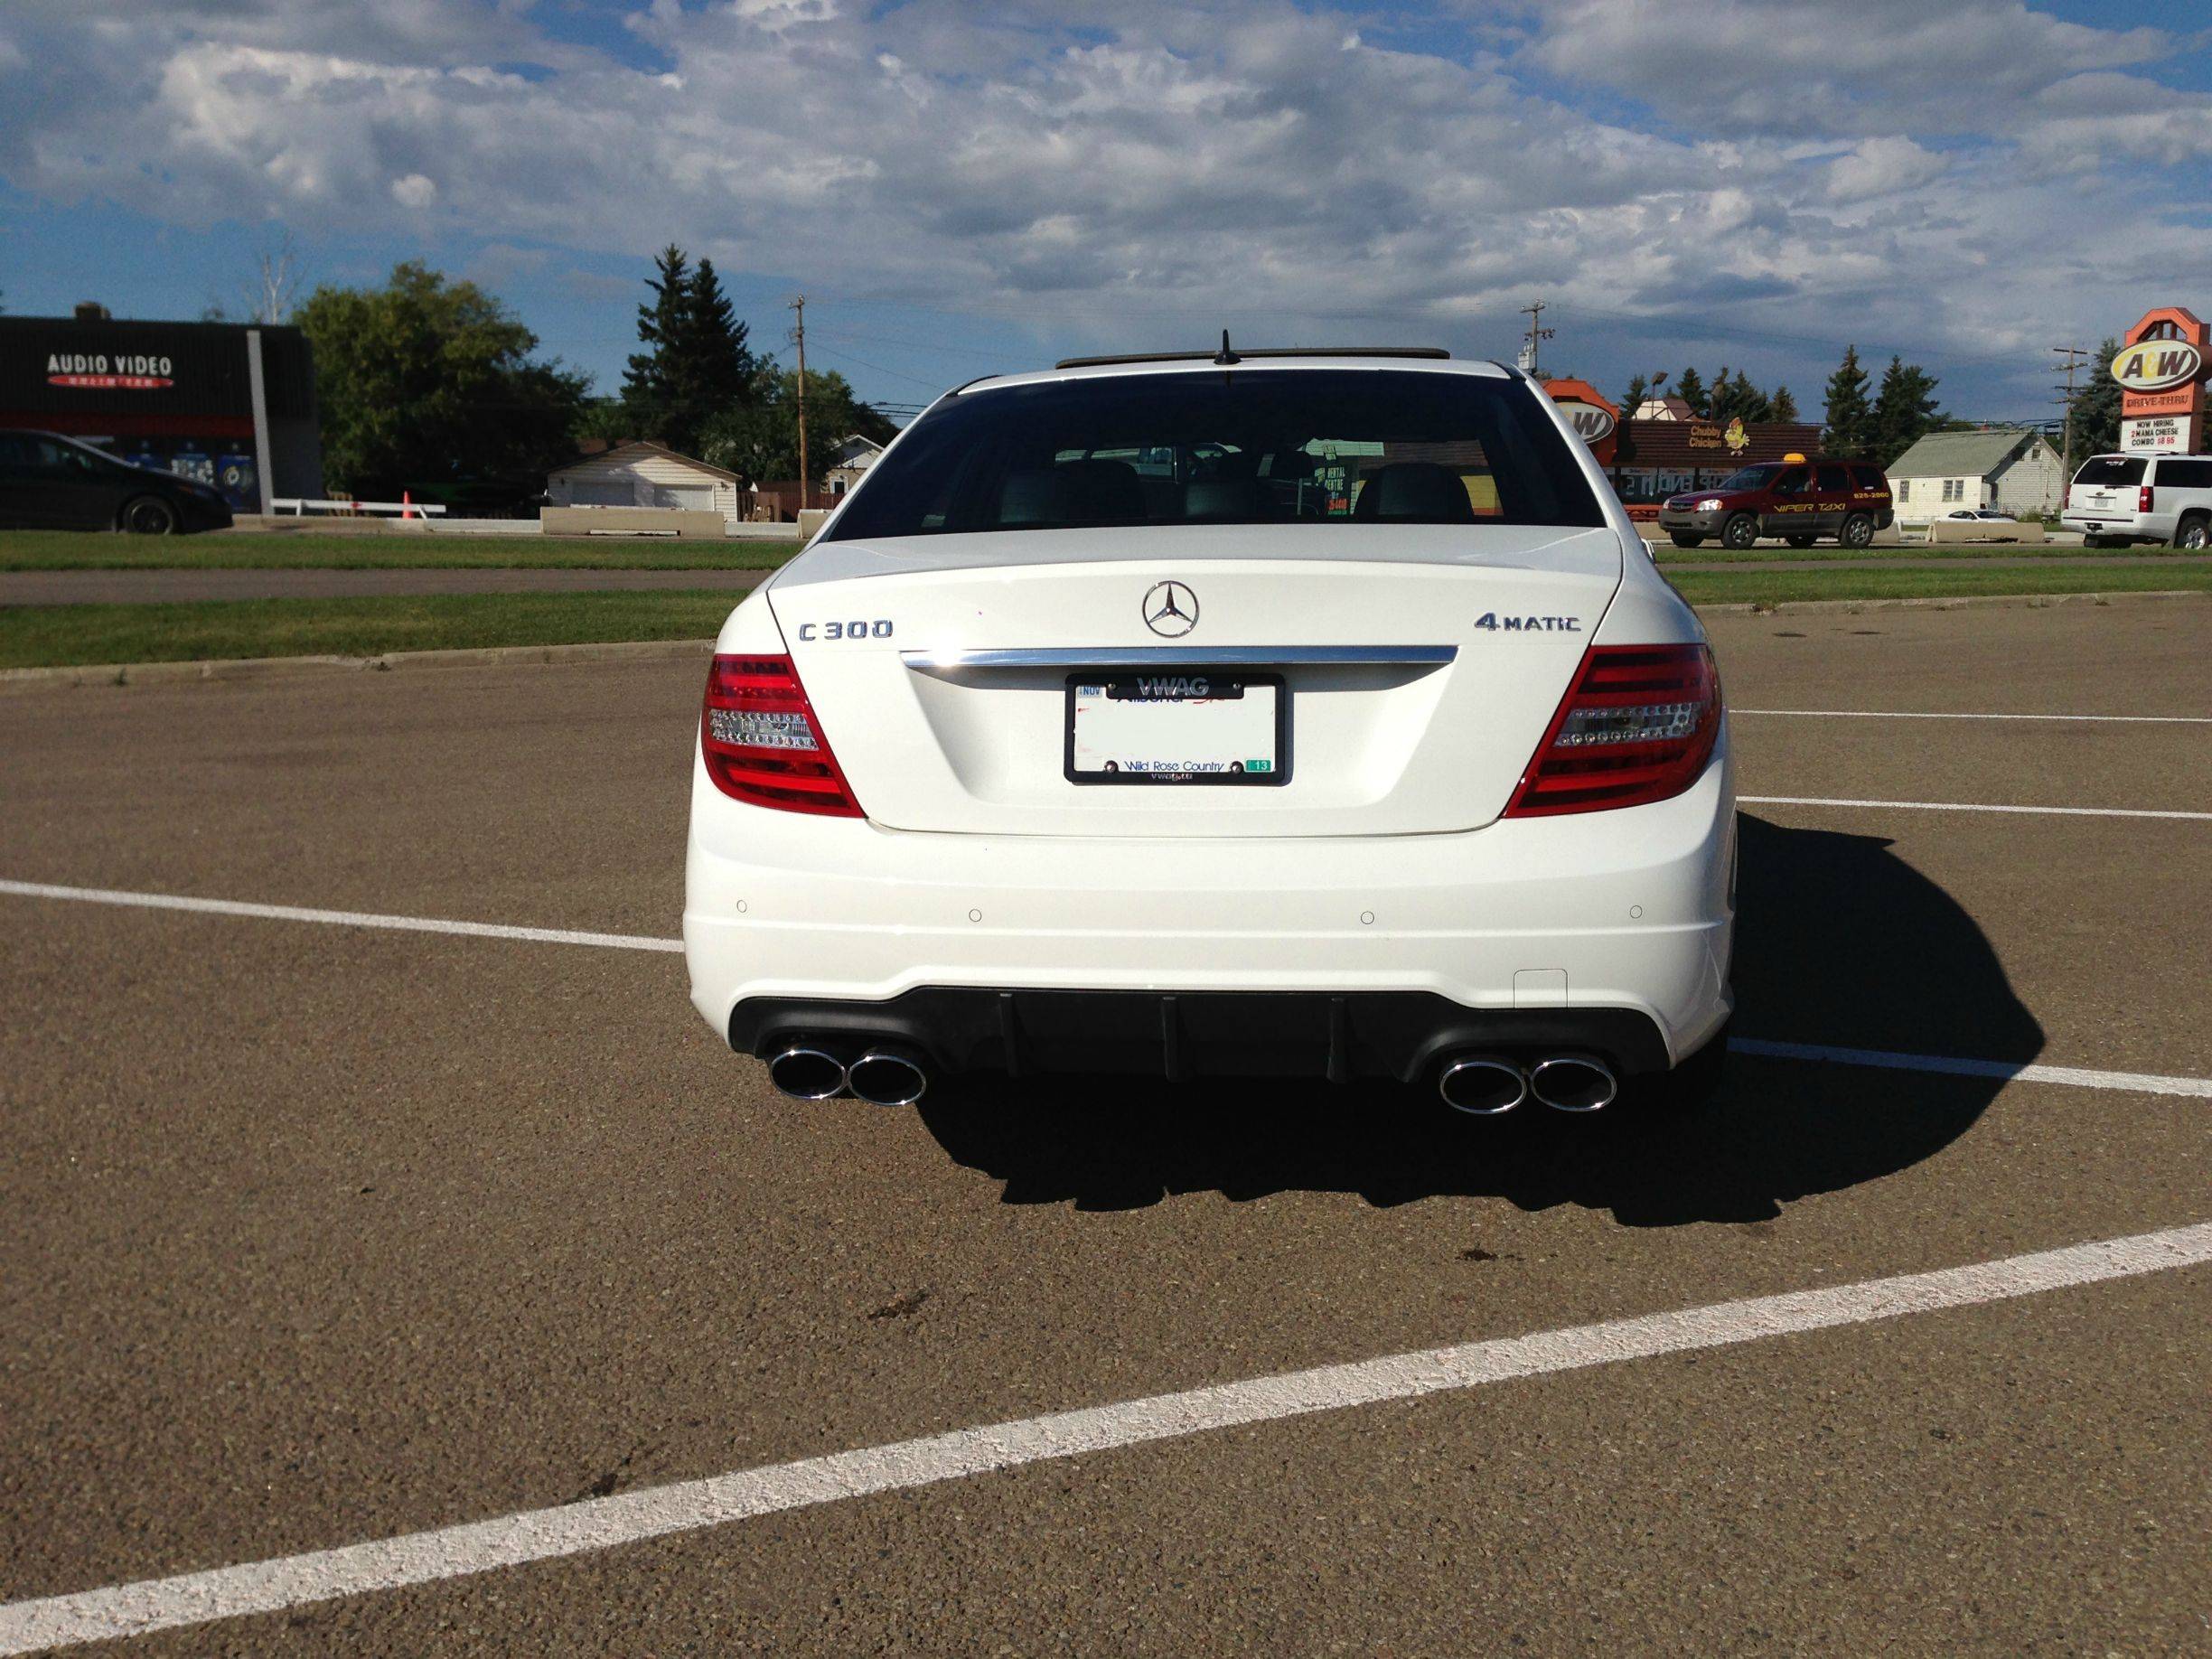
Hey guys,
This is considered a pretty easy install, but I had some trouble getting concrete information on the install for a facelift W204. (i.e. brackets, rivets, etc) Here are some of the things I noticed:
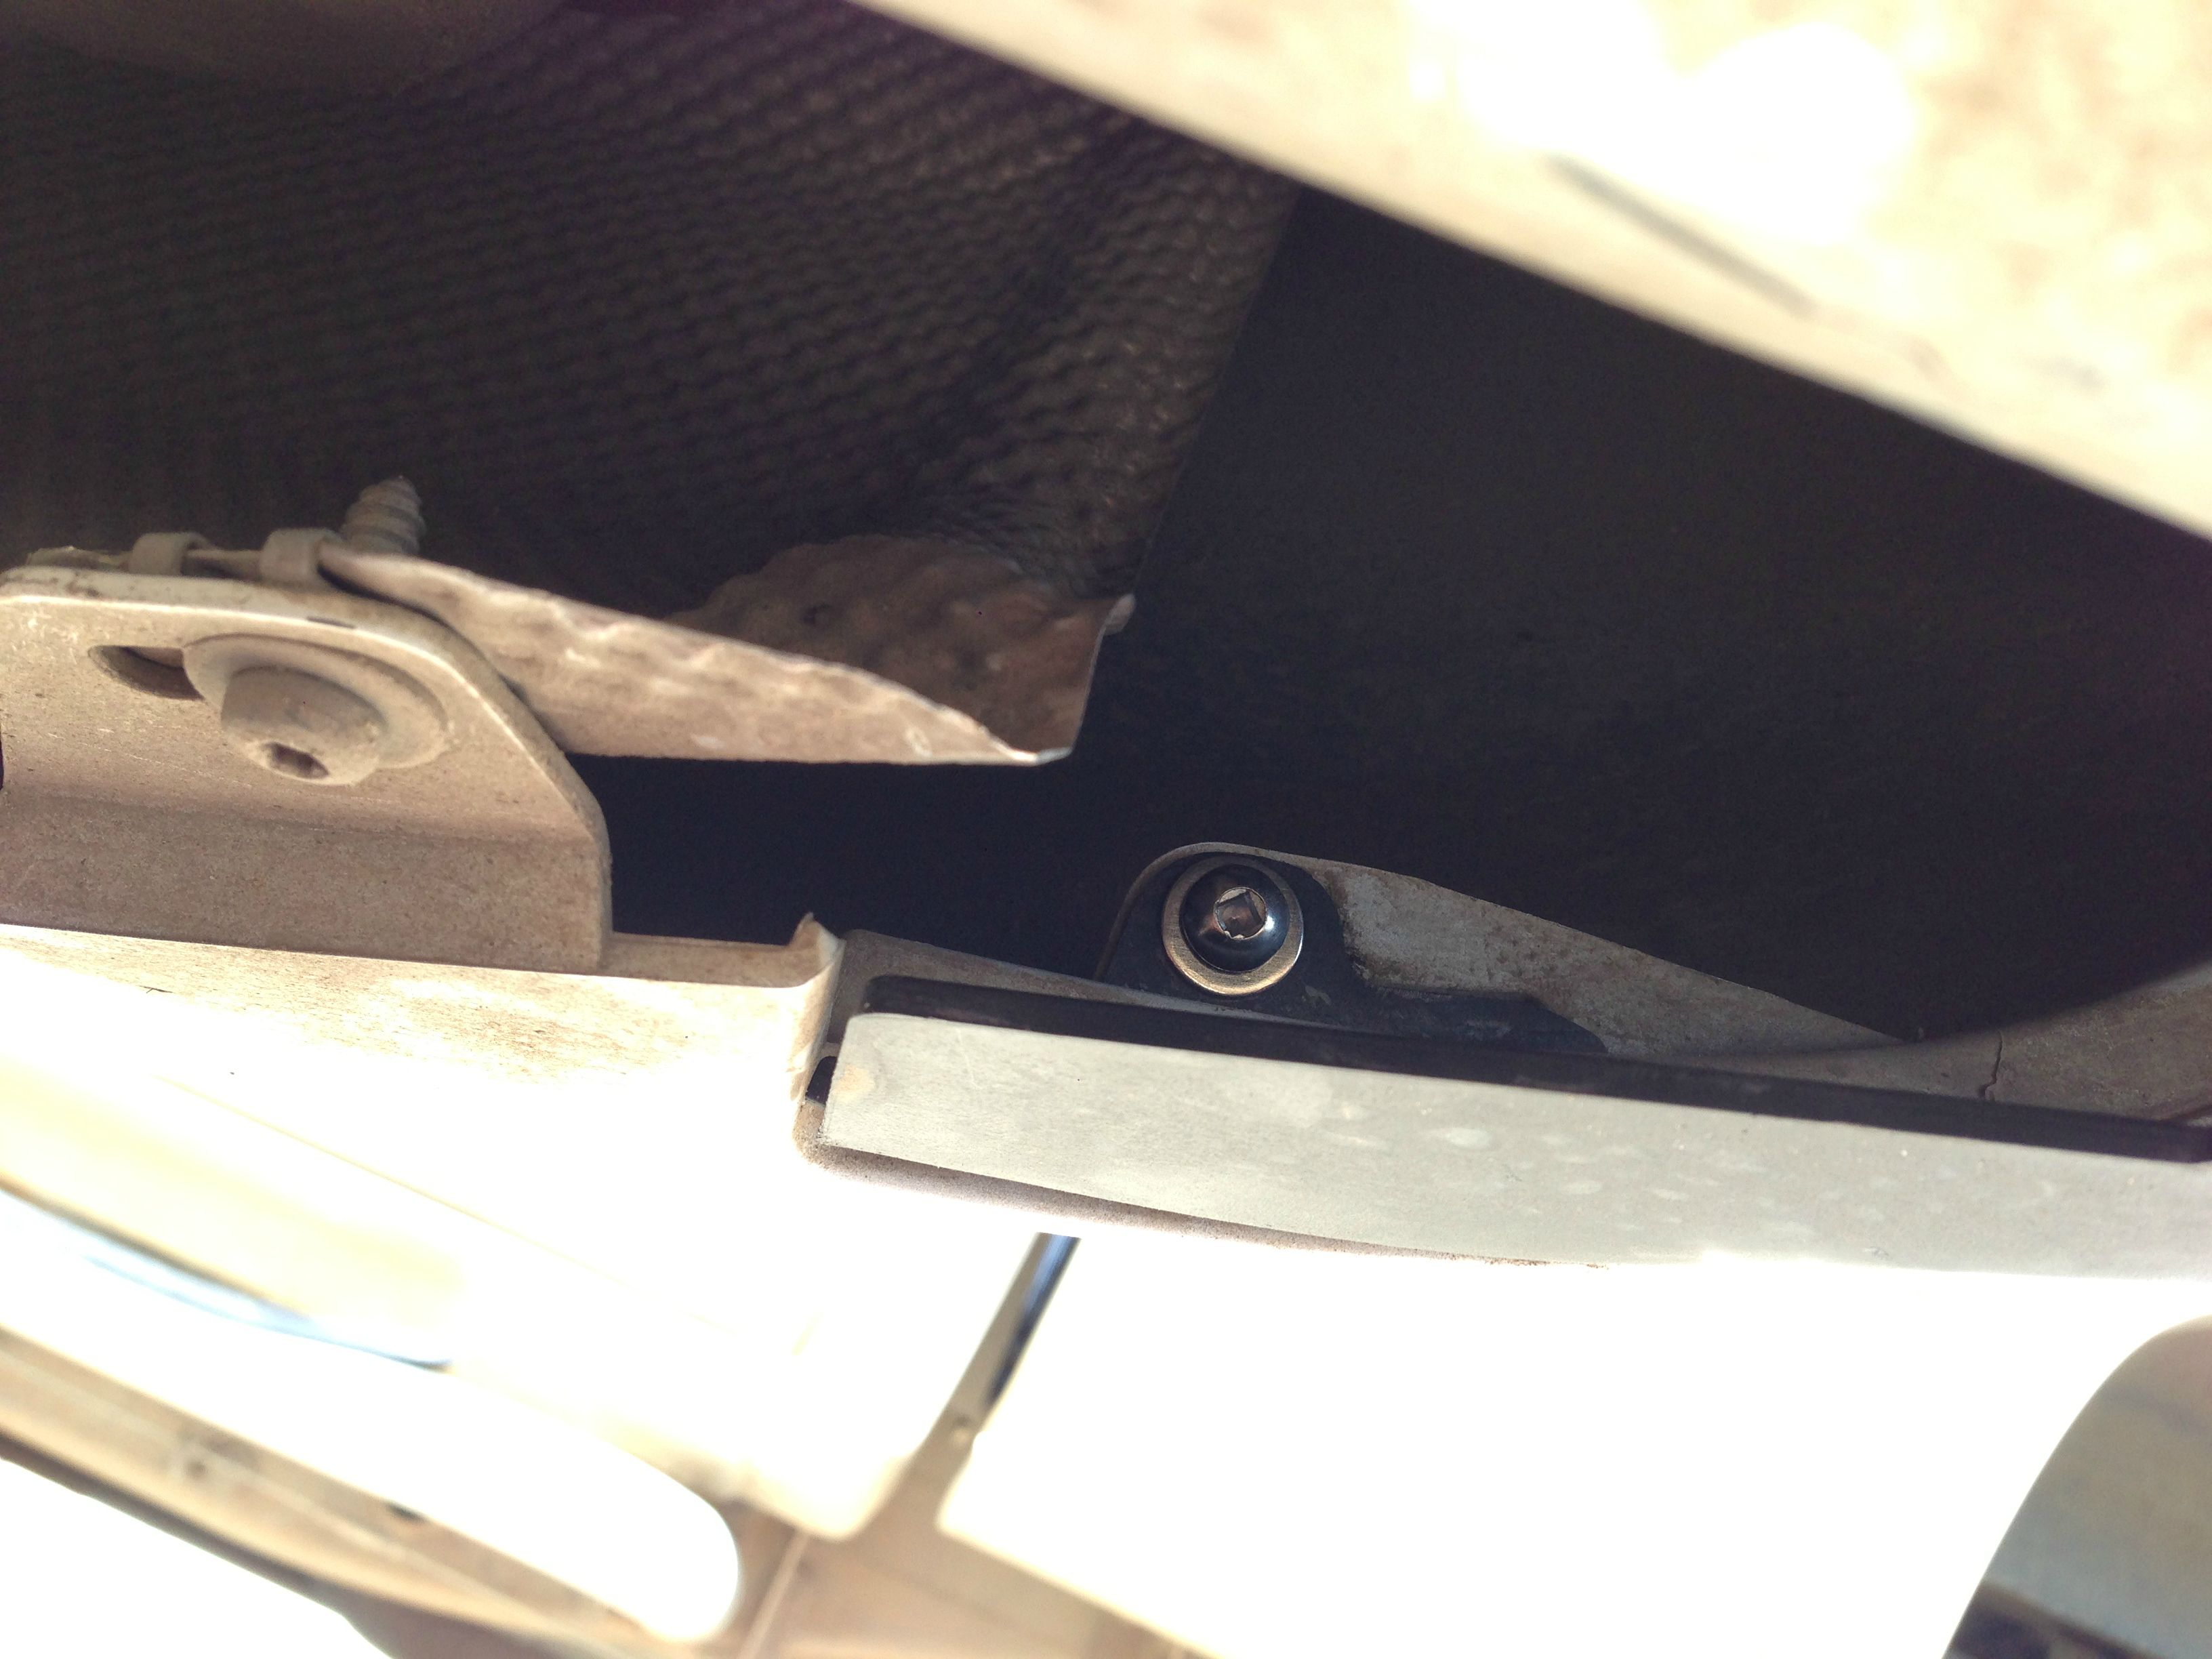
1.) You NEED brackets for rigidity. Most ebay sellers of this diffuser will tell you otherwise, but plan on purchasing them (~$50). Part numbers are: Diffuser - A204 885 39 38, Left Bracket - A204 885 46 14, Right bracket - A204 885 47 14. I bought mine from my dealer.
2.) The original diffuser is riveted to the bumper on both sides. I drilled them out and replaced them with stainless steel screws and a nylon locknut.
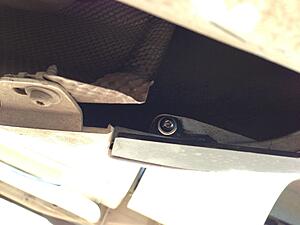
3.) The C63 bracket kind of clamps around the back of the bumper, and clips to the tab pushed through the bumper. It's a little difficult to get together properly.
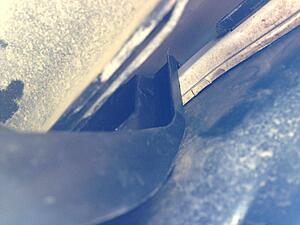
Otherwise, fairly easy. Take off your original exhaust tips, and unscrew the hex bolt holding on the original brackets. Drill out the rivets, and pull off the diffuser starting from one side. Apply some grease to the tabs of the new diffuser, and have a buddy hold up the diffuser while you attach the brackets correctly and push in the tabs.
Booked to get my quad tips welded on in a couple days!
This is considered a pretty easy install, but I had some trouble getting concrete information on the install for a facelift W204. (i.e. brackets, rivets, etc) Here are some of the things I noticed:
1.) You NEED brackets for rigidity. Most ebay sellers of this diffuser will tell you otherwise, but plan on purchasing them (~$50). Part numbers are: Diffuser - A204 885 39 38, Left Bracket - A204 885 46 14, Right bracket - A204 885 47 14. I bought mine from my dealer.
2.) The original diffuser is riveted to the bumper on both sides. I drilled them out and replaced them with stainless steel screws and a nylon locknut.
3.) The C63 bracket kind of clamps around the back of the bumper, and clips to the tab pushed through the bumper. It's a little difficult to get together properly.

Otherwise, fairly easy. Take off your original exhaust tips, and unscrew the hex bolt holding on the original brackets. Drill out the rivets, and pull off the diffuser starting from one side. Apply some grease to the tabs of the new diffuser, and have a buddy hold up the diffuser while you attach the brackets correctly and push in the tabs.
Booked to get my quad tips welded on in a couple days!

Last edited by JaredP; 08-17-2013 at 03:40 PM.
 08-17-2013, 07:05 PM
#2
Newbie
Join Date: Sep 2010
Location: Brooklyn
Posts: 11
Likes: 0
Received 0 Likes
on
0 Posts
2013 C300 Sport Sedan
Hey guys,
This is considered a pretty easy install, but I had some trouble getting concrete information on the install for a facelift W204. (i.e. brackets, rivets, etc) Here are some of the things I noticed:
1.) You NEED brackets for rigidity. Most ebay sellers of this diffuser will tell you otherwise, but plan on purchasing them (~$50). Part numbers are: Diffuser - A204 885 39 38, Left Bracket - A204 885 46 14, Right bracket - A204 885 47 14. I bought mine from my dealer.
2.) The original diffuser is riveted to the bumper on both sides. I drilled them out and replaced them with stainless steel screws and a nylon locknut.

3.) The C63 bracket kind of clamps around the back of the bumper, and clips to the tab pushed through the bumper. It's a little difficult to get together properly.

Otherwise, fairly easy. Take off your original exhaust tips, and unscrew the hex bolt holding on the original brackets. Drill out the rivets, and pull off the diffuser starting from one side. Apply some grease to the tabs of the new diffuser, and have a buddy hold up the diffuser while you attach the brackets correctly and push in the tabs.
Booked to get my quad tips welded on in a couple days!

This is considered a pretty easy install, but I had some trouble getting concrete information on the install for a facelift W204. (i.e. brackets, rivets, etc) Here are some of the things I noticed:
1.) You NEED brackets for rigidity. Most ebay sellers of this diffuser will tell you otherwise, but plan on purchasing them (~$50). Part numbers are: Diffuser - A204 885 39 38, Left Bracket - A204 885 46 14, Right bracket - A204 885 47 14. I bought mine from my dealer.
2.) The original diffuser is riveted to the bumper on both sides. I drilled them out and replaced them with stainless steel screws and a nylon locknut.
3.) The C63 bracket kind of clamps around the back of the bumper, and clips to the tab pushed through the bumper. It's a little difficult to get together properly.
Otherwise, fairly easy. Take off your original exhaust tips, and unscrew the hex bolt holding on the original brackets. Drill out the rivets, and pull off the diffuser starting from one side. Apply some grease to the tabs of the new diffuser, and have a buddy hold up the diffuser while you attach the brackets correctly and push in the tabs.
Booked to get my quad tips welded on in a couple days!
great thanks, been looking for that part number for quite sometime now. Post final pics!
08-18-2013, 12:58 AM
#3
Member

Join Date: Nov 2012
Location: SoCal
Posts: 86
Likes: 0
Received 0 Likes
on
0 Posts
2013 W204
Cool...
Now you're telling me. I slapped in the C63 diffuser on my C250 this morning. Took me a while to figure out that in fact there is aluminum rivet on both sides. Flashlight and small mirror confirmed that. I snipped off that darn Alunimum Rivet using side cutter plier. It came off easily for me. I use Stainless Philip head Screw and Nut with Star washer attached.
Wish I had known the part# for the Bracket sooner. But I have a can do attitude and would do just about anything to make it work. I re-installed the old Brackets and secured the bottom part of the diffuser with fastener. It's solid!
I tossed all the exhaust mod parts in the trunk and drove around looking for Muffler Shop but no go. They're all close on weekend
Last edited by katuga; 08-18-2013 at 01:06 AM.
08-18-2013, 02:00 PM
#4
Member
Join Date: Jul 2013
Location: BOS
Posts: 87
Likes: 0
Received 0 Likes
on
0 Posts
2013 C300 Sport
Now you're telling me. I slapped in the C63 diffuser on my C250 this morning. Took me a while to figure out that in fact there is aluminum rivet on both sides. Flashlight and small mirror confirmed that. I snipped off that darn Alunimum Rivet using side cutter plier. It came off easily for me. I use Stainless Philip head Screw and Nut with Star washer attached.
Wish I had known the part# for the Bracket sooner. But I have a can do attitude and would do just about anything to make it work. I re-installed the old Brackets and secured the bottom part of the diffuser with fastener. It's solid!
I tossed all the exhaust mod parts in the trunk and drove around looking for Muffler Shop but no go. They're all close on weekend
Wish I had known the part# for the Bracket sooner. But I have a can do attitude and would do just about anything to make it work. I re-installed the old Brackets and secured the bottom part of the diffuser with fastener. It's solid!
I tossed all the exhaust mod parts in the trunk and drove around looking for Muffler Shop but no go. They're all close on weekend


Trending Topics

 08-20-2013, 01:22 AM
#9
Member
Join Date: Nov 2012
Location: SoCal
Posts: 86
Likes: 0
Received 0 Likes
on
0 Posts
2013 W204
Ditto...C250
Y pipe is used after the resonator and installed Magnaflow 11365 Muffler on each side. Shop did a good job. He fabricated exhaust hanger similar to the orig and even painted the exhaust pipe black.
 03-05-2015, 08:02 PM
#13
MBWorld Fanatic!
http://www.ebay.com/itm/MB-C-Class-W204-12-14-C63-AMG-Style-Rear-Bumper-AERO-Diffuser-Black-/171323127209?pt=Motors_Car_Truck_Parts_Accessories&hash=item27e3a775a9&vxp=mtr
http://www.ebay.com/itm/2012-2014-MERCEDES-BENZ-W204-C204-C-CLASS-AMG-STYLE-REAR-DIFFUSER-/191528478441?pt=Motors_Car_Truck_Parts_Accessories&hash=item2c97fca6e9&vxp=mtr
Last edited by aznmode; 03-05-2015 at 08:06 PM.
03-05-2015, 11:29 PM
#16
MBWorld Fanatic!
Correction: From what I read from another member you can reuse your existing bracket on FL w204? Post 125 here.
https://mbworld.org/forums/c-class-w...ml#post6013062
https://mbworld.org/forums/c-class-w...ml#post6013062
Last edited by aznmode; 03-05-2015 at 11:38 PM.
03-05-2015, 11:31 PM
#17
Super Member
Thread Starter
the guy asking has a 2013. this thread is also titled install for 2012+. and the brackets are pretty much necessary, very little support without them.
03-05-2015, 11:41 PM
#18
MBWorld Fanatic!
Looking at both ebay images it looks like the brackets are included. 1st listing says direct bolt on. 2nd listing also say no additional hardware needed.
Last edited by aznmode; 03-05-2015 at 11:45 PM.
03-06-2015, 12:47 AM
#20
Super Member
Thread Starter
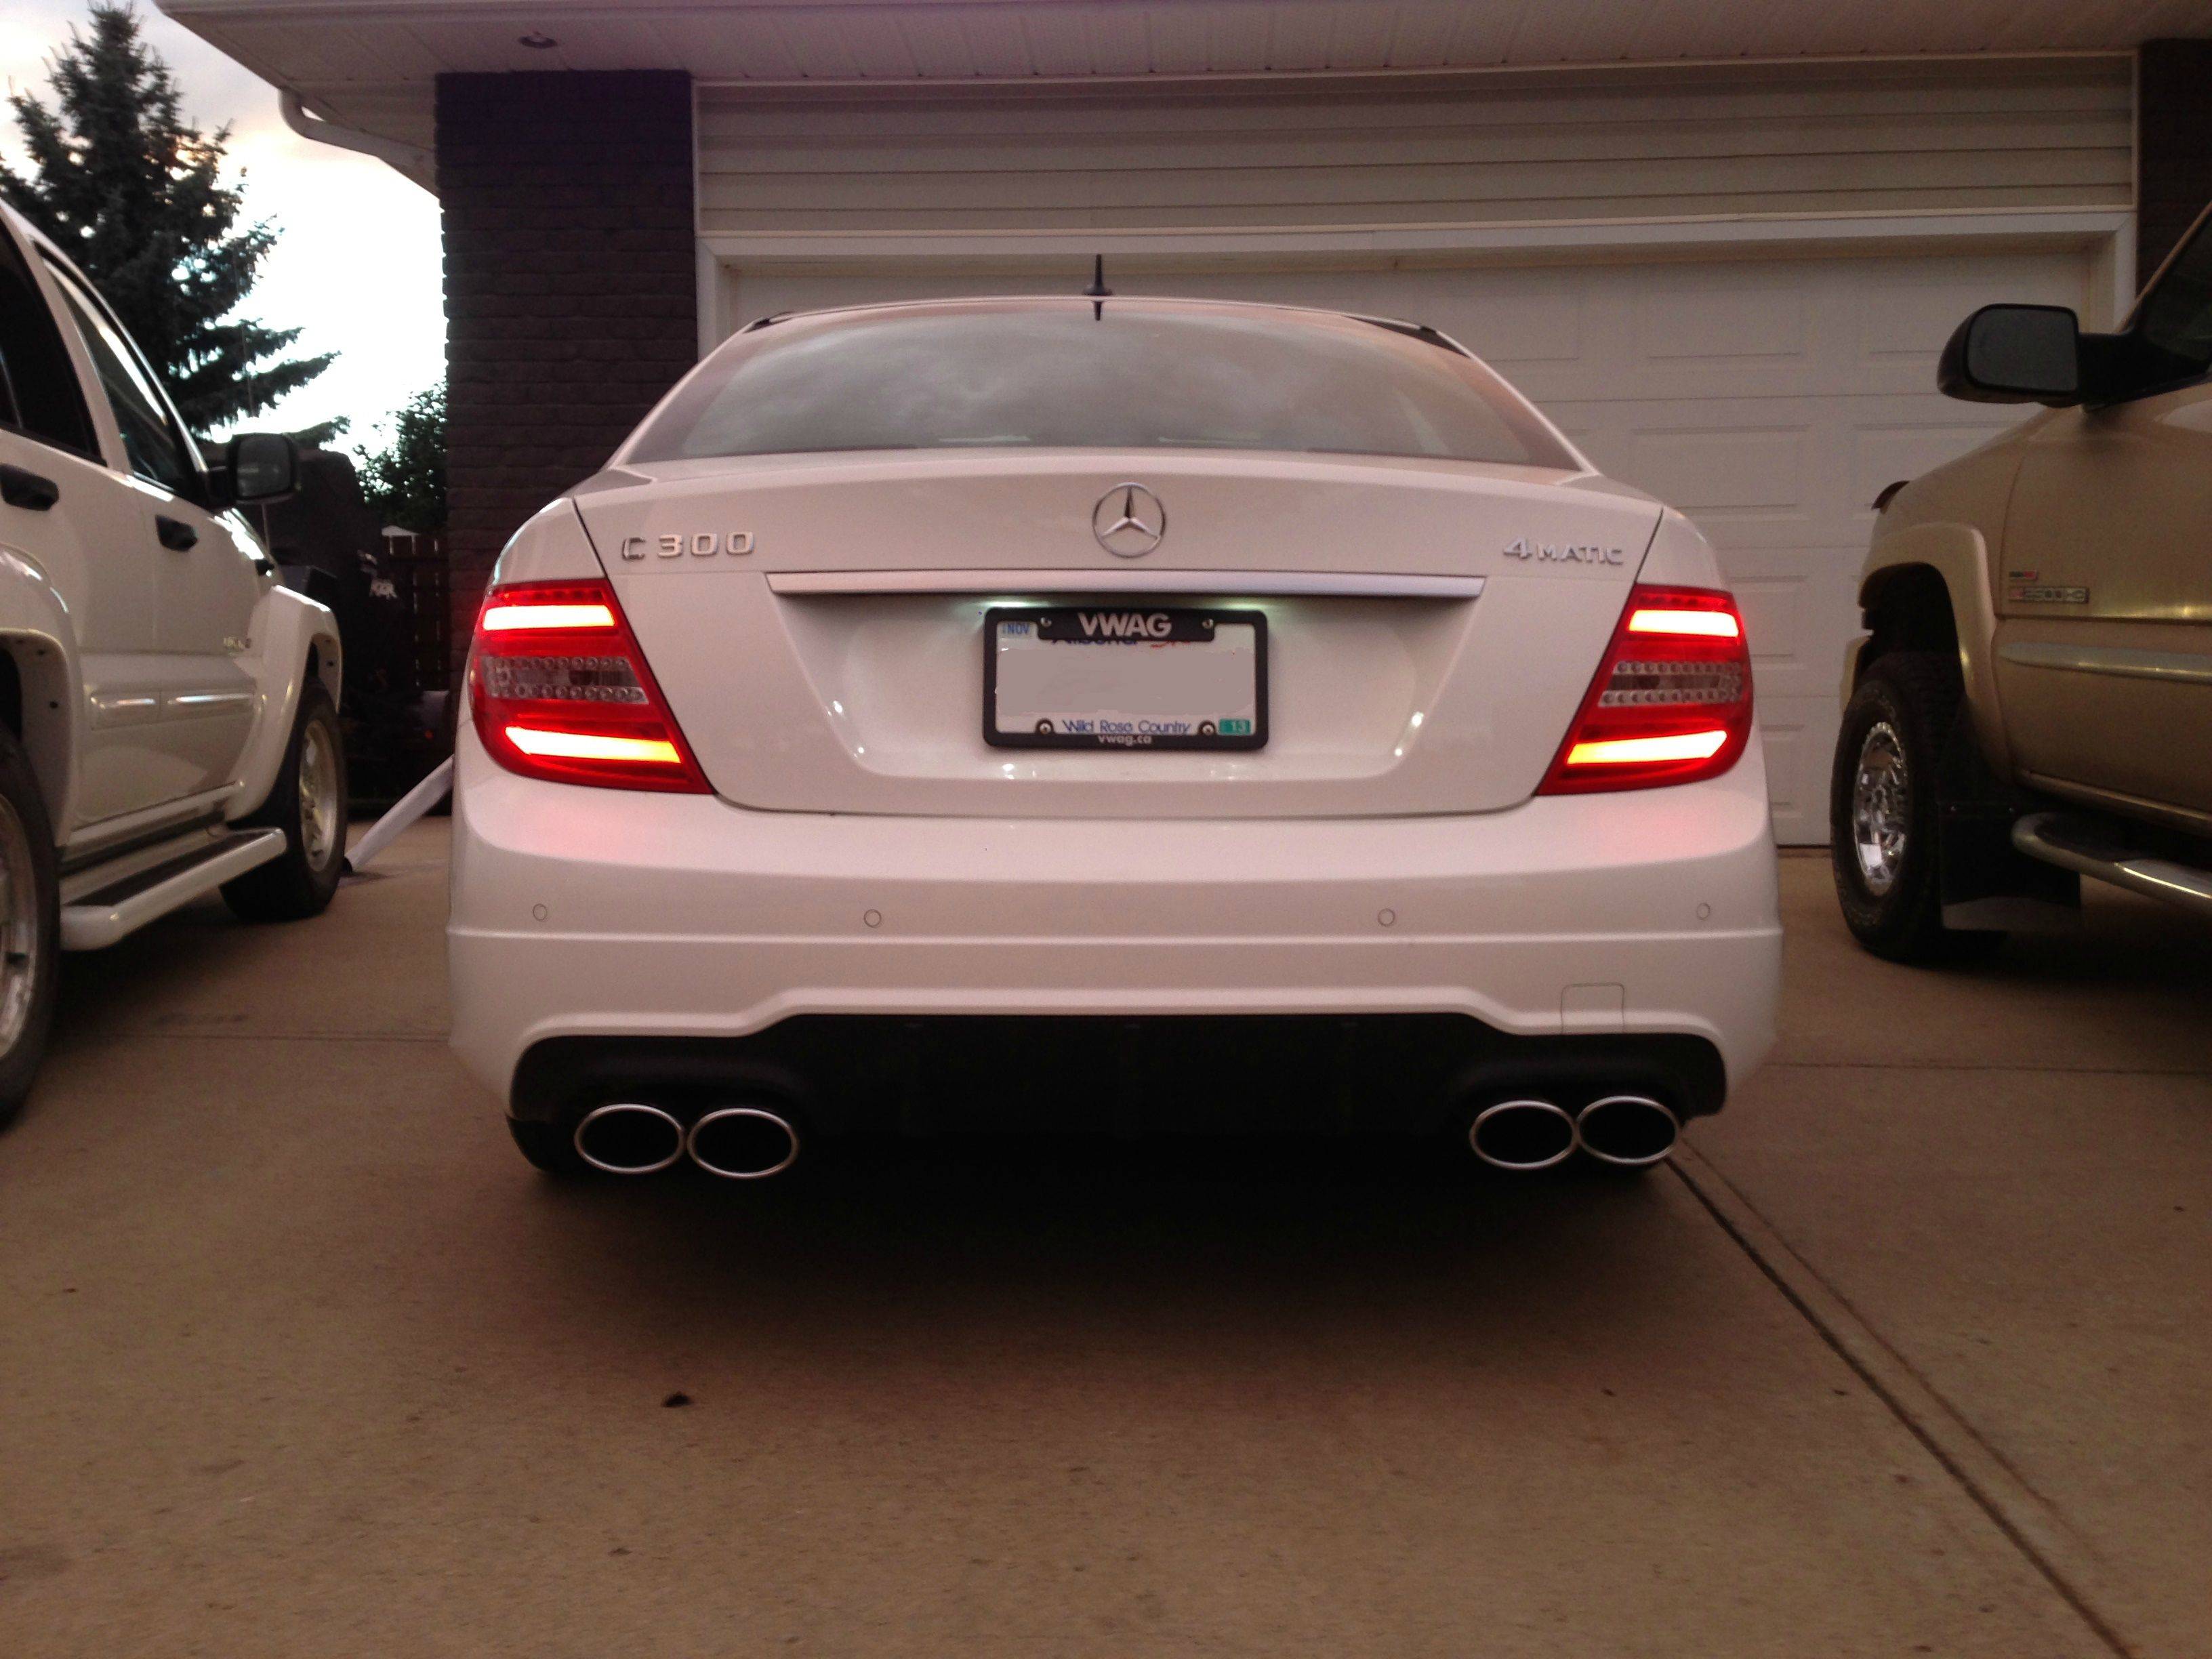
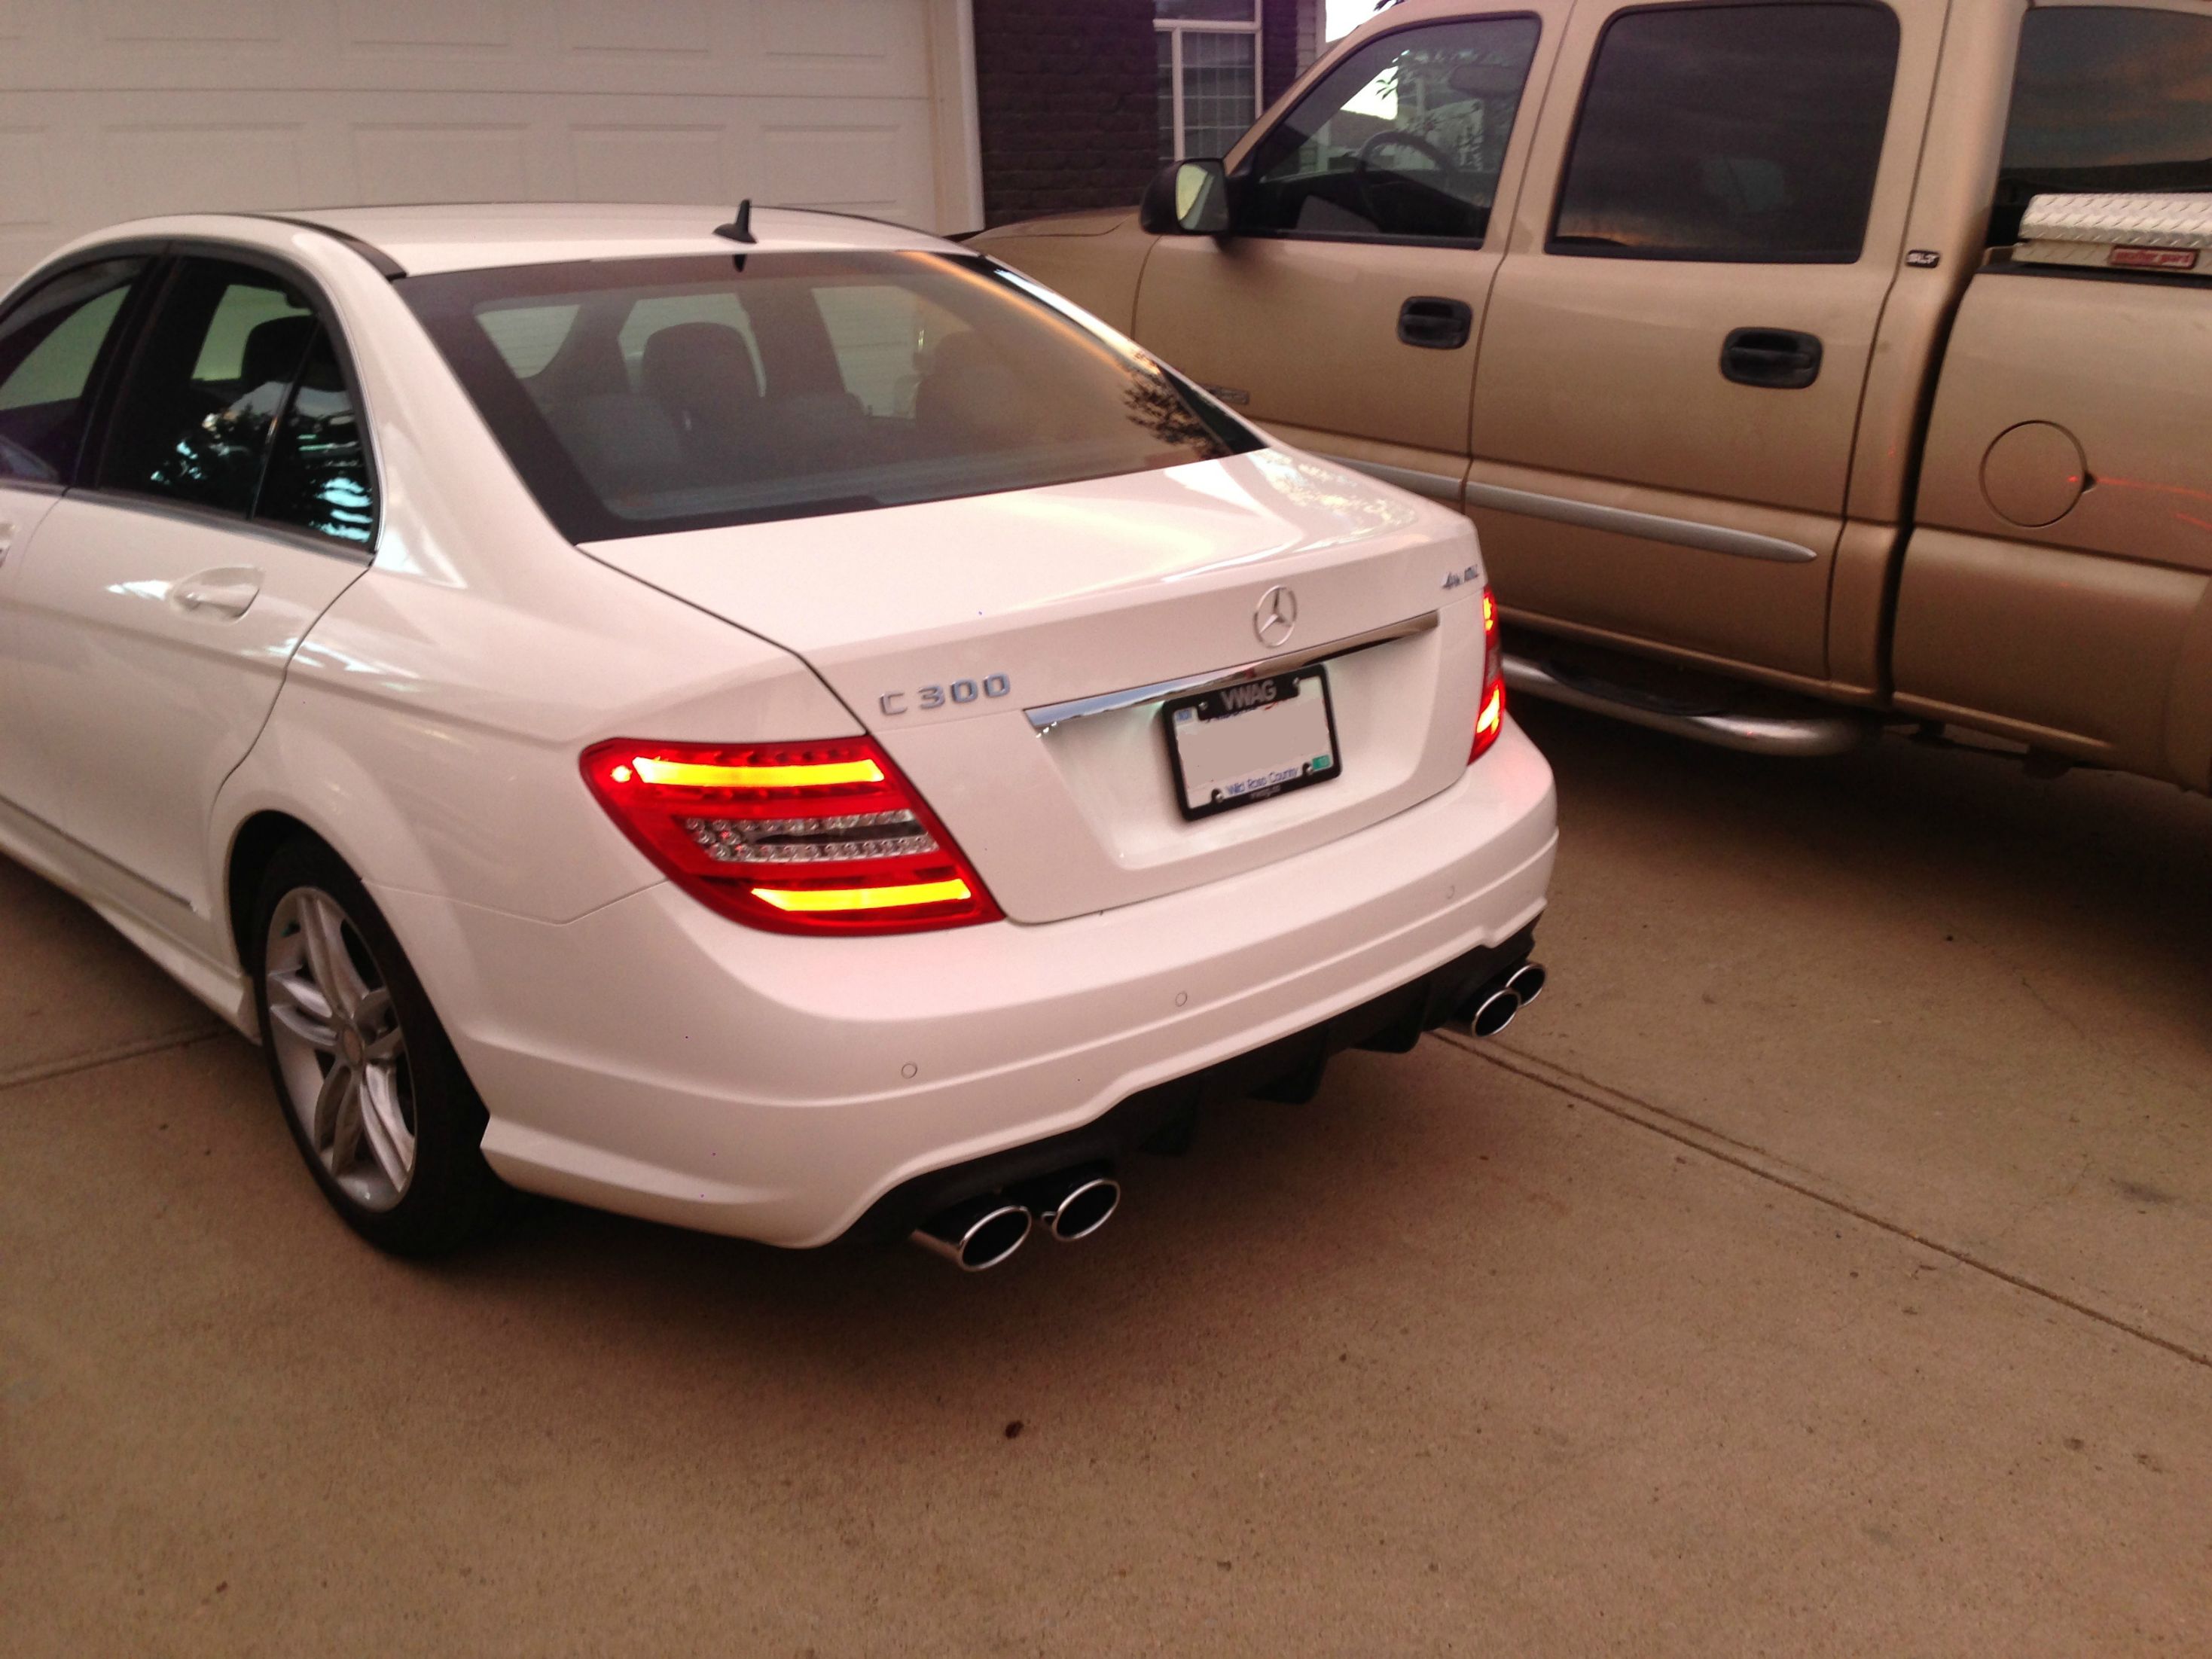
It was a little crooked unfortunately, just a defect in how the tips were prewelded when i bought the set. I was going to buy a replacement, but it didn't bother me that much. My tips are (More properly) sticking out from the diffuser less now, so it's not as noticeable.
03-06-2015, 11:10 AM
#21
Correction: From what I read from another member you can reuse your existing bracket on FL w204? Post 125 here.
https://mbworld.org/forums/c-class-w...ml#post6013062
https://mbworld.org/forums/c-class-w...ml#post6013062
Pre FL are different.
03-06-2015, 11:39 AM
#23
The stock part numbers are
A2048854414
A2048854514
in EPC (C350, not c63)
Though when I googled that part number for images, it looks like a different part than I had on my car. I bought mine used so who knows. It had the stock diffuser on it.
03-06-2015, 02:07 PM
#24
MBWorld Fanatic!
Weird. I wonder if its because I have a C350?
The stock part numbers are
A2048854414
A2048854514
in EPC (C350, not c63)
Though when I googled that part number for images, it looks like a different part than I had on my car. I bought mine used so who knows. It had the stock diffuser on it.
The stock part numbers are
A2048854414
A2048854514
in EPC (C350, not c63)
Though when I googled that part number for images, it looks like a different part than I had on my car. I bought mine used so who knows. It had the stock diffuser on it.
03-06-2015, 02:25 PM
#25
You know what, I'll just go out in the garage tonight and look at the ones I took off. I seem to remember them having more cross bracing, but its been a long time since I looked at them. I know for sure when I pulled them off they looked the same as the new ones.


