When you click on links to various merchants on this site and make a purchase, this can result in this site earning a commission. Affiliate programs and affiliations include, but are not limited to, the eBay Partner Network.
I recently changed the serpentine belt on my girlfriend's '14 C250. I had searched here ahead of time to find any info about the job and hadn't found anything for the C250 other than a thread in the coupe forum. I updated that thread, but figured I would stick the same info here in the sedan forum, too.
Other than the fact that (as far as I can tell) you need to access the belt from underneath, it's not that difficult. In addition to the little socket needed for removing the under panels, you need a T60 bit** to take the tension off the tensioner, and then something a couple/few inches long and thin (I used a small allen wrench) to "lock" the tensioner in the untensioned position so you can get the old belt off and the new belt on.
[** - I used a T60, because that's what I had. It fit perfectly fine. However, it looked to me like the star opening may actually be a Torx Plus. Hard to tell, since I obviously couldn't get a straight-on view to clearly see the shape of the star.]
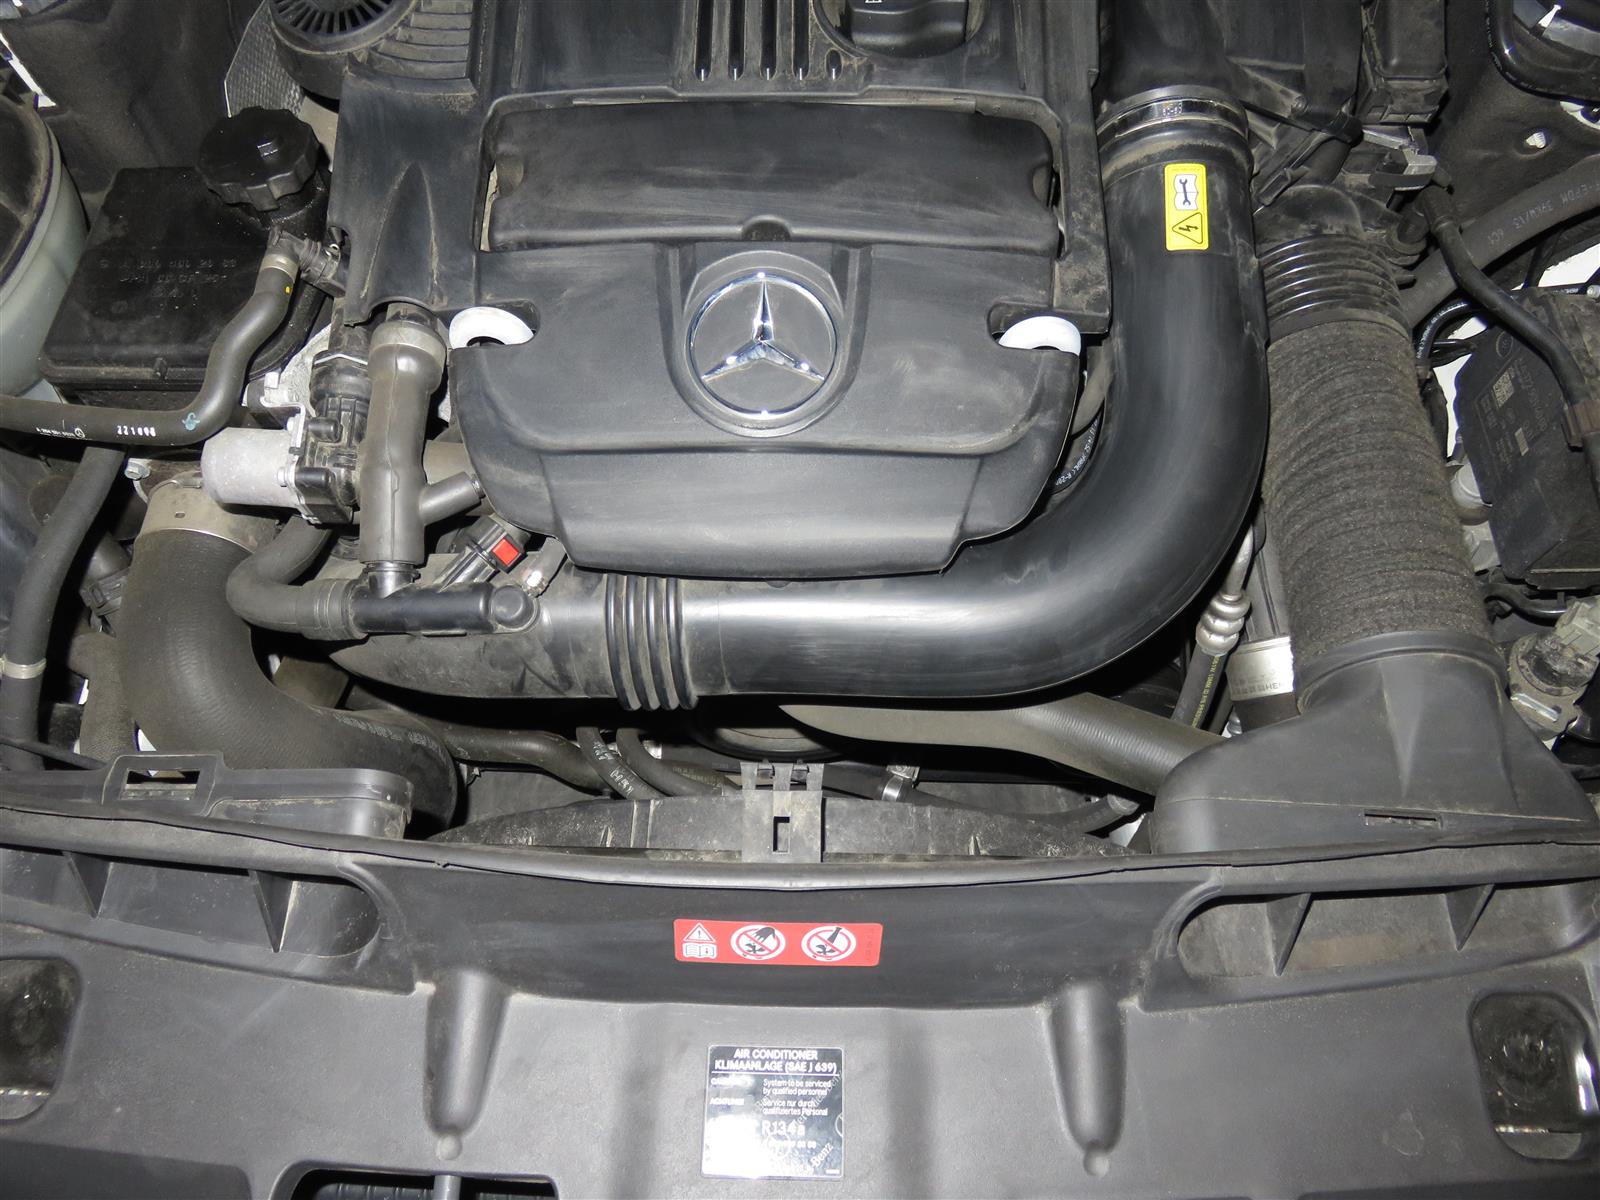
Pic from above. Nope, not getting to the belt from here! The intake tract is very much in the way of getting one's arms down in there, and removing that intake pipe is not a trivial task from what I could see. So, to the lift we go!
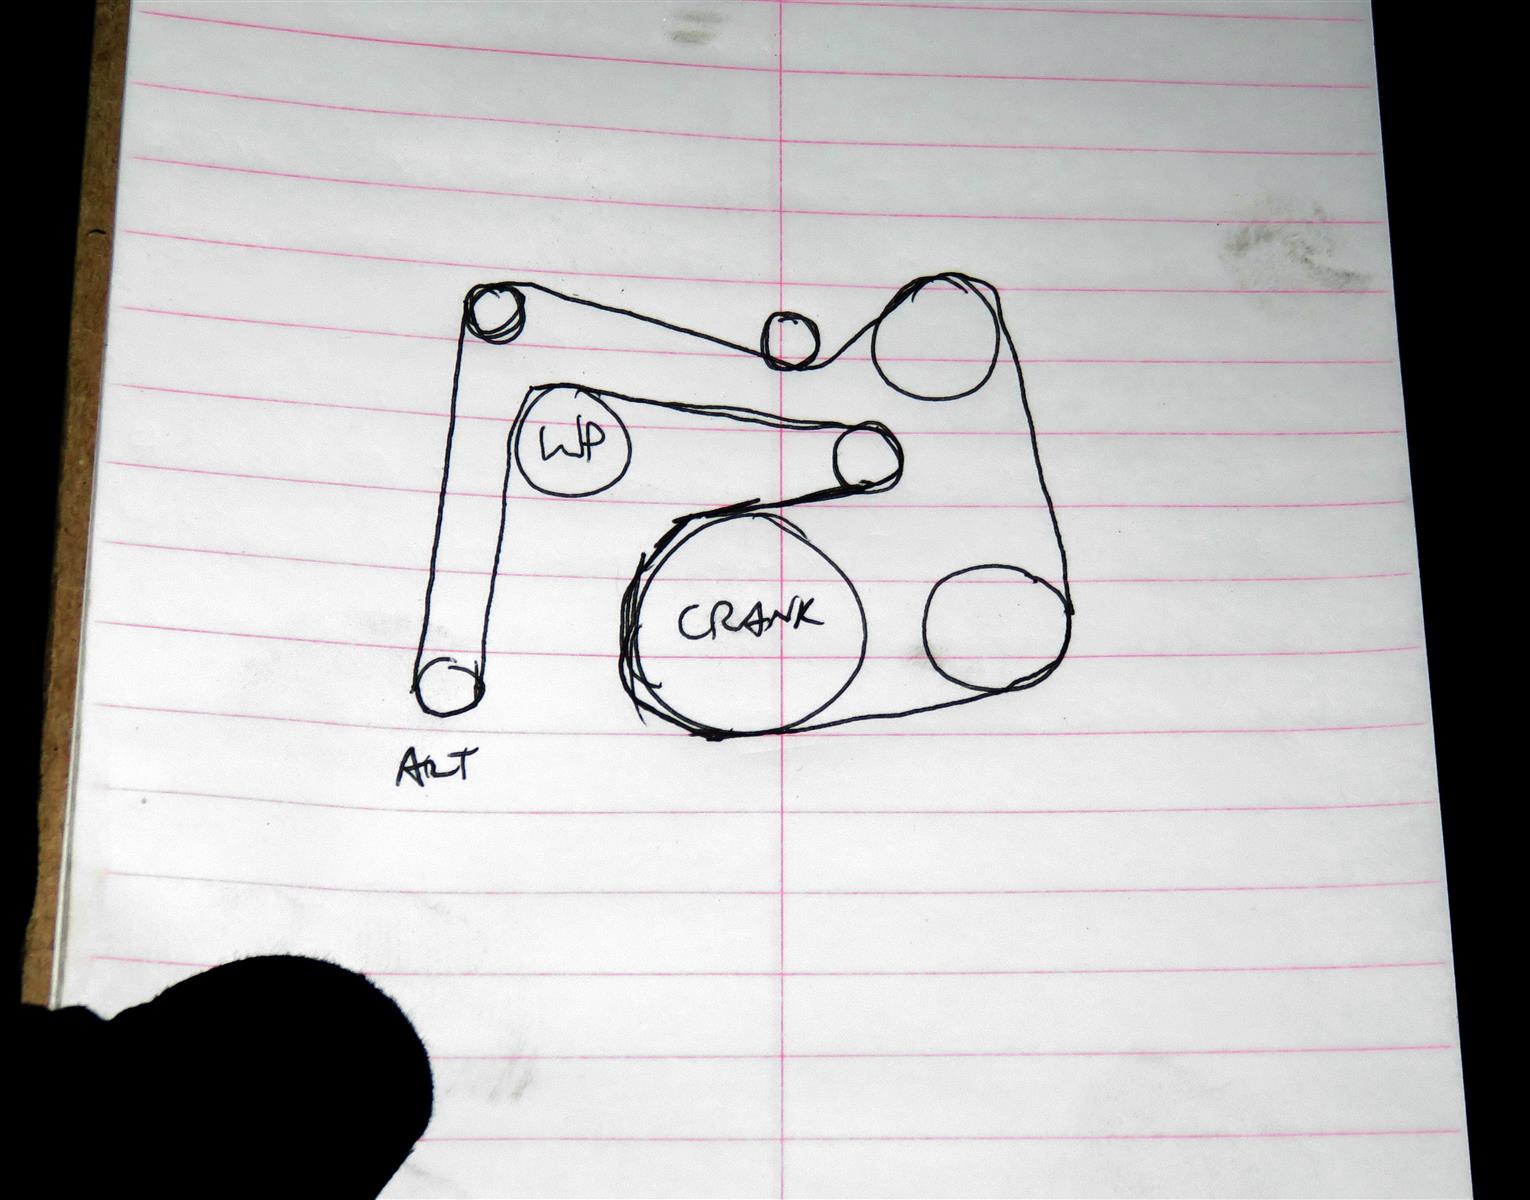
Looking up from underneath I drew myself a diagram so I knew where I needed to route the new belt.
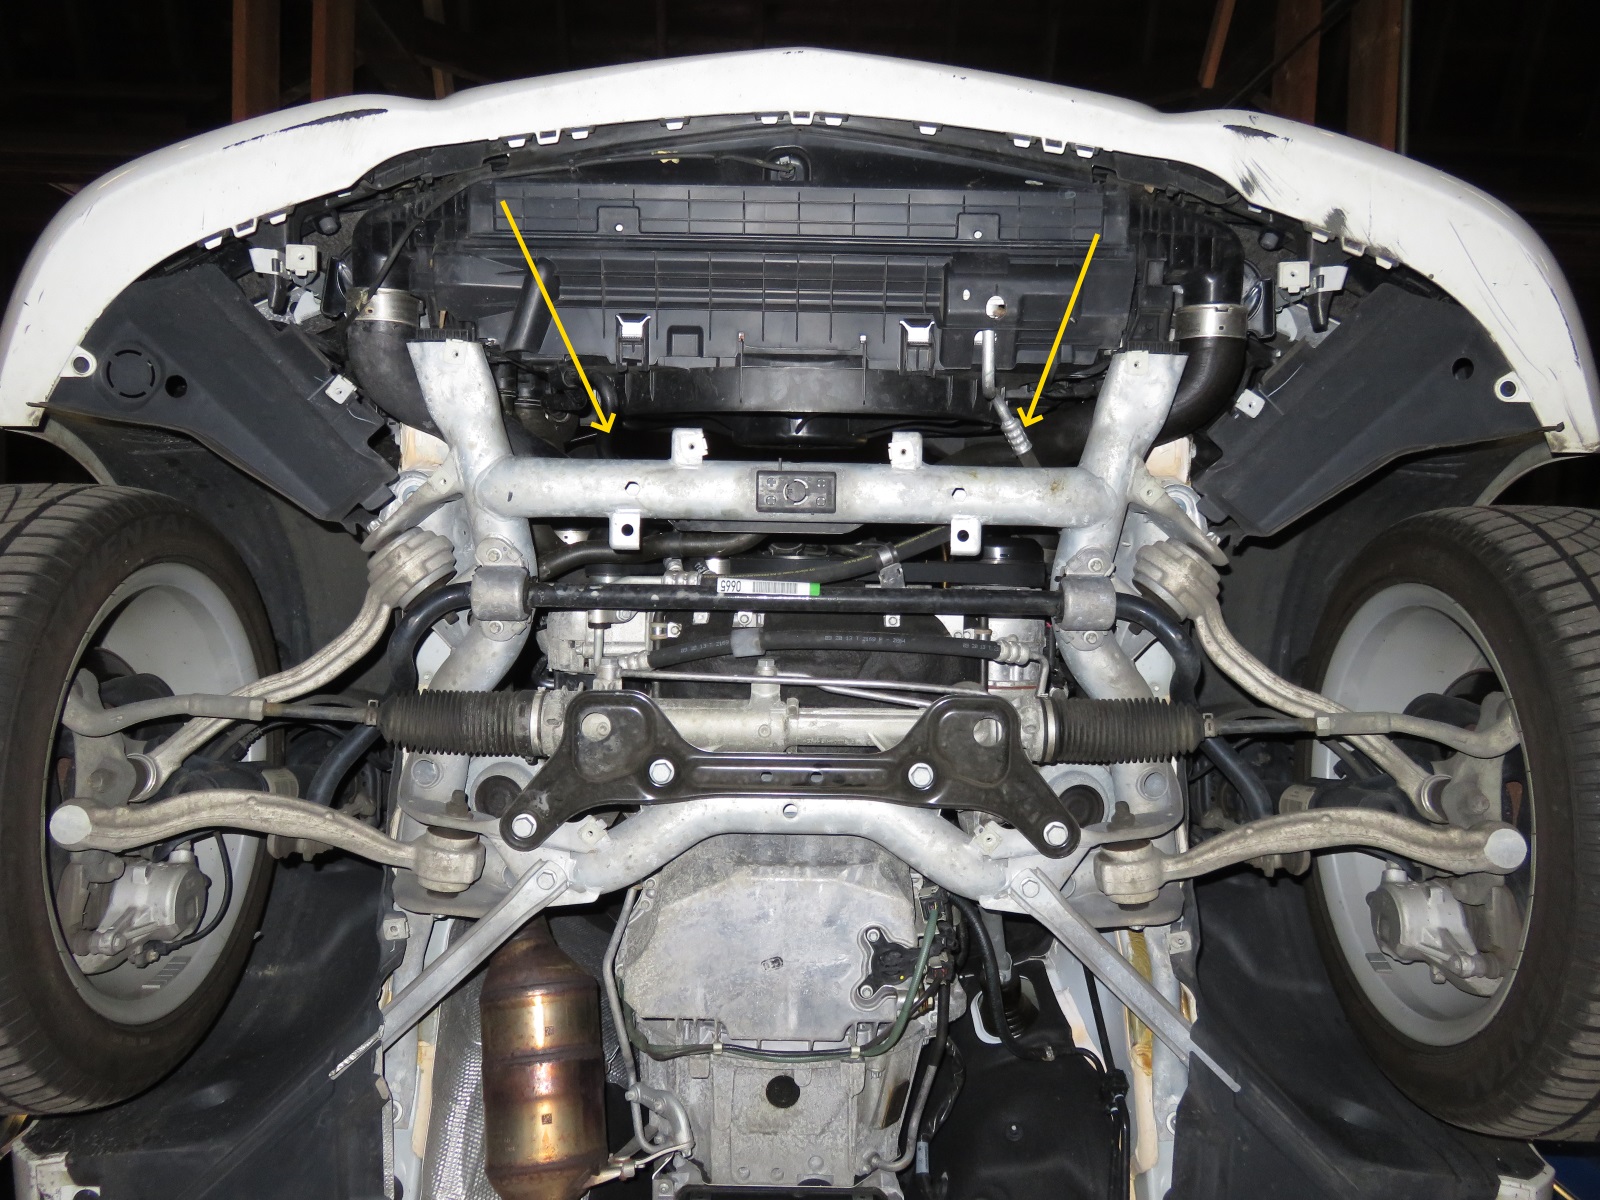
Although access from below is better, it's still not great. If you've got fat or short arms, it's gonna be tough. But there are gaps on both sides (on either side of the cooling fan, yellow arrows) where you can reach in/up to get to the belt.
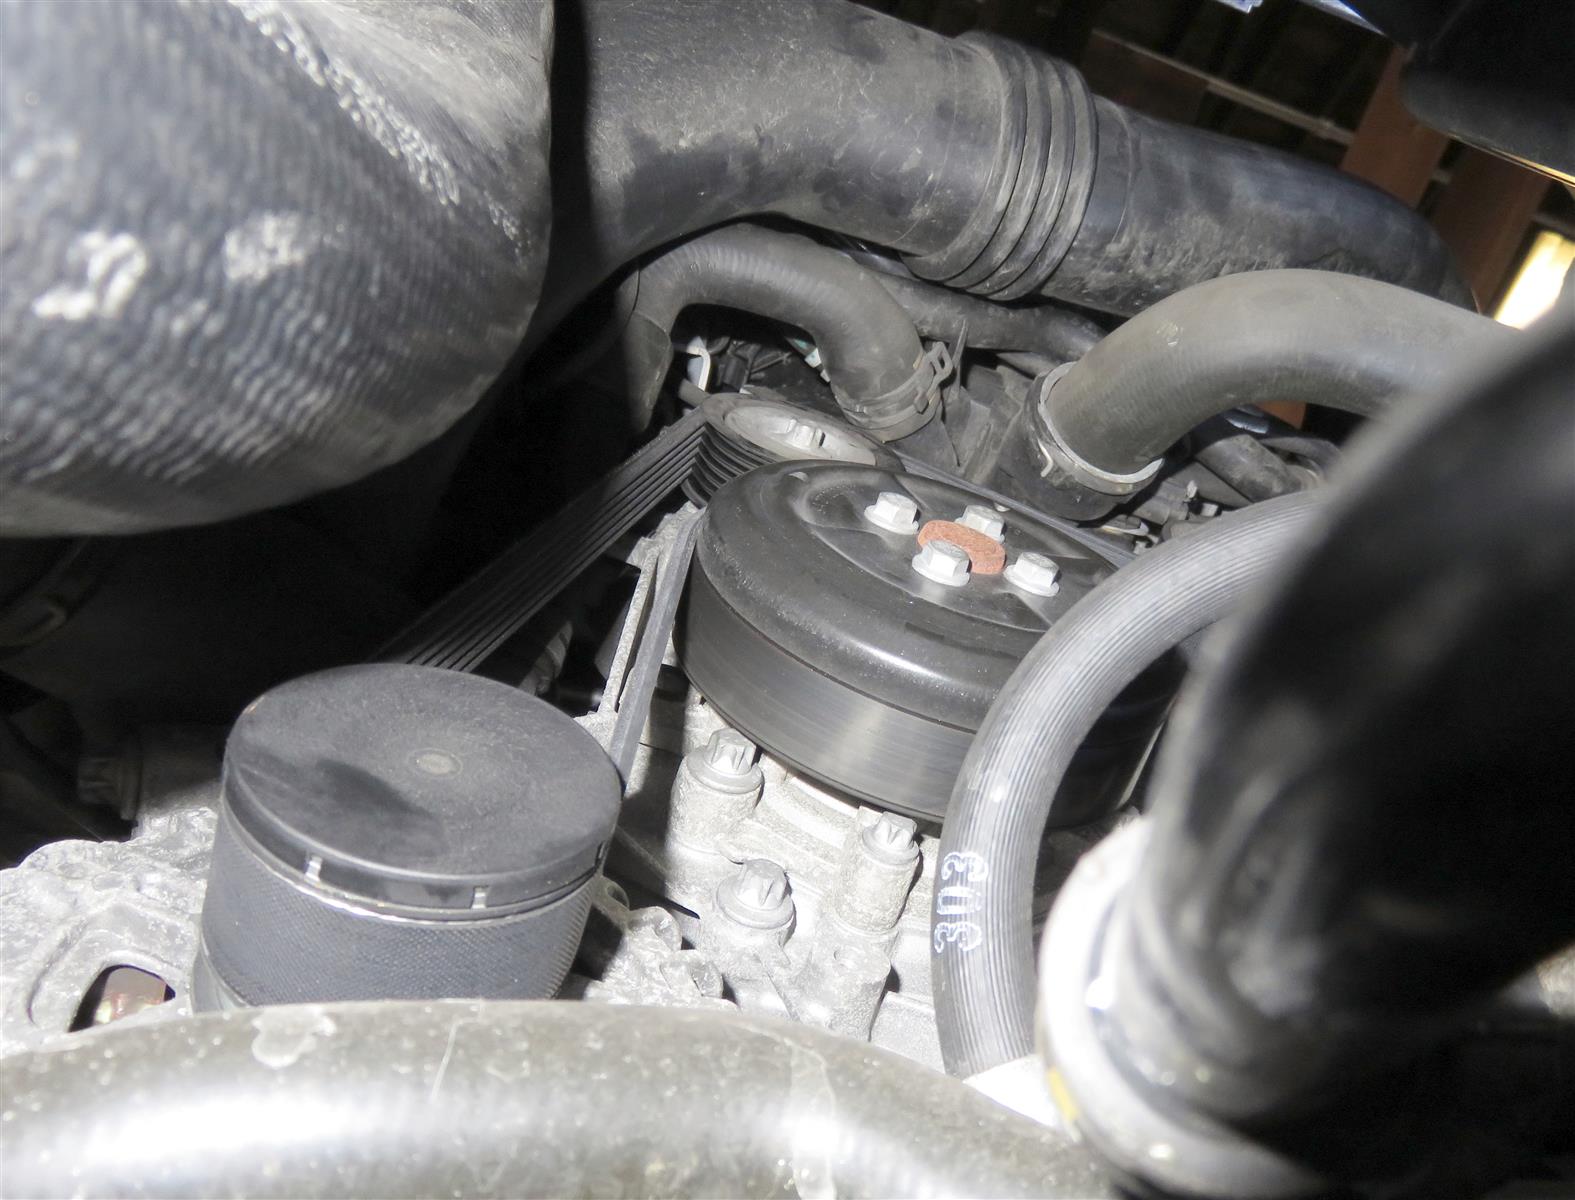
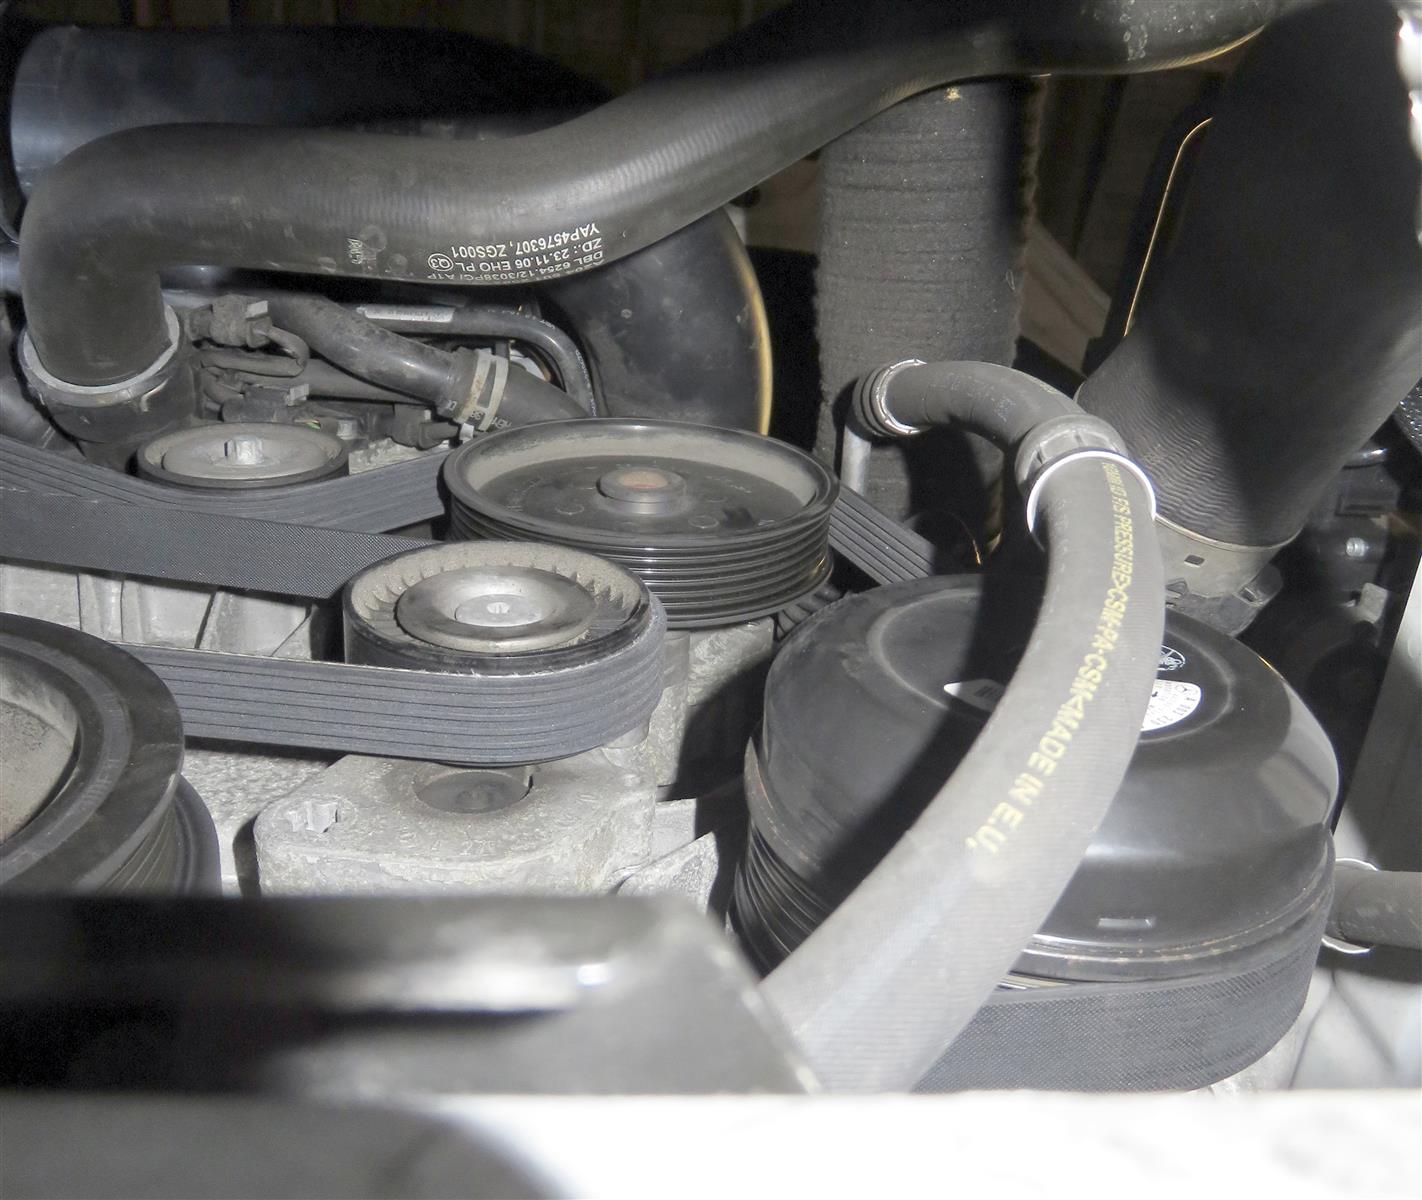
Looking up on the passenger side. Crank pulley is out of view off the right side of the picture.
Looking up on the driver side. Crank pulley is in the bottom left of the picture, with the tensioner pretty much in the center of the picture.
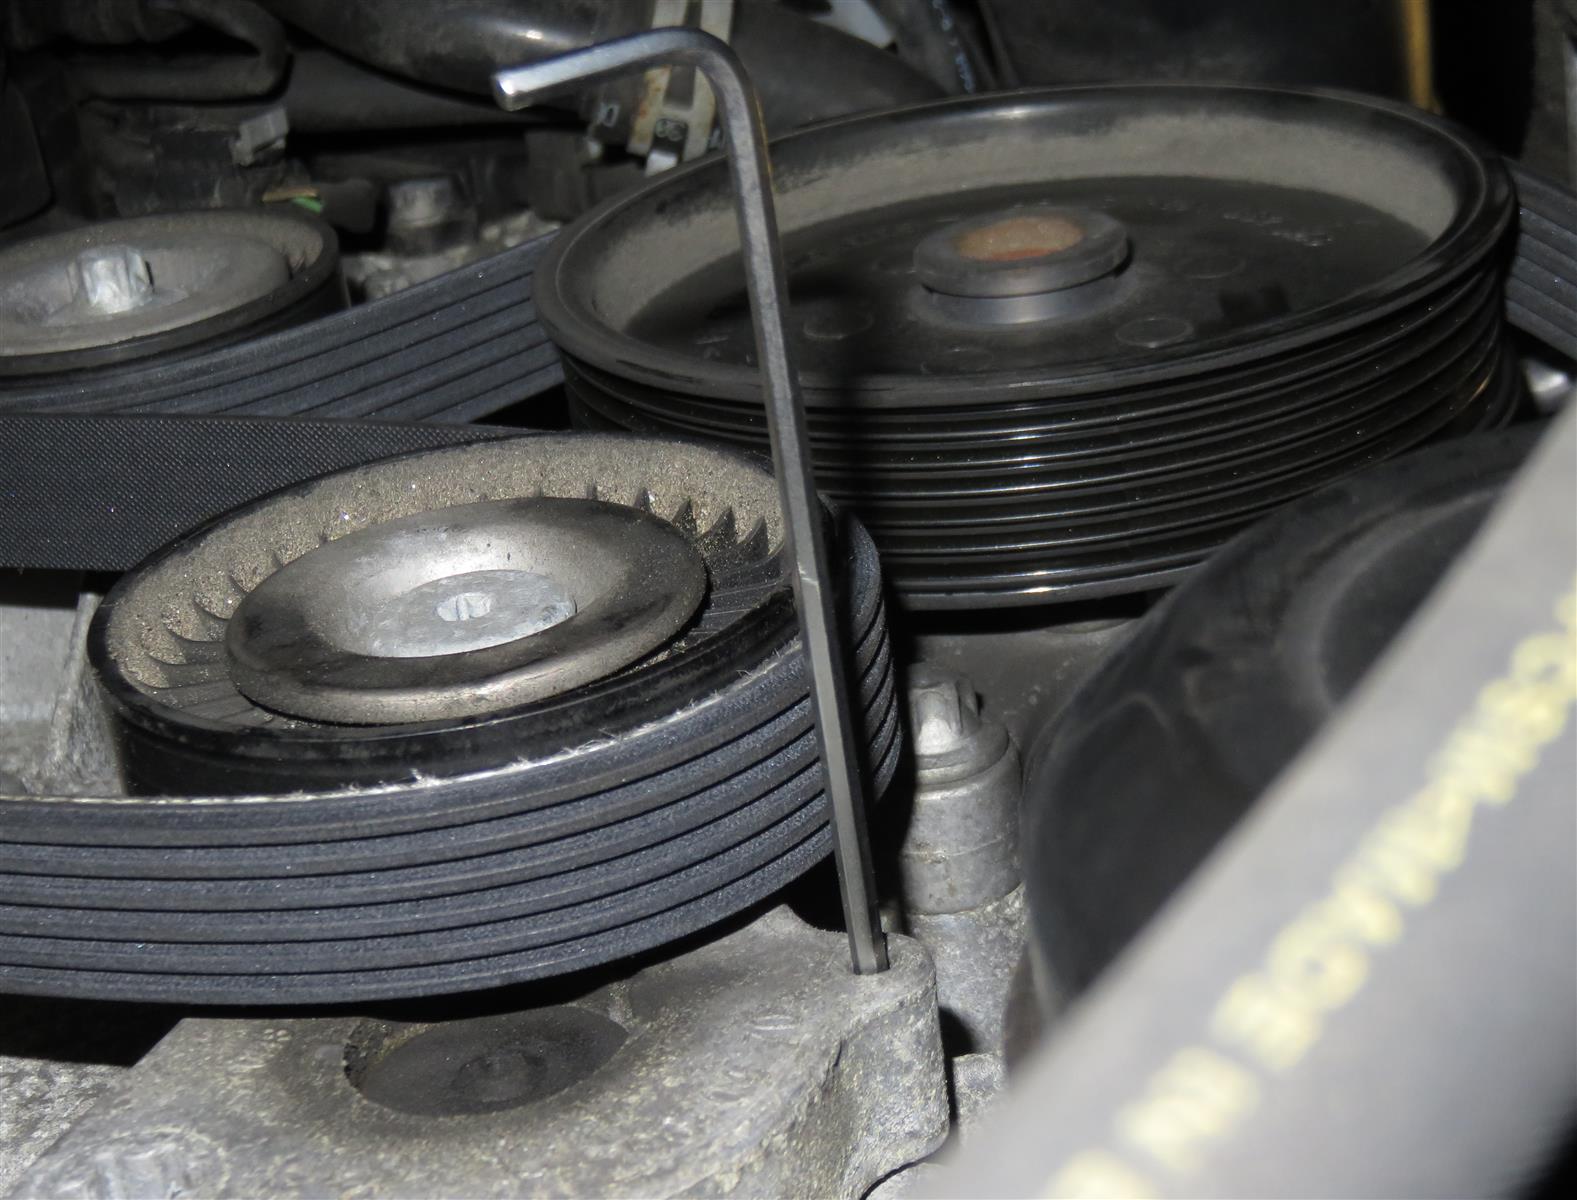
I used a T60 Torx bit on a 1/2" ratchet to loosen the tensioner; with the handle of the ratchet pointing towards the passenger side, I pulled down to take tension off the belt. In order to have both hands free to manipulate the new belt into position, I "locked" the tensioner by putting an allen wrench through a small hole on the tensioner so that it would catch on the bracket or whatever was behind the tensioner. I assume that's what that hole is there for; if not, it came in handy anyway!
Once I had the new belt properly routed, I used the wrench and T60 to take tension off the allen wrench, pulled the allen wrench out, then gently let the tensioner put tension on the belt. Good to go!
Bonus picture of the underside of a C250 automatic with the 3 front underpanels removed. (Two pictures pasted together, so there's some mismatch due to parallax.)
Reviving an old thread. Is there a certain mileage it's recommended to do the serpentine belt?? No info whatsoever in the maintenance schedule. Normally it's something like 80k I believe?
W204 C200, BMW E30 M3, 1980Gt Mini, Toyota Corona, KTM 200 EXC.
Hi,
I did mine at 100,000KM and changed the pulley on the tensioner at the same time.
When you have the belt off carry out a test of the sprag one way clutch bearing inside of the alternator pulley mine was seized and making intermittent strange noise when idling and did not realise what the problem was when replacing the belt thinking it was the belt or plastic idler pulley related.
I apologize for bringing up this old thread. I had a similar issue with my vehicle recently; I had a visible crack in my serpentine belt. I get a proper tool for the DIY and then follow certain procedures on how to replace it. I came across an in-depth article that may be worth reading.Search for "Mercedes-Benz Serpentine Belt Replacement Guide on YOUCANIC" and you will see an article that goes over common causes and possible fixes. You can read about it yourself. I hope this information can assist someone else with a similar issue.
I recently picked up an inexpensive stethoscope and used it to check the idler pullies. I had previously replaced one of the idler pullies along with the tensioner and belt last year. Using the stethoscope by placing the tip on the heads of the bolts, the pulley I replaced was nice and quiet, the pulley I didnt replace sounded loud like a skateboard wheel. Just by ear I couldnt tell any difference, so I'm thinking the stethoscope was worth getting.
When I replaced the belt I put the old one in the trunk with the spare tire just in case something happens and I need one. I also marked the direction it was installed, I read the belts wear in a certain way to the pullies. Not sure if it matters but I did it in case it does matter.
So unfortunately when the serpentine belt broke it spun around in the engine compartment. The belt also broke broke my airbox tube, tensioner pulley (I think what caused the belt to break) and a high flow coolant line. Something also happened which I have never seen or heard about before. The ribs from my original belt melted into the grooves of my pulleys.... Each pulley groove has to scraped out for the new belt to seat properly. A long and tedious task. Has anyone heard about this before. I ended up having it towed to my local shop. They never saw this happen with a serpentine either. I was quoted $2350 for the repair. And Here I thought this was going to be an easy simple fix by just swapping out the belt......................
I would just replace all the idler pullies that have melted rubber on them. Save some money by buying the parts yourself if possible. I used a Continental belt, Gates brand tensioner and INA pullies. The old Mercedes tensioner was stamped gates. I'm currently looking around for the best price for an INA lower smooth pulley which are around $25, Mercedes pulley is at least 2x's the cost.
I�ve seen this happen once before where the belt got oil contaminated. But not that much damage.
Tip for cleaning pulleys that you can�t replace: get one of those brass wire brushes used to clean BBQ pit grills. It eliminates the need to scrape individual pulley grooves on the power steering, alternator, harmonic balancer, etc.
Check that there is no source of oil that can get to the belt like valve cover and power steering.
Great write up, really helpful.
I replaced the belt on my 2013 C250, did not need to get under the car, I had enough space after I removed the air intake hose or whatever you call it.
I would just replace all the idler pullies that have melted rubber on them. Save some money by buying the parts yourself if possible. I used a Continental belt, Gates brand tensioner and INA pullies. The old Mercedes tensioner was stamped gates. I'm currently looking around for the best price for an INA lower smooth pulley which are around $25, Mercedes pulley is at least 2x's the cost.
What about the AC Compressor, Alternator and Power Steering Pump?
I recently changed the serpentine belt on my girlfriend's '14 C250. I had searched here ahead of time to find any info about the job and hadn't found anything for the C250 other than a thread in the coupe forum. I updated that thread, but figured I would stick the same info here in the sedan forum, too.
Other than the fact that (as far as I can tell) you need to access the belt from underneath, it's not that difficult. In addition to the little socket needed for removing the under panels, you need a T60 bit** to take the tension off the tensioner, and then something a couple/few inches long and thin (I used a small allen wrench) to "lock" the tensioner in the untensioned position so you can get the old belt off and the new belt on.
[** - I used a T60, because that's what I had. It fit perfectly fine. However, it looked to me like the star opening [i]may actually be a Torx Plus. Hard to tell, since I obviously couldn't get a straight-on view to clearly see the shape of the star.]
Pic from above. Nope, not getting to the belt from here! The intake tract is very much in the way of getting one's arms down in there, and removing that intake pipe is not a trivial task from what I could see. So, to the lift we go!
Looking up from underneath I drew myself a diagram so I knew where I needed to route the new belt.
Although access from below is better, it's still not great. If you've got fat or short arms, it's gonna be tough. But there are gaps on both sides (on either side of the cooling fan, yellow arrows) where you can reach in/up to get to the belt.
Looking up on the passenger side. Crank pulley is out of view off the right side of the picture.
Looking up on the driver side. Crank pulley is in the bottom left of the picture, with the tensioner pretty much in the center of the picture.
I used a T60 Torx bit on a 1/2" ratchet to loosen the tensioner; with the handle of the ratchet pointing towards the passenger side, I pulled down to take tension off the belt. In order to have both hands free to manipulate the new belt into position, I "locked" the tensioner by putting an allen wrench through a small hole on the tensioner so that it would catch on the bracket or whatever was behind the tensioner. I assume that's what that hole is there for; if not, it came in handy anyway!
Once I had the new belt properly routed, I used the wrench and T60 to take tension off the allen wrench, pulled the allen wrench out, then gently let the tensioner put tension on the belt. Good to go!
Bonus picture of the underside of a C250 automatic with the 3 front underpanels removed. (Two pictures pasted together, so there's some mismatch due to parallax.)
THANK YOU for your smart topic study + presentation. Great pics of the beast suspension rubber wear items ie. ALL cheap Lemforder OE arms/balljoints + Bilstein Strut mounts/bearings.
A must necessary job at 60kMi or before 90kMi. Bearings run dry...
Replace all at once kit.
Last edited by CaliBenzDriver; Aug 3, 2024 at 11:03 PM.
What about the AC Compressor, Alternator and Power Steering Pump?
I would clean up all those pullies since I dont think they are easy or inexpensive to replace. But things like the small idler pullies they arent that much money if you get INA brand, plus they are typically replaced as wear items anyways. Especially if you are paying a shop to do the work, probably cheaper to get new idler pullies than pay someone to sit there and clean them.
I'm as cheap as they come and enjoy working on the car and I would buy new idler pullies instead of trying to clean them. Unless they already were new pullies, like I had recently installed them and I knew the bearings were still good.
Mercedes SLR McLaren 722 S Is Extremely Rare Example Modified by McLaren
Slideshow: A one-of-one U.S.-spec Mercedes-Benz SLR McLaren Roadster became even rarer after a factory-backed transformation at McLaren's headquarters.