


How To: Cleaning volume knob to restore sensitivity

Thread Starter
Senior Member


Joined: Apr 2014
Posts: 321
Likes: 34
From: Massachusetts
2010 C350 Sport
Many of you are aware that the volume knob on the W204 C-class, and other models, can be frustrating specifically during colder months. The sensitivity of the knob will seemingly disappear and will no longer accurately change the volume level. Once the cabin warms up the knob may begin to work properly again but usually this is not guaranteed. Basically the volume knob is junk and Mercedes-Benz should've done a better job with such a commonly used component.
This write-up aims to show you how to perform a semi-permanent fix by cleaning out the dial underneath the knob with contact cleaner. The dial used for volume control is what is called a rotary encoder. It is similar to a potentiometer except you can turn it infinitely, whereas a potentiometer has two stop points. Both function similarly in that there are brass wipers inside that slide across a contact plate. Overtime dust gets inside creating grime that causes the dial to either work sporadically or not work at all. Cleaning out the dial solves these problems.
For more information on how a rotary encoder works, watch this video: https://youtu.be/v4BbSzJ-hz4
For the contact cleaner, use something like this: https://www.crcindustries.com/produc...-oz-02130.html
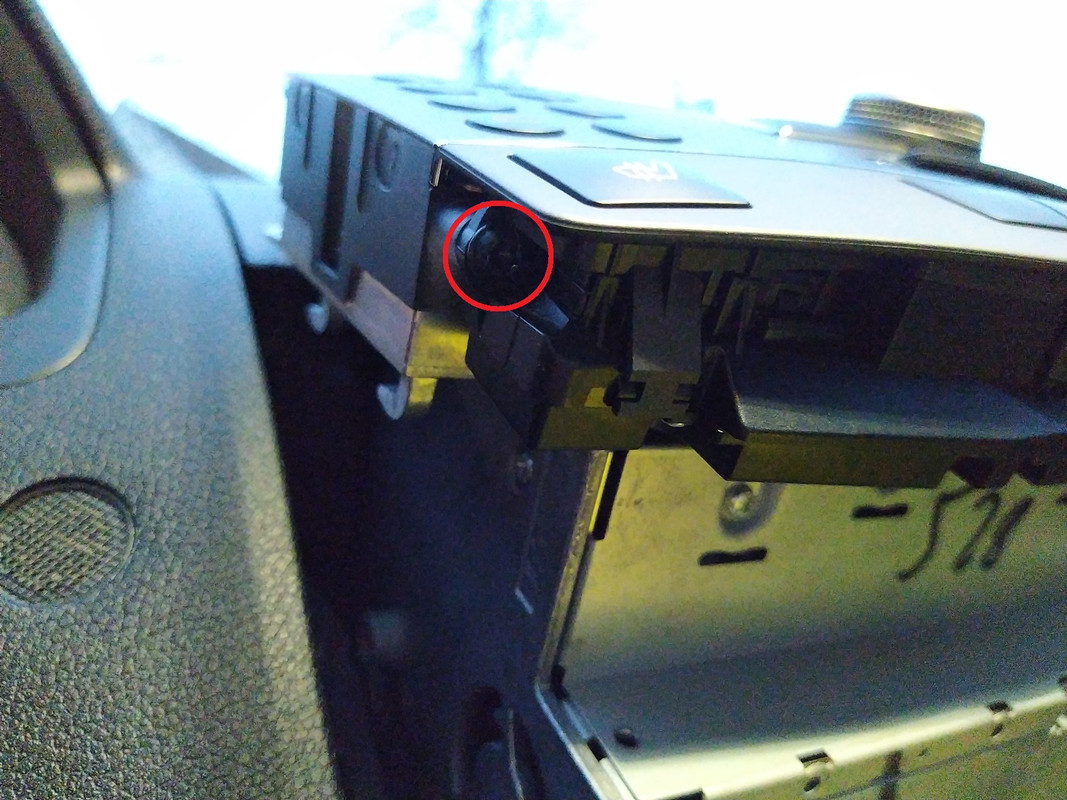
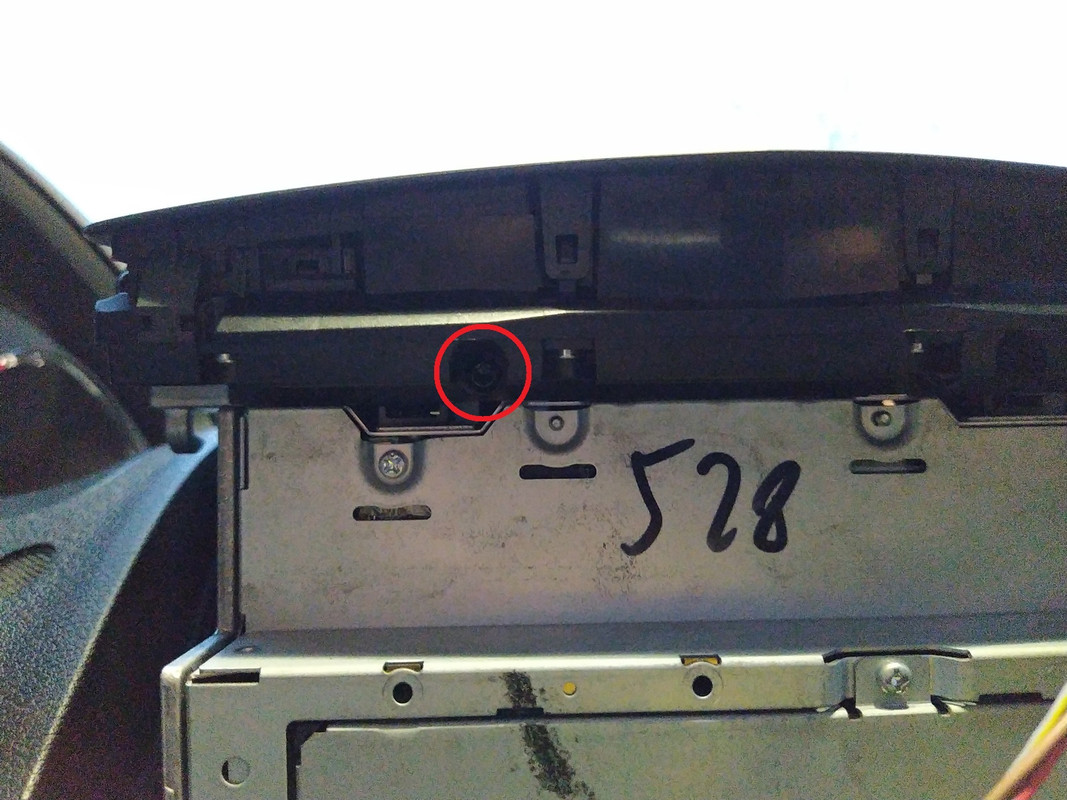
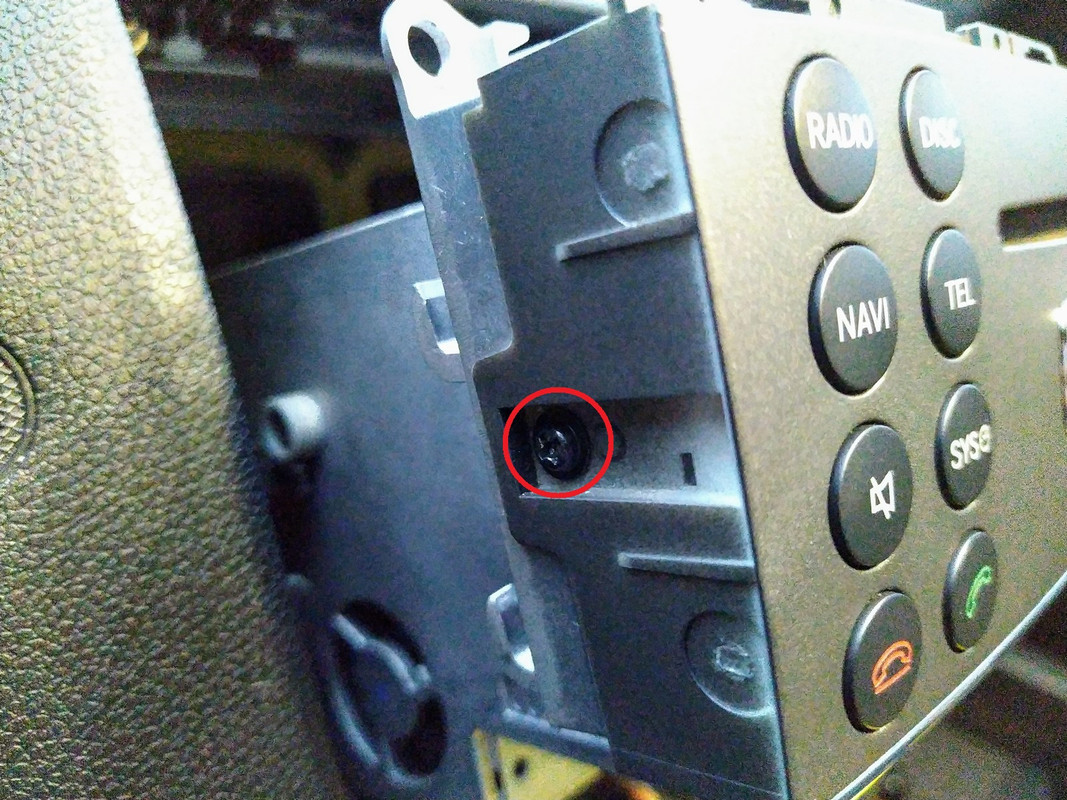
Step 1: Remove the head unit by following these instructions: https://www.pelicanparts.com/techart...eo_Removal.htm
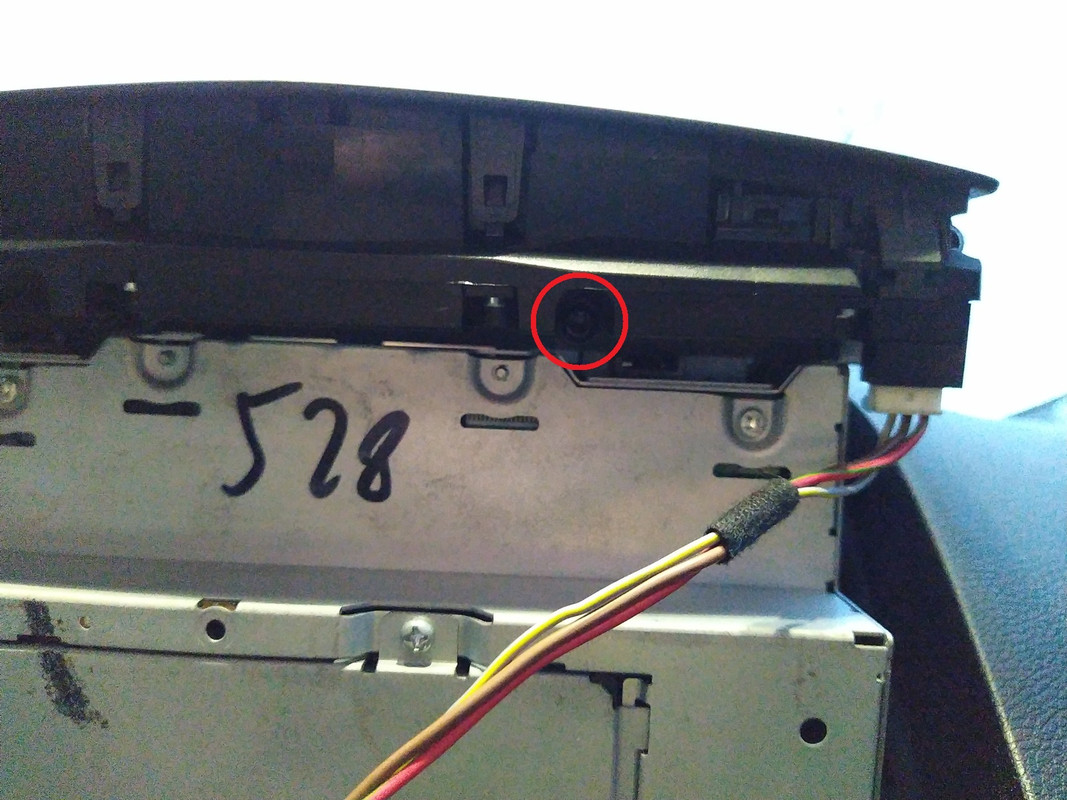
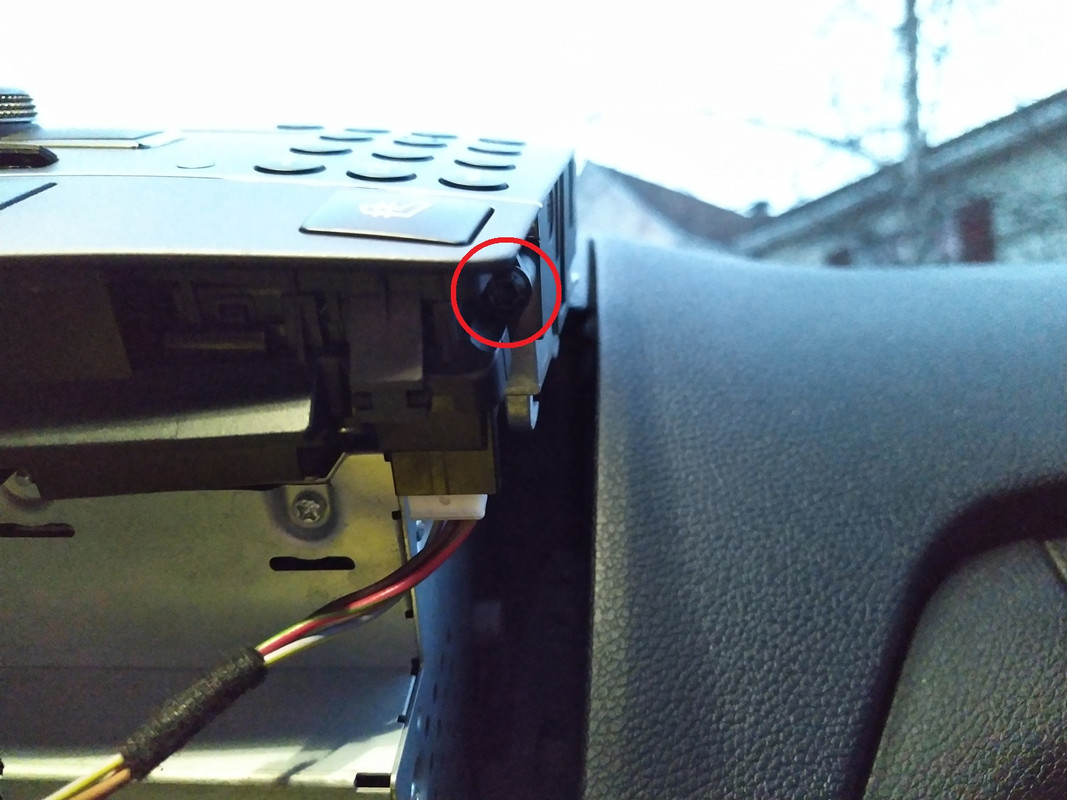
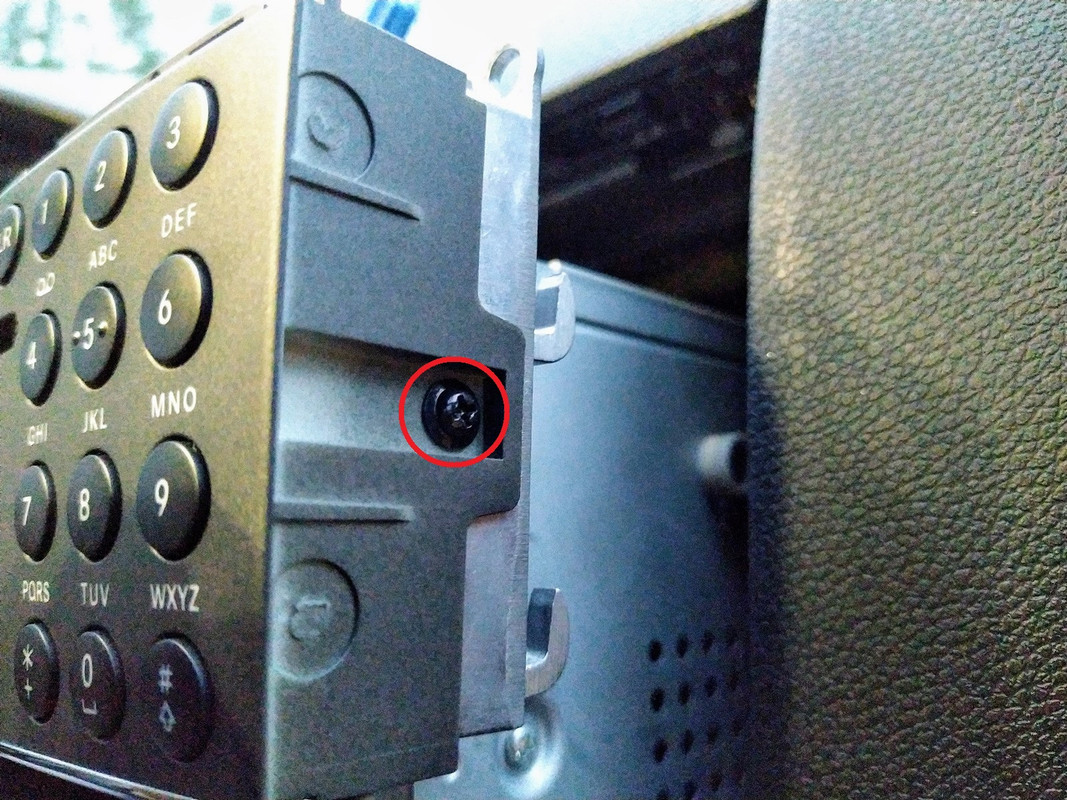
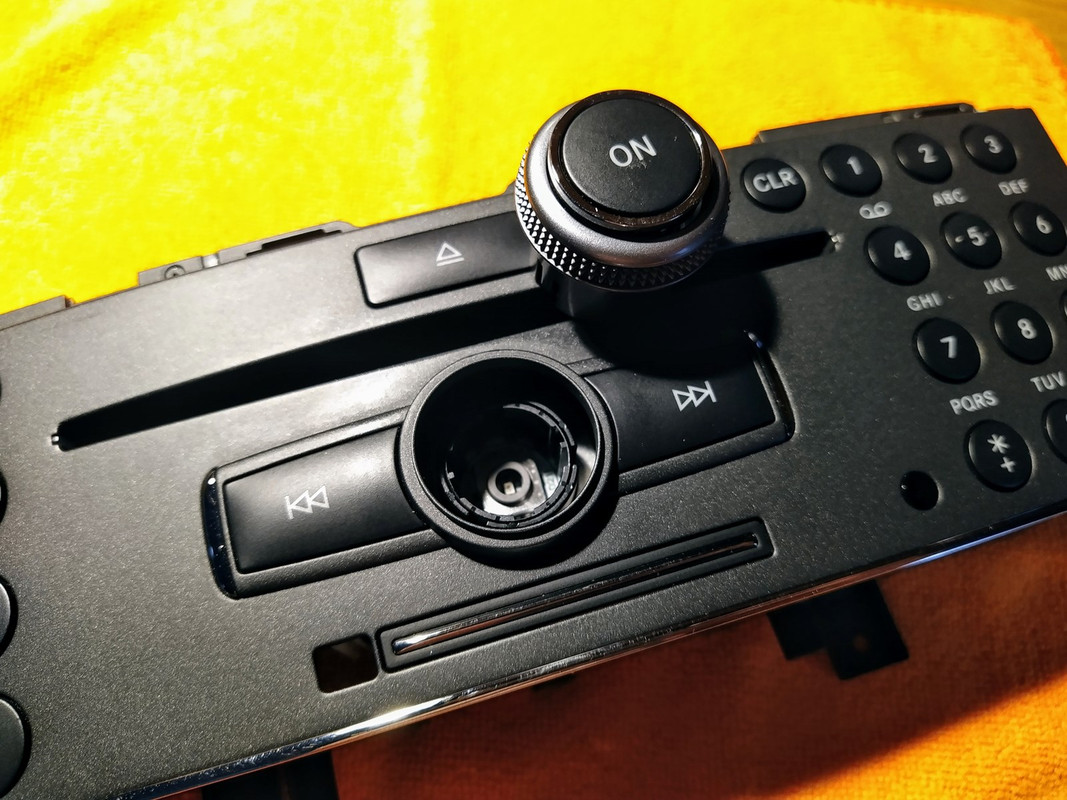
Step 2: Remove the lower switch bank by removing the four T15 screws securing it to the head unit.
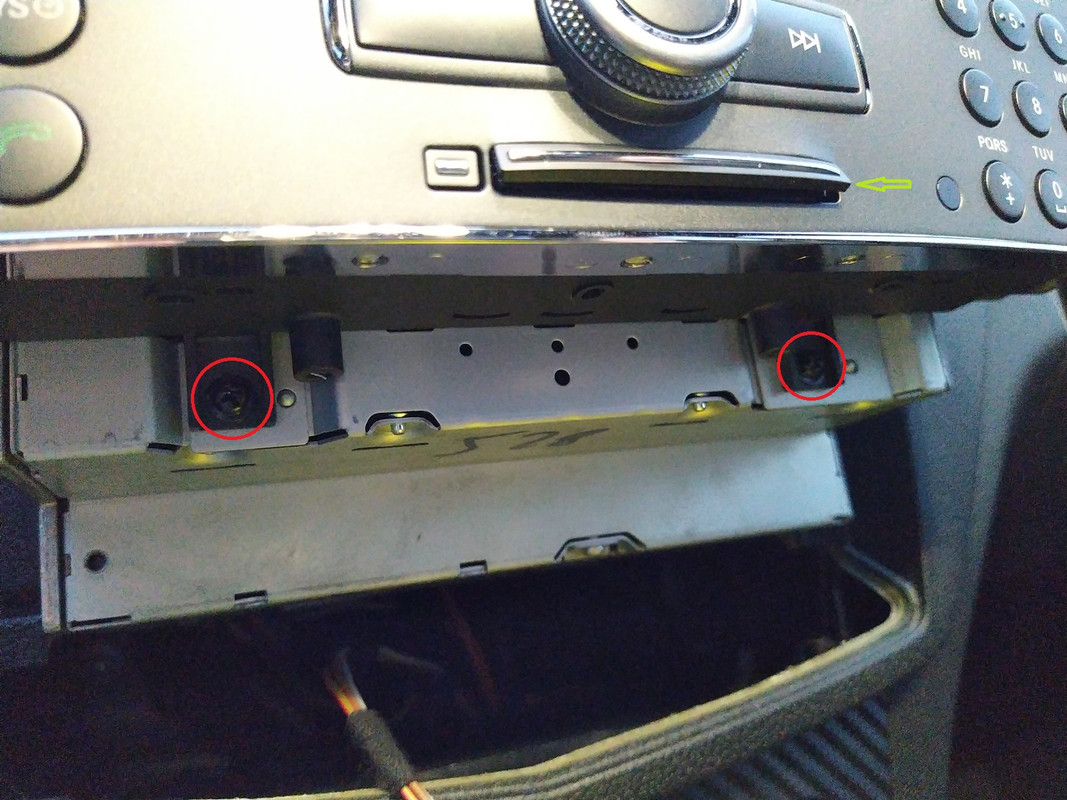
Step 3: Remove the face plate from the head unit by removing the four PH2 screws holding it on.
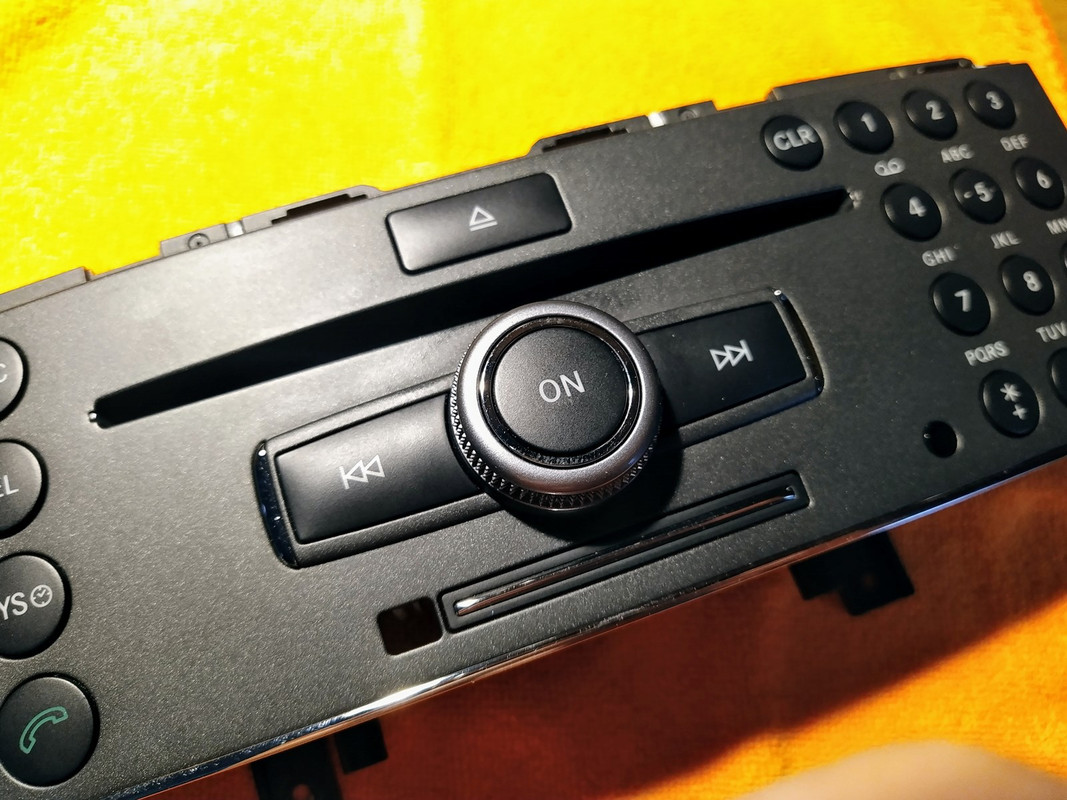
Step 4: Remove the volume knob by simply pulling on it.
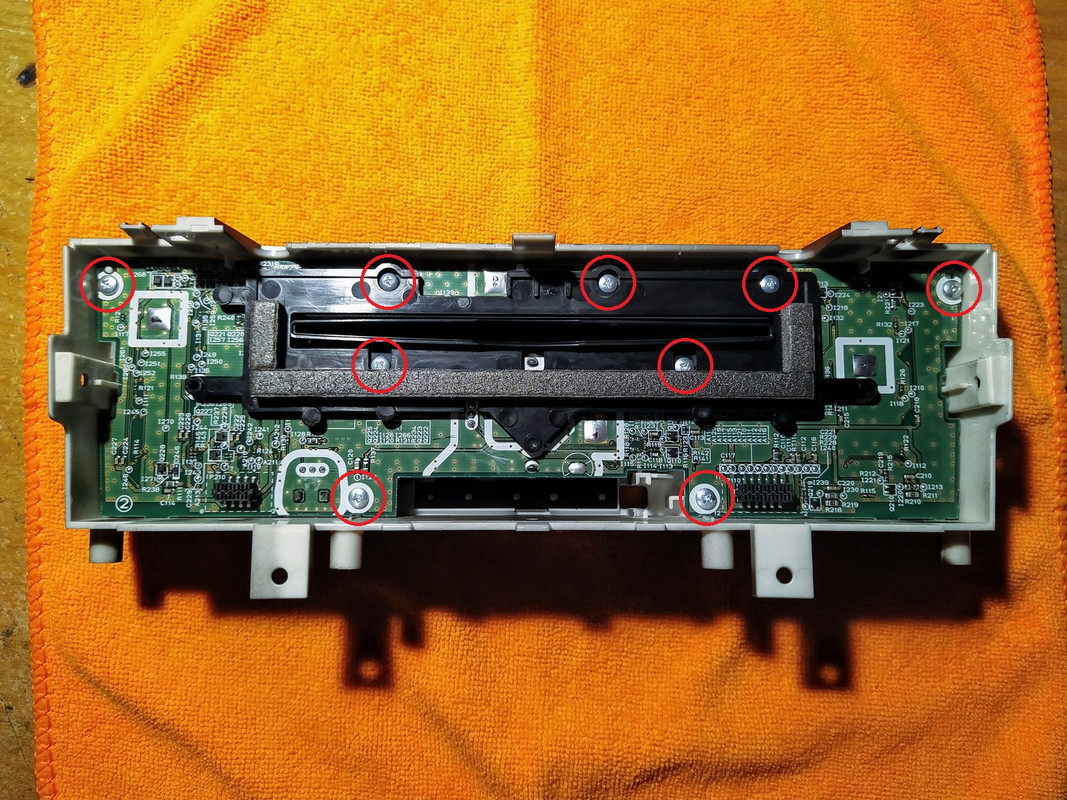
Step 5: Remove the circuit board from the face plate by removing the nine PH1 screws holding it on.
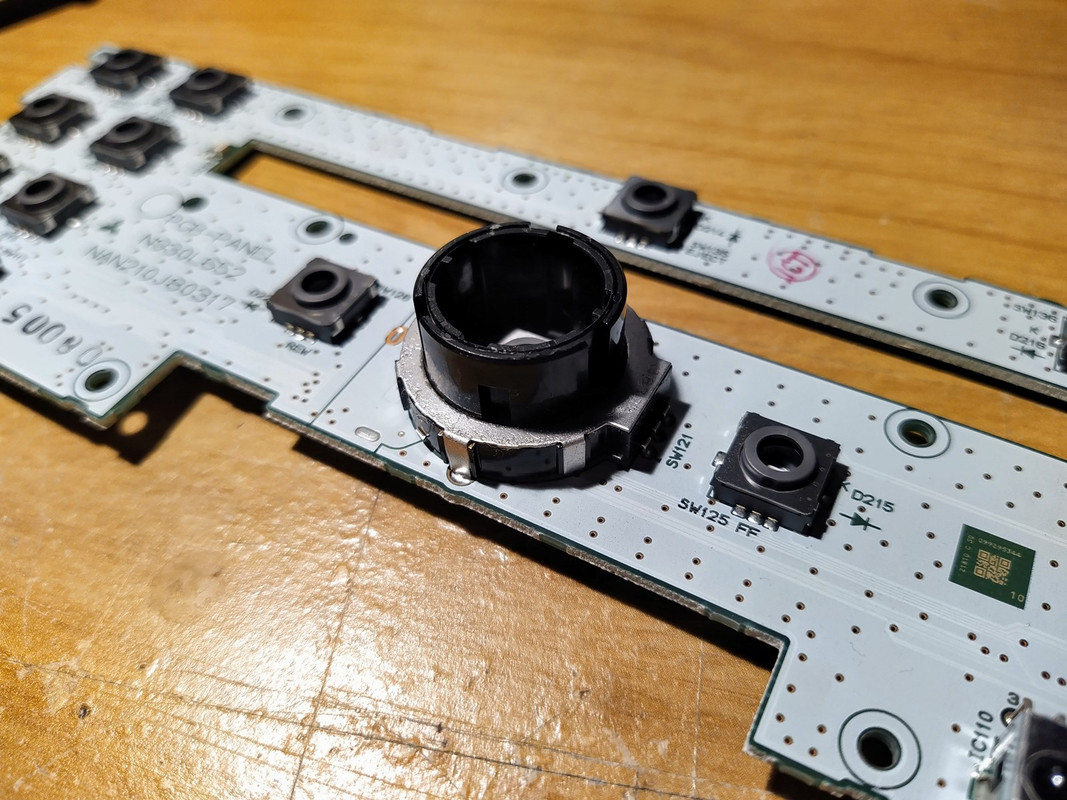
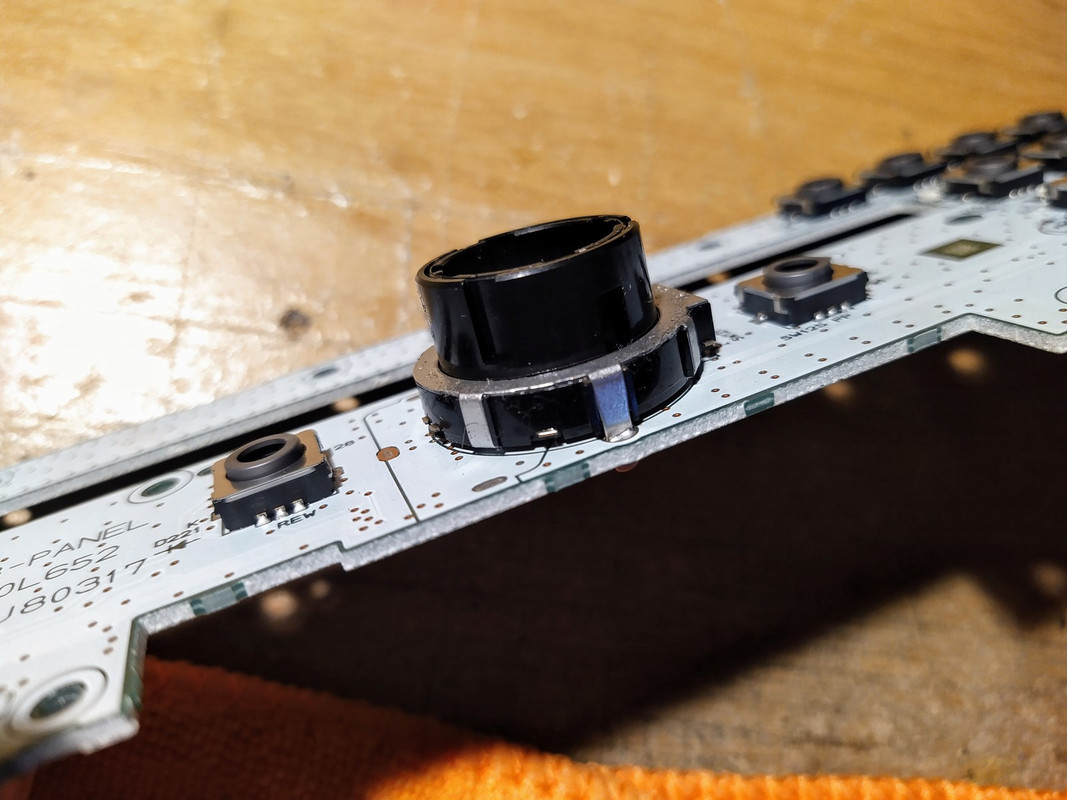
Step 6: Spray contact cleaner liberally into the dial in between the outer plastic drum and metal bracket. Occasionally spin the dial back and forth and completely around then spray again. Do this multiple times. Do this outside or over a towel to catch run off. Do this in a well ventilated area. The idea is to dissolve the grime and wash it OUT of the dial so do not be stingy with the contact cleaner.

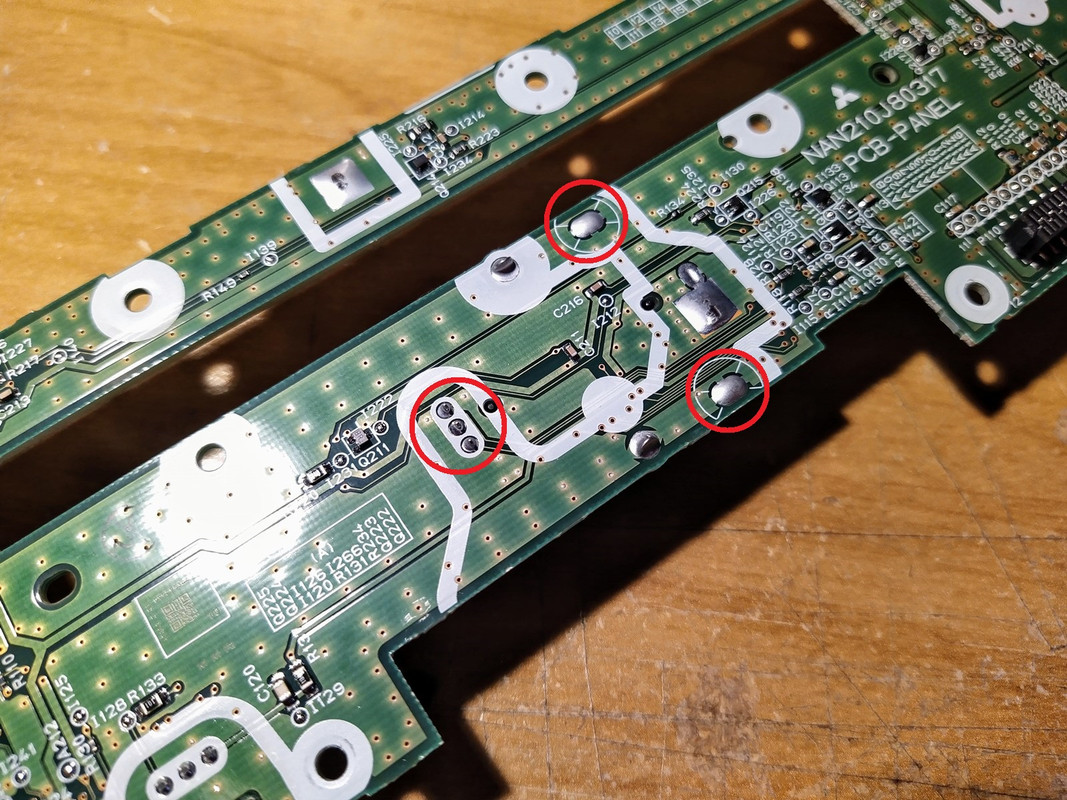
NOTE: Opening the actual dial is tricky and not recommended. The metal bracket is pressed around the switch holding it together. But first the dial has to be desoldered from the circuit board. There are two points where the bracket is soldered and three points where the electrical leads of the dial are soldered. Once these are undone the switch will come off. The bracket will have to be pried away from the dial before the dial can be opened. This will most likely destroy the dial or make it difficult to put back together. Since this is a custom made component a replacement will not be easy, if not impossible, to come by.
Step 7: Reassemble everything in the reverse order. If you had something in the PCMCIA make sure to remove before putting the face plate back on. Otherwise you may nearly break the door off.
My immediate results seem to be promising and the volume knob seems to respond much better than it had before. But time will tell how long this solution lasts.
This write-up aims to show you how to perform a semi-permanent fix by cleaning out the dial underneath the knob with contact cleaner. The dial used for volume control is what is called a rotary encoder. It is similar to a potentiometer except you can turn it infinitely, whereas a potentiometer has two stop points. Both function similarly in that there are brass wipers inside that slide across a contact plate. Overtime dust gets inside creating grime that causes the dial to either work sporadically or not work at all. Cleaning out the dial solves these problems.
For more information on how a rotary encoder works, watch this video: https://youtu.be/v4BbSzJ-hz4
For the contact cleaner, use something like this: https://www.crcindustries.com/produc...-oz-02130.html
Step 1: Remove the head unit by following these instructions: https://www.pelicanparts.com/techart...eo_Removal.htm
Step 2: Remove the lower switch bank by removing the four T15 screws securing it to the head unit.
Step 3: Remove the face plate from the head unit by removing the four PH2 screws holding it on.
Step 4: Remove the volume knob by simply pulling on it.
Step 5: Remove the circuit board from the face plate by removing the nine PH1 screws holding it on.
Step 6: Spray contact cleaner liberally into the dial in between the outer plastic drum and metal bracket. Occasionally spin the dial back and forth and completely around then spray again. Do this multiple times. Do this outside or over a towel to catch run off. Do this in a well ventilated area. The idea is to dissolve the grime and wash it OUT of the dial so do not be stingy with the contact cleaner.
NOTE: Opening the actual dial is tricky and not recommended. The metal bracket is pressed around the switch holding it together. But first the dial has to be desoldered from the circuit board. There are two points where the bracket is soldered and three points where the electrical leads of the dial are soldered. Once these are undone the switch will come off. The bracket will have to be pried away from the dial before the dial can be opened. This will most likely destroy the dial or make it difficult to put back together. Since this is a custom made component a replacement will not be easy, if not impossible, to come by.
Step 7: Reassemble everything in the reverse order. If you had something in the PCMCIA make sure to remove before putting the face plate back on. Otherwise you may nearly break the door off.
My immediate results seem to be promising and the volume knob seems to respond much better than it had before. But time will tell how long this solution lasts.
Last edited by Shimee; Apr 30, 2020 at 07:06 AM.
Thread Starter
Senior Member
Joined: Apr 2014
Posts: 321
Likes: 34
From: Massachusetts
2010 C350 Sport
After about 2 weeks I can say this has markedly improved the function of the volume knob. I thought that shortly after cleaning the knob would go back to behaving poorly but it's still working fine. It has an instantaneous response now rather than needing to slowly rotate it to increase volume.
Thread Starter
Senior Member
Joined: Apr 2014
Posts: 321
Likes: 34
From: Massachusetts
2010 C350 Sport
The knob should be a similar design so it's probably removed by simply pulling on it. I have no idea what would've caused it to seize though. Hopefully you can figure it out.
Trending Topics

Senior Member


Joined: Feb 2018
Posts: 482
Likes: 140
GLK250 ML350
Many of you are aware that the volume knob on the W204 C-class, and other models, can be frustrating specifically during colder months. The sensitivity of the knob will seemingly disappear and will no longer accurately change the volume level. Once the cabin warms up the knob may begin to work properly again but usually this is not guaranteed. Basically the volume knob is junk and Mercedes-Benz should've done a better job with such a commonly used component.
This write-up aims to show you how to perform a semi-permanent fix by cleaning out the dial underneath the knob with contact cleaner. The dial used for volume control is what is called a rotary encoder. It is similar to a potentiometer except you can turn it infinitely, whereas a potentiometer has two stop points. Both function similarly in that there are brass wipers inside that slide across a contact plate. Overtime dust gets inside creating grime that causes the dial to either work sporadically or not work at all. Cleaning out the dial solves these problems.
For more information on how a rotary encoder works, watch this video: https://youtu.be/v4BbSzJ-hz4
For the contact cleaner, use something like this: https://www.crcindustries.com/produc...-oz-02130.html
Step 1: Remove the head unit by following these instructions: https://www.pelicanparts.com/techart...eo_Removal.htm
Step 2: Remove the lower switch bank by removing the four T15 screws securing it to the head unit.
Step 3: Remove the face plate from the head unit by removing the four PH2 screws holding it on.
Step 4: Remove the volume knob by simply pulling on it.
Step 5: Remove the circuit board from the face plate by removing the nine PH1 screws holding it on.
Step 6: Spray contact cleaner liberally into the dial in between the outer plastic drum and metal bracket. Occasionally spin the dial back and forth and completely around then spray again. Do this multiple times. Do this outside or over a towel to catch run off. Do this in a well ventilated area. The idea is to dissolve the grime and wash it OUT of the dial so do not be stingy with the contact cleaner.
NOTE: Opening the actual dial is tricky and not recommended. The metal bracket is pressed around the switch holding it together. But first the dial has to be desoldered from the circuit board. There are two points where the bracket is soldered and three points where the electrical leads of the dial are soldered. Once these are undone the switch will come off. The bracket will have to be pried away from the dial before the dial can be opened. This will most likely destroy the dial or make it difficult to put back together. Since this is a custom made component a replacement will not be easy, if not impossible, to come by.
Step 7: Reassemble everything in the reverse order. If you had something in the PCMCIA make sure to remove before putting the face plate back on. Otherwise you may nearly break the door off.
My immediate results seem to be promising and the volume knob seems to respond much better than it had before. But time will tell how long this solution lasts.
MB World Stories
The Best of Mercedes & AMG

Manual Mercedes? 6 Times Sindelfingen Let Drivers Have All The Fun
Verdad Gallardo
Mercedes SLR McLaren 722 S Is Extremely Rare Example Modified by McLaren
Verdad Gallardo
8 Classic Boxy Mercedes Designs That Have Aged Like Fine Wine
Verdad Gallardo
Flawlessly Restored Mercedes 190E Evo II Heads to Auction
Verdad Gallardo
Electric Mercedes C-Class Unveiled: 11 Things You Need to Know
Verdad Gallardo
Mercedes EQS Gets A Major Update: Everything You Need to Know
Verdad Gallardo
5 Underrated Mercedes-Benz Models That Don't Get the Love They Deserve
Verdad Gallardo
Mercedes 300D Has Pushed Well Past 1 Million Miles and It Ain't Stopping
Verdad Gallardo


