

Hi guys,
I previously made a post about having a funky driver side mirror (oil leaked in the mirror: now has a gold tint and double vision)
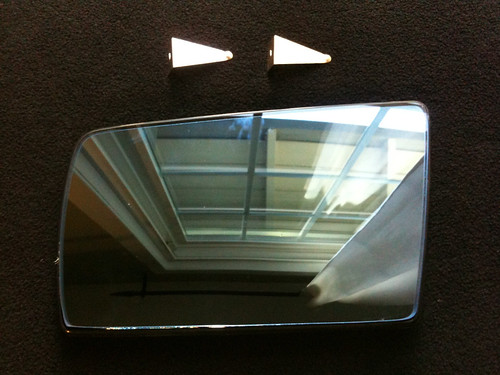
So I went ahead and ordered a mirror on ebay. It finally arrived from Eastern Europe. Hopefully it's the right part, and look forward to installing in this weekend. Here's what it looks like:
Has there been a thread in the past, or does anyone know of any instructions online on how to take the side mirror apart?
Thank you in advance.
Koich
I previously made a post about having a funky driver side mirror (oil leaked in the mirror: now has a gold tint and double vision)
So I went ahead and ordered a mirror on ebay. It finally arrived from Eastern Europe. Hopefully it's the right part, and look forward to installing in this weekend. Here's what it looks like:
Has there been a thread in the past, or does anyone know of any instructions online on how to take the side mirror apart?
Thank you in advance.
Koich

Banned
That mirror part# 202-810-03-21 is for a r/h drive car and it may not be self dimming. You need a 210-810-01-21.
If that doesnt work, I have a brand new 210-810-01-21 in the box that Im selling for $ 300 shipped.
let me know thanks.
Ed
If that doesnt work, I have a brand new 210-810-01-21 in the box that Im selling for $ 300 shipped.
let me know thanks.
Ed
Quote:
If that doesnt work, I have a brand new 210-810-01-21 in the box that Im selling for $ 300 shipped.
let me know thanks.
Ed
Hi Ed. Thanks for the offer. I'm looking for a quick fix for now. Sucks that it's for a RHD car, but oh well. Originally Posted by FastE550
That mirror part# 202-810-03-21 is for a r/h drive car and it may not be self dimming. You need a 210-810-01-21.If that doesnt work, I have a brand new 210-810-01-21 in the box that Im selling for $ 300 shipped.
let me know thanks.
Ed
 We'll see how it works first. If it doesn't work, I'll reach out to you.
Koich
Quote:
Thanks. Originally Posted by FastE550
Good Luck
Now, does anyone have any instructions on how to take the mirror apart?
 I'm wondering where/how those triangular metal pieces go.
I'd assume you take the mirror apart either via folding it or taking the interior panels off?
Quote:
Now, does anyone have any instructions on how to take the mirror apart? I'm wondering where/how those triangular metal pieces go.
I'd assume you take the mirror apart either via folding it or taking the interior panels off?
Originally Posted by koich
Thanks. Now, does anyone have any instructions on how to take the mirror apart?
I'm wondering where/how those triangular metal pieces go.I'd assume you take the mirror apart either via folding it or taking the interior panels off?
I LOVE YOUTUBE......... http://www.youtube.com/watch?v=1DZL7...eature=related
Quote:
THANK YOU!!Originally Posted by 503C43 ////AMG
I LOVE YOUTUBE......... http://www.youtube.com/watch?v=1DZL7...eature=related
Quote:
Anytime Originally Posted by koich
THANK YOU!!

MB World Stories
The Best of Mercedes & AMG
Explore

Manual Mercedes? 6 Times Sindelfingen Let Drivers Have All The Fun
Verdad Gallardo
Mercedes SLR McLaren 722 S Is Extremely Rare Example Modified by McLaren
Verdad Gallardo
8 Classic Boxy Mercedes Designs That Have Aged Like Fine Wine
Verdad Gallardo
Flawlessly Restored Mercedes 190E Evo II Heads to Auction
Verdad Gallardo
Electric Mercedes C-Class Unveiled: 11 Things You Need to Know
Verdad Gallardo
Mercedes EQS Gets A Major Update: Everything You Need to Know
Verdad Gallardo
5 Underrated Mercedes-Benz Models That Don't Get the Love They Deserve
Verdad Gallardo
Mercedes 300D Has Pushed Well Past 1 Million Miles and It Ain't Stopping
Verdad Gallardo
10 Most Reliable Mercedes-Benz Models You Can Buy Used
Verdad GallardoWorking from home today and had some time during lunch so I went
ahead and did the mirror install. Took some pictures, so hopefully this will
come in handy for someone someday.
Started by taking the mirror cover off as instructed on the Youtube video.
Pretty straight forward. The locking mechanism looks a little different and
doesn't move as easily as the video does, but basically you do as the video
says. The cover comes off, and the innards are exposed. At this point, I
noticed that the connectors are different from the mirror I purchased. The
C43 mirrors are 4 pin, the new one is 2 pin. Oh well. Didn't expect this to
be a complete fix anyway. Moving forward!
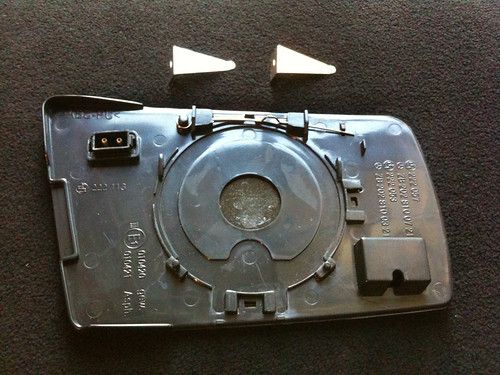
The mirror is somewhat stuck to the base via adhesive. So you gently pry it off:

The half moon shaped white part is a gauze like material that is adhesive.
Anyhow, I wrestled with unplugging the 4 wire connector. Not sure how it
comes off. While doing that, one of the wires came off of the mirror. Since
the mirror will be thrown away and I couldn't disconnect the connector, I
decided to yank the rest of the wires off, and e-taped them just in case:


Now the mirror is off. Here are the comparisons:
Old Mirror: Notice the bronze/gold tint from the oil leaking.

New mirror: Has a blue tint like the passenger mirror.

Old mirror:

New mirror:

Then I basically ignored the wiring and installed the new mirror. Yes, I
know, I have to wash my car. lol

The mirror sits at a bit of an angle, I guess since it's originally for a RHD
car? Anyhow, it works fine and I'm pretty happy. Still more room to
adjust the mirror if necessary.
Last but not least, here's a shot of my car. It came with later model AMG
wheels which I'm not a big fan of. Once I get all the little things that irk
me fixed, I'm going to hunt for some Monoblocks.

ahead and did the mirror install. Took some pictures, so hopefully this will
come in handy for someone someday.
Started by taking the mirror cover off as instructed on the Youtube video.
Pretty straight forward. The locking mechanism looks a little different and
doesn't move as easily as the video does, but basically you do as the video
says. The cover comes off, and the innards are exposed. At this point, I
noticed that the connectors are different from the mirror I purchased. The
C43 mirrors are 4 pin, the new one is 2 pin. Oh well. Didn't expect this to
be a complete fix anyway. Moving forward!
The mirror is somewhat stuck to the base via adhesive. So you gently pry it off:
The half moon shaped white part is a gauze like material that is adhesive.
Anyhow, I wrestled with unplugging the 4 wire connector. Not sure how it
comes off. While doing that, one of the wires came off of the mirror. Since
the mirror will be thrown away and I couldn't disconnect the connector, I
decided to yank the rest of the wires off, and e-taped them just in case:
Now the mirror is off. Here are the comparisons:
Old Mirror: Notice the bronze/gold tint from the oil leaking.
New mirror: Has a blue tint like the passenger mirror.
Old mirror:
New mirror:
Then I basically ignored the wiring and installed the new mirror. Yes, I
know, I have to wash my car. lol
The mirror sits at a bit of an angle, I guess since it's originally for a RHD
car? Anyhow, it works fine and I'm pretty happy. Still more room to
adjust the mirror if necessary.
Last but not least, here's a shot of my car. It came with later model AMG
wheels which I'm not a big fan of. Once I get all the little things that irk
me fixed, I'm going to hunt for some Monoblocks.
Quote:
ahead and did the mirror install. Took some pictures, so hopefully this will
come in handy for someone someday.
Started by taking the mirror cover off as instructed on the Youtube video.
Pretty straight forward. The locking mechanism looks a little different and
doesn't move as easily as the video does, but basically you do as the video
says. The cover comes off, and the innards are exposed. At this point, I
noticed that the connectors are different from the mirror I purchased. The
C43 mirrors are 4 pin, the new one is 2 pin. Oh well. Didn't expect this to
be a complete fix anyway. Moving forward!
The mirror is somewhat stuck to the base via adhesive. So you gently pry it off:
The half moon shaped white part is a gauze like material that is adhesive.
Anyhow, I wrestled with unplugging the 4 wire connector. Not sure how it
comes off. While doing that, one of the wires came off of the mirror. Since
the mirror will be thrown away and I couldn't disconnect the connector, I
decided to yank the rest of the wires off, and e-taped them just in case:
Now the mirror is off. Here are the comparisons:
Old Mirror: Notice the bronze/gold tint from the oil leaking.
New mirror: Has a blue tint like the passenger mirror.
Old mirror:
New mirror:
Then I basically ignored the wiring and installed the new mirror. Yes, I
know, I have to wash my car. lol
The mirror sits at a bit of an angle, I guess since it's originally for a RHD
car? Anyhow, it works fine and I'm pretty happy. Still more room to
adjust the mirror if necessary.
Last but not least, here's a shot of my car. It came with later model AMG
wheels which I'm not a big fan of. Once I get all the little things that irk
me fixed, I'm going to hunt for some Monoblocks.
Those wheels don't look so bad.... I bet the extra 2 connectors are for heating the mirror, I assume the new mirror isn't heated?Originally Posted by koich
Working from home today and had some time during lunch so I went ahead and did the mirror install. Took some pictures, so hopefully this will
come in handy for someone someday.
Started by taking the mirror cover off as instructed on the Youtube video.
Pretty straight forward. The locking mechanism looks a little different and
doesn't move as easily as the video does, but basically you do as the video
says. The cover comes off, and the innards are exposed. At this point, I
noticed that the connectors are different from the mirror I purchased. The
C43 mirrors are 4 pin, the new one is 2 pin. Oh well. Didn't expect this to
be a complete fix anyway. Moving forward!
The mirror is somewhat stuck to the base via adhesive. So you gently pry it off:
The half moon shaped white part is a gauze like material that is adhesive.
Anyhow, I wrestled with unplugging the 4 wire connector. Not sure how it
comes off. While doing that, one of the wires came off of the mirror. Since
the mirror will be thrown away and I couldn't disconnect the connector, I
decided to yank the rest of the wires off, and e-taped them just in case:
Now the mirror is off. Here are the comparisons:
Old Mirror: Notice the bronze/gold tint from the oil leaking.
New mirror: Has a blue tint like the passenger mirror.
Old mirror:
New mirror:
Then I basically ignored the wiring and installed the new mirror. Yes, I
know, I have to wash my car. lol
The mirror sits at a bit of an angle, I guess since it's originally for a RHD
car? Anyhow, it works fine and I'm pretty happy. Still more room to
adjust the mirror if necessary.
Last but not least, here's a shot of my car. It came with later model AMG
wheels which I'm not a big fan of. Once I get all the little things that irk
me fixed, I'm going to hunt for some Monoblocks.
Banned
Im thinking the other 2 connectors are for auto dimming feature.
Because I think in Europe they dont have that feature.
Because I think in Europe they dont have that feature.
Quote:
Because I think in Europe they dont have that feature.
I dont think side view mirror has auto dimming, I dont see a photo cell anywhere like the rear view mirror has. Without a photo cell how can it auto dim?Originally Posted by FastE550
Im thinking the other 2 connectors are for auto dimming feature.Because I think in Europe they dont have that feature.
DRBC43AMG
MBWorld Fanatic!
close


May 12, 2026
- Join DateMar 2010
- LocationLand of mountains, cheese, chocolate and watches
- Posts:5,889
-
iTrader Positive Feedback0
-
iTrader Feedback Score(0)
- Vehicle(s) I drive12' W204 C63 AMG coupe "T-Rex", 12' W451 Smart Fortwo Pulse (99' W202 C43 AMG + Ultima Can-Am sold)
-
Likes:726
-
Liked:322 Times in 267 Posts
I would think the extra wires are for heating the mirror in winter.
MBWorld Fanatic!
My car has this same issue and I am almost sure its auto dimming because my review is auto dimming. If not Ill just grab a cheap replacement thats not heated... The golden color in the OPs mirror is because its stuck in dim mode. My w210 had dimming mirrors and they worked correctly but I test drove one that was broken and looked like the OPs and mine.
Quote:
Well, after this replacement job, some idiot whacked my side mirror and busted it at the airport parking lot. Originally Posted by austinholloman
My car has this same issue and I am almost sure its auto dimming because my review is auto dimming. If not Ill just grab a cheap replacement thats not heated... The golden color in the OPs mirror is because its stuck in dim mode. My w210 had dimming mirrors and they worked correctly but I test drove one that was broken and looked like the OPs and mine.

Luckily somebody had the entire mirror assembly for a C43 (minus the outside shell) for sale on ebay, so I purchased it and repaired it.

Quote:
Side view mirror is not auto-dimming, your rear view mirror is. Take a closer look at your rear view mirror, on the bottom right you can see a photo cell which is used for the auto dimming feature. Without the photo cell your mirror can't auto dim as it has no way to tell how bright the light is. Look at your side view mirror, there is no photo cell. I believe the gold color is from the oil that is used to heat the mirror. I have a similar issue with my mirror although it is not a gold color.Originally Posted by austinholloman
My car has this same issue and I am almost sure its auto dimming because my review is auto dimming. If not Ill just grab a cheap replacement thats not heated... The golden color in the OPs mirror is because its stuck in dim mode. My w210 had dimming mirrors and they worked correctly but I test drove one that was broken and looked like the OPs and mine.
Quote:
Luckily somebody had the entire mirror assembly for a C43 (minus the outside shell) for sale on ebay, so I purchased it and repaired it.
Obviously... Just like poor Saab who had his entire car repainted just to have some douchebag run into it within a month or so. Murphys law in FULL effect.Originally Posted by koich
Well, after this replacement job, some idiot whacked my side mirror and busted it at the airport parking lot. Luckily somebody had the entire mirror assembly for a C43 (minus the outside shell) for sale on ebay, so I purchased it and repaired it.
MBWorld Fanatic!
Quote:
Originally Posted by 503C43 ////AMG
Side view mirror is not auto-dimming, your rear view mirror is. Take a closer look at your rear view mirror, on the bottom right you can see a photo cell which is used for the auto dimming feature. Without the photo cell your mirror can't auto dim as it has no way to tell how bright the light is. Look at your side view mirror, there is no photo cell. I believe the gold color is from the oil that is used to heat the mirror. I have a similar issue with my mirror although it is not a gold color.
The rear-view photo cell is used to for both. This worked the same way in my w210. The side mirror never had a photocell on the E320 either. I looked it up and they sell a C43 mirror with auto dimming so it must have been an option. Im almost sure my car has it.
Quote:
Well I stand corrected. I guess I do not have that option although I will not be able to tell until I replace my mirror as I have a similar issue with mine having a discoloration.Originally Posted by austinholloman
The rear-view photo cell is used to for both. This worked the same way in my w210. The side mirror never had a photocell on the E320 either. I looked it up and they sell a C43 mirror with auto dimming so it must have been an option. Im almost sure my car has it.
MBWorld Fanatic!
I am not replacing mine with a dimming mirror, the lowest price I have found on one is $500 bucks for just the glass. NO THANKS! Ill be just fine with a plain electric blue tinted one for $24 bucks that I just purchased off ebay. The ad said its heated too but im not sure ill be able to use this feature.
Junior Member
So out of curiosity, can the mirror glass alone just be replaced?
MBWorld Fanatic!
Quote:
I don't think I understand this question? Originally Posted by eddie_b
So out of curiosity, can the mirror glass alone just be replaced?
 This is what the OP did and I intend on doing...
 Junior Member
Quote:
This is what the OP did and I intend on doing...
Ok. Reading through the posts I thought the whole assembly was being replaced. I was looking at replacing just the mirror glass. I have the same issue with goldish coloration of the glass.Originally Posted by austinholloman
I don't think I understand this question? This is what the OP did and I intend on doing...
MBWorld Fanatic!
I found a great deal on just the mirror, on ebay for $24 bucks. So I will let you know how it goes.
MBWorld Fanatic!
Im starting to think Holmes is drunk this holiday... We were talking about side mirror glass.


