


 Jun 9, 2015, 03:57 PM
Last edit by: IB Advertising
See related guides and technical advice from our community experts:
Browse all: Interior Guides
- Mercedes-Benz C-Class: How to Hardwire Radar Detector
Step by step instructions for do-it-yourself repairs
Browse all: Interior Guides

C63's w Hardwired V1 Detectors

Thread Starter
Junior Member
Joined: May 2011
Posts: 47
Likes: 0
C63
C63's w Hardwired V1 Detectors
I've done some research and it seems only a few C63 members have a hardwired V1 radar detector.
Does anyone know which wires to tap and where. Lots of posts for other benz's but not anything really for the C63 that anyone has go thru it.
I Just want the hardwire to stick out from the top of the front windshield
Any thoughts or opinions?
Does anyone know which wires to tap and where. Lots of posts for other benz's but not anything really for the C63 that anyone has go thru it.
I Just want the hardwire to stick out from the top of the front windshield
Any thoughts or opinions?
MBWorld Fanatic!
Joined: Feb 2009
Posts: 1,035
Likes: 0
From: Northern NJ
2009 C63
May this can help: https://mbworld.org/forums/c63-amg-w...or-photos.html

Super Member
Joined: Dec 2010
Posts: 723
Likes: 4
From: Calgary, AB
2014 E63 S
I thought there would be a DIY like there was for my E46 M3 but no dice. not one that was as easy anyway (cabin lights by the rear view mirror)
Thread Starter
Junior Member
Joined: May 2011
Posts: 47
Likes: 0
C63
Someone needs to go into the top center console of sunroof and lights and test some wires out, I would be almost willing to pay another member to try it out, only reason I wouldn't is cause I got no idea and would be screwing stuff up more than anything.

Member
Joined: Jul 2010
Posts: 235
Likes: 1
From: Lower Mainland, BC
2009 C63
I gave up on looking for a hard-wired solution and followed this poster's writeup:
https://mbworld.org/forums/c63-amg-w...utlet-mod.html
Worked like a charm and I'm grateful to the OP in that thread who came up with it.
Trending Topics
MBWorld Fanatic!
Joined: Mar 2011
Posts: 1,601
Likes: 10
From: San Diego/San Francisco
AMG GLC63. Audi R8
I couldn't find a empty fuse terminal in the cabin that was set to turn on and off with the ignition. Add-a-fuse doesn't fit in the MBZ fuse box and I didn't what to start hacking into the wiring harness. I used the cigarette adaptor but plugged it into the extra outlet in the glove box. Then popped the panel on the passenger side of the dash board off and drilled a hole to feed the power wire out of the glove box. With the right uphostery tools (Harbor Freight sell them). You can push the wire behind the A pillar and run it up behind the windshield molding over to the the driver's visors. I used the visor clip to mount the V-1 since I use it in three different cars. You need to put something between the visor and the headliner to hold it level in the up position. You can't see the wire and the V-1 is near invisable too. (PS the V-! saved my *** twice on the toll road through the OC today.)
Last edited by DuaneC63; Aug 26, 2011 at 03:11 AM.
MB World Stories
The Best of Mercedes & AMG

Manual Mercedes? 6 Times Sindelfingen Let Drivers Have All The Fun
Verdad Gallardo
Mercedes SLR McLaren 722 S Is Extremely Rare Example Modified by McLaren
Verdad Gallardo
8 Classic Boxy Mercedes Designs That Have Aged Like Fine Wine
Verdad Gallardo
Flawlessly Restored Mercedes 190E Evo II Heads to Auction
Verdad Gallardo
Electric Mercedes C-Class Unveiled: 11 Things You Need to Know
Verdad Gallardo
Mercedes EQS Gets A Major Update: Everything You Need to Know
Verdad Gallardo
5 Underrated Mercedes-Benz Models That Don't Get the Love They Deserve
Verdad Gallardo
Mercedes 300D Has Pushed Well Past 1 Million Miles and It Ain't Stopping
Verdad Gallardo
10 Most Reliable Mercedes-Benz Models You Can Buy Used
Verdad Gallardo
Junior Member
Joined: Apr 2011
Posts: 15
Likes: 0
I've been looking for an easy DIY solution as well. Right now I've got that dang power cord hanging down from the passenger side of the rearview mirror and it's annoying and ugly. I had hardwired it on my old Lexus IS in about 10 minutes, but I had an easy to follow DIY from the Club Lexus forums ha.
MBWorld Fanatic!
Joined: Nov 2008
Posts: 1,624
Likes: 107
From: SoCal
2018 AMG GTR, 2017 GLS63, 2019 C63s
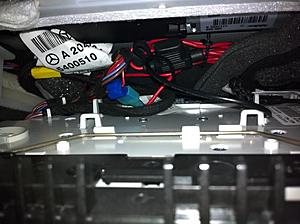
OK here we go:
Use a card to open the overhead control panel. push the card in with confidence. the starbucks card is an MB special tool!
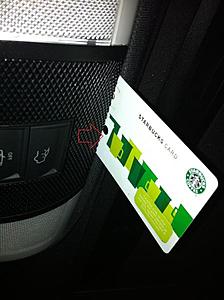
the panel flips open.
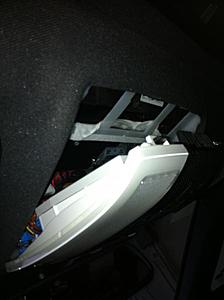
Track the bundle that is shown with red arrow:
Or you can follow the same bundle that has this tag, all the same:
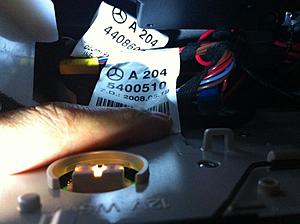
(5400510 on my 2011 MY)
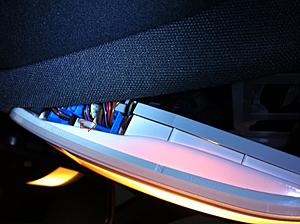
I believe this bundle includes the power line for the map light for the rear passengers. This was the best option for me because it does auto off a few minutes after the ignition is turned off and immediately when the alarm is activated.
There are more than one red wire with a black line in that bundle and I don't remember how I picked it, but I tested it for the rear map light with a voltmeter.
I use the base of the mirror mount that is a metal piece screwed to the roof skeleton as my ground. I just jammed the ground clip from the V1 harness in there and made sure it was stuck tight.
Here you can see the V1 piggyback clip in the said red wire.
The other end of the V1 power cable is pushed through the headliner and windshield gap on the left side of the rear view mirror.
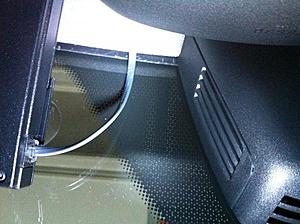
This is where I like the V1 best. I have all of their remote attachments but this way there is no need for those.
I have done this successfully on two C63s, but keep in mind that you are messing with the electronics that are attached to the car's computers and you are risking damaging something or voiding your warranty, not to mention fire!!!
I am maxed out on attachments for this post. B'Bye
Use a card to open the overhead control panel. push the card in with confidence. the starbucks card is an MB special tool!

the panel flips open.

Track the bundle that is shown with red arrow:

Or you can follow the same bundle that has this tag, all the same:

(5400510 on my 2011 MY)
I believe this bundle includes the power line for the map light for the rear passengers. This was the best option for me because it does auto off a few minutes after the ignition is turned off and immediately when the alarm is activated.
There are more than one red wire with a black line in that bundle and I don't remember how I picked it, but I tested it for the rear map light with a voltmeter.
I use the base of the mirror mount that is a metal piece screwed to the roof skeleton as my ground. I just jammed the ground clip from the V1 harness in there and made sure it was stuck tight.
Here you can see the V1 piggyback clip in the said red wire.

The other end of the V1 power cable is pushed through the headliner and windshield gap on the left side of the rear view mirror.

This is where I like the V1 best. I have all of their remote attachments but this way there is no need for those.
I have done this successfully on two C63s, but keep in mind that you are messing with the electronics that are attached to the car's computers and you are risking damaging something or voiding your warranty, not to mention fire!!!
I am maxed out on attachments for this post. B'Bye
Last edited by cyberorth; Sep 4, 2011 at 11:03 PM.


")

MBWorld Fanatic!
Joined: Nov 2008
Posts: 1,624
Likes: 107
From: SoCal
2018 AMG GTR, 2017 GLS63, 2019 C63s
Ok so I started unplugging connections to see what happens, eg the rear reading light would go out. I wanted to use power from reading lights because they don't dim and the car shuts them off if left on accidentally. This is important because having constant power would mean you have to manually turn off the V1.
Also a general rule in auto electrical is that your wirings are either live or switched, so there is no ground wire. The car body is ground. So if I have the reading light switched OFF the wire with power is live (before the switch) and the wire without power is after the switch.
I have had this on my 2011 since May and for 2 years on my 2009. I did a similar set up on my E46 M3 prior to this. Same concept though.
MBWorld Fanatic!
Joined: Nov 2008
Posts: 1,624
Likes: 107
From: SoCal
2018 AMG GTR, 2017 GLS63, 2019 C63s
I also wanted to keep my V1 mobile to use it on my other car and not to noticeably modify a leased car.
None the less that is the way to go as far as ultimate integrations go.
Last edited by cyberorth; Sep 7, 2011 at 05:43 PM.

Super Member
Joined: Dec 2008
Posts: 626
Likes: 19
From: Austin, TX
14 GL550; 14 E63s
Ok so I started unplugging connections to see what happens, eg the rear reading light would go out. I wanted to use power from reading lights because they don't dim and the car shuts them off if left on accidentally. This is important because having constant power would mean you have to manually turn off the V1.
Also a general rule in auto electrical is that your wirings are either live or switched, so there is no ground wire. The car body is ground. So if I have the reading light switched OFF the wire with power is live (before the switch) and the wire without power is after the switch.
I have had this on my 2011 since May and for 2 years on my 2009. I did a similar set up on my E46 M3 prior to this. Same concept though.
Also a general rule in auto electrical is that your wirings are either live or switched, so there is no ground wire. The car body is ground. So if I have the reading light switched OFF the wire with power is live (before the switch) and the wire without power is after the switch.
I have had this on my 2011 since May and for 2 years on my 2009. I did a similar set up on my E46 M3 prior to this. Same concept though.
Also, the number on the sticker is a bit different. 5400009 on mine.
I had intended to set it up just like my 2009, but the 2012 has no 12v outlet in the glove box.
Super Member
Joined: Dec 2008
Posts: 626
Likes: 19
From: Austin, TX
14 GL550; 14 E63s
Pics
Is the metal fitting depicted by the red arrow the area where you wedged the V1 ground into? Can't find any other suitable ground.
Is there another voltmeter that will test an auto wire without having to pierce the sheath? I'm used to testing home wiring, but then again that much higher voltage.
Is there another voltmeter that will test an auto wire without having to pierce the sheath? I'm used to testing home wiring, but then again that much higher voltage.
Junior Member
Joined: May 2012
Posts: 29
Likes: 0
From: Austin, TX
Iridium Silver 2009 C63
I ended up doing this last night in my 2009 C63 as well and wanted to say thank you for the instructions and previous comments posted.
In my case (probably due to my skill level), I had to pull the entire rearview mirror down to pass through the wire, but once I did that it passed through with no problems.
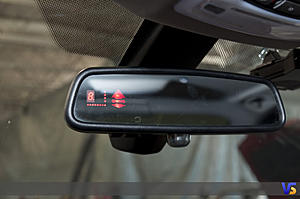
Earlier in this thread a few people asked how to distinguish between the two black/red wires to find the 12v switched wire, and I confirmed doing my install that both of these wires in the wire cluster mentioned in the OP are 12v switched, so you can tap into either one. In my case, I ended up just running a short power wire from the overhead wire tap out behind the mirror and mounted my 9500ix just above the rearview mirror on the passenger side. Only the radar sensor protrudes below the tinted portion of the window, so it's about as stealthily as I could get it installed without blocking the sensors.
Also, here is one other resource that helps considerably in understanding how to remove the mirror and overhead assembly as easily as possible.
DIY: V1 Mirror System Install for W204 C63
The hardest thing about this DIY is getting the mirror off (and even harder is getting it back on!). After pushing with zero effect for about 10 minutes with all the strength I could muster, I ended up wrapping the top of a hammer in a car cleaning chamois, wedging it against the mirror mount, and then slamming the bottom of the hammer with the flat of my hand to pop the mirror back into place. It was a last ditch effort, but it worked without breaking anything.
I'll post pictures later but wanted to send my thanks and get this much posted for now to help anyone else trying this in the future.
In my case (probably due to my skill level), I had to pull the entire rearview mirror down to pass through the wire, but once I did that it passed through with no problems.
Earlier in this thread a few people asked how to distinguish between the two black/red wires to find the 12v switched wire, and I confirmed doing my install that both of these wires in the wire cluster mentioned in the OP are 12v switched, so you can tap into either one. In my case, I ended up just running a short power wire from the overhead wire tap out behind the mirror and mounted my 9500ix just above the rearview mirror on the passenger side. Only the radar sensor protrudes below the tinted portion of the window, so it's about as stealthily as I could get it installed without blocking the sensors.
Also, here is one other resource that helps considerably in understanding how to remove the mirror and overhead assembly as easily as possible.
DIY: V1 Mirror System Install for W204 C63
The hardest thing about this DIY is getting the mirror off (and even harder is getting it back on!). After pushing with zero effect for about 10 minutes with all the strength I could muster, I ended up wrapping the top of a hammer in a car cleaning chamois, wedging it against the mirror mount, and then slamming the bottom of the hammer with the flat of my hand to pop the mirror back into place. It was a last ditch effort, but it worked without breaking anything.
I'll post pictures later but wanted to send my thanks and get this much posted for now to help anyone else trying this in the future.
MBWorld Fanatic!
Joined: Jul 2012
Posts: 1,610
Likes: 46
2012 C63 AMG Sedan
Hello Everyone!
I am an extremely proud new owner of a Sapphire Grey on Black/Porcelain C63 with all the goodies. I recently did some mods to the car (small visual ones) and I am so glad this website and all the users exist. I changed out the door pins to the AMG steel ones, changed the front side markers from orange to smoke, tinted the windows, and lastly hardwired my Valentine V1.
I'd like to thank everyone in this thread for contributing with amazing pictures and advice, I really couldn't have done it without you guys. I do have one question though....
My V1 turns on as soon as I unlock the car and step in. Also, unless I lock my car it will NOT turn off. The wire I tapped into was a red one with black stripe. Was this the correct one? While I know its not a big deal to just lock the car everytime, at home it sits in the garage and I would prefer it not be locked, but I don't want the V1 draining my battery. Any help would be appreciated.
Junior Member
Joined: May 2012
Posts: 29
Likes: 0
From: Austin, TX
Iridium Silver 2009 C63
Are you sure it never turns off, or does it just take time to do so? I leave my car unlocked in my garage and it definitely turns off after some amount of time. I know this because it chirps at me every time I get in, indicating it's just turned on when the door opened, which it wouldn't do if it was still on the whole time in the garage.
It could also be that the wiring / power feed through that circuit changed between '09 and '12.
It could also be that the wiring / power feed through that circuit changed between '09 and '12.

Former Vendor of MBWorld
Joined: Jun 2012
Posts: 139
Likes: 0
E92 M3
you guys all beat us to it, we were going to do a write up on hardwiring to a C63. We also offer the stealth mirror if any of you guys are interested
not a c63, but when our customer brings in his car we will post pictures
here is the mirror in our F30 3 series
not a c63, but when our customer brings in his car we will post pictures
here is the mirror in our F30 3 series


