


W208 How To's

Junior Member
Joined: Aug 2008
Posts: 53
Likes: 0
From: NEW JERSEY
1998 CLK 320
you need a special tool which is the same tool you use to take out the radio they are on ebay for $4.00 shipped. you insert the toold one each side until it clicks and then you just pull it straight out very easy just need to have the tool
id also like to say that the post in #21 is very useful i changed my cabin air filter today and the a/c started blowing ALOT colder. they other one i had in there was very dirty had leaves pollen etc. and it took about 5 minutes to do i recommend it to anyone!!
id also like to say that the post in #21 is very useful i changed my cabin air filter today and the a/c started blowing ALOT colder. they other one i had in there was very dirty had leaves pollen etc. and it took about 5 minutes to do i recommend it to anyone!!

Super Member
Joined: Feb 2003
Posts: 523
Likes: 1
From: Hollywood North
CLK 55 ///AMG Cabrio, ML63 ///AMG
Great info, thanks!
Your info helps explain what the 3rd connector is for in a CLK (Amp) which tells me that the deck that I installed last night is not using the Bose Amp, but rather the new deck's amp instead.
I also had to join the Battery wire with the accessory wire from the new deck to the RED with VIOLET strip wire to get the unit to turn on. Is there another wire that I need to connect the accessory wire to so that the unit can only be turned on if the ignition is in the "on" position?
Here is a complete and CORRECT list of all wires in the Amplifier plug  (see attached pictures too!):
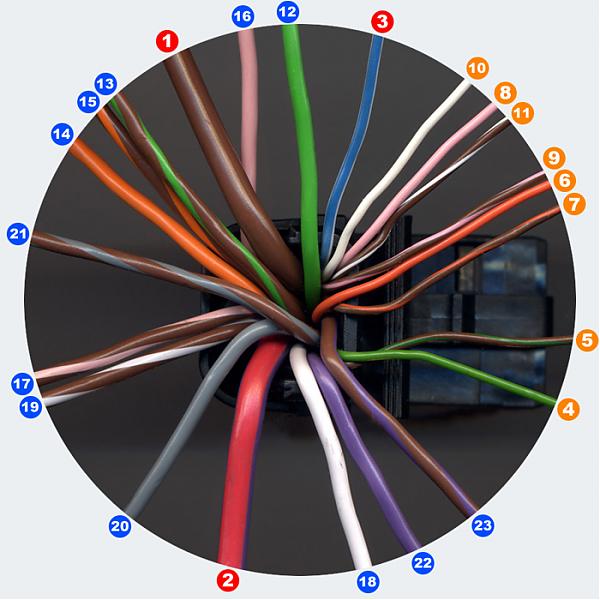
1. BROWN (big wire): Chassis Ground
2. RED with VIOLET strip (big wire): 12 Volt Ignition/Acc
3. BLUE with WHITE strip: Amp Turn-On (Remote)
INPUTS (from Headunit to Amplifier) - 8 THIN wires:
4. GREEN: + Left Front (input)
5. BROWN with GREEN strip: - Left Front (input)
6. ORANGE: + Right Front (input)
7. BROWN with ORANGE strip: - Right Front (input)
8. PINK: + Left Rear (input)
9. BROWN with PINK strip: - Left Rear (input)
10. WHITE: + Right Rear (input)
11. BROWN with WHITE strip: - Right Rear (input)
OUTPUTS (from Amplifier to Speakers) - 10 THICK wires:
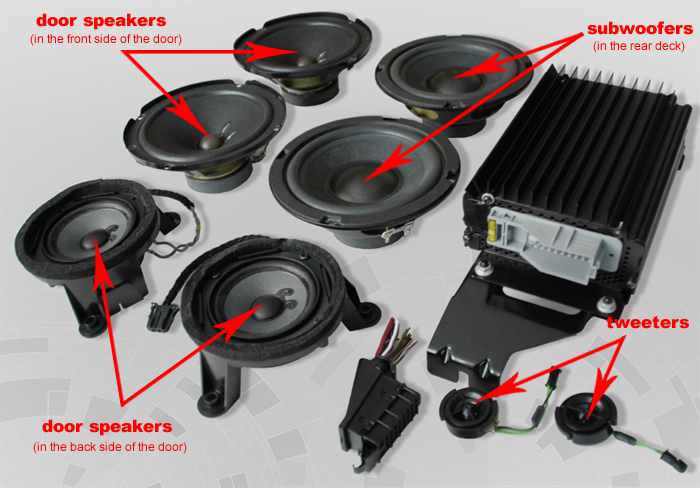
12. GREEN: + Left Speaker and Tweeter in the Front side of the door (output)
13. BROWN with GREEN strip: - Left Speaker and Tweeter in the Front side of the door (output)
14. ORANGE: + Right Speaker and Tweeter in the Front side of the door (output)
15. BROWN with ORANGE strip: - Right Speaker and Tweeter in the Front side of the door (output)
16. PINK: + Left Speaker in the Back side of the door (output)
17. BROWN with PINK strip: - Left Speaker in the Back side of the door (output)
18. WHITE: + Right Speaker in the Back side of the door (output)
19. BROWN with WHITE strip: - Right Speaker in the Back side of the door (output)
20. GRAY: + Left Speaker(subwoofer) in the rear deck (output)
21. BROWN with GRAY strip: - Left Speaker(subwoofer) in the rear deck (output)
22. VIOLET: + Right Speaker(subwoofer) in the rear deck (output)
23. BROWN with VIOLET strip: - Right Speaker(subwoofer) in the rear deck (output)
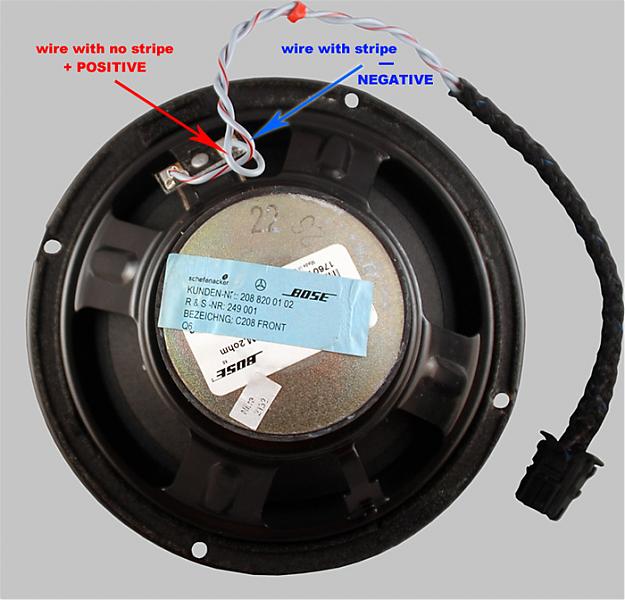
All speakers have two wires: one with a strip (Negative) and one with no strip (Positive):
1. BROWN (big wire): Chassis Ground
2. RED with VIOLET strip (big wire): 12 Volt Ignition/Acc
3. BLUE with WHITE strip: Amp Turn-On (Remote)
INPUTS (from Headunit to Amplifier) - 8 THIN wires:
4. GREEN: + Left Front (input)
5. BROWN with GREEN strip: - Left Front (input)
6. ORANGE: + Right Front (input)
7. BROWN with ORANGE strip: - Right Front (input)
8. PINK: + Left Rear (input)
9. BROWN with PINK strip: - Left Rear (input)
10. WHITE: + Right Rear (input)
11. BROWN with WHITE strip: - Right Rear (input)
OUTPUTS (from Amplifier to Speakers) - 10 THICK wires:
12. GREEN: + Left Speaker and Tweeter in the Front side of the door (output)
13. BROWN with GREEN strip: - Left Speaker and Tweeter in the Front side of the door (output)
14. ORANGE: + Right Speaker and Tweeter in the Front side of the door (output)
15. BROWN with ORANGE strip: - Right Speaker and Tweeter in the Front side of the door (output)
16. PINK: + Left Speaker in the Back side of the door (output)
17. BROWN with PINK strip: - Left Speaker in the Back side of the door (output)
18. WHITE: + Right Speaker in the Back side of the door (output)
19. BROWN with WHITE strip: - Right Speaker in the Back side of the door (output)
20. GRAY: + Left Speaker(subwoofer) in the rear deck (output)
21. BROWN with GRAY strip: - Left Speaker(subwoofer) in the rear deck (output)
22. VIOLET: + Right Speaker(subwoofer) in the rear deck (output)
23. BROWN with VIOLET strip: - Right Speaker(subwoofer) in the rear deck (output)
All speakers have two wires: one with a strip (Negative) and one with no strip (Positive):
Senior Member
Joined: Jan 2007
Posts: 294
Likes: 1
From: in the car :)
02' brabus modified ML500,05' Lambor Gallardo, 02' CLK
CLK430 fog light use H4 bulbs, best way to get to it is jack it up, or use a lift. I have 12000K in all my lights,

Newbie
Joined: Mar 2007
Posts: 4
Likes: 0
HOW TO ADJUST REAR CAMBER
I HIT A CURB AND BENT THE LOWER CONTROL ARM. IT HAS BEEN REPLACED, BUT NOW I HAVE SOME POSITIVE CAMBER. MONEY IS TIGHT SO I WANNA EXHAUST ALL MY OPTIONS AND TRY TO AVOID TAKING IT IN TO THE REPAIR SHOP. IS THERE A WAY TO FIX IT???
Member
Joined: Jun 2008
Posts: 107
Likes: 0
From: PK, NY
2kCLK320
You have pos camber after an alignment? Did you replace the arm yourself? Need more info.
Member
Joined: Jun 2008
Posts: 107
Likes: 0
From: PK, NY
2kCLK320
Well a good hit like that could have tweaked a number of things. I understand money is tight but I think your best bet is to take it to a shop and get that end aligned. If your lucky they'll adjust it and your problem will be solved. If your not so lucky the guy doing the alignment should be able to tell what needs to be replaced.
Sorry I'm not much help, good luck.
Sorry I'm not much help, good luck.
MB World Stories
The Best of Mercedes & AMG

Manual Mercedes? 6 Times Sindelfingen Let Drivers Have All The Fun
Verdad Gallardo
Mercedes SLR McLaren 722 S Is Extremely Rare Example Modified by McLaren
Verdad Gallardo
8 Classic Boxy Mercedes Designs That Have Aged Like Fine Wine
Verdad Gallardo
Flawlessly Restored Mercedes 190E Evo II Heads to Auction
Verdad Gallardo
Electric Mercedes C-Class Unveiled: 11 Things You Need to Know
Verdad Gallardo
Mercedes EQS Gets A Major Update: Everything You Need to Know
Verdad Gallardo
5 Underrated Mercedes-Benz Models That Don't Get the Love They Deserve
Verdad Gallardo
Mercedes 300D Has Pushed Well Past 1 Million Miles and It Ain't Stopping
Verdad Gallardo
10 Most Reliable Mercedes-Benz Models You Can Buy Used
Verdad Gallardo
Junior Member
Joined: Aug 2008
Posts: 17
Likes: 0
e55 LET Parts/Tune & 02 clk 55


MBWorld Fanatic!


Joined: Mar 2007
Posts: 1,305
Likes: 50
From: Yokohama, Japan
2000 CLK 320
KLEEMANN Kompressor Installation Manuals
KLEEMANN Kompressor Installation Manual for the V6 (M112)
CLK320 3.2 V6 shows gains of 113 HP and 97 lbs/ft Torque
V6 Installation Manual
Kleemann S1 Kompressor Mercedes CLK430 & CLK55 V8 5spd W208
CLK430 4.3 V8 shows gains of 158 HP and 118 lbs/ft of Torque.
CLK55 5.5 V8 shows gains of 146 HP and 105 lbs/ft of Torque.
Mounted on top of a 5.0 litre normally aspirated V8-engine, it immediately
enhances the engine's power output from standard 306 Hp and 460 Nm
(340 lb-ft) to up to 455 Hp and 585 Nm (433 lb-ft), without any need for
further modifications to the engine.
V8 Installation Manual
1. Model: KLM-S1-V8-5SPD-W208 List: $9,999.99
2. Model: KLM-S2-V8-5SPD-W208 List: $10,999.99
KLEEMANN Camshaft Installation Manual
Camshaft Installation Manual
CLK320 3.2 V6 shows gains of 113 HP and 97 lbs/ft Torque
V6 Installation Manual
1. Model: KLM-KOM-V6-W208 List: $9,499.99
2. Model: KLM-S1-V6-W208 List: $10,499.99
3. Model: KLM-S2-V6-W208 List: $12,899.99
2. Model: KLM-S1-V6-W208 List: $10,499.99
3. Model: KLM-S2-V6-W208 List: $12,899.99
Kleemann S1 Kompressor Mercedes CLK430 & CLK55 V8 5spd W208
CLK430 4.3 V8 shows gains of 158 HP and 118 lbs/ft of Torque.
CLK55 5.5 V8 shows gains of 146 HP and 105 lbs/ft of Torque.
Mounted on top of a 5.0 litre normally aspirated V8-engine, it immediately
enhances the engine's power output from standard 306 Hp and 460 Nm
(340 lb-ft) to up to 455 Hp and 585 Nm (433 lb-ft), without any need for
further modifications to the engine.
V8 Installation Manual
1. Model: KLM-S1-V8-5SPD-W208 List: $9,999.99
2. Model: KLM-S2-V8-5SPD-W208 List: $10,999.99
KLEEMANN Camshaft Installation Manual
Camshaft Installation Manual
Last edited by Williams707; Mar 11, 2009 at 09:42 AM.


Newbie
Joined: Jan 2007
Posts: 10
Likes: 0
From: Dallas. Texas, SA
2000 CLK 430 Cab (W208)
Windows won't roll up all the way on your W208?
I had to replace my battery recently, after doing so my front window would not stay rolled up all the way. I tried everything. Then I remembered my key remote would roll the windows down if the unlock button was held for a minute. So, I tried the opposite...I held the lock button on the remote down for a minute and the windows rolled all the way up and stayed up. Simple fix. The dealer or my mechanic would have charged me a ridiculous price to fix this I am sure.
Almost a Member!
Joined: Mar 2009
Posts: 30
Likes: 0
From: Gothenburg, Sweden
Mercedes-Benz CLK320 MY2000
Just to make some kind of contribution to the Benz community here (as i am a fresh poster here), i suppose i can describe how i removied the trunk lining on the LHS of my w208 (i did not find any info on this in the forums, so maybe it can help someone).
First off; lift up the trunk carpet and pull it out of there (it comes out easily), and while you have it out you can do as i did and vacuum it thorougly.
Next thing on the list is to take out the plastic cover that sits over the cables and thingys just behind the rear seats in the trunk. Do this by (by hand) unscrew the three large plastic 'screws' that holds it down. Then just lift it up and take it out of the trunk. Place the screws in a secure location for now (like with everything you remove from the car, of course).
Next thing on order is to remove the LHS trunk lining itself. This is done by with a flat head screw driver removing the two plastic heads/locks in the trunk that hold the lining to the body of the car. There is one located on the back of the car, in the vincinity of the LHS rear light assembly. The other one is located on the left side underneath the rear shelf (where the speakers etc are installed). Just pull the heads out with the screw driver and your fingers, and remove the seats for them as well (small plastic parts) and place them in a secure location. Now, there is a third head/lock that is most easily accessible from inside the car. I did this by folding the LHS rear seat and working at the head from inside the back seat. Either way it comes out just as easily as the two others in the trunk.
Now, with the LHS rear seat still folded down you need to unscrew the bolt that holds the LHS cargo hook and the black plastic detail that runs across the space between the back seats and the trunk. Remove this bolt together with the cargo hook, and then proceed to unsrew the philips screw that holds to plastic detail in it's place in the middle.
Now, when all this is done it is pretty easy to pull the lining outwards from the rear seat area. Just pull the plastic detail carefully upwards (dont break it!) so that it allows clearance for the lining. Then you can pretty much pull the lining to a degree that is suitable for you from the trunk. All these parts are pretty flexible, so you can move them quite abit without removing them from the car completely.
At this stage you should be able to access all of the area behind the LHS trunk lining, except maybe the rearmost corner where the rear lights etc are installed (as the lining is still stuck to the body here).
I hope this little guide can help someone who needs access to this area. I had to do it to gain access to the PSE unit, although to my surprise i did not find it there..but that's another story.
Newbie
Joined: Mar 2009
Posts: 9
Likes: 0
From: va
'00 CLK 43 AMG
Remove the head rests. This will require a small screwdriver and a small head to see (if your back window�s too dark to see through. A good job for little brother to feel useful. There�s a little plastic piece that you simply depress next to the unit that holds the head rest in. Push it down and pull the chrome bars out. The plastic rings attached to the deck pop out very easily. Bad picture� Sorry � too close to focus.

Help

Newbie
Joined: Apr 2009
Posts: 4
Likes: 0
From: ATL, GA
01' CLK 430
hey guys im pretty new here (obviously), i have a couple of issues i need some help solving...
1). My rear seats wont fold down, i think the latches to release them in the trunk are broken? not entirely sure.
2). If anyone knows how to remove the rear seat cushions (the ones that you actually sit on), or the entire bottom cushion/ashtray assembly it would be most appreciated. - figured it out, found the "buttons"
3). Anyone know how to remove the sideskirts and rear bumper?
Last edited by common_boy; Apr 4, 2009 at 10:26 PM. Reason: update
Newbie
Joined: Mar 2009
Posts: 9
Likes: 0
From: va
'00 CLK 43 AMG

Junior Member
Joined: May 2009
Posts: 16
Likes: 0
2001 CLK 55 AMG
My Instrument is reading -36F. I am guessing its the outside temperature sensor. I performed ac diag and it gave me the error code to fix sensor.
Anybody Knows how to change the outside temperature sensor?
Anybody Knows how to change the outside temperature sensor?

Super Member


Joined: Apr 2007
Posts: 737
Likes: 38
From: Fort Worth, TX
2019 CLS450/ 2002 CLK55
Go to front of car just inboard (10- 15 inches) of drivers fog light is the sensor. It is simply pressed into a hole down by the diffuser. autohausaz.com has them. Again, very very easy. Hell, might wann just make sure it didnt get disconnected.


