Replaced Front Control Arms


 04-21-2015, 09:16 PM
#27
Junior Member

Join Date: Apr 2015
Posts: 21
Likes: 0
Received 0 Likes
on
0 Posts
2006 CLK 350
Thanks ambit, great pictures. I was quoted $450 just to change the upper control brushings. My indy said the balljonts are fine. I think it's too much just for brushing change.
04-21-2015, 10:41 PM
#28
MBworld Guru
Thread Starter

Love the pics! A few comments:
1. When lifting the vehicle, only use the hydraulic jack to raise it - then let it rest on solid jack stands. I use the center jack point to raise, then place the jack stands under the vehicle at the "emergency" jack points. I see that you placed the jack stands under the suspension which you were working on.
2. I don't like using a pickle fork as it can damage the grease seal. I prefer the compression-style ball joint separator. But of course if you are replacing the ball joint, it doesn't matter much.
2. Marking the control arm positions is no good for torquing. You MUST put vehicle weight on them so they will be in the correct orientation with the correct "twist" on the bushings.
04-22-2015, 12:44 AM
#29
Super Member

1. Yeah I forgot the remove the belly pan so I had to drop the car back down, remove it then jack it up properly again. I didn't get a pick of that. I set the jack stands to the left and right of the 'puck' under the engine cross brace. I put the removed tires under the L & R side jack points too just in case. My dad got some ribs crushed by a car that slid off jackstands so I'm pretty careful about it 
2. Yeah I was straight up replacing the whole arm not just the bushing so I didn't mind tearing up the grease boot. (I also don't have a separator)
3. I'm not sure what you mean here.. I attached the ball joint end to the steering knuckle with the 21mm crown nut, then used a smaller jack under the base of the steering knuckle. Jacked the assembly up, compressing the strut and leveling off the control arms to where they would normally be. Then tightened the fluted bolts to line up where they were before any work.
Is that not right?
I fixed the rear control arm bolt I had off a tiny bit yesterday:
And my steering wheel is almost back to center. I might have to tweak the forward control arm on the driver-side to finish it up.
Car feels tighter up front. I can feel the potholes more now") and the steering requires a little more input.
and the steering requires a little more input.
2. Yeah I was straight up replacing the whole arm not just the bushing so I didn't mind tearing up the grease boot. (I also don't have a separator)
3. I'm not sure what you mean here.. I attached the ball joint end to the steering knuckle with the 21mm crown nut, then used a smaller jack under the base of the steering knuckle. Jacked the assembly up, compressing the strut and leveling off the control arms to where they would normally be. Then tightened the fluted bolts to line up where they were before any work.
Is that not right?
I fixed the rear control arm bolt I had off a tiny bit yesterday:
And my steering wheel is almost back to center. I might have to tweak the forward control arm on the driver-side to finish it up.
Car feels tighter up front. I can feel the potholes more now
and the steering requires a little more input.
04-22-2015, 11:02 AM
#30
Junior Member
Join Date: Apr 2015
Posts: 21
Likes: 0
Received 0 Likes
on
0 Posts
2006 CLK 350
ambit: This looks like a lot of hard work for someone trying to do it the first time. On the scale of 1 to 10. What you rate it? I'm try to see if I want to do it myself or pay other mechanic $170 just to install the front two control arms.
04-22-2015, 09:18 PM
#31
Super Member
^^ I've been thinking about this today.
Its wasn't "terrible" but it wasn't "enjoyable" either. I think I'd give it maybe a 6 or 7?
Replacing the strut bearings sucked because the spring compressors I have weren't getting a good grip and it was kinda dangerous. I'd give than an "8".
Replacing the sway bar links and bushings was easy, like a 3.
Replacing the rotors was $$ but easy, like a 3.
Replacing the AC condenser sucked because there wasn't much room to work and had to tear apart a bunch of the front end. That'd be a 6.
( https://mbworld.org/forums/clk-class...ne-sucked.html )
Air pump relay was super easy, like a 2 ( https://mbworld.org/forums/clk-class...ump-relay.html )
I replaced the valve cover gaskets when I first bought the car. That was like a "6" because you're leaning over the engine bay for an hour and then I had to do it twice, I still had a leak near the back.
Honestly, if you don't have:
2 x 21mm socket/wrench
19mm socket for back of strut
14mm box wrench for bolt in middle of strut
inverted t40 torx to remove the sway bar bushings
pickle fork/ball bearing puller
PB Blaster
2 x jacks + jackstands
and 6 hours to spare
I'd rather pay someone else to do it.
If I could go back I'd only replace the front control arms, the others looked fine. In fact I was planning on doing the same for the rear but after doing this I think they look fine.
Last edited by ambit; 04-23-2015 at 04:21 PM.
04-22-2015, 10:12 PM
#32
Junior Member
Join Date: Apr 2015
Posts: 21
Likes: 0
Received 0 Likes
on
0 Posts
2006 CLK 350
Havn't done much to the car, my mileage is at 130K now, already replaced spark plugs at 90k, replaced front and rear pads, front sway bar links, just replaced front wheel bearings.
Now my front brushing need to replace, there is small crack in it.
Now my front brushing need to replace, there is small crack in it.
04-22-2015, 10:39 PM
#33
MBworld Guru
Thread Starter
3. I'm not sure what you mean here.. I attached the ball joint end to the steering knuckle with the 21mm crown nut, then used a smaller jack under the base of the steering knuckle. Jacked the assembly up, compressing the strut and leveling off the control arms to where they would normally be. Then tightened the fluted bolts to line up where they were before any work.
Is that not right?
Is that not right?
Car feels tighter up front. I can feel the potholes more now and the steering requires a little more input.
and the steering requires a little more input.
04-22-2015, 10:43 PM
#34
MBworld Guru
Thread Starter
Quantifying the difficulty of this is a hard thing to do. If you've done oil and spark plug changes, this is many times more difficult. But if you've done brakes, this is may a factor of 2 more difficult. I would not do this unless you have a good selection of tools (large size sockets and wrenches), a good jack and jack stands, etc.
04-27-2015, 08:12 PM
#35
Super Member
So the conversation went something like this:
me: "I need an alignment"
MB: "Ok, which way is it pulling?"
me: "I replaced the control arms and it pulls to the right now"
MB: "You replaced them? Yourself?"
me: "Yes."
MB: "Upper and lower?"
me: "Yes. Look here's my name, just look up my account"
MB: type.. type.. type.. "Ohhhhhh. You've done a bit of your own work I see. Ok, well bring it in."
So $150 later it tracks perfectly true again. Needed a toe adjustment, camber and caster were ok. No eccentric bolt kits needed either.
04-27-2015, 10:12 PM
#36
Junior Member
Join Date: Apr 2015
Posts: 21
Likes: 0
Received 0 Likes
on
0 Posts
2006 CLK 350
Great job ambit.
So I took my car to this new indy place to have my upper control arms bushing replaced and they charged me $265 that was a lot less then my indy. They say the lower control arms need to replace and that would be $700.. that's insane, they show me the bushing of the control arm and it have a very small crack. I can get two Lemforder arms for $210 shipped and I'm thinking about to install it myself to save some money. By looking at the WIS you don't need to remove the 3 bolts holding the knuckle just pop the balljoint and remove the bolt on the other end. Is that correct guys? To install the balljont side you don't need a press..right?
So I took my car to this new indy place to have my upper control arms bushing replaced and they charged me $265 that was a lot less then my indy. They say the lower control arms need to replace and that would be $700.. that's insane, they show me the bushing of the control arm and it have a very small crack. I can get two Lemforder arms for $210 shipped and I'm thinking about to install it myself to save some money. By looking at the WIS you don't need to remove the 3 bolts holding the knuckle just pop the balljoint and remove the bolt on the other end. Is that correct guys? To install the balljont side you don't need a press..right?
04-28-2015, 07:54 PM
#39
Super Member
reused the same bolts. MB reused the same bolts when they did the alignment.
You have to remove the strut from the steering knuckle to do either of the front control arms.
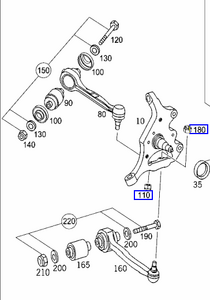
You could theoretically do the rear arm without removing it.. maybe.. it would be nightmare. The king/crown nut is directly below the bottom of the strut. It might be possible to get a 21mm wrench in there and loosen it some without removing the strut.. but that would be a tedious task. Part 180 in this pic. You could try to loosen it then swing the arm down and out.
I wouldn't do it that way, yikes.
The front arm (p/n 80 )requires the strut out of the way to pull up out of the steering knuckle.
To install them you don't need a press, no. As the 21mm nut threads it pulls the control arm into the steering knuckle tight.
You know.. now that I'm thinking about this.. I wonder:
Remove the 21mm bolt (p/n 120)from the subframe, swing the rear control arm ( p/n 80 ) down (not sure how far it would move), use a handheld press to pop out the old bushing ( p/n 90) and pop in a new one. Swing it back up and re-install the bolt. No messing with the steering knuckle side at all.
Wonder if it would work
[edit]I have a $5 off $200 coupon from partsgeek.com if anyone needs it
You have to remove the strut from the steering knuckle to do either of the front control arms.
You could theoretically do the rear arm without removing it.. maybe.. it would be nightmare. The king/crown nut is directly below the bottom of the strut. It might be possible to get a 21mm wrench in there and loosen it some without removing the strut.. but that would be a tedious task. Part 180 in this pic. You could try to loosen it then swing the arm down and out.

I wouldn't do it that way, yikes.
The front arm (p/n 80 )requires the strut out of the way to pull up out of the steering knuckle.
To install them you don't need a press, no. As the 21mm nut threads it pulls the control arm into the steering knuckle tight.
You know.. now that I'm thinking about this.. I wonder:
Remove the 21mm bolt (p/n 120)from the subframe, swing the rear control arm ( p/n 80 ) down (not sure how far it would move), use a handheld press to pop out the old bushing ( p/n 90) and pop in a new one. Swing it back up and re-install the bolt. No messing with the steering knuckle side at all.
Wonder if it would work
[edit]I have a $5 off $200 coupon from partsgeek.com if anyone needs it
Last edited by ambit; 04-29-2015 at 02:43 PM.
04-28-2015, 10:42 PM
#40
MBworld Guru
Thread Starter
You will have to remove the three bolts holding the shock to the wheel hub/steering knuckle. You will not need to compress the spring to do this - its captive. It is a bit of a pain to get everything lined back up, but it's just part of the job.
04-28-2015, 11:29 PM
#41
Junior Member
Join Date: Apr 2015
Posts: 21
Likes: 0
Received 0 Likes
on
0 Posts
2006 CLK 350
This is how this indy replace my upper control arm bushing (90) without removing anything from the steering knuckle, the control arm still attacked. He use a press to remove the bushings. If you have a press this job would be a lot easier just for bushing replacement.
Now that my upper control arms are done, I need to replace my lower control arms.
Looking at the WIS from this forum, you don't to remove the steering knuckle, just pop the balljoint from the knuckle..is that correct? Not sure if my CLK350 suspension is different than your CLK5.. By looking at my lower control arm there is nothing blocking the nut.
04-29-2015, 11:52 PM
#42
MBworld Guru
Thread Starter
If all you do is replace the bushings, then there is no need to remove the shock. But to remove the "upper" control arm from the steering knuckle, (#80) you must remove the shock. There is no difference from the CLK350 to CLK550.
04-30-2015, 10:21 AM
#43
MBWorld Fanatic!

Well it looks like this is a project I'll be taking on this weekend. The holes in NYC seems to have completely destroyed my driver side upper control arm/thrust arm. The symptoms were clunking over light pot holes and wheel vibration/general instability while braking.
I have to say, I am not impressed with the quality of this car at all at 50k miles. I've never replaced these parts on any other car I've ever owned before 100k.
I have to say, I am not impressed with the quality of this car at all at 50k miles. I've never replaced these parts on any other car I've ever owned before 100k.
05-01-2015, 01:09 PM
#44
Junior Member
Join Date: Apr 2015
Posts: 21
Likes: 0
Received 0 Likes
on
0 Posts
2006 CLK 350
What is correct the torque spec for the lower control arm?
Found some info on w203: 59lbs on balljoint side, 110lbs on frame side.
w209: 59lbs on balljoint side, 88lbs on frame side.
Found some info on w203: 59lbs on balljoint side, 110lbs on frame side.
w209: 59lbs on balljoint side, 88lbs on frame side.
05-03-2015, 10:00 PM
#45
Junior Member
Join Date: Apr 2015
Posts: 21
Likes: 0
Received 0 Likes
on
0 Posts
2006 CLK 350
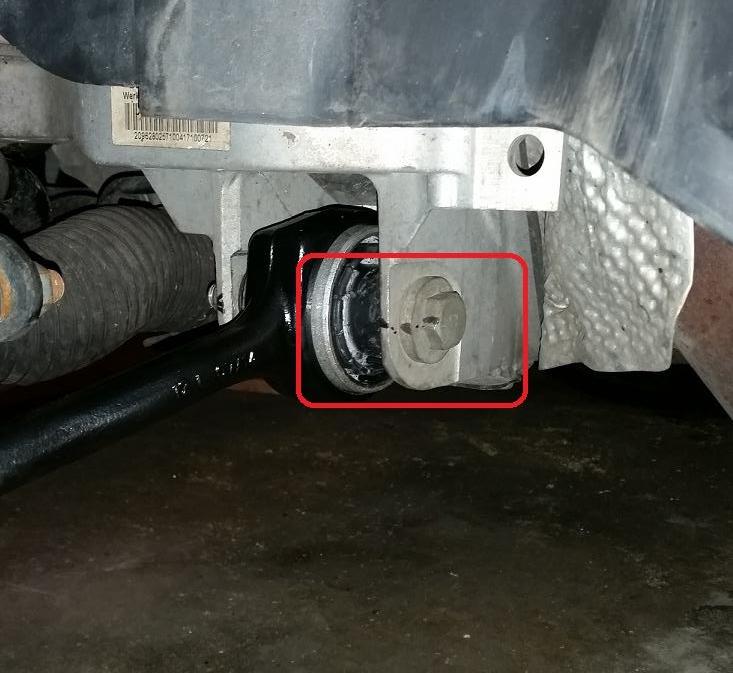
I was able to remove the nut with 21mm wrench on my lower control arm without removing anything else. I tried using the balljoint separator that I bought from Harbor Freight and no luck popping the balljoint. What type of balljoint separator do you guys use?
05-04-2015, 09:15 PM
#48
MBWorld Fanatic!
Finished this today. There's no need to remove the shocks...not sure if somebody mentioned it was necessary . The only thing you need to disconnect is the sway bar pretty much. The end links can be a pain to reattach because of the relatively large torque value and the small torx bit needed.
There's also very little room to maneuver around the arm bolt on the chassis side. Be prepared with 21mm sockets in various sizes...socket...wrench...deep socket...curved wrench haha.
That being said I would probably pay 200$ for somebody to do this. It's kind of a hassle as suspension work generally is. The steering feels a lot more firm now and the clunking I had is gone. I'll post a pic of the messed up parts later...for reference.
05-04-2015, 11:00 PM
#49
MBworld Guru
Thread Starter
You tighten the specified torque using a torque wrench, then you turn the nut that number of degrees. 60 degrees would be one 1/6 of a full rotation, or one "flat" on a hex nut. 120 degrees is 1/3 of a full turn, or two "flats".
05-04-2015, 11:02 PM
#50
MBworld Guru
Thread Starter
Did you install new control arms, or just replace the bushings? There is no way to remove the upper control arm's ball joint for the hub without removing the shock from the hub.


