


To dye or not to dye - there was no question
Thread Starter
MBWorld Fanatic!


Joined: Nov 2002
Posts: 1,028
Likes: 133
From: Massachusetts
2018 GLE350, 2014 G550, 2000 SL500, 1980 TR8, 1995 E320 Cabriolet
To dye or not to dye - there was no question
I have slowly been sorting out all the details on my cabriolet. I've re-done the suspension, installed new tires and AMG monoblock wheels, added a wood steering wheel, installed Jenhert speakers coupled to an OEM Audio 20 with the Dension Gateway 500 D2B fiberoptic iPod adapter, added some accent bits to the interior and had the paint nicely buffed and detailed. Everything about the car for me was really coming together.
But the one thing that always bothered me was that it still felt "old" inside. I finally realized that this was because some interior parts had aged to different colors than others and much of the upholstery looked dirty, even though in wasn't. Some of the plastic parts had cracks or missing pieces. The leather seats, while having no outright holes, were cracked and well worn, especially where my butt slides in on the drivers side bolster. I spent a great deal of time trying to clean things up as good as I could and this really helped the situation. But the aging plastic/vinyl/leather parts still showed through which, to me, created a big detraction from the greatness of the W124, and the cabriolet in particular. These issues were really emphasized after I re-dyed the arm rest last year and it really contrasted against the rest of the car's interior.
So, for better or worse, I decided to do something about it. I sourced all the required dyes, coatings, fillers, cleaners, and binding agents to re-dye or coat all of the Parchment colored (or what should have been Parchment colored) parts in the interior. And when I say all, I mean all - even the kick panels and the little parts under the seats!
But, it was no trivial task to do. I removed everything that needed to be done except for the center console and the dashboard, which I masked and dyed in-place. The R&R of the parts did not take that much time and effort, but the material repair (divots, cuts, cracks) etc. took a great deal of time. And the dying/coating itself took even longer! I opted to spray the dye on, because as I had discovered from the arm rest project, this must be done as many, very light coats in order to get uniform coverage without drips, globs, and thick spots. I used (abused) a hair dryer to more quickly dry the dye between coats.
As some of you may be wondering, dying is not without it's drawbacks. The first is that the dyed surfaces are extremely fragile and easily damaged for some time. The manufacturer says it can take up to 30 days for it to fully cure. I think it may take longer. This is one reason why I did the project at the end of the summer - the car will be going back into its winter hibernation in a month or so, but there will still be time for the dye to cure before freezing weather sets in. The cost was not exactly inexpensive either - the total for dyes and supplies was about $500.
You may be also thinking that the dye is the wrong color because of the contrast between old and new. I thought so too at first. But, in places that were protected from oxygen and light (like where the wood covered the console), the new color is a perfect match to the old.
The only thing I have left to do is the front door panels because mine were "vandalized" by those door mounted cup holders.
The results, IMHO, turned out to be fantastic. It really is like climbing into a brand new car. My newer E-class wagon isn't even this pristine. It really has added that final cherry on top to the pleasure of driving this car.
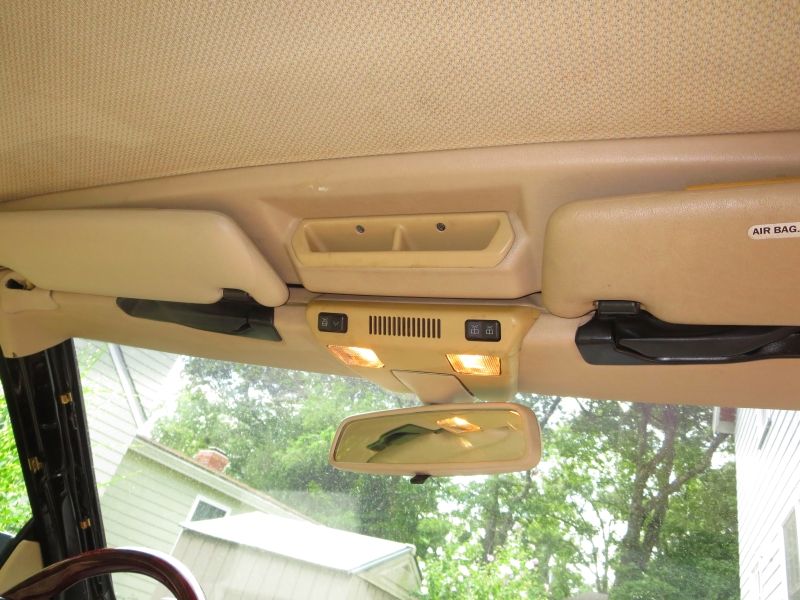
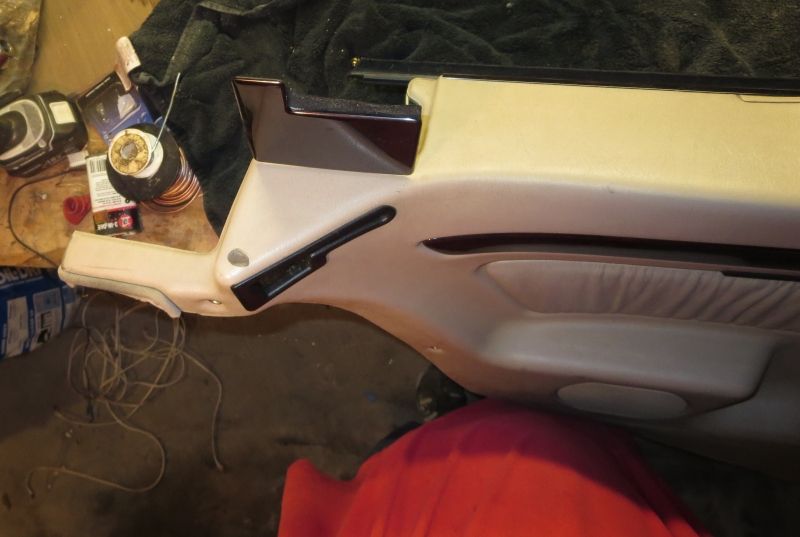
Old windshield header parts. Note how almost every piece is a different color.
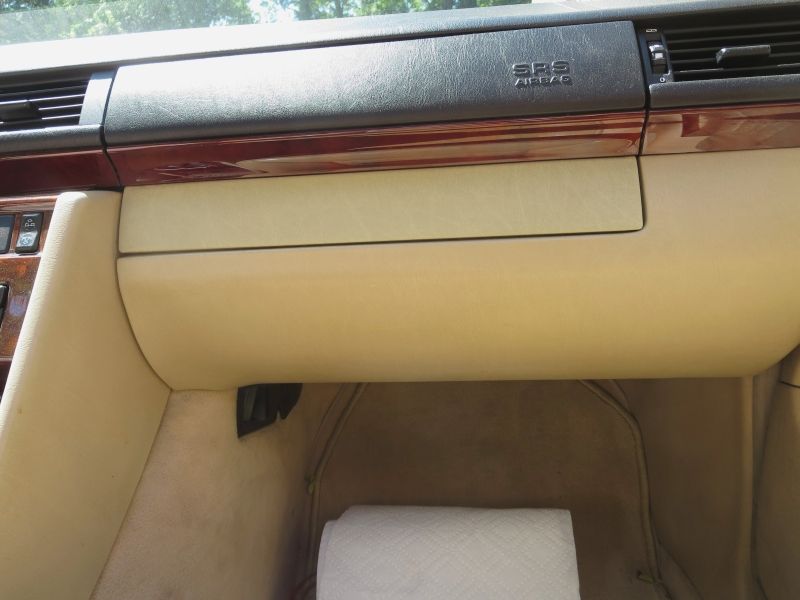
The airbag vinyl has aged differently that the dash board vinyl.
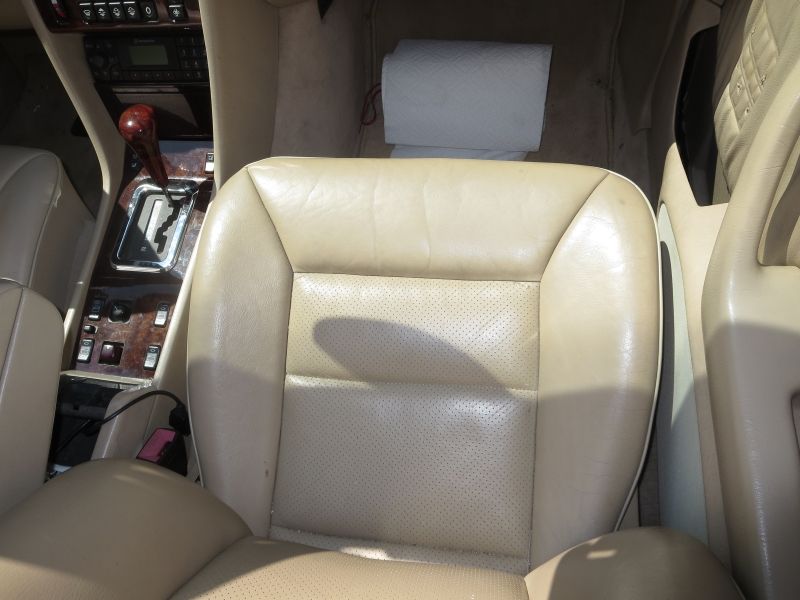
The passenger seat shows a few cracks. The driver's seat had more, but my daughter accidentally deleted those pictures when she borrowed my camera.
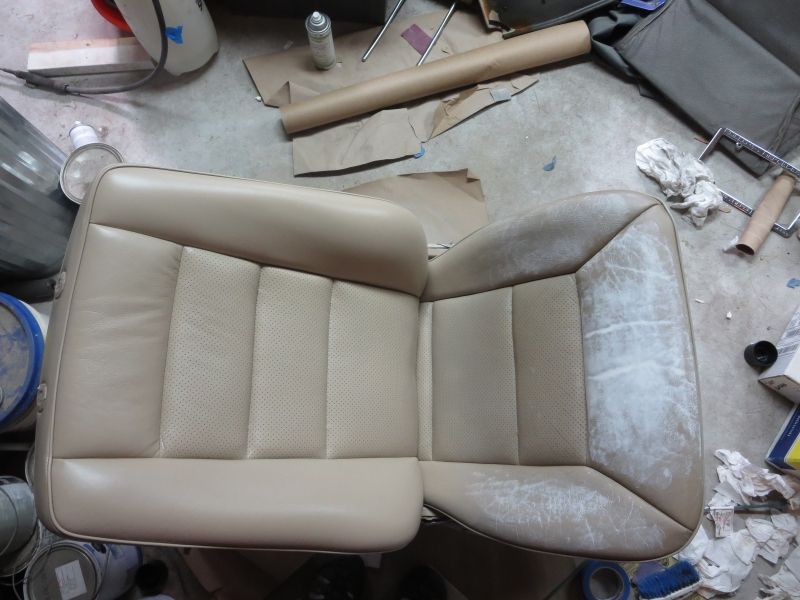
Passenger seat showing the leather filler/patch before dying.
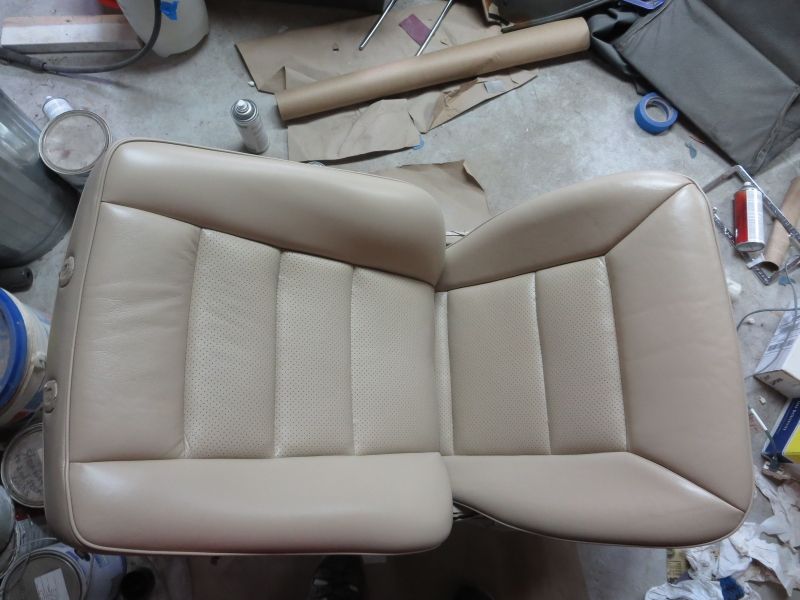
Passenger seat completely dyed.
Rear seat, partially finished.

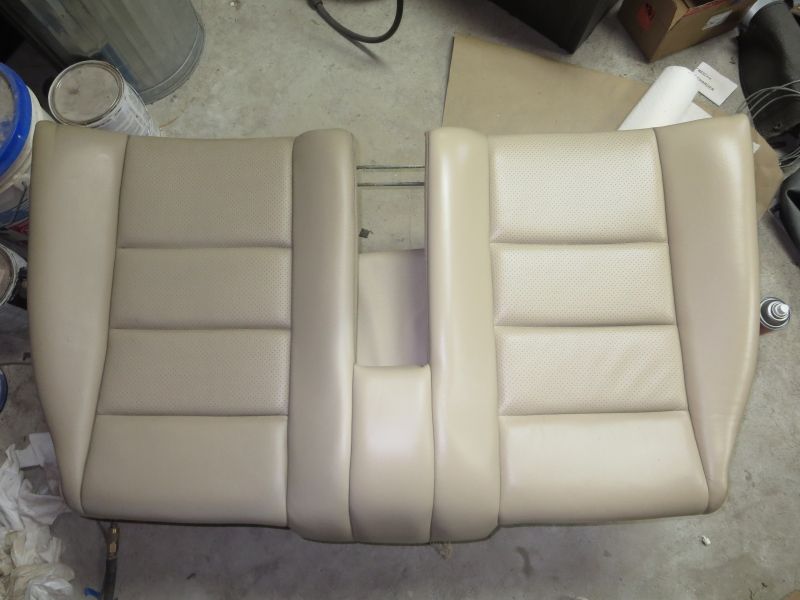
Rear seat, completely finished.
Rear interior panel showing divot before repair and dying.
Rear interior panel showing repaired divot after dying.

The masked interior prior to dying.
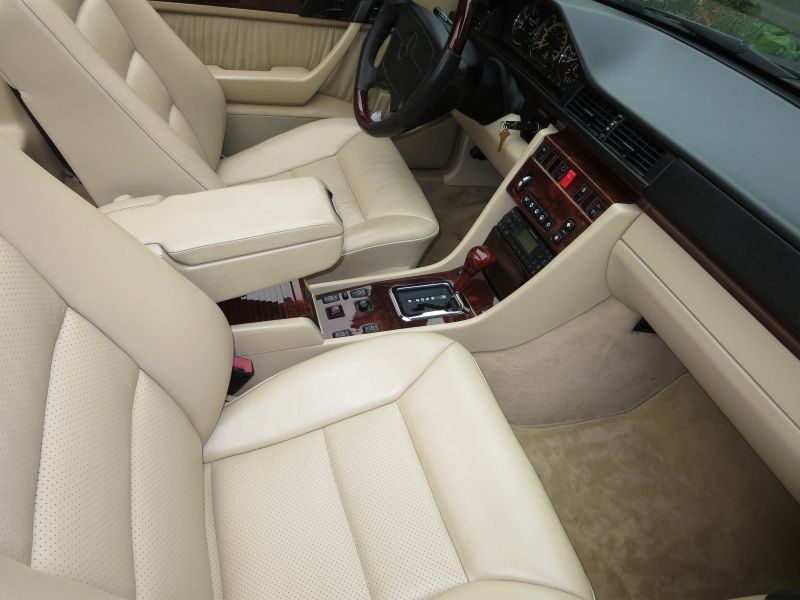
The finished front seats, dashboard, and console.

The finished rear seats, interior panels, and tonneau.
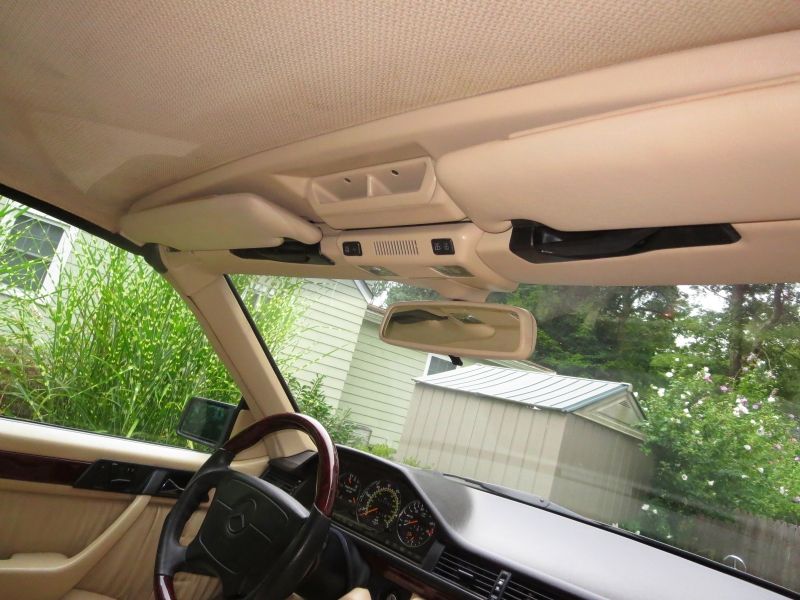
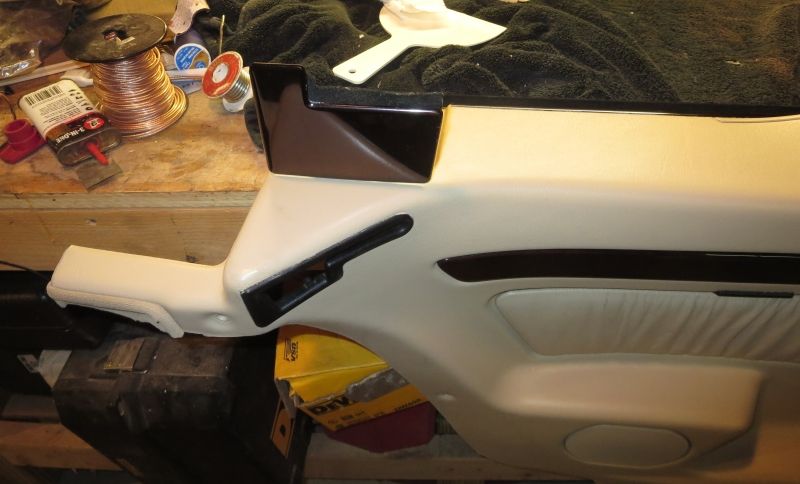
The finished windshield header.
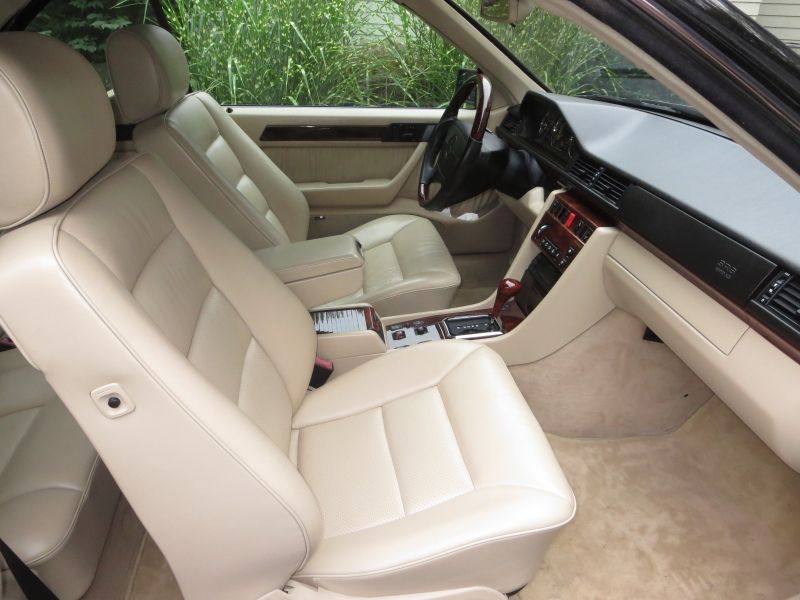
Side view again.
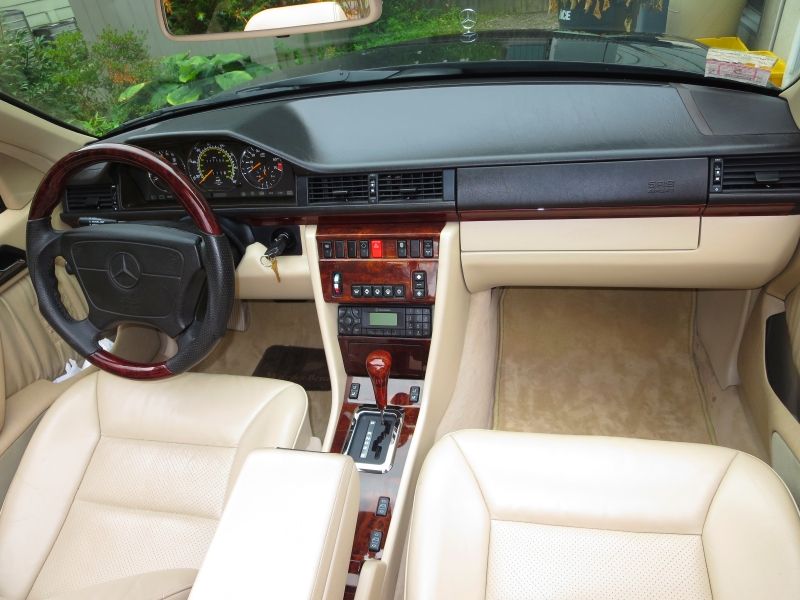
Dashboard and seats, key in the ignition, ready for a drive!
But the one thing that always bothered me was that it still felt "old" inside. I finally realized that this was because some interior parts had aged to different colors than others and much of the upholstery looked dirty, even though in wasn't. Some of the plastic parts had cracks or missing pieces. The leather seats, while having no outright holes, were cracked and well worn, especially where my butt slides in on the drivers side bolster. I spent a great deal of time trying to clean things up as good as I could and this really helped the situation. But the aging plastic/vinyl/leather parts still showed through which, to me, created a big detraction from the greatness of the W124, and the cabriolet in particular. These issues were really emphasized after I re-dyed the arm rest last year and it really contrasted against the rest of the car's interior.
So, for better or worse, I decided to do something about it. I sourced all the required dyes, coatings, fillers, cleaners, and binding agents to re-dye or coat all of the Parchment colored (or what should have been Parchment colored) parts in the interior. And when I say all, I mean all - even the kick panels and the little parts under the seats!
But, it was no trivial task to do. I removed everything that needed to be done except for the center console and the dashboard, which I masked and dyed in-place. The R&R of the parts did not take that much time and effort, but the material repair (divots, cuts, cracks) etc. took a great deal of time. And the dying/coating itself took even longer! I opted to spray the dye on, because as I had discovered from the arm rest project, this must be done as many, very light coats in order to get uniform coverage without drips, globs, and thick spots. I used (abused) a hair dryer to more quickly dry the dye between coats.
As some of you may be wondering, dying is not without it's drawbacks. The first is that the dyed surfaces are extremely fragile and easily damaged for some time. The manufacturer says it can take up to 30 days for it to fully cure. I think it may take longer. This is one reason why I did the project at the end of the summer - the car will be going back into its winter hibernation in a month or so, but there will still be time for the dye to cure before freezing weather sets in. The cost was not exactly inexpensive either - the total for dyes and supplies was about $500.
You may be also thinking that the dye is the wrong color because of the contrast between old and new. I thought so too at first. But, in places that were protected from oxygen and light (like where the wood covered the console), the new color is a perfect match to the old.
The only thing I have left to do is the front door panels because mine were "vandalized" by those door mounted cup holders.
The results, IMHO, turned out to be fantastic. It really is like climbing into a brand new car. My newer E-class wagon isn't even this pristine. It really has added that final cherry on top to the pleasure of driving this car.

Old windshield header parts. Note how almost every piece is a different color.

The airbag vinyl has aged differently that the dash board vinyl.

The passenger seat shows a few cracks. The driver's seat had more, but my daughter accidentally deleted those pictures when she borrowed my camera.

Passenger seat showing the leather filler/patch before dying.

Passenger seat completely dyed.

Rear seat, partially finished.

Rear seat, completely finished.

Rear interior panel showing divot before repair and dying.

Rear interior panel showing repaired divot after dying.

The masked interior prior to dying.

The finished front seats, dashboard, and console.

The finished rear seats, interior panels, and tonneau.

The finished windshield header.

Side view again.

Dashboard and seats, key in the ignition, ready for a drive!
Thread Starter
MBWorld Fanatic!
Joined: Nov 2002
Posts: 1,028
Likes: 133
From: Massachusetts
2018 GLE350, 2014 G550, 2000 SL500, 1980 TR8, 1995 E320 Cabriolet
Trending Topics
Member
Joined: Oct 2011
Posts: 242
Likes: 0
From: Chicago
93 300CE Cabriolet, 13 E350 Sport Wagon
Please tell us more about your solve for the cracked and missing interior parts? I am frustrated at how many small trim pieces are continuing to fall out of the interior. I lost the vanity mirror cover on the drivers side visor and when I did a short inspection of the wiring I had part of the cover that hides the visor mount come off i my hand. Is this the kid of thing you've been fixing? What kind of glue can keep this old chalky/waxy plastic together?
MB World Stories
The Best of Mercedes & AMG

Manual Mercedes? 6 Times Sindelfingen Let Drivers Have All The Fun
Verdad Gallardo
Mercedes SLR McLaren 722 S Is Extremely Rare Example Modified by McLaren
Verdad Gallardo
8 Classic Boxy Mercedes Designs That Have Aged Like Fine Wine
Verdad Gallardo
Flawlessly Restored Mercedes 190E Evo II Heads to Auction
Verdad Gallardo
Electric Mercedes C-Class Unveiled: 11 Things You Need to Know
Verdad Gallardo
Mercedes EQS Gets A Major Update: Everything You Need to Know
Verdad Gallardo
5 Underrated Mercedes-Benz Models That Don't Get the Love They Deserve
Verdad Gallardo
Mercedes 300D Has Pushed Well Past 1 Million Miles and It Ain't Stopping
Verdad Gallardo
10 Most Reliable Mercedes-Benz Models You Can Buy Used
Verdad Gallardo
Thread Starter
MBWorld Fanatic!
Joined: Nov 2002
Posts: 1,028
Likes: 133
From: Massachusetts
2018 GLE350, 2014 G550, 2000 SL500, 1980 TR8, 1995 E320 Cabriolet
The leather patch/filler was from Leatherique. The link for that is here: http://www.leatherique.com/products.html.
The dye, cleaner, and binder was from World Upholstery. The link for that is here: http://www.worlduph.com/others/dye. I ordered 766 "Parchment" color.
Note that I have read on various forums that the Letherique dyes are better than the World Upholstery dyes, however, I went with the World dye because it can be used on leather, vinyl, and hard plastic trim (with the proper binding agent). I was concerned about a color mismatch if I got the leather dye from Leatherique and the vinyl/plastic dye from World.
I found the World dye to work quite well with the only drawback being that it takes a while to fully dry (it can be handled soon if dried with a hair dryer) and is fragile during that time. The other thing I found that was important is that the leather filler must be really, really dry or it will crack on you.
Yes, dealing with the old brittle ABS/PVC plastic parts is tough! I have been using fast drying epoxy to glue the parts I can or I have been using it and crude molds to "cast" a replacement part. I then sand/grind/finish the crude castings to make a replacement part. I have attached a couple of pics showing one of the bezels for the top release levers that was missing a big piece, the crude molding, and the finished part back in place. You can also see where I fixed cracking on the dome light unit as well.
I am looking into a 3-D printer / scanner so that I can literally "print" replacement parts / pieces (I am planning to use it for other non-car things as well).
Thanks for the kind words everyone,
- FD
The dye, cleaner, and binder was from World Upholstery. The link for that is here: http://www.worlduph.com/others/dye. I ordered 766 "Parchment" color.
Note that I have read on various forums that the Letherique dyes are better than the World Upholstery dyes, however, I went with the World dye because it can be used on leather, vinyl, and hard plastic trim (with the proper binding agent). I was concerned about a color mismatch if I got the leather dye from Leatherique and the vinyl/plastic dye from World.
I found the World dye to work quite well with the only drawback being that it takes a while to fully dry (it can be handled soon if dried with a hair dryer) and is fragile during that time. The other thing I found that was important is that the leather filler must be really, really dry or it will crack on you.
Please tell us more about your solve for the cracked and missing interior parts? I am frustrated at how many small trim pieces are continuing to fall out of the interior. I lost the vanity mirror cover on the drivers side visor and when I did a short inspection of the wiring I had part of the cover that hides the visor mount come off i my hand. Is this the kid of thing you've been fixing? What kind of glue can keep this old chalky/waxy plastic together?
I am looking into a 3-D printer / scanner so that I can literally "print" replacement parts / pieces (I am planning to use it for other non-car things as well).
Thanks for the kind words everyone,
- FD
Last edited by Floobydust; Sep 25, 2013 at 11:17 PM. Reason: typo


