


 Jun 17, 2015, 07:52 PM
Last edit by: IB Advertising
See related guides and technical advice from our community experts:
- Mercedes-Benz E-Class How to Replace Front Shocks
Step by step instructions for do-it-yourself repairs

Install Arnott front Airmatic shock

Thread Starter
Junior Member
Joined: Aug 2011
Posts: 16
Likes: 1
From: Portland, OR
2003 E320 Jade Black / Charcoal
Hey all -
I'm in the process of trying to install a rebuilt front Arnott unit, however, I'm not able to collapse the shock the same way as the folks here have described in the following thread:
https://mbworld.org/forums/w211-amg/...there-any.html
And obviously, I can't get the shock installed. I basically can't get the ears for the single attachment point over the lower control arm. By rotating the shock unit, I'm able to get the top attached and threaded on, but I just can't move the suspension down far enough to get the lower portion of the shock over the arm.
Would it be prudent to detach the front sway bar to get more flex in the suspension? Can I take the shock to a shop and have them collapse it via Star? I spent a good 4 hours on this problem and still have not had any luck. I'm definitely not a novice when it comes to working on cars, but this is the first time doing anything "major" on my W211.
Any help is appreciated!
Thread Starter
Junior Member
Joined: Aug 2011
Posts: 16
Likes: 1
From: Portland, OR
2003 E320 Jade Black / Charcoal
I was able to install the strut this morning. For some reason on the first day of install, the computer wasn't releasing air from the shock. Today, it started releasing air and I was able to compress the shock enough to where I could get the prybar to move suspension down far enough to get the shock over the lower arm. Overall was easy install after that.
Thread Starter
Junior Member
Joined: Aug 2011
Posts: 16
Likes: 1
From: Portland, OR
2003 E320 Jade Black / Charcoal
I was able to replace the shock by doing the following:
REMOVAL:
INSTALLATION:
This is the ghetto way of taking care of the front airmatic struts. People have warned about the strut coming apart from letting it become too deflated, so watch out and only deflate the shock as much as you need to compress it.
REMOVAL:
- Disconnect trunk battery.
- Jack car up, place jack stands at both front side jacking points.
- Remove wheel.
- Disconnect air line and electrical connection from the top of the strut. Loosen the three nuts at the top of the strut.
- Disconnect ADC from the car - this will require you removing the wheel well liner in order to access the plug attaching to the car's harness. A lot of the people break the plug bracket, but it's available at the dealer.
- Remove the bolt holding the strut to the lower control arm.
- At this point, determine if you can compress the strut by hand. Mine was blown, so I could easily compress the tube without assistance from a floorjack. Remove the strut from the lower control arm.
- Remove the three nuts at the top of the strut tower.
- Finaggle the strut out of the wheel well. I believe I dropped the strut behind the lower control arm, but it's been a couple months since I did it. I will be doing this again on the driver side, so I will document this with pictures.
INSTALLATION:
- Arnott ships these struts fully extended, which is really a curse for the guy who doesn't own a STAR-capable computer.
- Slide the strut into the strut tower and thread all three nuts on at least a couple of threads.
- Connect the electical plug to the top of the strut. Leave the air line unhooked.
- Connect the battery. Leave it connected for a few seconds while the car's ECU figures out that the ride height of the car is high (you've jacked it up) and starts letting air out of the struts. Since you've not connected the air line, air should just escape from the strut. You will not notice a massive change each time you perform step #4 - you will have to disconnect and reconnect the battery several times (I probably did it 9 or 10 times) in order to release enough pressure to compress the strut.
- Check the strut for movement each time you reconnect the battery. If possible, have a second pair of eyes shining a flashlight onto the rubber portion of the strut. You'll see it move slightly.
- You can compress the strut slightly with a floor jack to help get it over the lower control arm, if needed.
- Once the strut is compressable, disconnect the battery again.
- Once the lower portion of the strut is over the lower control arm, reinstall the bolt that attaches the strut to the lower control arm.
- Tighten the three bolts at the top of the strut.
- Connect the air line to the top of the strut, and the electrical connection.
- Connect the ADC plug.
- Replace all wheel well fasteners.
- Replace wheel.
- Lower car to ground.
- Reconnect battery.
- Start car. This process could take up to about 5 minutes and the air compressor will be running. The car will slowly rise.
This is the ghetto way of taking care of the front airmatic struts. People have warned about the strut coming apart from letting it become too deflated, so watch out and only deflate the shock as much as you need to compress it.
MBWorld Fanatic!
Joined: Mar 2006
Posts: 3,254
Likes: 15
From: Louisiana
03 E500 and Corvette
Otherwise all worked well.
Super Member
Joined: Jul 2009
Posts: 593
Likes: 1
From: New Jersey
W211
I was able to replace the shock by doing the following:
REMOVAL:
INSTALLATION:
This is the ghetto way of taking care of the front airmatic struts. People have warned about the strut coming apart from letting it become too deflated, so watch out and only deflate the shock as much as you need to compress it.
REMOVAL:
- Disconnect trunk battery.
- Jack car up, place jack stands at both front side jacking points.
- Remove wheel.
- Disconnect air line and electrical connection from the top of the strut. Loosen the three nuts at the top of the strut.
- Disconnect ADC from the car - this will require you removing the wheel well liner in order to access the plug attaching to the car's harness. A lot of the people break the plug bracket, but it's available at the dealer.
- Remove the bolt holding the strut to the lower control arm.
- At this point, determine if you can compress the strut by hand. Mine was blown, so I could easily compress the tube without assistance from a floorjack. Remove the strut from the lower control arm.
- Remove the three nuts at the top of the strut tower.
- Finaggle the strut out of the wheel well. I believe I dropped the strut behind the lower control arm, but it's been a couple months since I did it. I will be doing this again on the driver side, so I will document this with pictures.
INSTALLATION:
- Arnott ships these struts fully extended, which is really a curse for the guy who doesn't own a STAR-capable computer.
- Slide the strut into the strut tower and thread all three nuts on at least a couple of threads.
- Connect the electical plug to the top of the strut. Leave the air line unhooked.
- Connect the battery. Leave it connected for a few seconds while the car's ECU figures out that the ride height of the car is high (you've jacked it up) and starts letting air out of the struts. Since you've not connected the air line, air should just escape from the strut. You will not notice a massive change each time you perform step #4 - you will have to disconnect and reconnect the battery several times (I probably did it 9 or 10 times) in order to release enough pressure to compress the strut.
- Check the strut for movement each time you reconnect the battery. If possible, have a second pair of eyes shining a flashlight onto the rubber portion of the strut. You'll see it move slightly.
- You can compress the strut slightly with a floor jack to help get it over the lower control arm, if needed.
- Once the strut is compressable, disconnect the battery again.
- Once the lower portion of the strut is over the lower control arm, reinstall the bolt that attaches the strut to the lower control arm.
- Tighten the three bolts at the top of the strut.
- Connect the air line to the top of the strut, and the electrical connection.
- Connect the ADC plug.
- Replace all wheel well fasteners.
- Replace wheel.
- Lower car to ground.
- Reconnect battery.
- Start car. This process could take up to about 5 minutes and the air compressor will be running. The car will slowly rise.
This is the ghetto way of taking care of the front airmatic struts. People have warned about the strut coming apart from letting it become too deflated, so watch out and only deflate the shock as much as you need to compress it.
Trending Topics

Newbie
Joined: May 2012
Posts: 1
Likes: 1
Jetta
If you'd like to let the air out of your Air-matic shock, just apply 5 volts to the bottom two pins of the electrical connector. The bottom is ground, the middle is +5V. That will energize the solenoid and let all the air out. I'm working on a E500 with a blown strut and got the part in yesterday from Arnott. Just did it and thought I'd share with y'all.
MB World Stories
The Best of Mercedes & AMG

Manual Mercedes? 6 Times Sindelfingen Let Drivers Have All The Fun
Verdad Gallardo
Mercedes SLR McLaren 722 S Is Extremely Rare Example Modified by McLaren
Verdad Gallardo
8 Classic Boxy Mercedes Designs That Have Aged Like Fine Wine
Verdad Gallardo
Flawlessly Restored Mercedes 190E Evo II Heads to Auction
Verdad Gallardo
Electric Mercedes C-Class Unveiled: 11 Things You Need to Know
Verdad Gallardo
Mercedes EQS Gets A Major Update: Everything You Need to Know
Verdad Gallardo
5 Underrated Mercedes-Benz Models That Don't Get the Love They Deserve
Verdad Gallardo
Mercedes 300D Has Pushed Well Past 1 Million Miles and It Ain't Stopping
Verdad Gallardo
10 Most Reliable Mercedes-Benz Models You Can Buy Used
Verdad Gallardo
MBWorld Fanatic!
Joined: Oct 2011
Posts: 1,084
Likes: 68
From: Athens, GA USA
2011 E63, 2011 Hyundai Genesis 4.6 v8, 2013 GMC Denali XL, 1965 Ford Mustang, 2005 Merc. E500
I disconnected the sway bar to put on the two front Arnott air struts. I think it took less time to do that since I have compressor and impact wrench/sockets.
MBWorld Fanatic!
Joined: Mar 2006
Posts: 3,254
Likes: 15
From: Louisiana
03 E500 and Corvette
If you'd like to let the air out of your Air-matic shock, just apply 5 volts to the bottom two pins of the electrical connector. The bottom is ground, the middle is +5V. That will energize the solenoid and let all the air out. I'm working on a E500 with a blown strut and got the part in yesterday from Arnott. Just did it and thought I'd share with y'all.

Junior Member
Joined: May 2012
Posts: 17
Likes: 3
From: DE
2005 E320 AWD Wagon
disconnect battery ok?
Hello everyone, my RF airmatic had the same issue and I think I will go with the Arnott strut and the directions are pretty easy I guess. My question is, is it ok to disconnect the battery? I thought I read in some posts that MB cars are not advised to disconnect battery as it may cause a lot of resetting that you will end up getting the car back to the dealership for some resetting procedure. Is this true? Can we work on the strut replacement without disconnecting the battery?
Junior Member
Joined: May 2012
Posts: 17
Likes: 3
From: DE
2005 E320 AWD Wagon
Hello everyone, my RF airmatic had the same issue and I think I will go with the Arnott strut and the directions are pretty easy I guess. My question is, is it ok to disconnect the battery? I thought I read in some posts that MB cars are not advised to disconnect battery as it may cause a lot of resetting that you will end up getting the car back to the dealership for some resetting procedure. Is this true? Can we work on the strut replacement without disconnecting the battery?
can somebody help please?
MBWorld Fanatic!
Joined: Oct 2011
Posts: 1,084
Likes: 68
From: Athens, GA USA
2011 E63, 2011 Hyundai Genesis 4.6 v8, 2013 GMC Denali XL, 1965 Ford Mustang, 2005 Merc. E500
I did not disconnect my battery. I was jst very carefull with the wiring and for protection put electrical tape over end while it was disconnected.

Former Vendor of MBWorld
Joined: Jan 2012
Posts: 302
Likes: 29
From: Merritt Island, Florida
MERCEDES-BENZ CL-CLASS
Save 10% on Arnott Air Suspension Replacement Products
For the rest of September Arnott is pleased to extend a special 10% discount to MBWorld forum members on Arnott�s replacement air suspension products for your Mercedes-Benz �!
You can save 10% off your purchase of http://www.arnottindustries.com/part_MERCEDES-BENZ_yid18.html?utm_source=MBWorld&utm_medium=foru m&utm_campaign=mbsave12 ] Arnott Air Suspension replacement products for Mercedes [/url]by using code MBSAVE10 * during checkout.
This 10% off special promotion (max $75 savings) is good on any single order placed using Arnott's 24/7 Web Store. Hurry, offer ends September 30, 2012.
* To save 10% on your order simply enter the Special Promotion Code MBSAVE10 during your purchase. Offer good on retail prices for Mercedes-Benz replacement air suspension parts purchased directly from Arnott, maximum savings $75, only one coupon per customer, cannot be used with any other discount. Does not apply to taxes, shipping or core deposits.
http://www.arnottindustries.com/part_MERCEDES-BENZ_yid18.html?utm_source=MBWorld&utm_medium=foru m&utm_campaign=mbsave12 ] View Arnott Mercedes-Benz Replacement Air Suspension Products [/url]
Like us on Facebook for product news: https://www.facebook.com/ArnottInc
Last edited by arnottdoug; Mar 23, 2018 at 03:14 PM.
Junior Member
Joined: May 2012
Posts: 17
Likes: 3
From: DE
2005 E320 AWD Wagon
i did it!

MBWorld Fanatic!
Joined: Mar 2006
Posts: 3,254
Likes: 15
From: Louisiana
03 E500 and Corvette
Thanks for the info homeofstone. I already disconnected the battery before seeing your response. I probably would have not disconnected it although its kinda scary on what might the computer do while fixing the car. Anyway, I finally installed the strut and its working now. The computer didn't ask me to go to MB for major resets. All good to go now!

Newbie
Joined: Sep 2012
Posts: 1
Likes: 0
e500 2003
just finished
i thought i would add my two cents, just having done this with the help of this forum:
to release the air, if you don't want to disconnect the battery 10 times, i second the 5V trick. you may be wondering where can i get 5V--i connected 4 AAA batteries in series (one after the other, ends up being 6V but seemed to work), taped them up, hooked a wire to each end, and touched the two bottom plugs on the top connector--it started hissing. i let it hiss until the hissing sound got weaker. then i set it vertically on the ground, and basically sat on it to let the thing compress. then i tied a tyne to keep it from expanding, and it was compressed plenty to go in place. i'm hoping nothing happens to the top seal as the other poster mentioned. so far it seems to be intact.
to release the air, if you don't want to disconnect the battery 10 times, i second the 5V trick. you may be wondering where can i get 5V--i connected 4 AAA batteries in series (one after the other, ends up being 6V but seemed to work), taped them up, hooked a wire to each end, and touched the two bottom plugs on the top connector--it started hissing. i let it hiss until the hissing sound got weaker. then i set it vertically on the ground, and basically sat on it to let the thing compress. then i tied a tyne to keep it from expanding, and it was compressed plenty to go in place. i'm hoping nothing happens to the top seal as the other poster mentioned. so far it seems to be intact.

Member
Joined: Dec 2011
Posts: 109
Likes: 0
From: Toronto
CL55, S550, 450SL
I just recently replaced a front strut on my mothers w220 w/airmatic and before doing so, I read this thread. I got the top 3 nuts on but I couldn't get the strut on the lower control arm (it was about two inches too long), so I jacked up the other side of the car so the front was level and by doing this, I was able to get the strut on easily with no force. I hope this helps you DIY's like me without a hoist .
.
Last edited by MagCL; Jun 21, 2013 at 10:50 PM.
MBWorld Fanatic!
Joined: Oct 2011
Posts: 1,084
Likes: 68
From: Athens, GA USA
2011 E63, 2011 Hyundai Genesis 4.6 v8, 2013 GMC Denali XL, 1965 Ford Mustang, 2005 Merc. E500
I just recently replaced a front strut on my mothers w220 w/airmatic and before doing so, I read this thread. I got the top 3 nuts on but I couldn't get the strut on the lower control arm (it was about two inches too long), so I jacked up the other side of the car so the front was level and by doing this, I was able to get the strut on easily with no force. I hope this helps you DIY's like me without a hoist .
.
Newbie
Joined: Mar 2013
Posts: 1
Likes: 0
From: Atlanta, GA
Ml320, E55, 911
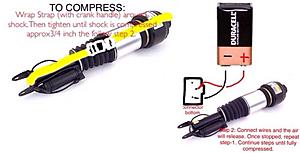
Method to Compress Airmatic (Arnott) Shock
I actually used this method to easily install both front struts on E55 this past weekend. Also, Arnott has how-to videos posted on You-Tube.

Last edited by witman77; Mar 3, 2014 at 06:13 PM.

Junior Member
Joined: Sep 2013
Posts: 15
Likes: 0
04 E500 Wagon
Just did a front air shock on my 04 E500 w/4motion. I understand why Arnott would send them filled... if there's no air in it when it arrives, you know it's defective. But still, I had no idea how I was going to install it before I came across this thread. Definitely harder than the rears, but still doable with basic tools.
Darn upper control arm ball joint wouldn't separate... had to borrow a tool for it and ripped the boot of course.
I can't think of any tricks I found - it takes some muscle to get the old one out. I used heavy zip ties to keep it compressed.
Good luck, and thanks for the battery tip! Worked for me too! I used a 9v battery.
Junior Member
Joined: Jan 2014
Posts: 25
Likes: 0
2005 E-500 4matic sedan
Arnott air strut
I have a question for witman77, when you used the strap did you go over top of the plastic part at the top of the shock? I want to do this but don't want to damage a 500.00 shock without asking first. I realize this is an old post hope your still around to help. Thanks in advance
Junior Member
Joined: Jan 2014
Posts: 25
Likes: 0
2005 E-500 4matic sedan
Arnott air strut
Help, I have tried over and over to collapse the strut using the 5v trick and its not working? I need some more info. Does the 5v have to be applied to the plug on top of the strut, or the plug on the pigtail on the bottom?
MBWorld Fanatic!
Joined: Jan 2010
Posts: 1,057
Likes: 19
From: SWFL
E55, E320 CDI , CLA250, Jag XJ Supersport
Then just hit the raise/lower button a few times. It will release the air a little at a time. Just don't let too much air out.
Junior Member
Joined: Jan 2014
Posts: 25
Likes: 0
2005 E-500 4matic sedan
Thanks for the response Bagman, but I need to collapse the shock enough to get it installed over the axle. The bad shock was hard enough getting out and I think I had it compressed all the way. ???


