When you click on links to various merchants on this site and make a purchase, this can result in this site earning a commission. Affiliate programs and affiliations include, but are not limited to, the eBay Partner Network.
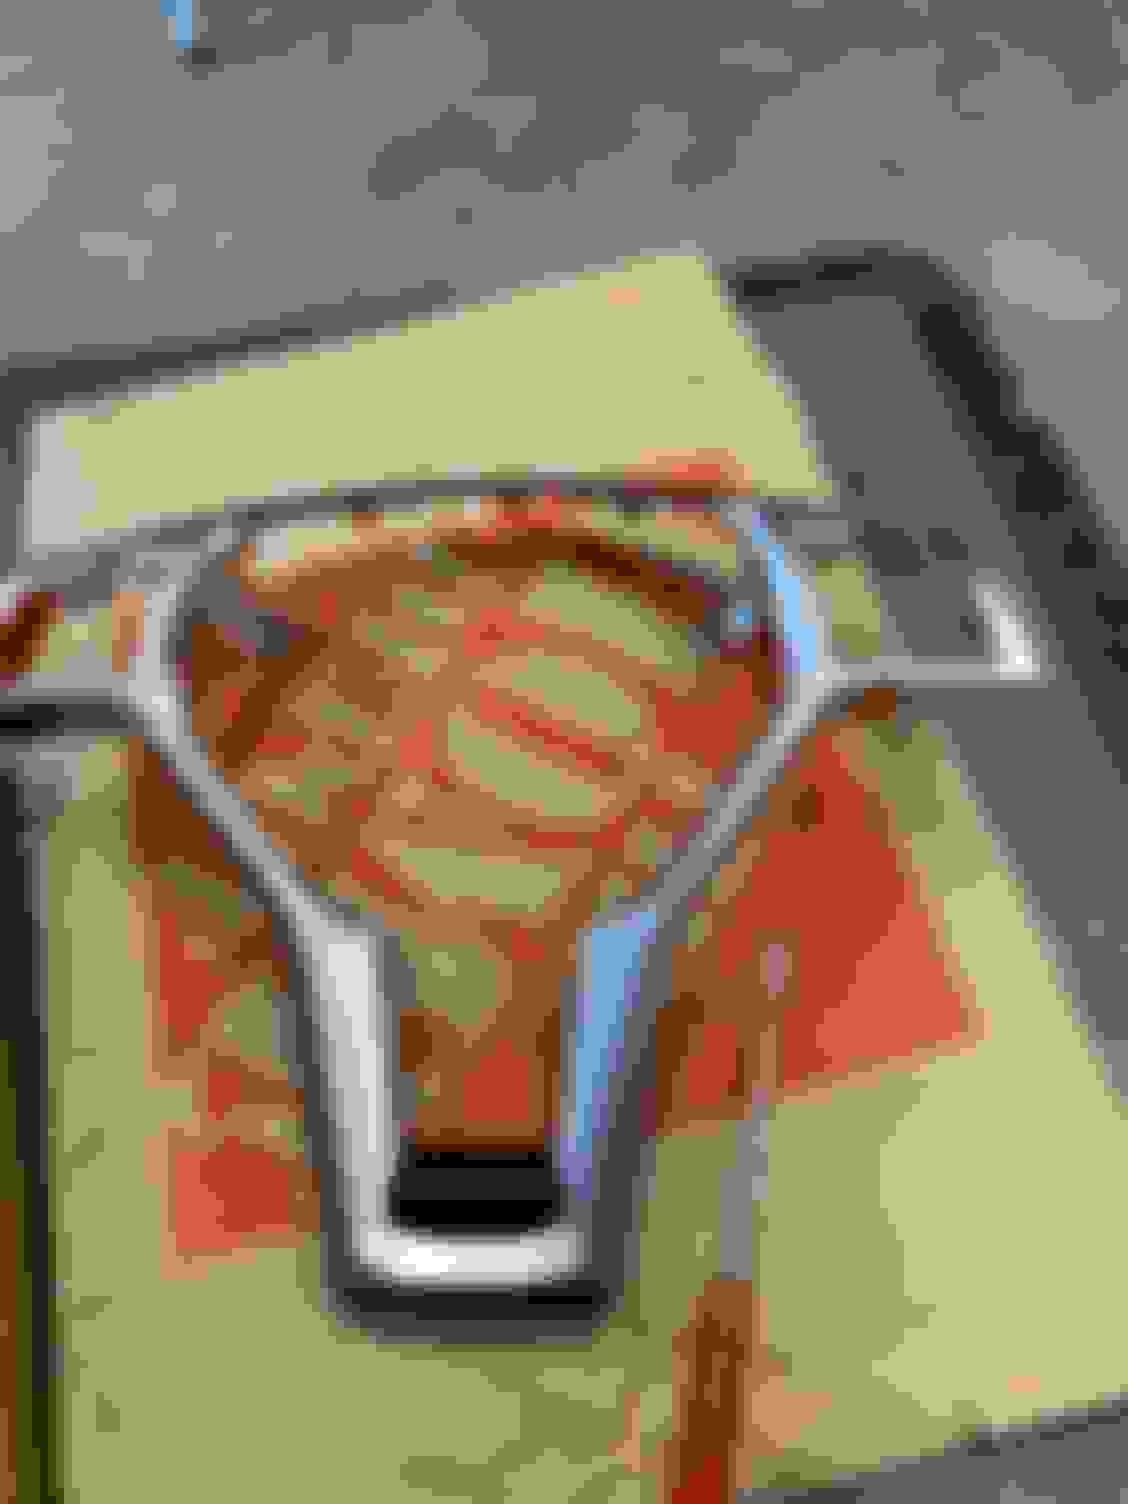
Razor Sharp steering wheel. The plating started to peel, and produced a 1/8" sharp edge on the plated corner decoration of the wheel. OUCH !
It's a 2010 E350 4-Matic. Any chance of dealer coverage? After removing the band aid that protected our hands, the edge stood up 1/8" best seen in the left hand close up, although visible in the right hand shot as well.
I removed the sharp edge, so now it's safe. This sort of issue is disappointing.
W212 M276 DELA 30 ; W211 M113k, W126 M117, W126 OM617, W211 OM642 ; R107 M117 X2, Sierra 1500 LZ0
Fortunately this piece can replaced without replacing the whole steering wheel. However, a bunch of disassembly is necessary and may cost a lot in labor. Might just want to use some glue to stick it down.
Razor Sharp steering wheel. The plating started to peel, and produced a 1/8" sharp edge on the plated corner decoration of the wheel. OUCH !
It's a 2010 E350 4-Matic. Any chance of dealer coverage? After removing the band aid that protected our hands, the edge stood up 1/8" best seen in the left hand close up, although visible in the right hand shot as well.
I removed the sharp edge, so now it's safe. This sort of issue is disappointing.
Are any of your interior buttons melting away? my high traffic buttons have rubbed away, I was going to get replacements from amazon/ aliexpress.
This happened to me and I changed mine. The dealer won't cover as my E-Class was still under CPO and they denied coverage under " wear and tear" item. Should be a recall as the trim bubbles and cracks from the heat in the cabin overtime.
The part number is MERCEDES-BENZ 09946400139107. There are many aftermarket ones which come in gloss black, carbon fiber, etc available on eBay. Got mine via Amazon.
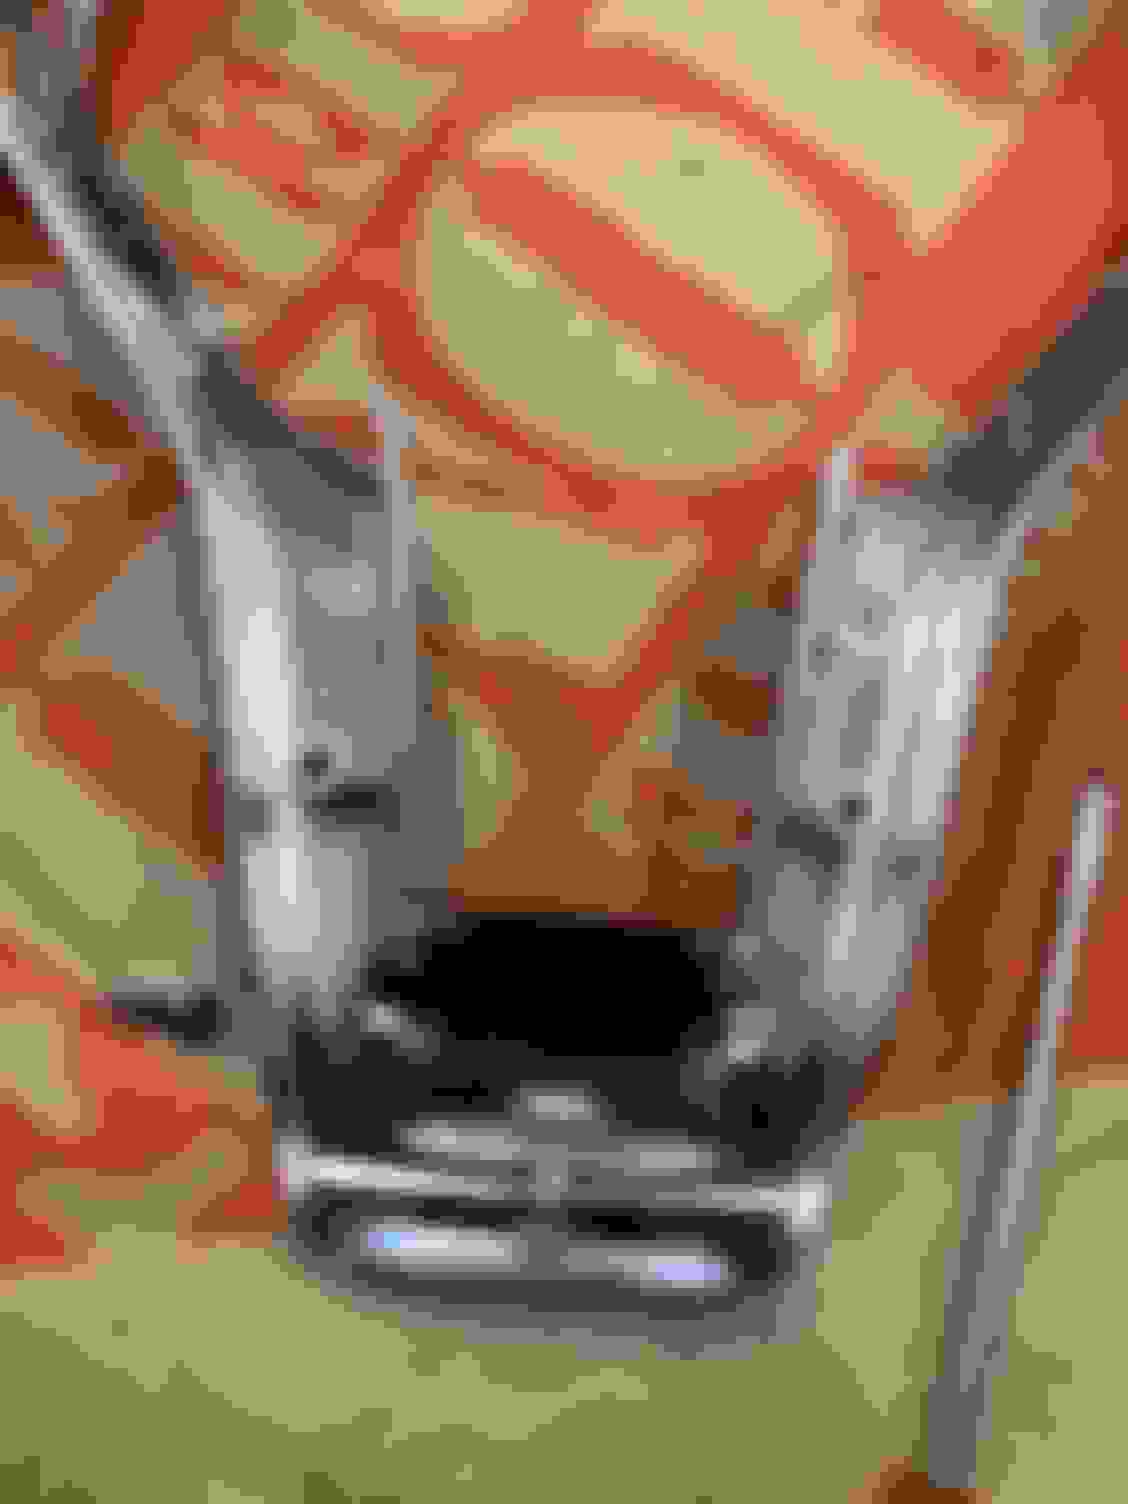
To change the trim, you will need to remove the airbag. You MUST disconnect the battery and allow the air bag is discharge for 10-15 minutes before removing it to avoid an SRS warning light. Youtube has videos on how to remove the airbag, basically poking two holes on the back of the steering wheel to toggle two latches, one on each side of the wheel which allow the airbag assembly to be removed. Try to keep the hole you poke as small as possible. Another bad Mercedes design.
Once unlatched, hold the airbag assembly forward and disconnect the harnesses. Place it carefully somewhere safe, so it�s not damaged. The trim piece can be unscrewed from the from front two screws being the air bag, and two screws accessible from behind the steering wheel. (See pics below).
Unclip the steering wheel controls and unscrew from the trim piece. Exchange the steering wheel controls to the new trim and start to install the new trim on the wheel. Make sure that the wires don�t cross into the airbag space and be super careful that the lower screw prongs on the steering wheel align right with the screws so they don�t snap off. (See Below).
Once everything is screwed and the trim piece is installed, plug in the airbag. All the plugs are color and shape matched. The airbag clips in, you�ll hear each side engage. Reconnect the car battery, start the car with the doors closed. Let it run for 5 mins and test steering wheel buttons to confirm functionality. I hope this helps.
Use a long small screw driver to access the airbag prongs. Additionally, the trim piece is help in by two front screws, accessible being the airbag and two back screws accessible behind the steering wheel. Be carful with these two prongs. Make sure the screw lines up and not to over screw when installing the trim on the wheel. I broke one off which required me to plastic epoxy it back together and pray. It held up extremely well but would be better to avoid my struggle.
Small hole to access the airbag prong clip. You'll feel an indent guiding you where to stab. Horrible design, since once its made, you can really repair without replacing the back cover. I have a some electrical tape to cover it. Super tacky but beats getting slashed while driving.
This happened to me and I changed mine. The dealer won't cover as my E-Class was still under CPO and they denied coverage under " wear and tear" item. Should be a recall as the trim bubbles and cracks from the heat in the cabin overtime.
The part number is MERCEDES-BENZ 09946400139107. There are many aftermarket ones which come in gloss black, carbon fiber, etc available on eBay. Got mine via Amazon.
To change the trim, you will need to remove the airbag. You MUST disconnect the battery and allow the air bag is discharge for 10-15 minutes before removing it to avoid an SRS warning light. Youtube has videos on how to remove the airbag, basically poking two holes on the back of the steering wheel to toggle two latches, one on each side of the wheel which allow the airbag assembly to be removed. Try to keep the hole you poke as small as possible. Another bad Mercedes design.
Once unlatched, hold the airbag assembly forward and disconnect the harnesses. Place it carefully somewhere safe, so it�s not damaged. The trim piece can be unscrewed from the from front two screws being the air bag, and two screws accessible from behind the steering wheel. (See pics below).
Unclip the steering wheel controls and unscrew from the trim piece. Exchange the steering wheel controls to the new trim and start to install the new trim on the wheel. Make sure that the wires don�t cross into the airbag space and be super careful that the lower screw prongs on the steering wheel align right with the screws so they don�t snap off. (See Below).
Once everything is screwed and the trim piece is installed, plug in the airbag. All the plugs are color and shape matched. The airbag clips in, you�ll hear each side engage. Reconnect the car battery, start the car with the doors closed. Let it run for 5 mins and test steering wheel buttons to confirm functionality. I hope this helps.
Use a long small screw driver to access the airbag prongs. Additionally, the trim piece is help in by two front screws, accessible being the airbag and two back screws accessible behind the steering wheel. Be carful with these two prongs. Make sure the screw lines up and not to over screw when installing the trim on the wheel. I broke one off which required me to plastic epoxy it back together and pray. It held up extremely well but would be better to avoid my struggle.
Small hole to access the airbag prong clip. You'll feel an indent guiding you where to stab. Horrible design, since once its made, you can really repair without replacing the back cover. I have a some electrical tape to cover it. Super tacky but beats getting slashed while driving.
Awsome help!
Last edited by CaliBenzDriver; Oct 5, 2022 at 09:13 PM.
Mercedes SLR McLaren 722 S Is Extremely Rare Example Modified by McLaren
Slideshow: A one-of-one U.S.-spec Mercedes-Benz SLR McLaren Roadster became even rarer after a factory-backed transformation at McLaren's headquarters.