


Senior Member
I thought I told you about those, just set the bumper on the ground with wires connected it saves time
Hi Jimmy, no you don't toll me about that... but I appreciate that you help me with couple pictures showing where to connect the wiring harness... every 2cnts. help !
12) finally, you are almost in the middle of this project... now the bumper is free, no more bolts, make sure you have a towel or something under the bumper before you pull it out, if you get the bathroom towel make sure to work fast before your wife find out that you are using it, not to mention that you start this project with a nice shirt + new jeans... as always "why you don't change your clothes before do a dirty work... yeah yeah... this sound familiar?
Ok I use a bubble wrap to protect the bumper, what work for me is I pull each corner first, then I stand in the middle, pull slowly but firm, bumper come off, if you have parktronic you don't need to disconnect... check pic.
I circle in red where the bumper bolts are, (the last one's I remove) you may have a better idea know, bolts are attach to the bumper, what you remove from inside are the nuts.
Ok here is when you start to realize... if you purchase aftermarket hitch, this one will be attach where the blue rectangles are, you attach the hitch right there... your done, you will pull your trailer or boat from the collision bar brackets... I am not a mechanic but my common sense point to a no no (I maybe wrong) but if you planning just put a hitch bike carrier, a nice hitch cover of your favorite team or propeller that turn when you drive or one of those luggage hitch carrier do it.

13) At this point, this is the reason I like to do some DIY projects, I baby my cars, see how dirty is, well, grab a rag, clean all the area, you think if you pay a shop to do it they will clean everything really good... No, I don't think so, took me about 30 minutes to clean everything, use a brush to clean the bumper (rear side, the one is facing the SUV) if you have air compressor is better... don't use water, remember about the Parktronic sensors, then clean the rear of your GL.
14) After this process, I disconnect the parktronic from each sensor to remove the bumper, clean up a the area, let the harness hang from the GL.
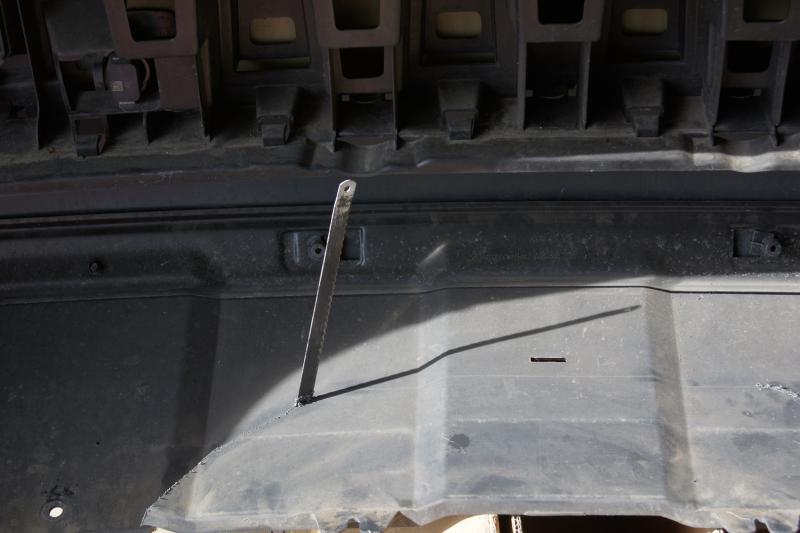
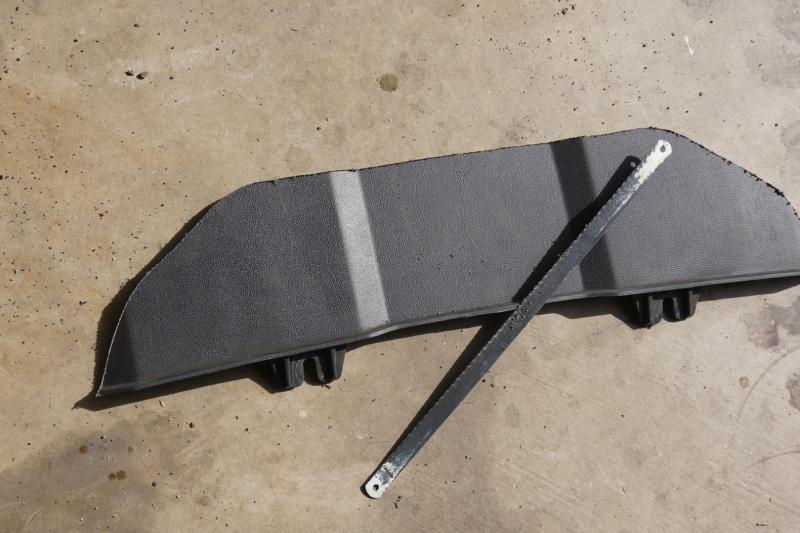
15) The reason I remove the bumper is to work better with the lower balance, I read on this forum that lower balance have a line you can cut, it is true !! you don't need to purchase a hitch lower balance option... to make this cut I have a different options, including a dremel, electric shears, a kitchen "cutco" set of knifes (my wife don't know this was an option) a grinder, air cutter, a hatch, a machete, a cardboard knife, a swiss army knife. First I start with a cardboard knife, I am planning to follow the line with very patience till make a fine clean cut... well after 10 seconds I have a cut in my finger !! *(&#@% after left blood everywhere.... I grab a $2.00 hand saw blade.... guess what? work like this blade was made for this purpose... first picture will show in red where is the line, green circle will show a drop of sweat to show how hard I work !!
14) After this process, I disconnect the parktronic from each sensor to remove the bumper, clean up a the area, let the harness hang from the GL.
15) The reason I remove the bumper is to work better with the lower balance, I read on this forum that lower balance have a line you can cut, it is true !! you don't need to purchase a hitch lower balance option... to make this cut I have a different options, including a dremel, electric shears, a kitchen "cutco" set of knifes (my wife don't know this was an option) a grinder, air cutter, a hatch, a machete, a cardboard knife, a swiss army knife. First I start with a cardboard knife, I am planning to follow the line with very patience till make a fine clean cut... well after 10 seconds I have a cut in my finger !! *(&#@% after left blood everywhere.... I grab a $2.00 hand saw blade.... guess what? work like this blade was made for this purpose... first picture will show in red where is the line, green circle will show a drop of sweat to show how hard I work !!

16) Time to remove the rear bumper support crash bar reinforcement, each support have 4 bolts, 8 total. you can reach the lower nuts just by looking under the car, fallow the brackets.... you will see two bolts on each side, remove all four.
To remove the upper bolts, remove the spare tire, also remove the spare tire liner, to remove the liner you need to remove the rear door trim, trim have 2 35T bolt, then you have to pull the trim firmly, trim have some plastic rivets.
Look the edge inside, follow the bracket you will see 2 black caps on each side, remove caps with a channel lock or something similar, twist the caps a little bit, remove it, you will see the nuts.
On the right side remove the radio AMP, you don't need disconnect the amp, just unscrew the bracket, move the AMP to get more space to work, anyway you need to do this in order to connect the harness later. Radio AMP is located in from of the rear SAM, at the lower part.
BTW take a few minutes to polish your exhaust tips...

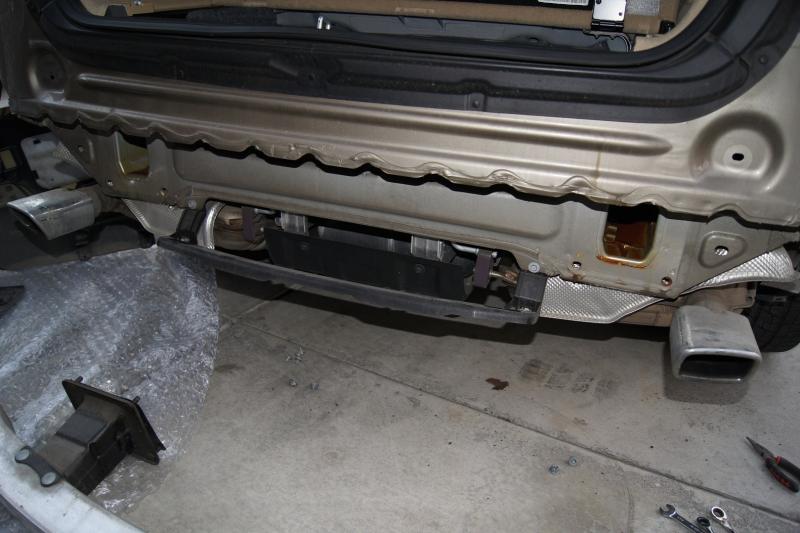
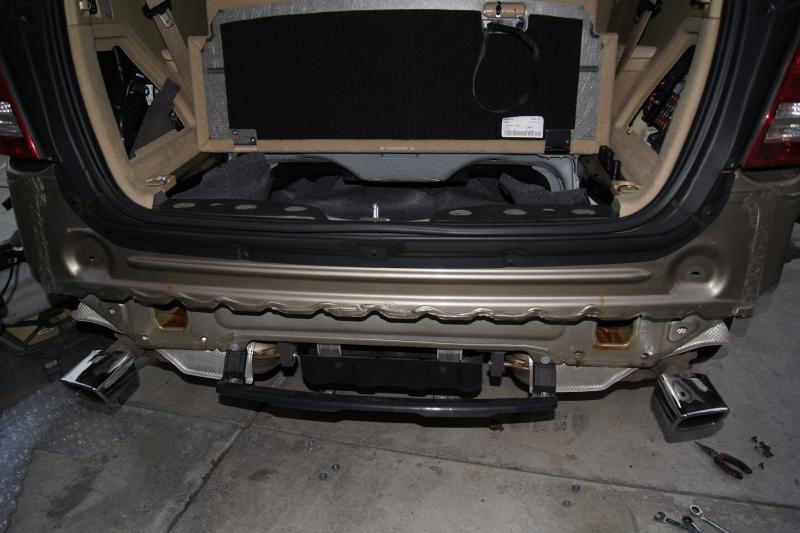
17) look where the green circles are, the stiff bars go inside about 16 inches, each bar weight about 21 pounds, they are heavy, this bars are attached to the frame by two bolts on each bar, bars are marked left and right, after you stick the bars inside of each hole you will see inside of your SUV by the spare tire on each side two holes maybe 8 - 10 inches apart, this holes is where the stiff bar bolts go, you can screw the bolts to the bars, don't tight the bolts yet.
About the red lines, you need to cut this support where the red lines are, yes, you can remove the support if you want, but the lower balance will be loose, make sure you cut passing about 3 1/2 inches from the screw hole on each side, the hitch will be in the middle, the cut is where the red lines are, you will left two small brackets after the cut, one on each side. bracket is hard plastic.
About the red lines, you need to cut this support where the red lines are, yes, you can remove the support if you want, but the lower balance will be loose, make sure you cut passing about 3 1/2 inches from the screw hole on each side, the hitch will be in the middle, the cut is where the red lines are, you will left two small brackets after the cut, one on each side. bracket is hard plastic.

Super Member
crazy thread.......thank god i opted for 550 everything stock....nice touch on the tips look spanking...
MB World Stories
The Best of Mercedes & AMG
Explore

Manual Mercedes? 6 Times Sindelfingen Let Drivers Have All The Fun
Verdad Gallardo
Mercedes SLR McLaren 722 S Is Extremely Rare Example Modified by McLaren
Verdad Gallardo
8 Classic Boxy Mercedes Designs That Have Aged Like Fine Wine
Verdad Gallardo
Flawlessly Restored Mercedes 190E Evo II Heads to Auction
Verdad Gallardo
Electric Mercedes C-Class Unveiled: 11 Things You Need to Know
Verdad Gallardo
Mercedes EQS Gets A Major Update: Everything You Need to Know
Verdad Gallardo
5 Underrated Mercedes-Benz Models That Don't Get the Love They Deserve
Verdad Gallardo
Mercedes 300D Has Pushed Well Past 1 Million Miles and It Ain't Stopping
Verdad Gallardo
10 Most Reliable Mercedes-Benz Models You Can Buy Used
Verdad Gallardo18) after you bolt and secure stiff bars from inside, about 5- 6 inches will be facing out from the frame, stiff bars have on each bar two holes facing down, holes where the hitch will be attached with provided nuts. This mean hitch will be attach by six nuts-bolts on each side
At this point you can attach the harness to the hitch, I mean attach because factory harness came with a female plastic fasteners that go in a couple pins that hitch have from factory.
After run the wiring behind the hitch, also have the hitch plug connected to the harness it's easy for me to explain where each harness plug is connected:
- Brown circle plug will be connected in trailer hitch trailer connector.
- Red circle plug will be connected in fuse box (I will write about this later)
- Yellow circle plug will be connected on rear SAM, do not be confuse about rear SAM and fuse box unit, they are different things !
- Green circle, this plug is not connected anywhere, No, is not because I don't know, is because this plug is connected to a trailer brake controller, could be an aftermarket one to control your trailer brakes, if you have a brake controller then you plug your controller here.
Grab the hitch (I know is heavy) about 60 lbs, slide the hitch in, slowly, bolts will fit exactly where the bumper crash bar brackets was, have a couple hitch nuts close to you, have the trunk open, when you stick the hitch in the holes you can just attach some of the nuts to the hitch from inside of you GL, do not tight yet, then you can install all the nuts (do not tight yet), now you can install the hitch-stiff bars bolts, two on each side, again they are located on each corner, (check picture two, I circle this bolts, picture show just one on each side but is a second bolt following the one in the picture) holes are in the bottom. I use a screw driver to line out the holes, after you place all four bolts you can tight everything...


19) Now you can have a drink !!! the hitch is installed !!! Now... wiring ...
Ok this sound difficult but it's not, like I said, I am not a mechanic, tech or nothing close, but yes, I like to work with tools (sometimes) this sound a time consuming installation but it's not, yes, took me about 6 hours but I doing this very slow, taking pics. (for you guys) with a very limited information, playing with my Son in the middle.... at the end I have a factory hitch... (forgot about this option before purchase )*&@$% things happened.
Ok this sound difficult but it's not, like I said, I am not a mechanic, tech or nothing close, but yes, I like to work with tools (sometimes) this sound a time consuming installation but it's not, yes, took me about 6 hours but I doing this very slow, taking pics. (for you guys) with a very limited information, playing with my Son in the middle.... at the end I have a factory hitch... (forgot about this option before purchase )*&@$% things happened.
20) On your right side / passenger side locate the rubber cap (as show in the picture), you need to run the wire harness true this hole, wire harness have another cap attached so you can cover the hole again, you can dispose the one you remove (show in green circle), you need to remove the "air vent" to connect the rear SAM plug to the rear SAM.

what about this... I need opinions... http://www.ebay.com/itm/Mercedes-Ben...item1c30addfe6

BlownV8
MBWorld Fanatic!
close


May 3, 2026
- Join DateAug 2003
- LocationIn my garage
- Posts:8,882
-
iTrader Positive Feedback0
-
iTrader Feedback Score(0)
- Vehicle(s) I driveE55, GLS450, GL63, GLE350
-
Likes:301
-
Liked:1,212 Times in 969 Posts
Those would look horrible on your GL.
Quote:
just kidding ... Originally Posted by BlownV8
Those would look horrible on your GL.

what about this? now I'm not kidding ...
http://www.ebay.com/itm/Mercedes-GL-...item2c6d12f36a
Junior Member
Quote:
what about this? now I'm not kidding ...
http://www.ebay.com/itm/Mercedes-GL-...item2c6d12f36a
Hey.... I would like too see how that goes.... Please post if you do that! Originally Posted by wally AMG
just kidding ... what about this? now I'm not kidding ...
http://www.ebay.com/itm/Mercedes-GL-...item2c6d12f36a
Quote:
I'm sure I will BTW is anyone have diagrams or any info how to connect / install running boards illumination kit? I mean MB diagrams? Any info will be highly appreciated !!Originally Posted by lotuni
Hey.... I would like too see how that goes.... Please post if you do that!

Junior Member
Just curious, has anyone purchased these LED DRLs for their GL?
http://www.ebay.com/itm/160986158324...84.m1438.l2649
http://www.ebay.com/itm/160986158324...84.m1438.l2649
Quote:
http://www.ebay.com/itm/160986158324...84.m1438.l2649
Don't look bad but what happened if one LED burn out, purchase a full set again? not a cheap part, also what happened if you have a corner-illumination? you may lost this future. Personally I like all factory on my GL but for who don't care maybe is a good option.Originally Posted by rtu
Just curious, has anyone purchased these LED DRLs for their GL?http://www.ebay.com/itm/160986158324...84.m1438.l2649
Super Member
Quote:
what about this? now I'm not kidding ...
http://www.ebay.com/itm/Mercedes-GL-...item2c6d12f36a
im getting this done aswell....but wanna get the side stepper painted factory colour....will post pics..Originally Posted by wally AMG
just kidding ... what about this? now I'm not kidding ...
http://www.ebay.com/itm/Mercedes-GL-...item2c6d12f36a


Quote:
")
That one I am interested in.Originally Posted by wally AMG
I mean factory ...
Keep close track of the parts, costs, and steps.
http://www.ebay.com/itm/Mercedes-Benz-Illuminated-LED-Star-GL-X166-GL350-GL450-GL550-GL63-2013-13-/121080875665?pt=Motors_Car_Truck_Parts_Accessories&vxp=mtr&hash=item1c30fb8a91
Some people like it, some people hate it... some said "look like Rudolf reindeer car" "look like Christmas decoration" but the true is the illuminated star is out, I don't care about some people don't like the idea, I like it.. I may don't like if the illuminated star is "on" all the time, but I like the idea when you press your remote control at night .... boom ... the star is there for a few minutes... showing you that your Mercedes is waiting for you,.. nop, I don't have plans to show people I have a Mercedes (I already know I have one), I will do it because I like it... as always, I will try to post some info about installation...
Some people like it, some people hate it... some said "look like Rudolf reindeer car" "look like Christmas decoration" but the true is the illuminated star is out, I don't care about some people don't like the idea, I like it.. I may don't like if the illuminated star is "on" all the time, but I like the idea when you press your remote control at night .... boom ... the star is there for a few minutes... showing you that your Mercedes is waiting for you,.. nop, I don't have plans to show people I have a Mercedes (I already know I have one), I will do it because I like it... as always, I will try to post some info about installation...
Super Member
Quote:
Some people like it, some people hate it... some said "look like Rudolf reindeer car" "look like Christmas decoration" but the true is the illuminated star is out, I don't care about some people don't like the idea, I like it.. I may don't like if the illuminated star is "on" all the time, but I like the idea when you press your remote control at night .... boom ... the star is there for a few minutes... showing you that your Mercedes is waiting for you,.. nop, I don't have plans to show people I have a Mercedes (I already know I have one), I will do it because I like it... as always, I will try to post some info about installation...
lucky you not possible on 550...Originally Posted by wally AMG
Mercedes Benz Illuminated LED Star GL X166 GL350 GL450 GL550 GL63 2013 13 | eBaySome people like it, some people hate it... some said "look like Rudolf reindeer car" "look like Christmas decoration" but the true is the illuminated star is out, I don't care about some people don't like the idea, I like it.. I may don't like if the illuminated star is "on" all the time, but I like the idea when you press your remote control at night .... boom ... the star is there for a few minutes... showing you that your Mercedes is waiting for you,.. nop, I don't have plans to show people I have a Mercedes (I already know I have one), I will do it because I like it... as always, I will try to post some info about installation...
Quote:
Some people like it, some people hate it... some said "look like Rudolf reindeer car" "look like Christmas decoration" but the true is the illuminated star is out, I don't care about some people don't like the idea, I like it.. I may don't like if the illuminated star is "on" all the time, but I like the idea when you press your remote control at night .... boom ... the star is there for a few minutes... showing you that your Mercedes is waiting for you,.. nop, I don't have plans to show people I have a Mercedes (I already know I have one), I will do it because I like it... as always, I will try to post some info about installation...
Originally Posted by wally AMG
Mercedes Benz Illuminated LED Star GL X166 GL350 GL450 GL550 GL63 2013 13 | eBaySome people like it, some people hate it... some said "look like Rudolf reindeer car" "look like Christmas decoration" but the true is the illuminated star is out, I don't care about some people don't like the idea, I like it.. I may don't like if the illuminated star is "on" all the time, but I like the idea when you press your remote control at night .... boom ... the star is there for a few minutes... showing you that your Mercedes is waiting for you,.. nop, I don't have plans to show people I have a Mercedes (I already know I have one), I will do it because I like it... as always, I will try to post some info about installation...
Darn, I was hoping for Distronic


