When you click on links to various merchants on this site and make a purchase, this can result in this site earning a commission. Affiliate programs and affiliations include, but are not limited to, the eBay Partner Network.
I turned 35K on my '18 GLE350 today. I did mount 20" AMG wheels and H&R springs that lowered it about 2 inches. I've changed the oil more frequently and have it serviced every 5,000 miles. Virtually no problems, just regular maintenance and a map update. It had the **** halogens and I replaced them with LED's.
For those following this topic, has anyone found air shocks as a replacement for vehicles like mine without the factory airmatic suspension? My searches so far have only found a direct replacement for vehicles with factory installed systems.
Sorry, it didn't understand you wanted to switch to airmatic. Strutmaster only makes conversion kits to change out airmatic. It seems your best bet is a salvage yard but I would think you have to re-program the ECU not to mention the cost. There are air lines to run as well as a pump, control module, and switching. If you go ahead with it, post photos.
Visually the rear brake pads looked close to needing replacement, so I ordered all the parts online from Mercedes-Benz of Naperville. Good website, good prices and one day standard shipping from Chicago to central Indiana. All good. My local dealer prices were 50% higher than MB of Naperville, and they didn't have all of the parts in stock. My local dealer is clueless about nearly everything. They have recently changed ownership, and I hope for improvement.
I pulled the right rear wheel off, removed the caliper and the outer brake pad. Upon closer inspection, the pad looked to have more life in it than I originally thought. I measured 12mm total brake pad + backing plate thickness. Subtract 6mm for backing plate thickness and 2mm for minimum pad threshold left me with 4mm usable pad life. Using MB's most conservative wear factor of 4k km per mm, this gives 16k km or 10k miles remaining pad life.
So I decided to keep the old pads and rotors in place for another couple of months, and change them at the end of the summer/early fall. I have 63k miles on the vehicle, and if I get 70k or more miles from the rear brakes, I will be happy.
Best I have ever done is 120k miles on factory brakes on a 2010 VW Touareg. That car was a driving machine. My driving style is to use the brakes as infrequently as possible and to use engine braking whenever possible. I avoid allowing the base cruise control (non-Distronic) to decelerate the vehicle, because the rear brakes are used for this function. This unnecessarily consumes brake pads in my view. I have no other assist systems on the vehicle that consume brake pads, for example active lane keeping assist.
p.s. A Lile 24300 Speedy Brake Pad Spreader works perfectly to compress the caliper piston. Also, to remove the caliper slide pin screw, a thin open end wrench is needed, because the slide pin holding hex feature has a flange that prevents the use of a standard thickness open end wrench.
Like I said, zero problems and mine is low mileage. I had a '17 that I really liked but that GLE43 was cursed. No mechanical issues but I caught the front bumper cover on a pole sticking out of the ground at a park, backed into a guy at Mickey D's, and then scraped the side of the garage. I haven't scratched a car since 1985. I loved that car but like a said, it was cursed.
Aston Martin Vantage, GLE 43 AMG, Volvo XC60, BMW X1 35i, Ram 1500, BMW Z4 35i
Originally Posted by Bill Baird
Like I said, zero problems and mine is low mileage. I had a '17 that I really liked but that GLE43 was cursed. No mechanical issues but I caught the front bumper cover on a pole sticking out of the ground at a park, backed into a guy at Mickey D's, and then scraped the side of the garage. I haven't scratched a car since 1985. I loved that car but like a said, it was cursed.
sounds more like the driver was cursed! 😉. We love our 2017 GLE 43, although thinking about giving it my daughter to replace her BWM X1.
Trying once again to convince my wife to getting a AMG E class Wagon
Today I replaced the wood trim panel on the front right door. It cracked, likely from being pushed on. This is a common failure for W166 trim, maybe other MB models as well. The left (driver's) front door trim was cracked when I bought my GLE and it was replaced under warranty. My vehicle now has 67k miles so I replaced it myself. 100% successful repair.
Parts:
- wood trim panel (switch bezel). My vehicle is anthracite poplar with ambient lighting and no passenger seat memory. $204 in stock at a dealer 2 hours away. I asked for and received 20% off the original price of over $240. The prices for this part are all over the map, with 100% variation between sellers. Be sure to call around. One dealer wanted over $300 and didn't have it in stock. Part no. A166720440264
- extra orange door panel trim clips in case of breakage. They are around $2, cheap insurance. Part no. A0009918698
- recommended (I wasn't able to find it in stock, so didn't buy one): Part no. A0009917940 square expansion rivet
Tools:
- Leatherman multi tool or needle nose pliers
- Torx bits or drivers
- long trim wedge tool
- Mercedes trim pullers (metal rods with black T-handles)
- fine flat blade screwdriver
- very thin flat knife blade
Time: it took me about 2 hours. The dealer books less than one hour.
The WIS instructions and videos are good. Some pointers:
- working with plastic trim requires finesse and patience. It's very easy to break a plastic part, making the project more expensive and time consuming.
- using the right tools helps avoid breaking plastic parts.
- buy extra trim clips. I purchased two (that's all the dealer had) and I broke one during disassembly. I recommend buying 3 or 4 extra trim clips, they are cheap insurance.
- the square rivet is easy to remove, hard to pull the small inner pin out for reassembly. I don't know how I eventually got the two pieces separate, but I did. This is a job stopper so be sure you know how this fastener works. Its typical Mercedes over complication.
- don't overtorque any fasteners, all except for the main door panel screw are threaded into plastic. WIS doesn't specify torque values, so torque the screws "just enough" but not "too much"
- removing the buttons from the old trim panel requires careful work with a thin flat screwdriver or thin knife. This is probably the trickiest steps in the project.
Mercedes trim pullers and cover panel over the main door panel screw. The metal clips on this part are firmly attached and require alot of pulling force.
Main door panel screw, with cover removed. The two oblong holes are where the metal clips attach.
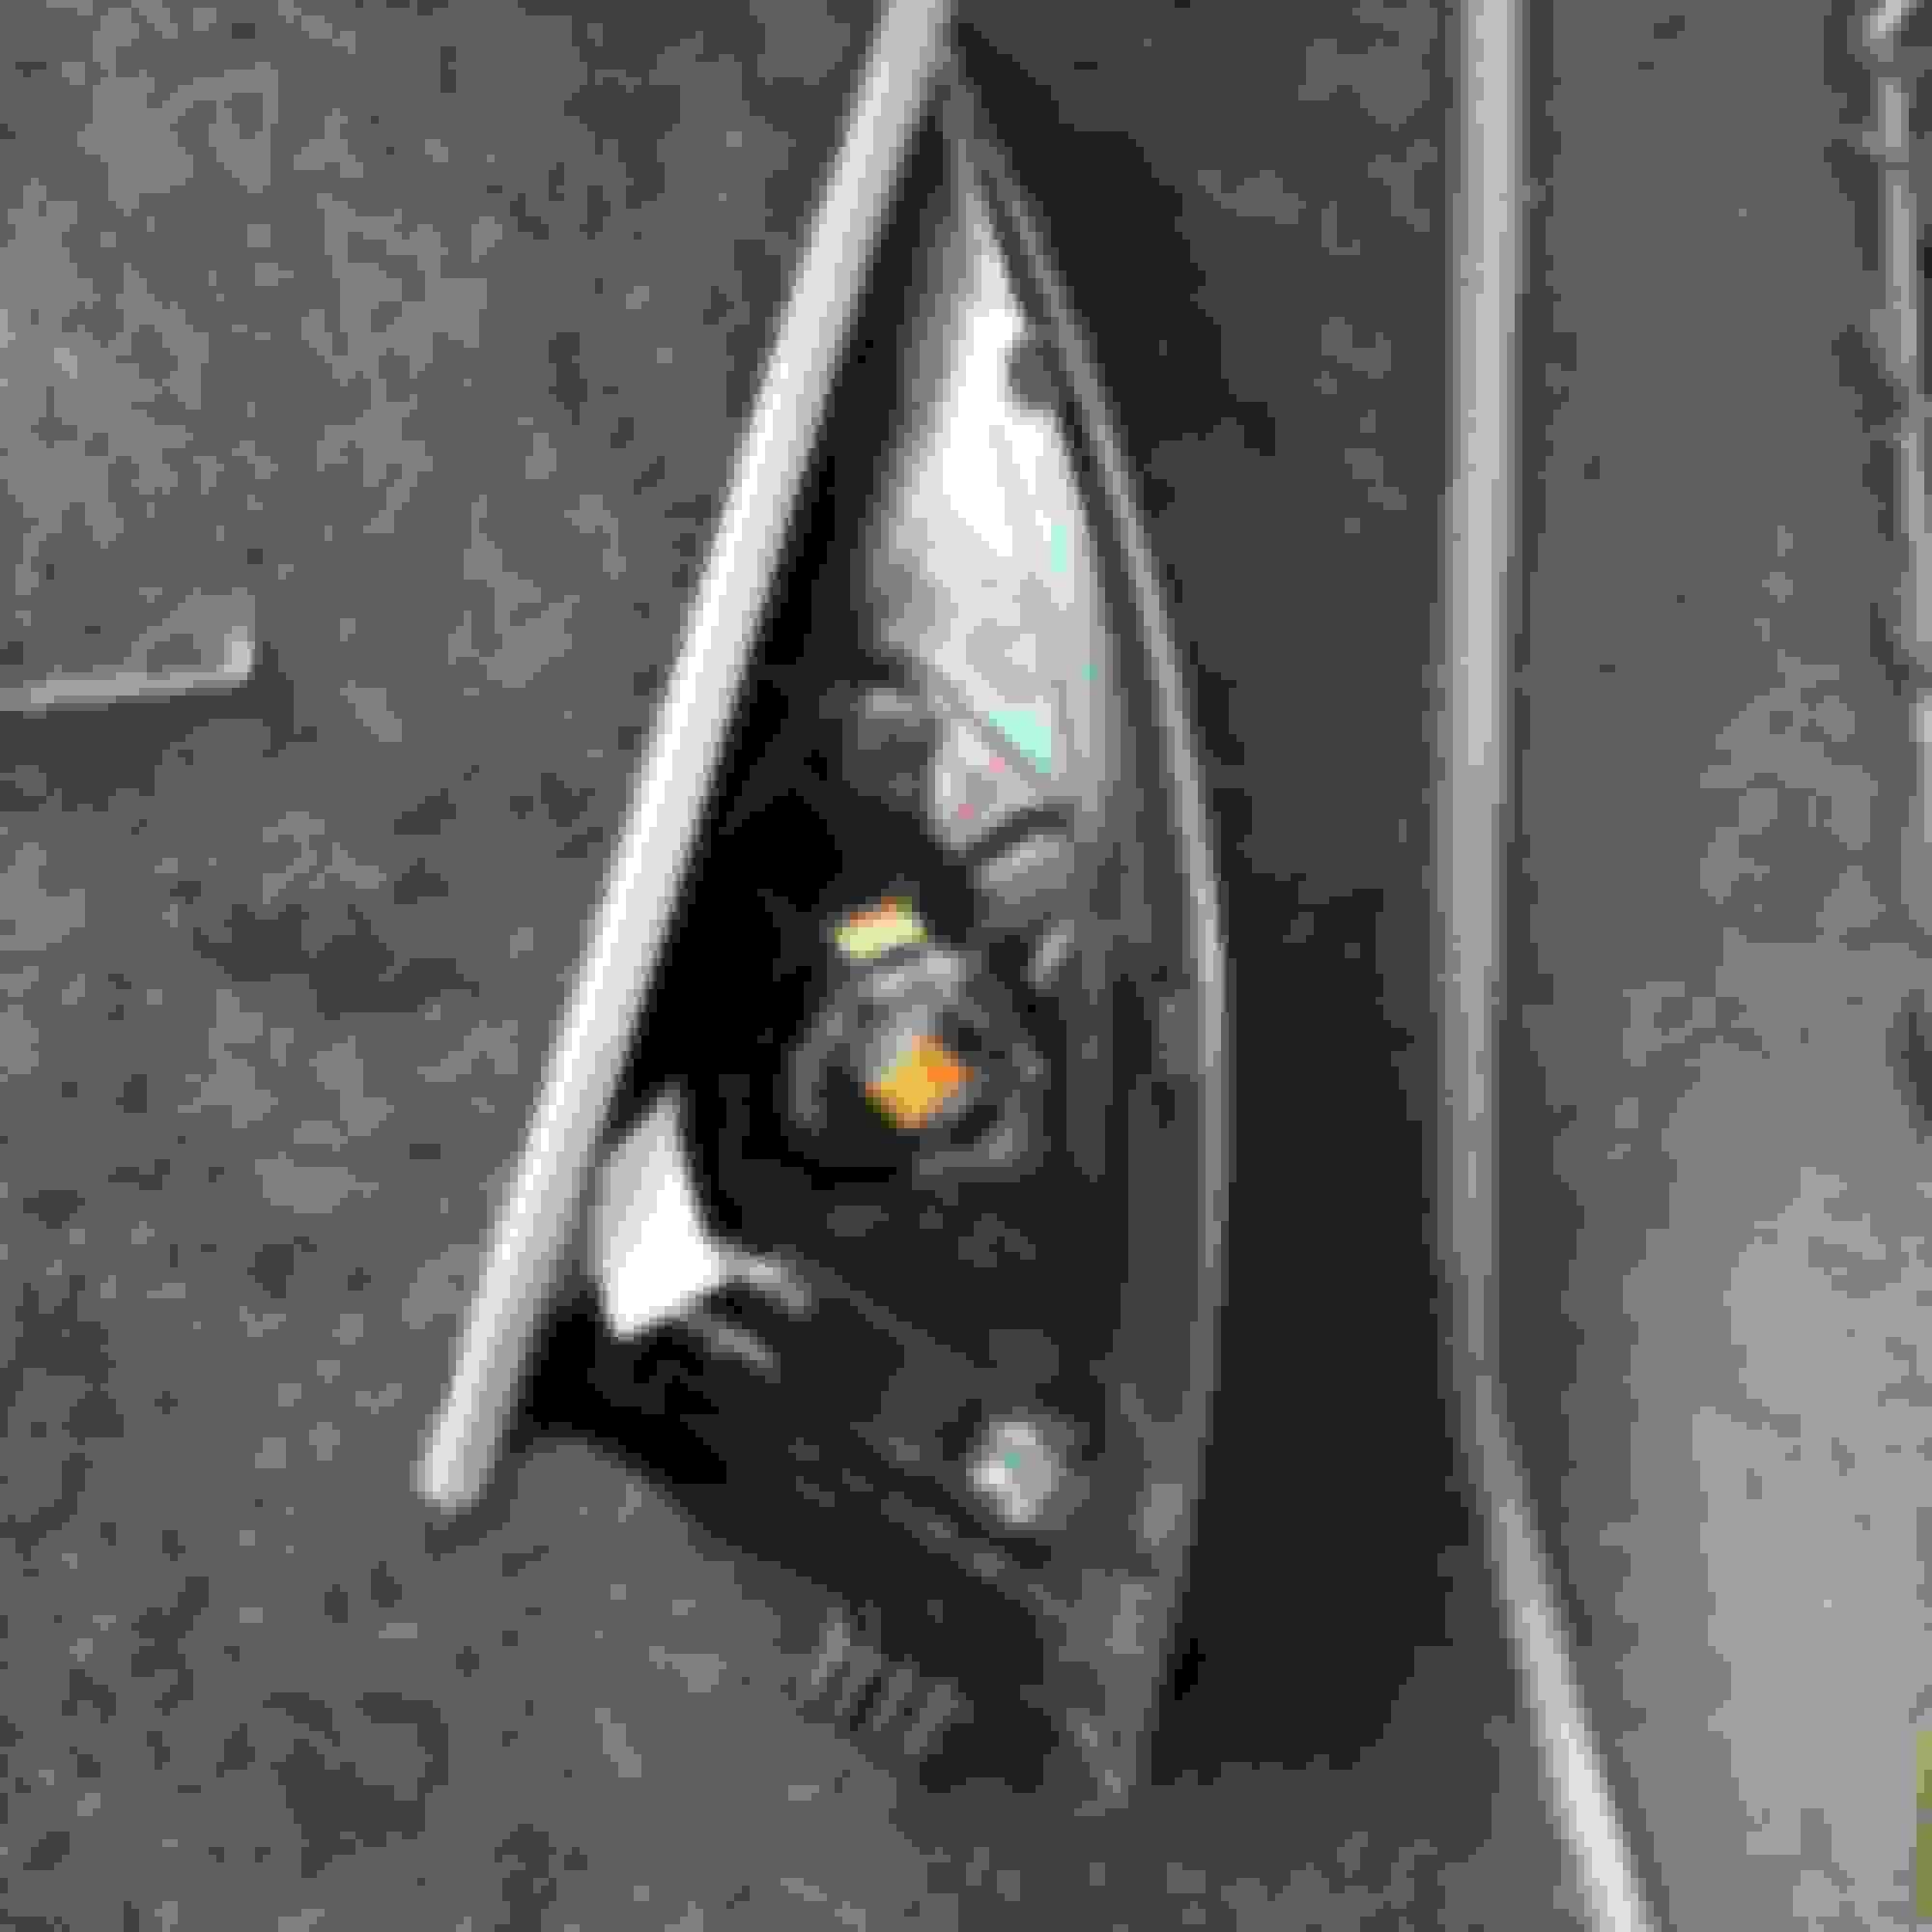
Door sail where the speaker is attached. I have the harmon kardan system. This is tricky because the speaker is clipped into the perimeter trim, and the perimeter trim is clipped into the metal window surround. The parts are rigidly connected in this area, so prying on plastic needs a careful hand.
Door speaker showing 4 clipe (3 on curved edge, 1 on the bottom) and the straight edge which grabs the perimeter trim along the entire length of the speaker.
Another view showing the 2 rectangular holes where the window perimeter trim snaps in.
Showing the plastic features on the window perimeter trim where the speaker attaches.
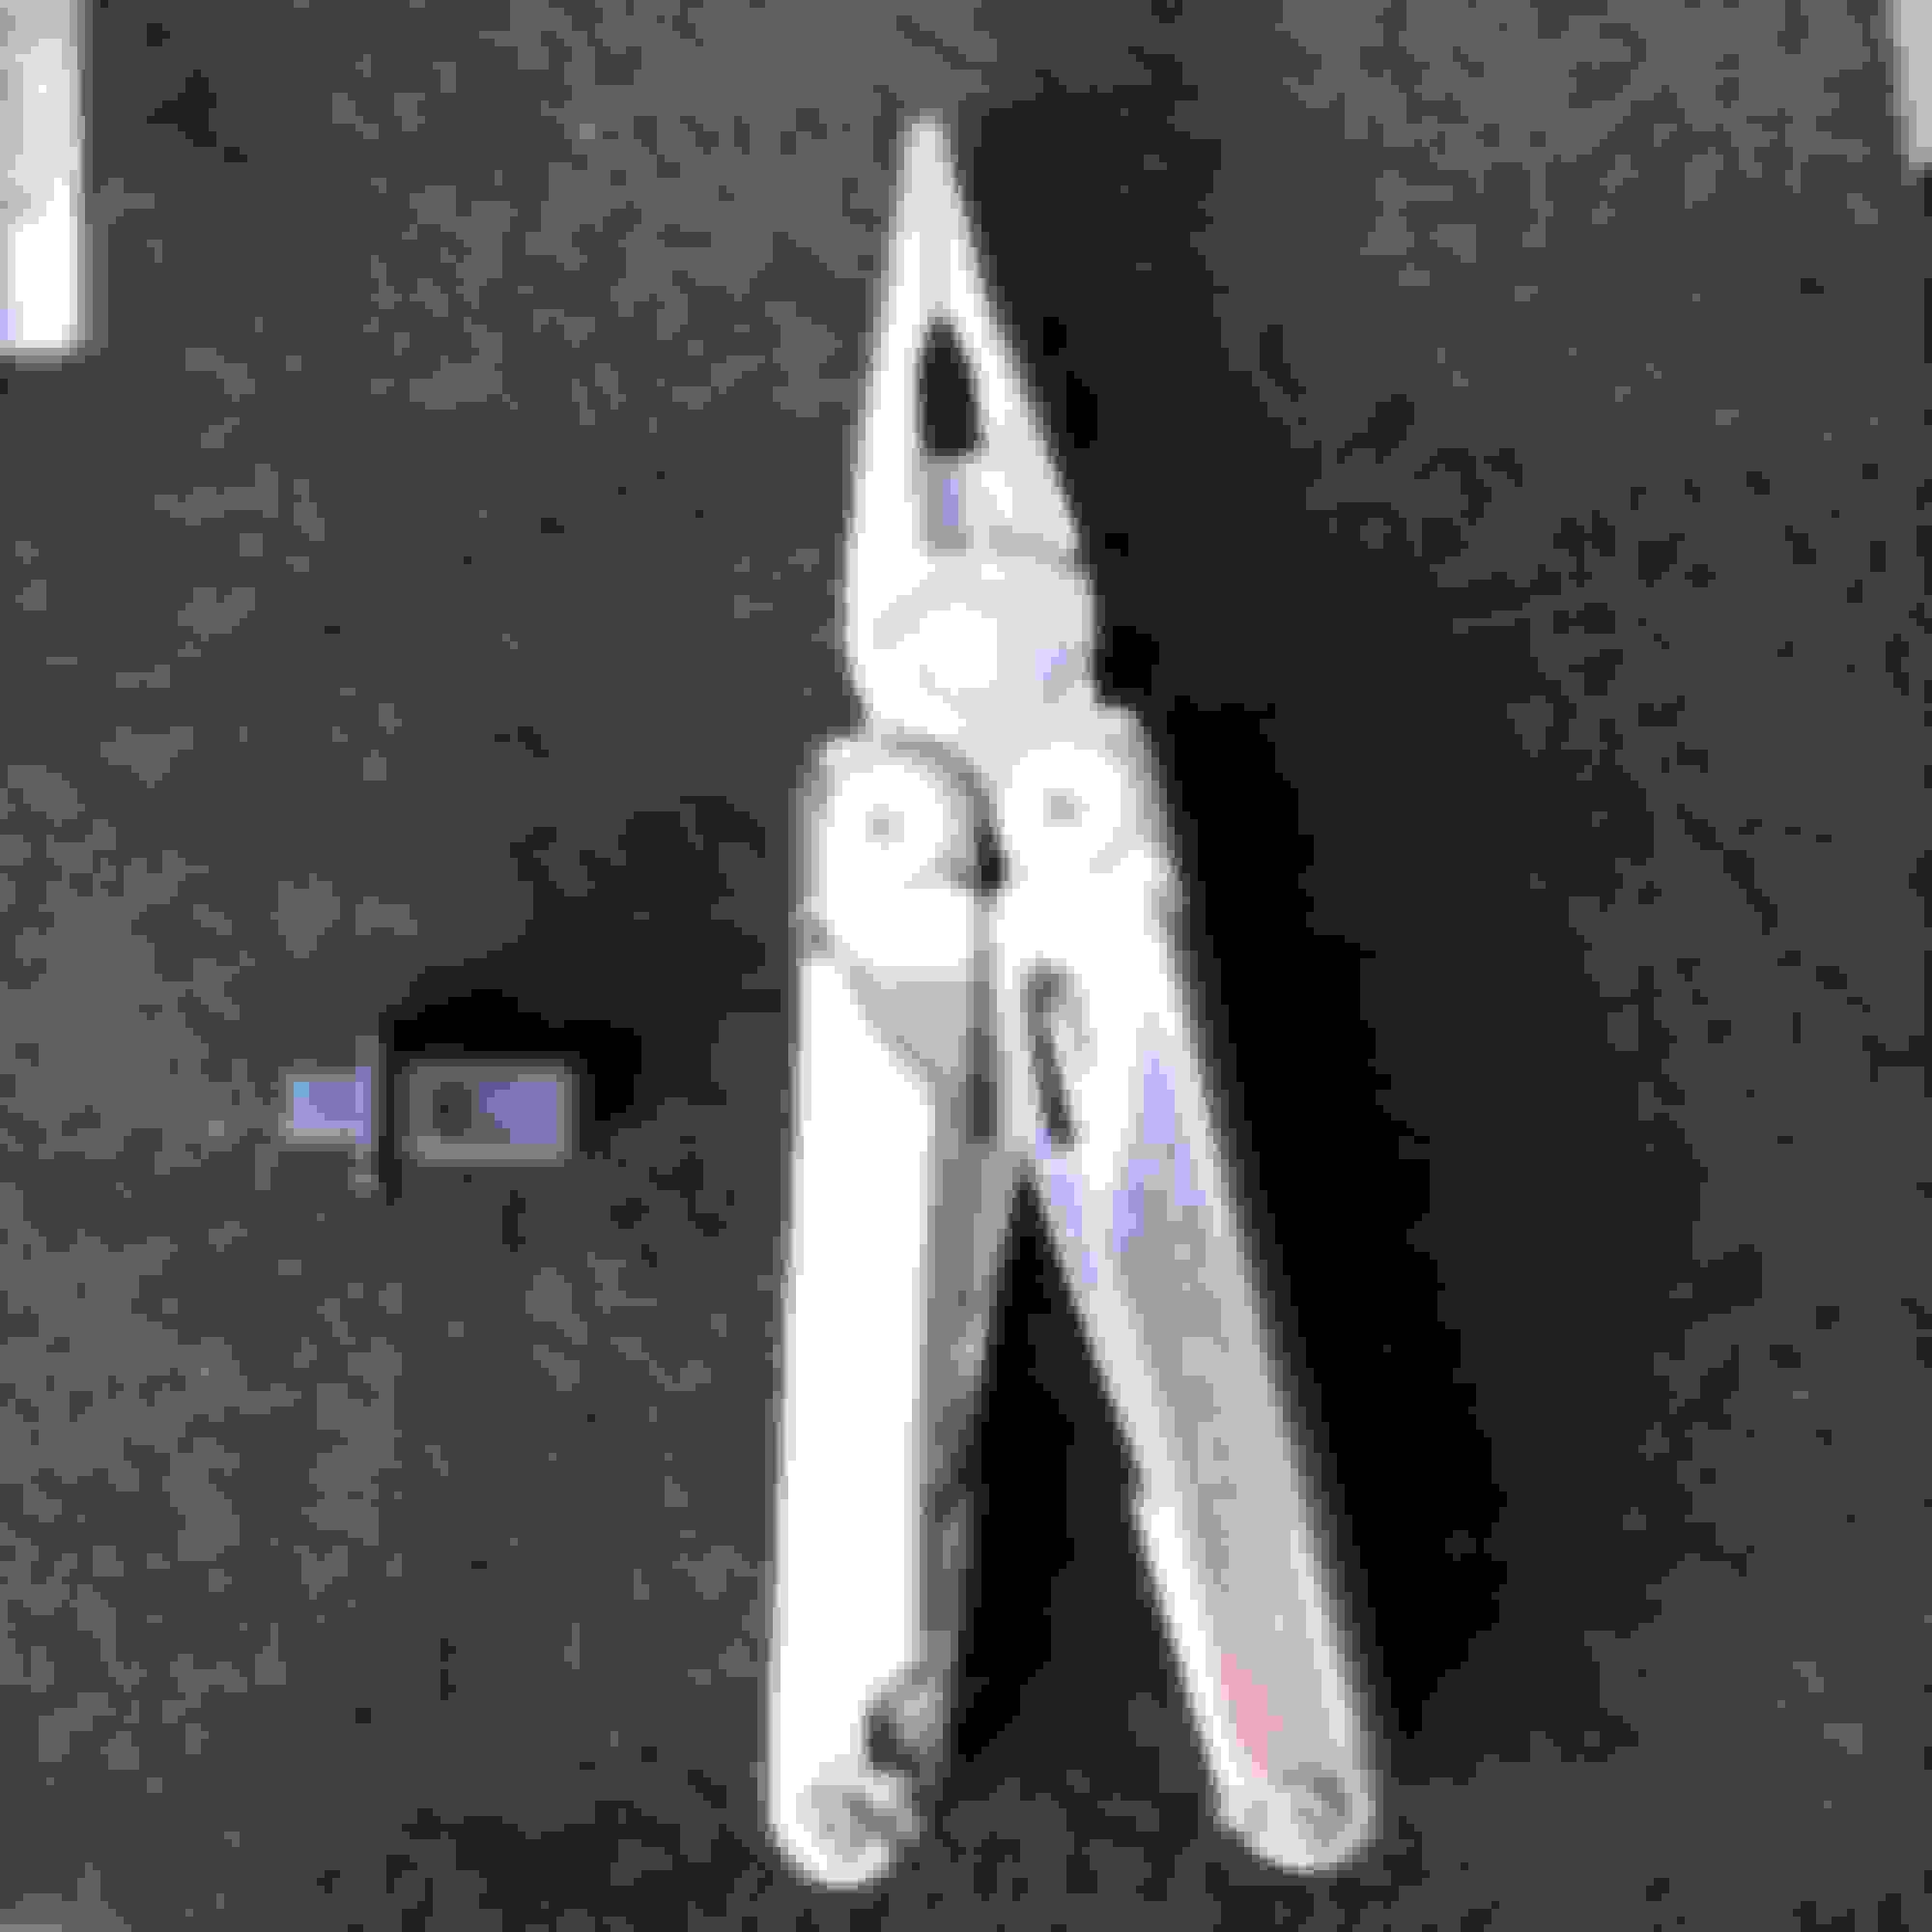
Leatherman and square plastic rivet that holds the door trim panel near the lock button at the upper/rearward corner.
Square rivet with perimeter window trim removed, before removing the rivet. The Leatherman pliers are used to pull the H-shaped inner key out. The inner key is then rotated 90 degrees and reinserted into the rivet. The large square rivet is thereby released, allowing removal from the metal door frame.
Overall inner door assembly showing door control module, window lift motor, wiring harness and speaker. Amazing amounts of plastic, typical for Mercedes.
Closeup showing the door button mounted in the trim panel. Removing the switches from the old trim panel is fiddly because of tight tolerance and the use of plastic. Go slowly and use the right tools.
Old and new trim panels, the old one had cracked in front of the seat control switches.
68,000 miles, changed the transfer case oil today. Easiest job so far on this vehicle. Note that MB does not specify a change interval for the t/case fluid. I chose to do this. My vehicle has standard/base 4MATIC with a 50/50 torque split and open non-biasing center differential. It's a very basic and old design chain and sprocket type of transfer case. The old oil looked used, but not bad at all. Cloudiness was present as expected, but it was also still transparent.
WIS procedure attached.
Sealing rings: N007603016105, 2 required. Hard to find. I bought them at idparts.com. Thickness: 1.26mm (crushed), o.d.: 20mm, i.d.: 16.3mm
Sealing plugs: reused originals, requires 8mm hex bit, both plugs are the same size thread and hex
Tools: 1/2" ratchet with 8mm hex bit, torque wrench capable of 25Nm with 8mm hex bit, Motive power fill or similar, drain pan, shop towels, mineral spirits to clean the Motive filler.
Fluid: 236.14 0.5 liters, red in color. MB part no: A001989680315
There is some confusion on the fluid. WIS specifies 236.12. I waited for 30 minutes at my local dealer's parts counter while they fumbled around trying to figure out which fluid should be used. They gave me 236.14 after calling "the guy who knows" who has been transferred to another dealership in the ownership group. I am confident using 236.12 because:
- there are no clutch discs in my t/case, a standard 4MATIC open differential 50/50 torque split
- color of 236.12 and 236.14 are both red
- a dealer sold me 236.14
- the preponderance of comments on other MB fora are that 236.14 is backwards compatible with 236.12
I went for an Italian tuneup and so far no crunching sounds or sprocket teeth lying in the driveway.
Volume of fluid drained from transfer case, includes a few 30ml or so of overflow when I added new fluid.
Changed front and rear differential oils today, with 68,000 miles. Mercedes does not specify differential fluid change for the base 4MATIC on W166. The hardest part of the job was wrestling with the front underbelly shield. It's wedged/underlapped behind both the front bumper fascia and the rear belly pan. The rear 2 screws need to be started, then the shield needs to be bowed and slipped behind the bumper fascia, and the front two fasteners started. Then all fasteners can be run down tight after the shield is in place.
Front axle: oil was clear and gold in color; it looked new. The fill plug was tough to get open because it is above the static oil level making the breakaway torque higher, and it is close to the engine oil pan which means a universal swivel was needed. The drain plug was fairly easy to remove. Fill was straightforward. Note to self: small rust bubbles were visible on the engine oil pan, a new oil pan would make sense at 120,000 miles. The oil pan is easy to remove because all fasteners are accessible and the oil pan can drop straight down.
Rear axle: the iron axle housing and apparently lower quality plugs required alot more torque to remove. The outer edges of the plugs were corroded, I'm glad I did this job. With higher mileage the plugs would be very difficult to remove. Acess to the drain plug is tight because of the exhaust pipe. I used a hex 14 bit from Harbor Freight, it was shorter than Husky and Crafttsman hex bits. I was able to easily put the bit into the plug with a wrench, without grinding down the hex bit. The used oil had a slight cloudy/darker color but was still transparent. It's good to have it changed now.
Parts: A3529970032 rear axle plugs, 2 required A1643310056 front axle plugs, 2 required
A001989330312 universal hypoid gear oil, I purchased 3 liters from my local dealer. Another fumbling around experience for them to find the right oil. I told them which oil I needed.
Oil spec is confusing as usual with Mercedes. WIS shows one thing, Bevo shows another, EPC lists all of the numbers, and the dealers have no clue. I went with Bevo, because it seems most updated. 239.71 and 239.72 have the same part numbers, and are specified for W166 non-AMG. However the dealer didn't recognize the part number, so I went with the universal Mercedes 75W-85 gear oil. I have confidence in this because there are no friction discs in the standard 4MATIC differentials.
In addition to the pictured tools, I used a Motive power fill to dispense the oil into the axles.
I can relate to pain of removing under body panel at home.
It's so large and tucked in at both ends (front/back), real pain to put it back.
Toyota has a nice design where you only remove small panel area to access oil drain/filter.
BTW: My luck would have it, I had to buy large 15 liter bulk oil from Walmart (they did not have small bottles).
That made it impossible to measure and pour 7+ qt. I had overfilled which I drained today (again removed the darn panel).
Oil level still shows too much (I measured it car level and cold). May have to re-do this next weekend.
Originally Posted by chassis
I changed the oil today, it wasn't too much drama. The vehicle has 62,000 miles. Next projects are front axle oil change, rear axle oil change and transfer case oil change.
It took me two hours including cleanup and putting tools away. Two reasons for the time - I took my time and gave the underbody and running gear a thorough inspection, and it was the first time for me changing oil on this vehicle. Next time I will do it in less than one hour, including cleanup.
Observations:
- I drained 6.5 qts, and poured in 7 qts per WIS. I conclude that the engine burns very little oil, or burns no oil, under the assumption I didn't drain every last drop of oil. Pretty happy about this.
- Underbody paneling remove/install is the biggest pain in the neck part of this job. I don't have a top extractor, and don't plan to get one. My dealer drains oil from below, despite what WIS says. If you have a top extractor, this is probably more efficient.
- Advance Auto sold "12mm oil seal rings" made of a copper-like material. I measured the Advance auto seal ring and the Mercedes crush washer, and the two were different in each dimension. I am not 100% convinced the Advance Auto part would work and seal correctly. I advise against generic sealing rings.
- I checked 3 or 4 of the 8 connectors (cam solenoids and cam position sensors) known to leak oil into the engine harness. All were dry and had no residue. The connectors I did not check required removal of either the air filter housing, or the intake manifold.
Materials:
Mobil 1 Full Synthetic 0W-40, purchased at Advance Auto Parts in stock - I poured in 7 quarts, and the dipstick indicated slightly below max full
Mann oil filter Mercedes A0209975445 / Mann HU7025Z, included filter and o-ring, purchased at Advance Auto Parts in stock
Crush washer Mercedes N007603012102, purchased from my MB dealer in stock.
Shop towels and rags
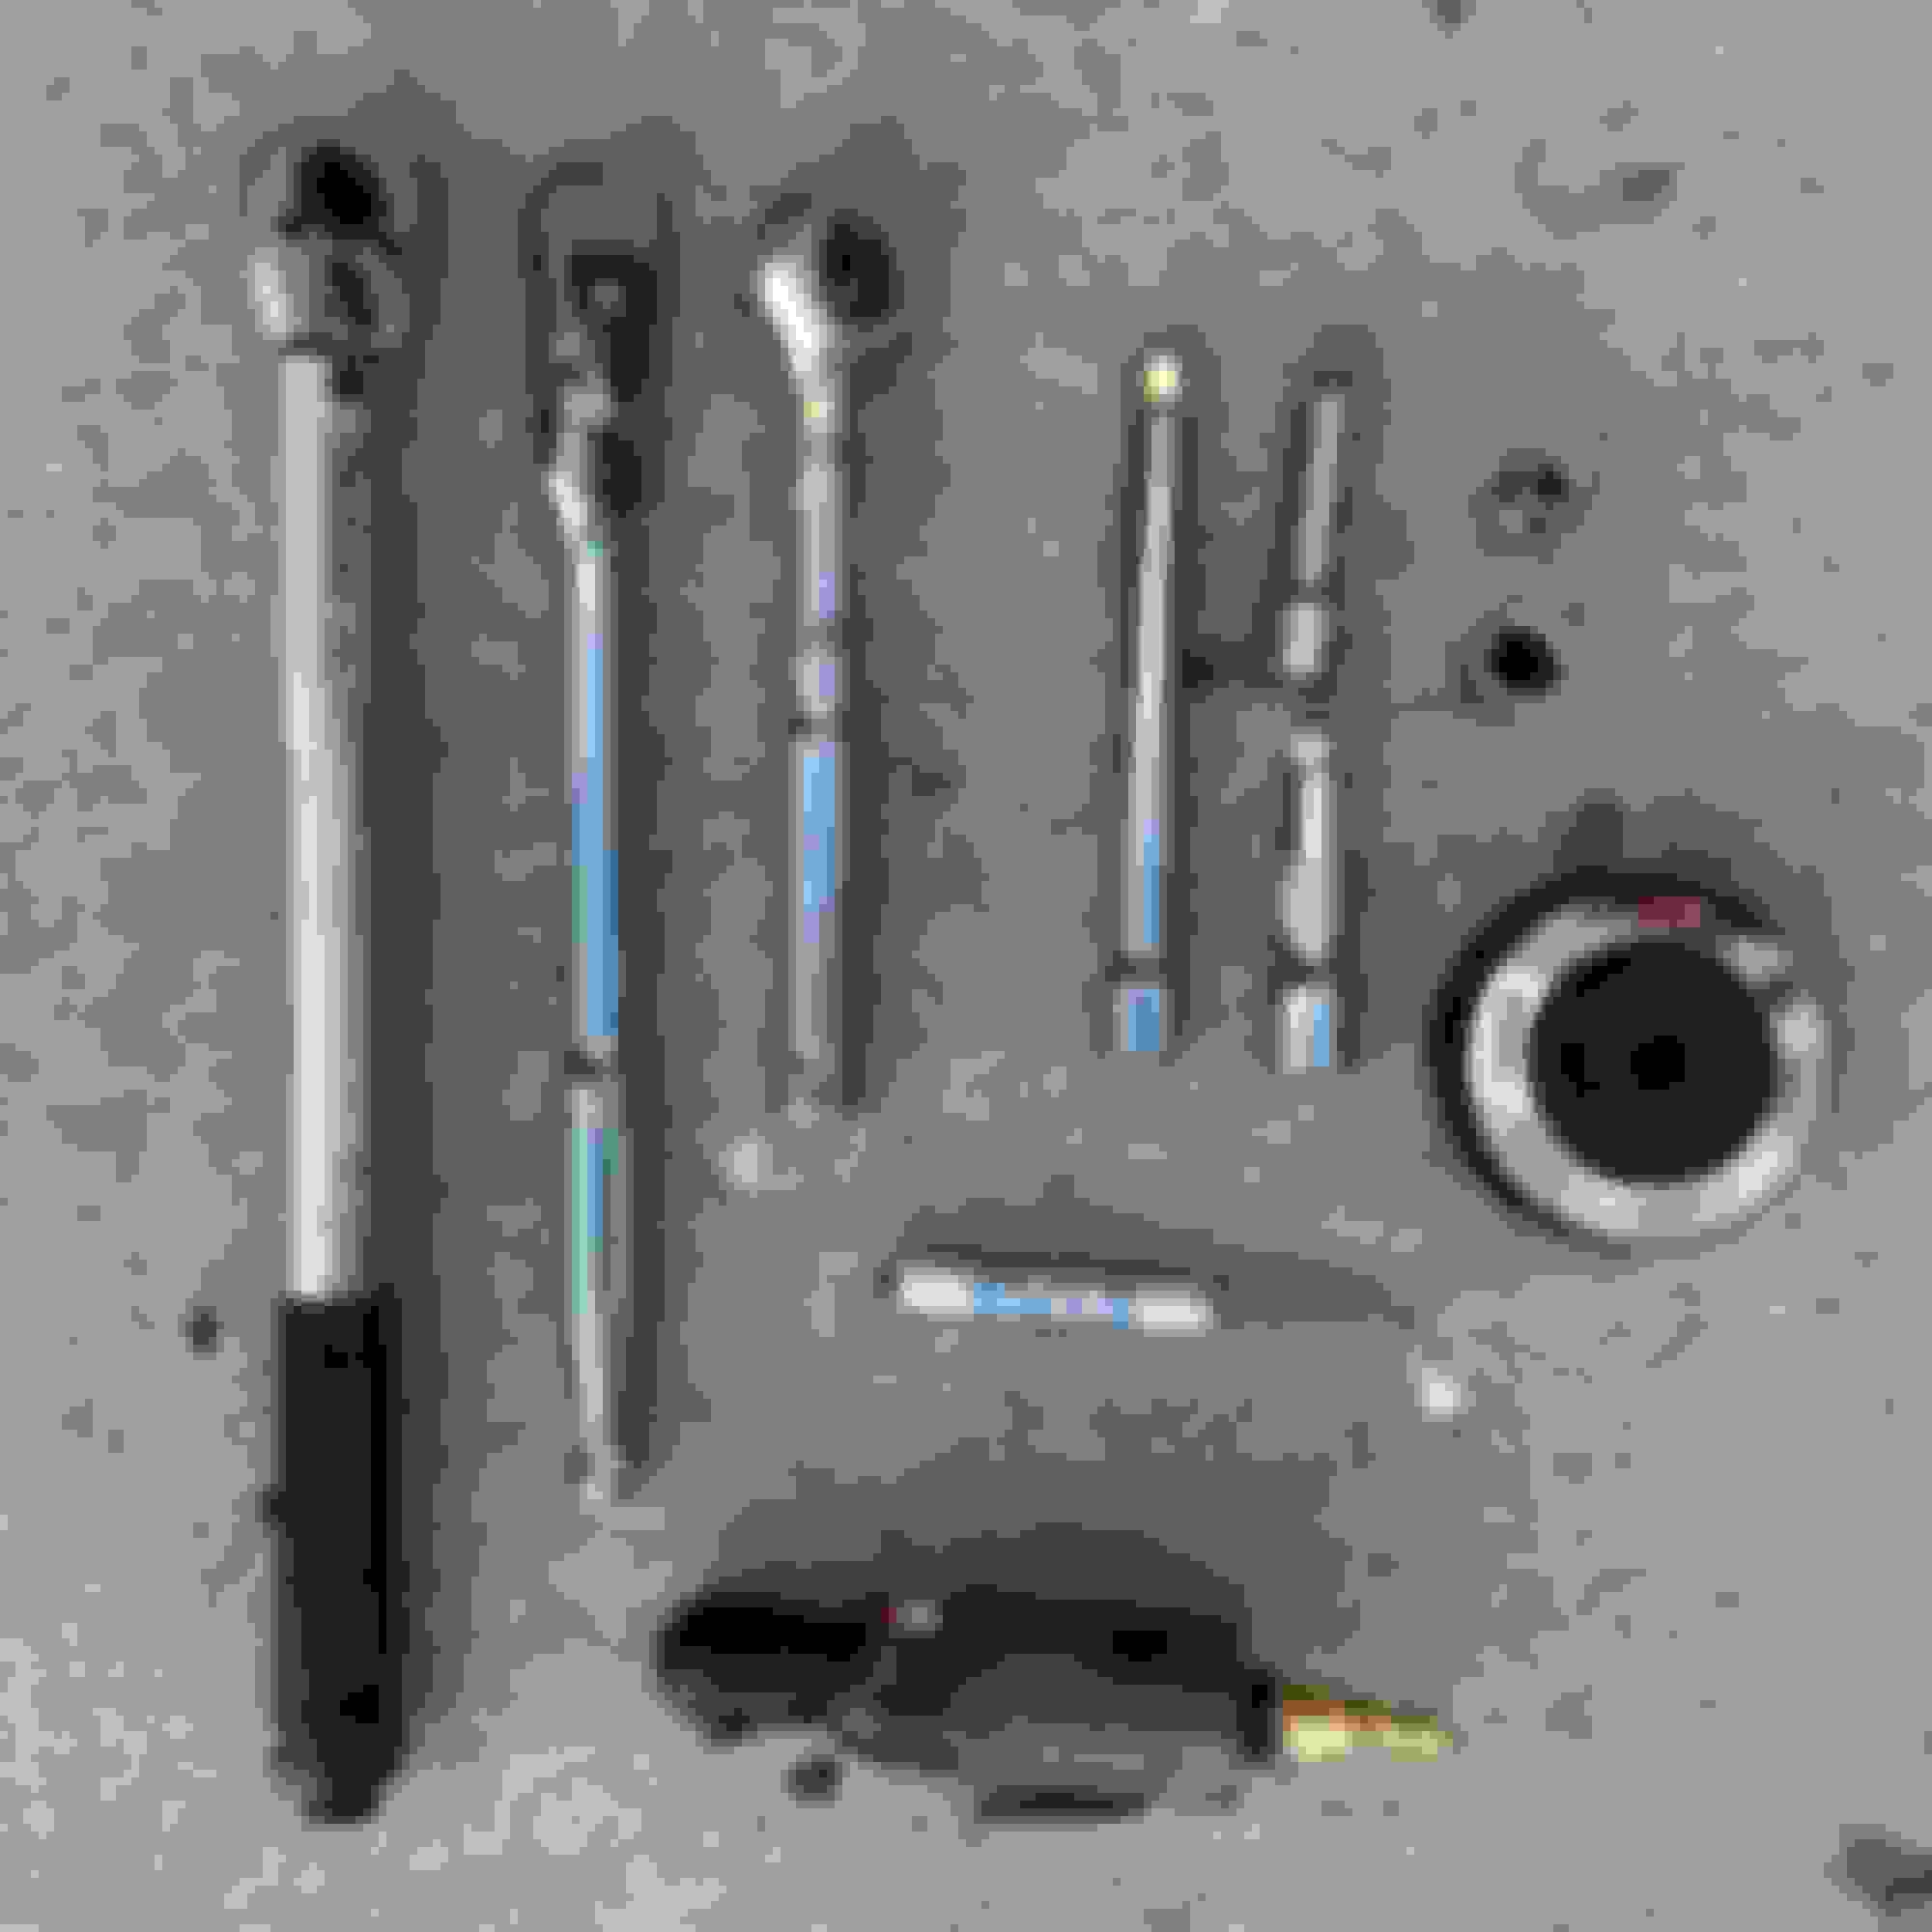
Tools:
1/2" ratchet handle
3/8" ratchet handle
1/4" ratchet handle
1/2" to 3/8" adapter
3/8" extension
1/4" extension
3/8" torque wrench capable of achieving 25Nm
74mm / 14 flute oil filter housing wrench, purchased at Advance Auto Parts in stock
14mm socket
8mm socket
oil drain pan (not in photo)
thin flat screwdriver (not in photo)
Basic procedure (refer to attached WIS docs)
- Mise en place: assemble all tools and materials and prepare workspace/garage
- Warm engine to operating temperature
- Turn off engine, wait 2-3 minutes, check oil level on dipstick if present, note level
- Remove plastic engine cover
- Crack open oil fill cap
- Partially loosen oil filter housing - 74mm oil filter housing wrench
- Remove rear underbody panel - 8mm socket
- Remove center underbody panel - 8mm socket
- Remove drain plug, drain oil - 14mm socket. Discard crush washer. Allow oil to thoroughly drain. I waited 15 minutes.
- Install new crush washer, install drain plug. I torqued to 25Nm. You are on your own for this torque. MB does not specify a torque for this screw because WIS calls for top oil extraction. I have seen 30Nm on this site, but that seems too high for this screw, which has a small head and appears to be made of soft metal. I advise using a new drain plug each time (I did not do this, but will do next time.).
- Pour in new oil. I poured in 6.5 quarts and checked the dipstick, it was just even with the min level. I poured in another 0.5 quarts and the dipstick read near the max fill level.
- Clean the oil fill cap thoroughly, and replace it. Clean the area surrounding the fill cap.
- Remove filter housing (74mm filter wrench), remove old filter and o-ring. Clean the filter housing exterior.
- Install new o-ring on filter housing, install new filter in filter housing, and install filter housing+filter. Torque to 25Nm per MB specs. Clean the area surrounding the filter housing.
- Replace engine cover. Clean the engine cover.
- Close hood.
- Replace underbody paneling.
- Clear service indicator message from MFD.
Aston Martin Vantage, GLE 43 AMG, Volvo XC60, BMW X1 35i, Ram 1500, BMW Z4 35i
just did my 2017 GLE 43 oil change last weekend...15 minutes of effort took about 45 minutes all together...
vac pumped oil out. captured 6.5 qts and filled back 7. easiest oil change ever
Many thanks to Chassis for his many detailed posts! I own a 2017 GLE350. Today I attempted the air filter change...well you really need the special tool (knipex or equivalent for the click clamp release), So that is ordered. I did successfully change the oil and filter...and I found a couple of changes to chassis notes, at least for my vehicle.
1) The drain plug is 13 mm not 14mm.
2) I only needed to remove the rear underbody panel (easier because car was on a lift)
3) I thought it made sense to remove the oil filter housing and filter before adding new oil to the engine.
Note: working on braking systems can kill you or others, or destroy property, if you make a mistake. Don't do this work if you think you could make a mistake.
Changed the rear brakes today at 70k miles. I did it in 2.5 hours, going slowly. This included gathering tools and cleanup. Next time I could probably get it done in 2 hours. I enjoy this type of work, so for me it was fun.
There are no real gotchas. Some points that aren't in the documents or in videos:
- dead blow hammer to remove the brake disc
- wire brush to clean the hub pilot
- needle nose pliers to remove the wear sensor connector
- thin 17mm wrench to hold the slide pin when removing caliper to slide pin bolts
- tiny dab of dielectric grease on the new wear sensor connector
- detach two clips securing the parking brake cable, and one clip securing the brake hose. No tools required but the hose clip is fussy so get a good look at it first. Don't rip it apart.
- no hanger device needed to move caliper out of the way. I rotated it and let it rest on the suspension links.
- regular anti seize on the hub, the documents call for a hub paste which is expensive from MB. The Porsche Castrol Molub alloy paste equivalent is cheaper than MB's version.
- I siphoned with a clear tube (via mouth, don't tell anyone) excess brake fluid from the reservoir. Total fluid removed is shown in the photo, plus about 40% more that was disposed of two months ago when I first checked the pad thickness. Total fluid removal was approx 50ml - 100ml.
Rotors were smooth, no grooving. I had no vibration or pulling on the original brakes.
My remaining pad thickness after 70k miles and 4.5 years. The uneven wear is strange. The caliper slide pins all were free and smooth, and had factory grease on them. The only explanation I can think of is the speed control (not Distronic) that applies rear brakes to decelerate to target speed. And ESP/TSC/4ETS when on slippery or off road conditions. My vehicle does not have Distronic or lane keeping assist systems.
Right outside: 2.8mm --> this is what led me to change the pads and rotors
Right inside (wear sensor location): 8.4mm
Left outside: 6.7mm
Left inside: 4.4mm
Parts, ordered from mbparts.mbusa.com (MB of Naperville):
Note: working on braking systems can kill you or others, or destroy property, if you make a mistake. Don't do this work if you think you could make a mistake.......
It took about 35 minutes including set up, clean up and turning on the Doobie Brothers to start the project!
Minor comments, no major changes from previous oil change:
- new drain plug 002-997-34-30, $2.54 from mercedesbenzstarparts.com, torque 30Nm (see attached)
- oil drain plug socket is 13mm as noted by another poster. I mistakenly said it was 14mm, apologies for that
- oil filter housing wrench is 74mm 14 flutes. In stock at Advance Auto Parts.
- started at the rear underbody shield, and removed 6 of 8 fasteners, then worked from back to front removing all 8 front underbody shield fasteners. The front underbody shield came out easily. It is both overlapped and underlapped to the rear shield. It's a pain to remove, but the design prevents one or the other from falling off if a few fasteners are missing.
Filter: Mann HU7025z, also interchangeable with:
Fram CH11060
Hengst E129H D222
Knecht/Mahle OX814D
Purflux L394
The engine seems to be burning no oil. This makes me happy. So far no leaks and not burning oil.
I checked 1 out of 4 camshaft position sensors (exhaust cam right side) for oil weeping through the connector, and it was bone dry. Another good sign. The remaining 3 camshaft position sensors require intake manifold removal to inspect. If I get the motivation to remove the intake I will check them. But based on the one I did check, hopefully all is OK.
With the air filter housing off, I cleaned up some oil drool from the PCV tube at the turning vane, just before the throttle body. The turning vane wasn't too heavily coated with oil. Another possible preventive job is to remove the air filter housing and spray carb cleaner into the throttle body when the engine is running. I haven't seen anyone scope the intake manifold for deposits on the M276. Some MB engines were known to have severe intake valve deposits from PCV mist condensing on the backside of the intake valve, and turning into muck.
Mercedes SLR McLaren 722 S Is Extremely Rare Example Modified by McLaren
Slideshow: A one-of-one U.S.-spec Mercedes-Benz SLR McLaren Roadster became even rarer after a factory-backed transformation at McLaren's headquarters.