When you click on links to various merchants on this site and make a purchase, this can result in this site earning a commission. Affiliate programs and affiliations include, but are not limited to, the eBay Partner Network.
2014 GLK350 low beam headlamps is much easier to change
There is no longer the spring that you need to deal with carefully. Just pull and push. No trouble.
The problem is that
1. The driver side has really little space to work with. You need to take a breath and be careful on the driver side
2. I did not see different color of the wires... how do I know which is positive and which is ground ? Both of them are black...
As a result, today when I install the HID kit I burned one capacitor due ...
Any tips on knowing which is positive? I really need to use a multi meter to test before installing?
I will post a full log on installing the HIDEXTRA.COM HID kit with pictures when my replacement capacitor is here....
35W or 55W? are you concern about melting the housing/lens by the HID kit?
What I noted is that the first version of GLK (2010-2013) still had lens in the light housing without the lighting package, but the new GLKs seem to have different housing all together so not sure how well HID conversion would work without the lens.
Those who put HIDs on regular lapms without lens are extremely blinding to the uncoming traffic.
The OEM halogen light was also H7 55W? And the Kit says as long as there is 1 cm distance away from the bulb, it won't overheat. I would observe see if it is the case...
But the blinding of uncoming traffic may be a concern. I will park it on the street tonight and drive my other car towards it and see how bad it is...
Actually I thought about it, if you see in my original post , in that picture the new white light has a clear cut-off line same as the old yellow-ish light. which should not go into oncoming driver's eye. But i will double check tonight when the sun goes down.
Originally Posted by NYCGLK
35W or 55W? are you concern about melting the housing/lens by the HID kit?
What I noted is that the first version of GLK (2010-2013) still had lens in the light housing without the lighting package, but the new GLKs seem to have different housing all together so not sure how well HID conversion would work without the lens.
Those who put HIDs on regular lapms without lens are extremely blinding to the uncoming traffic.
The OEM halogen light was also H7 55W? And the Kit says as long as there is 1 cm distance away from the bulb, it won't overheat. I would observe see if it is the case...
Thanks for the note. Need to double check.
Not sure what the stock halogens are, but I'm under impression (may wrongly so) that HID kits burn hotter than stock halogens. On original the GLKs, I remember reading about cornering light (55W) not turning off due to fault and melting the housing around it (those conering lights came only on cars with lighting package).
Not sure what the stock halogens are, but I'm under impression (may wrongly so) that HID kits burn hotter than stock halogens. On original the GLKs, I remember reading about cornering light (55W) not turning off due to fault and melting the housing around it (those conering lights came only on cars with lighting package).
I just now drove it out for about 20 minutes and after backing it into garage I use hand to measure both halogen side housing and new HID side housing . The temperature was about the same. This is super unscientific but it does not feel like the hid side is much hotter.
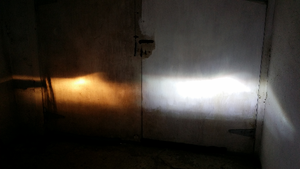
The concern now is the glaring issue.
The original low beam halogen lights can be seen in opposite driver eyes too but their brightness were less intense . I am not sure how other feel if 3 times more lights are into their eyes.
I took another photo. See if anyone can suggest from their experience.
By right we should not directly swap it out but the new housing has a cover on top of the bulb and the reflection in top housing seems to be made to make sure lights are not going up to drivers eyes too much. I tried switch on the headlight and there is a clear difference so I assume this low beam is just bright, not much about wrong focus and direction?
Really learning here. Any experts words are welcomed!
Any updates, lessons learned from the HID conversion?
I have a 2013 GLK350 with the yellow headlights and whitish/bluish LED fog lights. Right now the truck looks stupid. Another black eye for MB in my opinion.
I bought a kit earlier this year and got stiffed from the eBay company (burkemotopros) because it was supposed to be plug and play and is NOT. They said I had a stock H7 connector but I apparently do not because they sent me a round 2 pin connector but I have a square 3 pin connector. They said I can go buy an adapter harness but wouldn't refund (even though they false advertised) so I am stuck either buying an adapter or trying to sell this kit outright.
They recommended using spade connectors to plug into the factory harness but I'm not looking to hack up and jury rig anything, even if it is the kit that I bought. Any lessons learned? Any regrets? Anybody know the proper harness for the 2013 GLK350? I think it's an H4 to H7 but I guess I really need to know what the OEM harness is. Is it an H4?
HI Jiwengang,
You mentioned that "There is no longer the spring that you need to deal with carefully. Just pull and push. No trouble."
I tried to change the Right Low Beam bulb, for me, it is difficult to "pull" the bulb out of the bulb holder. I removed the cover and disconneted the wire, but I could not remove the bulb. Do you have any trick?
I just had aftermarket HID headlights put in, Low Beam 2010 GLK 350. The installer couldn't get the inside running lights out. To me it looks funny having a standard headlamp next a HID. How do we get the bulbs out, spring? and what kind of bulbs do we use to replace the old ones with? I've attached a photo of the light I want to replace. Dealership won't help.
I have a 2013 glk350 and I cannot get the low beam bulb out. The manual says push up,a DN for the life of me neither side budges. Any additional guidance or suggestions?
I have a 2013 glk350 and I cannot get the low beam bulb out. The manual says push up,a DN for the life of me neither side budges. Any additional guidance or suggestions?
It's not terribly obvious, so camera phone to the rescue! Here's a view of the (US) passenger side low-beam bulb.
The plastic outer cover has been removed. The metal bulb base is circular. In the photo, note the top is slipped up underneath a metal retainer. At the bottom, two metal spring-clip-prong-thingies hold the bulb in place. These should, in theory, allow the bottom of the bulb to tilt out, depressing the clips slightly until the bulb is free.
Bare metal on bare metal meant there was a lot of friction; I pressed the clip slightly with my finger while tilting the bulb; even that didn't do it. I ended up sliding a very small, flat blade screwdriver between the bulb base and housing to get enough leverage to overcome the clip's friction. Before putting in the replacement, I put a very thin film of high-temp silicone dielectric grease on the flat part of the clip so the next bulb removal would be easier. I also put a thin layer around the rubber sealing gasket on the housing cover so it would seal better and make the next removal easier.
Just need to slightly bend the lower two metal pieces at 4 and 8 o�clock outward. Takes some pressure, but I think this was how it was designed. When you put your replacement bulb in, be sure to put the small notch upward towards 12 o�clock. After the bulb is in place, bend the two metal pieces back to secure the bulb.
well, I tried to replace the low beam bulb on my GLK350 2011. the bulb attachment (as in thee pic above) is hidden beyond a black plastic arm that holds the reflector. There is kind of a lever to detach the wire connection and then need to find a way to snick a finger below that dum plastic arm to reach those springs. I manage to release the passenger bulb from those springs but spent several hours trying to slide back a new bulb. eventually, I gave up and plan to take it to the dealer. I can't find any reference, even in the manual, on how to deal with that arm that seems to be holding the reflector but also making it extremely difficult to access to the bulb.
Any help is highly appreciated.
I just dealt with the low and high beams on my 2011 GLK 350.
The low beam (outside, nearest the fender) shouldn't have any kind of "arm" on it. It's just got a squarish wire "latch". A lot (!!!) of people get confused by this, and end up ripping the wire latch off the back of the headlight trying to pivot it down (like a "normal car's" headlight). Instead, you just need to wedge a finger under the square "loop" above the bulb, and push it up about 1/2". Then the bulb can be removed without further drama (other than the contorted position your hand is in reaching into the housing - if you have big hands, find a kid to help you). ;-)
Here's what that latch looks like:
You can see as you move the clip up, the lower ends are spread, allowing room for the bulb to basically fall out.
Now the HIGH beam bulbs DO have a black plastic arm. This is what that looks like:
This bulb is held in with three flat spring "clips" (that stay where they are), and nothing else needs to be moved. You want to pop the two lower clips (toward the lever side of the bulb, away from that tab at the top), so put slight upward pressure on the arm, toward the tab, then pull the arm back toward the back of the car (which should clear the two lower clips). Installation is the reverse (guide the tab into position, push up toward the tab, and rotate the arm toward the front of the car.
Thanks, Hubbyguy for your quick response. I just added the pic that looks like my bulb assembly (no such clip that you can slide/push up). But that is not even my issue. Aside from the arm that your second pic show. There is another black plastic piece that is firmly connected to the reflector on one side and to the headlight body on the other side and covers most of the assembly. That black plastic is what I'm trying to figure out how to remove if possible at all. Unfortunately, I'm currently away from my car but will try to upload a pic later in the evening.
Thanks again for your input
I know what you're talking about - I don't think it's removable. I loosened the obvious inside screw, and it still seemed firmly attached. So I stopped trying. ;-)
The good news is, you can easily work around it (though it blocks any direct visual access to what's going on inside the headlight assembly on that side).
And to clarify my previous post about getting the bulb connected to the arm out, look at your photo (of the same "clip" but without the "arm"), and picture pushing the bulb up against the clip at 12 o'clock (also corresponds to the tab on the bulb), to make clearing the other two clips (red arrows in your photo) when you pull the arm back. It's a blind process, but once you understand how it works, it's dead easy.
Thanks, Habbyguy. Yes, that is exactly the plastic piece with the screw that I'm talking about. Lucky you that it went easy for you. I tried for hours to snug back a new bulb on the passenger side but it just refused to go in (with the notch at 12 o'clock, obviously). I tried with a screwdriver and even used a socket that hold tightly the bulb and give me some forcing power but to no avail. I don't want to even think about the driver side with its limited access. On the driver's side, I can't even master enough strength in my fingers to remove the bulb in the first place. So disappointed with such stupid engineering. I previously had a CLK32, among many other brands, that I happily DIY almost all I wanted and somehow assumed that bulb replacement in new models will be even easier. I will see what the dealer has to say. At this point, I'm thinking to remove the whole bumper and the headlight assembly for better access.
If everything is correct (big assumption), you should be able to push "up" (which is really kinda sideways) with the handle, and leverage the lip of the bulb over the two smaller clips.
I'm wondering if perhaps one or both of the small clips has managed to get over the lip of the bulb's base, which will lock it in place against your best efforts. If that's the case, the more you struggle, the more the clips will bend in the wrong direction.
Try using your phone to find out - just put it on video mode, turn on the light, start a recording and lower it in front of the hole to peer inside. If you have a decent phone camera, it'll do a good job of showing the inside of the headlight, and may well show you something that's amiss.
thank you for the good advice. I will try my luck again in the next couple of days and update this thread with the outcome
Mercedes SLR McLaren 722 S Is Extremely Rare Example Modified by McLaren
Slideshow: A one-of-one U.S.-spec Mercedes-Benz SLR McLaren Roadster became even rarer after a factory-backed transformation at McLaren's headquarters.