


The ABC Suspension Thread

Member
Joined: Oct 2006
Posts: 165
Likes: 1
From: Westbury New York
2004 S 55 AMG
My 2004 S 55 JUST came with the ABC drive careful light I change the steerig pupm 4 years ago and for the last years was making a whining noise between 1000 and 1700 rpm:s I thing finally give up but how you can tell that ? where can I buy a new pump ,accumulators etc. ?
Thank you
Thank you
Junior Member
Joined: Jan 2014
Posts: 70
Likes: 3
From: Vegas, Baby!
05 CL600
The whining noise at that particular RPM is possibly due to a failed pulsation dampener. Those are a fairly simple fix. Similar to changing a light bulb. Unscrew the old and screw in the new.

Thread Starter
MBWorld Fanatic!


Joined: Nov 2010
Posts: 2,605
Likes: 343
From: Welwyn, Herts, UK
2006 S600
You can help to identify the whining noise (with a cold engine) by removing the auxillary drive belt (not the supercharger one) and starting the engine for a minute. If the noise goes away when you're inside the car with the doors closed, it means it's probably the accumulator. Unscrew the old and fit a new one. Its not QUITE as easy as that of course, but in the big scheme of things it's one of the easy wins.
Nick
Nick
MB World Stories
The Best of Mercedes & AMG

Manual Mercedes? 6 Times Sindelfingen Let Drivers Have All The Fun
Verdad Gallardo
Mercedes SLR McLaren 722 S Is Extremely Rare Example Modified by McLaren
Verdad Gallardo
8 Classic Boxy Mercedes Designs That Have Aged Like Fine Wine
Verdad Gallardo
Flawlessly Restored Mercedes 190E Evo II Heads to Auction
Verdad Gallardo
Electric Mercedes C-Class Unveiled: 11 Things You Need to Know
Verdad Gallardo
Mercedes EQS Gets A Major Update: Everything You Need to Know
Verdad Gallardo
5 Underrated Mercedes-Benz Models That Don't Get the Love They Deserve
Verdad Gallardo
Mercedes 300D Has Pushed Well Past 1 Million Miles and It Ain't Stopping
Verdad Gallardo
10 Most Reliable Mercedes-Benz Models You Can Buy Used
Verdad Gallardo
Member

Joined: Feb 2016
Posts: 192
Likes: 15
From: Cincinnati, Ohio
mb, saab, acura, dodge
https://mbworld.org/forums/m275-v12-...ml#post6242174
I'm convinced that many problems associated with the V12TT can be attributed to high under hood temps caused by the turbos. I never thought of adding turbo blankets though. I'm rather ignorant there unfortunately. I've seen lots of tuning shops sell them, and I appreciate the upsides, but I don't know about the downsides.
Presumably, by insulating the turbo, they increase its operating temperature. I guess that many people have done just that, and I'd sure like to know if they'd had faster turo failures as a consequence. Or not. Our turbos are water-cooled , so I'm sure that helps to protect them. I rebuilt my turbos this summer, and I looked at lots of ways of improving the under-hood heat management:
There are lots of different ways to do thermal management under hood, and they need to make sure the protection measure addresses the right threat to performance and reliability:
The coil packs on the other hand, are a rather different problem. They're in line of sight of the turbos, so they're subject to infra-red radiation, and they DON'T cool themselves. Mercedes solution is to screw insulating covers to the exposed center sections. The insulation does have a reflective outer layer, but there's insulation in between, and they're in contact with the coil pack.
I don't think this is a good idea, as there's no air under the shield, and heat will conduct through to the coil. When manufacturers insulate exhaust systems, they normally use single skin metal shields that provide a barrier for IR radiation and convecting air. They provide no insulation at all, but they're very effective. The key thing is that air is able to flow past both sides of the shield, so temps are never allowed to build up.
I think that's what's needed for the coil packs, so I built a pair of ally shields that stand off the coil, allowing air to flow down both sides. It took a few goes, and mounting them is tricky, as there's not much room, but it help if the stock shield is removed. I fitted one, and left the other off, to see what difference they make. I put temperature tape on the coil packs, and I'll take the intakes back off soon & look for any difference between them. What I did notice on Sunday is that on my first long journey for nine months, it never misfired and threw a CEL. Even with both new coil packs, that's still unusual on a long run.
I did similar things to the ABC pipes, and I've got lots of pictures of all these things...
Nick
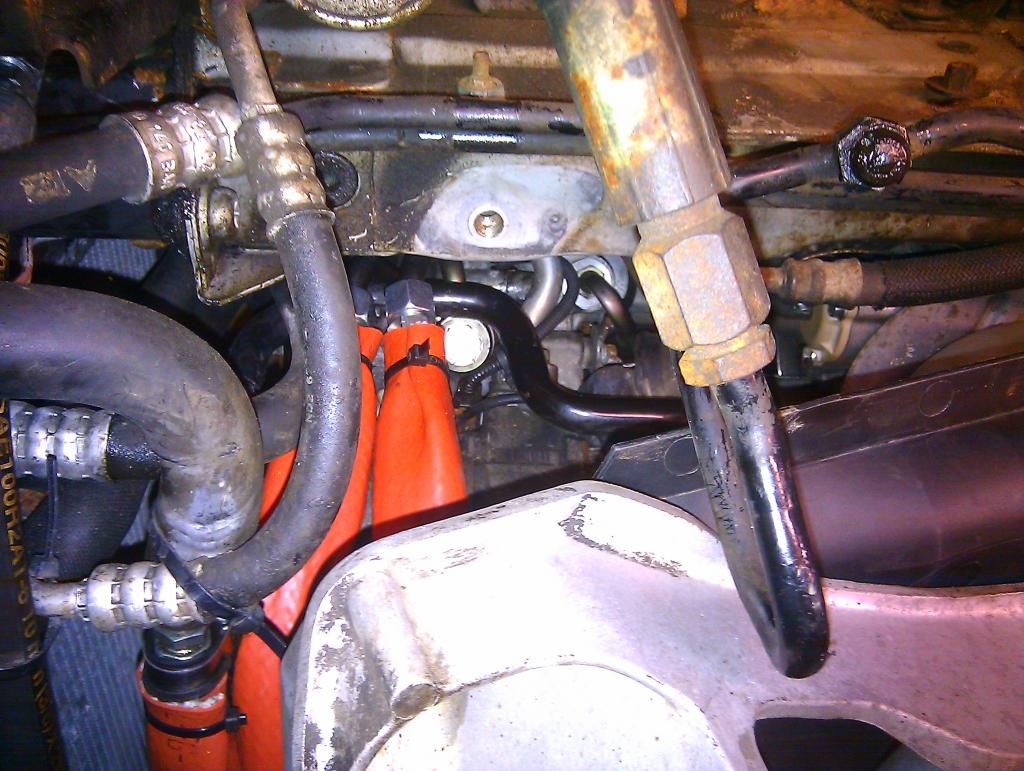
I removed all the ABC pipes around the engine, and replaced them with new pipes with compression connections:
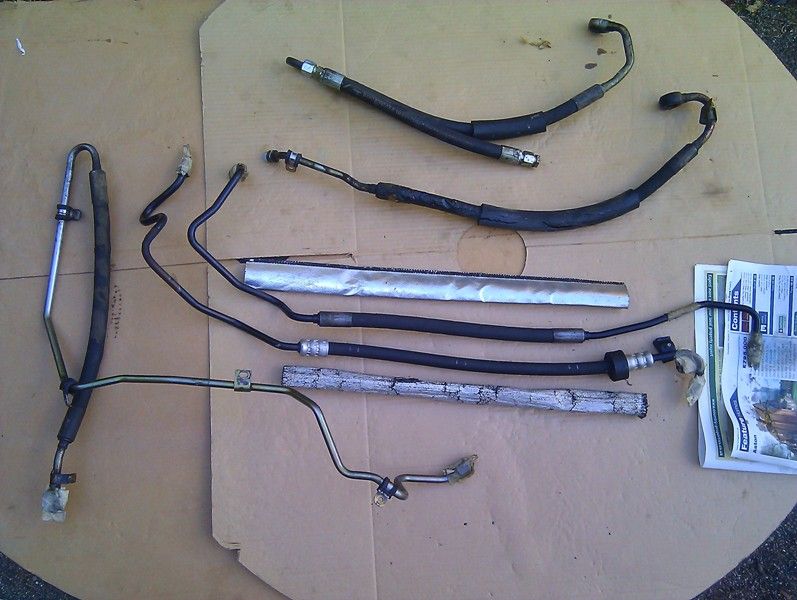
Taking a closer look at the pipes that were already protected by reflective insulating sleeves. I cleaned the sleeves, but the pipes are as they came off the car. They're in very good condition:
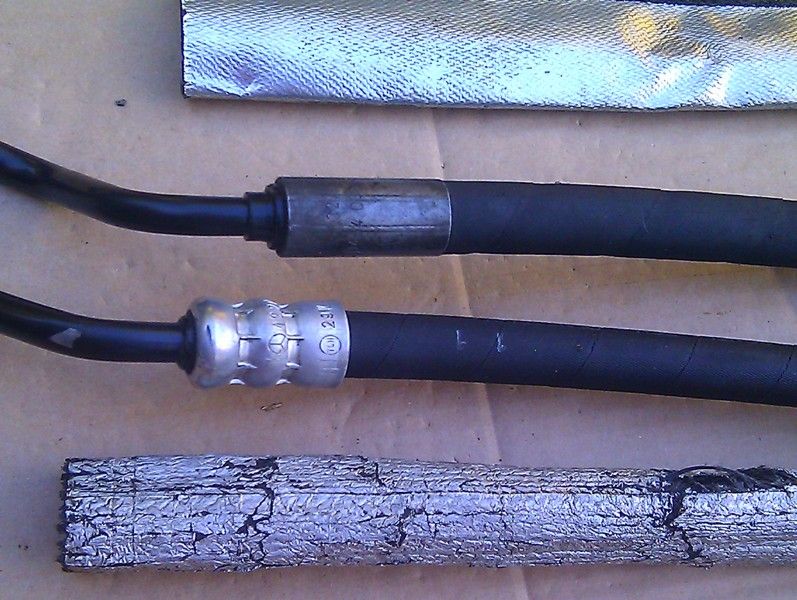
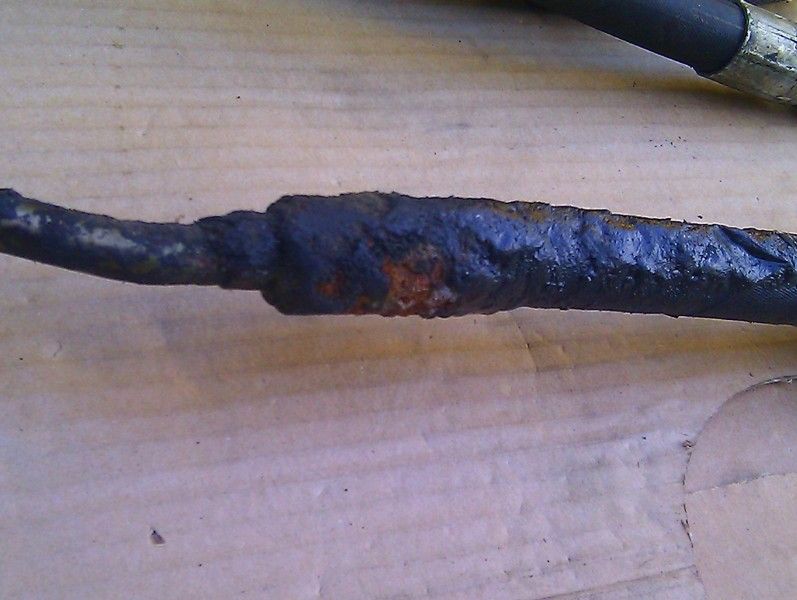
However, the feed pipe from the pump to the regulator wasn't protected, and looks horrible. Draw your own conclusions.
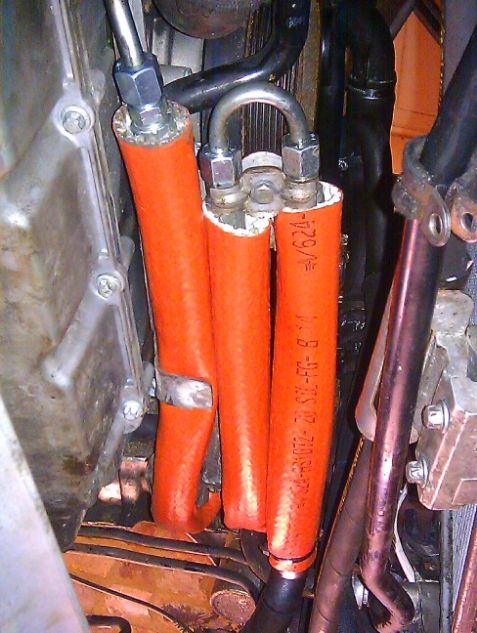
Therefore I protected all the new ones with firesleeve. This is 30mm ID, which is too large. 25mm is ideal.
If I was ever mad enough to buy another car with ABC, I would do all that straight away as a matter course, regardless of the condition of the pipes.
Fitting those pipes can be difficult. What I did was support the engine, undo the engine mounts and drop the front of the subframe.
In this picture you can see how easy it is to access the pipes, the PAS output connection, the diverter valves, and even the ABC output banjo - that's SO difficult otherwise.
Nick
I'm convinced that many problems associated with the V12TT can be attributed to high under hood temps caused by the turbos. I never thought of adding turbo blankets though. I'm rather ignorant there unfortunately. I've seen lots of tuning shops sell them, and I appreciate the upsides, but I don't know about the downsides.
Presumably, by insulating the turbo, they increase its operating temperature. I guess that many people have done just that, and I'd sure like to know if they'd had faster turo failures as a consequence. Or not. Our turbos are water-cooled , so I'm sure that helps to protect them. I rebuilt my turbos this summer, and I looked at lots of ways of improving the under-hood heat management:
- I fabricated a couple of heat shields to cover the whole length of the coil packs, sitting just outboard of the existing heat shields. I stuck some temperature tape on the coil packs to see if that lowered their peak surface temps. The results aren't in yet.
- I also wrapped the charge cooler lines in foil and fibreglass heat mats, to help insulate them from the turbos and reduce heat soak. I did the same to the IC's themselves, though I doubt that makes much difference.
- I can monitor my IC coolant temperature from my pump controller, and it does stay cool. I turned down the target temperature from 30C to 25C yesterday, and sure enough it ran 5C cooler today.
- The other thing I've done is replace all the ABC hoses in the engine compartment with compression-jointed removable hoses, and add reflective thermal insulation to those as well. I think that long term, that will probably be the biggest win.
- I did consider adding metal plates to the underside of the pipes between the compressors and the IC's, but I couldn't afford the time
- Of course, adding insulation to the turbos themselves may tackle the root cause of the problem, as long as the turbos themselves don't get too hot.
There are lots of different ways to do thermal management under hood, and they need to make sure the protection measure addresses the right threat to performance and reliability:
- infra-red radiation
- thermal conduction
- thermal convection
The coil packs on the other hand, are a rather different problem. They're in line of sight of the turbos, so they're subject to infra-red radiation, and they DON'T cool themselves. Mercedes solution is to screw insulating covers to the exposed center sections. The insulation does have a reflective outer layer, but there's insulation in between, and they're in contact with the coil pack.
I don't think this is a good idea, as there's no air under the shield, and heat will conduct through to the coil. When manufacturers insulate exhaust systems, they normally use single skin metal shields that provide a barrier for IR radiation and convecting air. They provide no insulation at all, but they're very effective. The key thing is that air is able to flow past both sides of the shield, so temps are never allowed to build up.
I think that's what's needed for the coil packs, so I built a pair of ally shields that stand off the coil, allowing air to flow down both sides. It took a few goes, and mounting them is tricky, as there's not much room, but it help if the stock shield is removed. I fitted one, and left the other off, to see what difference they make. I put temperature tape on the coil packs, and I'll take the intakes back off soon & look for any difference between them. What I did notice on Sunday is that on my first long journey for nine months, it never misfired and threw a CEL. Even with both new coil packs, that's still unusual on a long run.
I did similar things to the ABC pipes, and I've got lots of pictures of all these things...
Nick
I removed all the ABC pipes around the engine, and replaced them with new pipes with compression connections:
Taking a closer look at the pipes that were already protected by reflective insulating sleeves. I cleaned the sleeves, but the pipes are as they came off the car. They're in very good condition:
However, the feed pipe from the pump to the regulator wasn't protected, and looks horrible. Draw your own conclusions.
Therefore I protected all the new ones with firesleeve. This is 30mm ID, which is too large. 25mm is ideal.
If I was ever mad enough to buy another car with ABC, I would do all that straight away as a matter course, regardless of the condition of the pipes.
Fitting those pipes can be difficult. What I did was support the engine, undo the engine mounts and drop the front of the subframe.
In this picture you can see how easy it is to access the pipes, the PAS output connection, the diverter valves, and even the ABC output banjo - that's SO difficult otherwise.
Nick
Member
Joined: Feb 2016
Posts: 192
Likes: 15
From: Cincinnati, Ohio
mb, saab, acura, dodge
https://mbworld.org/forums/s-class-w...ml#post5480311
Hello Nick and Howard,
I'm familiar with the pulsation damper hose which burst on your car.
From the capped end it runs toward the passenger side horizontally, then appears to turn rearward just as it goes past the crankshaft pulley. However it actually does a U-turn there and goes back toward the driver side, then up to the ABC pump. The high pressure output of the pump is a banjo bolt on the underside of the pump and there are two banjos stacked, through which passes the single banjo bolt. The end of your popped hose is the lower of the two stacked banjos.
I cannot warrant the following, but when I examined the routing during a recent ABC pump replacement on my 2004 S600 TT, it appeared to me that I would be able to replace this hose without raising the engine at all, the most difficult part being the tight ratchet access to the banjo bolt from under the front side of the pump, just as had to be done during the pump replacement.
BTW, for anyone contemplating pump replacement, I can offer two very helpful tips in hindsight.
First, for the banjo bolt, use a 3/8" ratchet which has extra fine teeth in the ratcheting mechanism i.e. small angle between clicks, and with minimum backlash. This seemed even more essential for the reassembly compared to the dis-assembly. Secondly for the 10mm e-torx bolt which fastens the pump from the rear side, it may be easier to turn with an e-torx box end wrench having a vertical offset, i.e. an S-shaped bend in the shank near the box end, as viewed from the side of the wrench. I didn't have one, so I had to use a 10mm e-torx socket clamped in vise grips to get the offset, and turning and re-clamping the socket 1/12 revolution each time. None of my 3/8" ratchets would fit into the available space.
Should you find the part number for this pulsation damper hose, kindly post it here because I would like to get one to have on hand.
Good luck,
Drew

Newbie
Joined: Apr 2016
Posts: 2
Likes: 0
300GEL (463), S600 (W220)
Bogey pipe
Dear Nick, Thank you for your fantastic ABC thread which I have read in detail but I am still a bit unsure which pipe has blown and so is the MB dealer! They said the car is "old and rare" which means they can't identify the exact part. They did a video and it runs down from the UK passenger side pump to a joint with a pipe that runs up over the gearbox to an accumulator on the drivers side. They want �1800 to remove the engine. Your post seems to imply it can be done without doing this? The car has only 87K miles but I want to try and avoid scrapping it as its only worth 3K. I would appreciate any help you have as I am a bit new to all this and really wanted to believe in ABC. Regards Ian

MBWorld Fanatic!
Joined: Aug 2013
Posts: 1,077
Likes: 80
From: Anchorage
05 CL65
That is the main pressure line from the pump. I replaced mine in my garage without pulling the motor. You do have to unbolt the motor mounts and disconnect the upper radiator hose, then jack up the engine. I used my engine hoist to lift the motor enough to remove the old hoses and instal the new ones. Your A/c has to be discharged as the suction line to the compressor has to come off as well.
Thread Starter
MBWorld Fanatic!
Joined: Nov 2010
Posts: 2,605
Likes: 343
From: Welwyn, Herts, UK
2006 S600
Dear Nick, Thank you for your fantastic ABC thread which I have read in detail but I am still a bit unsure which pipe has blown and so is the MB dealer! They said the car is "old and rare" which means they can't identify the exact part. They did a video and it runs down from the UK passenger side pump to a joint with a pipe that runs up over the gearbox to an accumulator on the drivers side.
There are several ways to tackle this, and your dealer isn't much help. "old and rare" is a bit weak. Its the same technology as used on the current S and CL.
Firstly, what's the actual problem? Is the car still drivable, does it have warning messages, or has the suspension collapsed, leaving it undriveable?
Secondly, do you want the dealer to fix this, or do you want to?
Thirdly, yes, you can definitely replace the pipe without removing the engine. Just lift the engine a few inches, or drop the front of the subframe a few inches.
Finally, do you want to replace the hose with a new one, or do you want to repair it? Either is fine.
Be aware that the pipe in question is two pipes, and there's a threaded union at the front right corner of the engine. Assuming you have a failed flexible hose joint, you will need to establish which one - the one that runs in front of the engine, or the one that runs behind it.
Also be aware that if the ABC fluid reservoir is empty, you must not start the engine, or the ABC tandem pump will be wrecked in short order. Its fairly expensive, difficult to fit and difficult to bleed.
Finally, can you confirm whether its hose 215 or 260 that's failed?
215 is part number 2203205272; 2203202672 or 2203203972, and runs from the pump to hose 260.
260 is part number 2203205572; 2203203272 or 2203204272, and runs from hose 215 to the pressure regulator/accumulator.
(They're often prefixed with an "A".)
Regards, Nick

Last edited by Welwynnick; Apr 24, 2016 at 04:53 PM.
MBWorld Fanatic!
Joined: Aug 2013
Posts: 1,077
Likes: 80
From: Anchorage
05 CL65
I know when I was replacing my HPE hose, the first time, my part #215 on Nick's diagram above was weeping, so I replaced both. Barely any more labor to do 260 if you are already doing 215, and then you don't have to pay for the labor (or in my case do it yourself) twice. If 215 is fine and it is just 260 leaking, that should be a lot less work/labor than doing #215. You will still have to jack up the motor, but will not need to discharge the A/C and remove the hose from it, etc.
Newbie
Joined: Apr 2016
Posts: 2
Likes: 0
300GEL (463), S600 (W220)
Wow I certainly am a newbie to all this. Having trouble seeing which hose it is but think its 215 as it appears to have burst where the flexi joins near the starter motor according to the technician video. I am really wanting an indy to tackle this as �1800 is more than I can really put into this car as even at 87K miles its only worth �3K. MB say they turned it off "pretty quick" so hope that means its already new tandem ABC pump is OK? The car went in drivable with a leak and burst as they were looking at it. It seems a shame these cars become virtually worthless at the dealer.

Newbie
Joined: Oct 2014
Posts: 3
Likes: 0
2003 SL500
2003. SL500
Had issues with leaking RR shock and did a lot of reading on the forum and decided to cut my losses and did the conversion over to the coil over strut, after a few weeks the car dropped back to regular height and drives and handles really well and don't need to worry about any more issues with the suspension. don't plan on having to put chains on or drive down any dirt roads, so it should work out fine.
Had issues with leaking RR shock and did a lot of reading on the forum and decided to cut my losses and did the conversion over to the coil over strut, after a few weeks the car dropped back to regular height and drives and handles really well and don't need to worry about any more issues with the suspension. don't plan on having to put chains on or drive down any dirt roads, so it should work out fine.


MBWorld Fanatic!
Joined: Oct 2009
Posts: 1,924
Likes: 38
cl600
2003. SL500
Had issues with leaking RR shock and did a lot of reading on the forum and decided to cut my losses and did the conversion over to the coil over strut, after a few weeks the car dropped back to regular height and drives and handles really well and don't need to worry about any more issues with the suspension. don't plan on having to put chains on or drive down any dirt roads, so it should work out fine.
Had issues with leaking RR shock and did a lot of reading on the forum and decided to cut my losses and did the conversion over to the coil over strut, after a few weeks the car dropped back to regular height and drives and handles really well and don't need to worry about any more issues with the suspension. don't plan on having to put chains on or drive down any dirt roads, so it should work out fine.
thanks

Junior Member
Joined: Jun 2013
Posts: 39
Likes: 3
From: Frederick County, MD
1985 300D Turbo, 1985 500SEC, 1994 320e, 2003 CL600
Re: dropping the front subframe before tackling ABC line replacement '... you can see how easy it is to access the pipes, the PAS output connection, the diverter valves, and even the ABC output banjo - that's SO difficult otherwise.'
Hahahaha! Wish I had read this before trying to remove my ABC pump! So grateful for your guidance, Nick.
Hahahaha! Wish I had read this before trying to remove my ABC pump! So grateful for your guidance, Nick.
Last edited by booesq; Sep 28, 2016 at 07:48 PM. Reason: Clarification
Newbie

Joined: Feb 2010
Posts: 10
Likes: 3
From: Mid-Michigan USA
'03 SLK320 / '03 S600
https://mbworld.org/forums/cl-class-...op-mounts.html
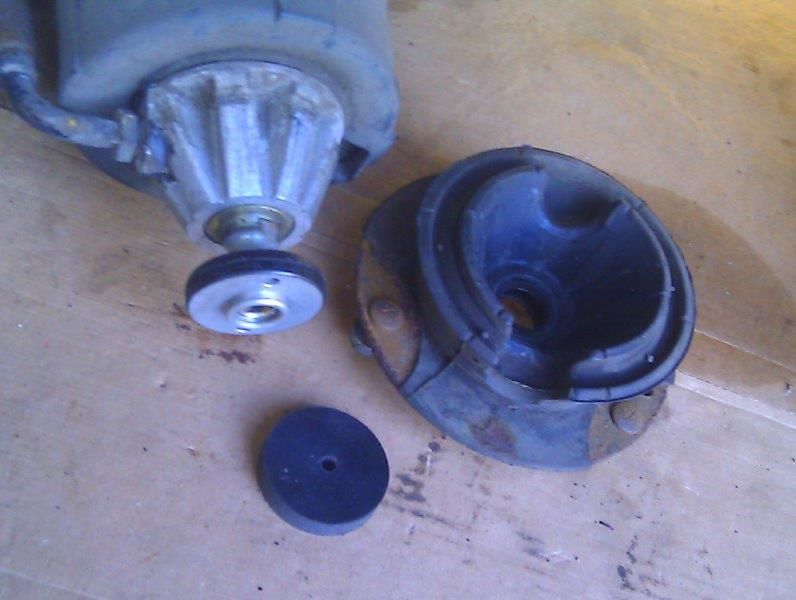
I think most well-used W215's and W220's will suffer from this problem, and it can be easily fixed. The improvement to the ride and handling is really worthwhile on broken surfaces.
On the rear strut, the bush appears to be bonded to the metal mounting. I don't think this causes problems as readily as the front, but the bush can come free due to corrosion or bonding failure. The only solution I found was to replace the strut. Buy a good used one off ebay, and its not too expensive or difficult (as long as the so-called quick-release connector isn't seized).
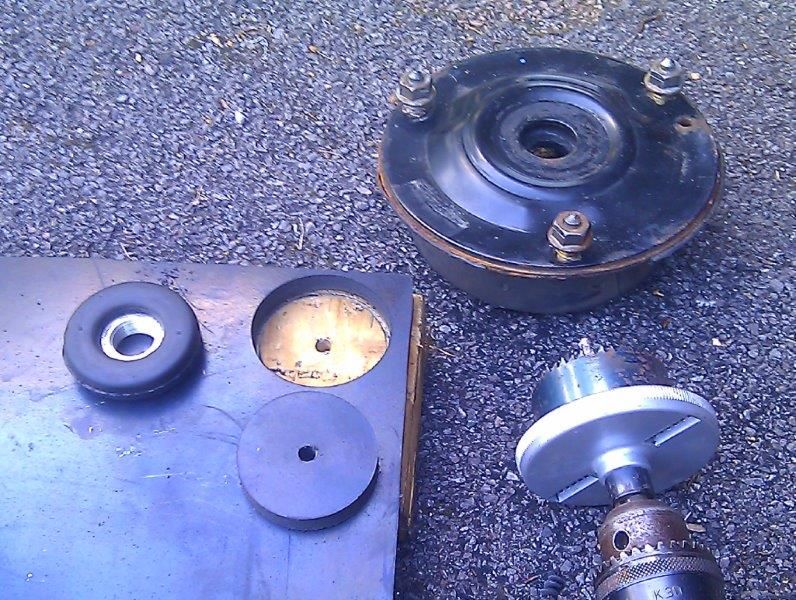
I cut some small doughnuts out of a 10mm rubber sheet and put them under the top bush nuts. You need a stout 35mm pin spanner. Don't even need to lift the car up - in fact its better if you don't.
The ride is much better now. You can't do the same trick with rear struts unfortunately.
Its an angle grinder type of spanner that you need; not a C spanner.
The one that you linked on ebay looks suitable.
You can't use adjustable ones; they're not up to the job. Ask me how etc.
You use the spanner to undo the large flat nut on the top of the front strut, in the centre. You remove the electrical connector first.
Don't jack the car up - you need the weight on the wheel to stop the rest of the strut from spinning round (which may damage the hydraulic pipe).
I think most well-used W215's and W220's will suffer from this problem, and it can be easily fixed. The improvement to the ride and handling is really worthwhile on broken surfaces.
On the rear strut, the bush appears to be bonded to the metal mounting. I don't think this causes problems as readily as the front, but the bush can come free due to corrosion or bonding failure. The only solution I found was to replace the strut. Buy a good used one off ebay, and its not too expensive or difficult (as long as the so-called quick-release connector isn't seized).
I cut some small doughnuts out of a 10mm rubber sheet and put them under the top bush nuts. You need a stout 35mm pin spanner. Don't even need to lift the car up - in fact its better if you don't.
The ride is much better now. You can't do the same trick with rear struts unfortunately.
Its an angle grinder type of spanner that you need; not a C spanner.
The one that you linked on ebay looks suitable.
You can't use adjustable ones; they're not up to the job. Ask me how etc.
You use the spanner to undo the large flat nut on the top of the front strut, in the centre. You remove the electrical connector first.
Don't jack the car up - you need the weight on the wheel to stop the rest of the strut from spinning round (which may damage the hydraulic pipe).
Couple of additions I found while doing this repair today.
1. The large aluminum "nut" that you need to remove with the pin spanner has blue thread lock from the factory. I found that a few seconds on the four quadrants of the top of the disk (holding the torch very close to the surface) warmed it sufficiently to break the bond.
2. I was unable to remove the top disc with a pin spanner and ended up making a "special" tool out of a 1-1/8" cheap impact socket, using a metal band saw and grinder to fabricate. Worked great! I used an air impact on low setting with low air pressure to gently work the nut loose without turning the complete shock assembly.
3. A little Dow Corning 111 Silicon grease between the rubber parts really eases the reassembly.
Thread Starter
MBWorld Fanatic!
Joined: Nov 2010
Posts: 2,605
Likes: 343
From: Welwyn, Herts, UK
2006 S600
Good techniques.
Yes, the top nut is difficult to undo, and you risk spinning the whole strut if you're not careful. I guess an impact wrench would help avoid that.
I had to drill the pin holes right through the nut to get the spanner to stay put - it pops out all too easily.
By coincidence, I just bought a full set of spare ABC struts from someone who fitted coil-overs to his CL. Never know when you might need some spares....
Nick
Newbie
Joined: Feb 2010
Posts: 10
Likes: 3
From: Mid-Michigan USA
'03 SLK320 / '03 S600
Same here as far as drilling the nut out - that really helped with the stability of the wrench. Using a fixed spanner wrench, the shock was still wanting to turn. I used the impact and socket tool to help with the turning aspect. The heat was an idea after the impact on low was not turning the nut. I knew it was aluminum and did not want to destroy it in the removal process. Saw the locktite after it was disassembled, now I understand the difficulty in getting it off without a small amount of heat.
Thanks for your write-up. I did not know the top came off so cleanly. Great fix. Drove car last night and noticeable improvement in quietness of front suspension over washboard pavement.
Still have one rear shock that has the same issue.
Thanks for your write-up. I did not know the top came off so cleanly. Great fix. Drove car last night and noticeable improvement in quietness of front suspension over washboard pavement.
Still have one rear shock that has the same issue.

Newbie
Joined: Dec 2016
Posts: 5
Likes: 0
07 S65
Anybody know where the rear lateral acceleration sensor is mounted on the 07 S65? Googling finds me every model but the W221. According to repair surge, it should be mounted at the top of the right rear shock tower. I looked and didn't see it. Rear shock is doing that weird thing that causes it to suddenly extend while driving. It doesn't cause any warning lights on the dash either.


