When you click on links to various merchants on this site and make a purchase, this can result in this site earning a commission. Affiliate programs and affiliations include, but are not limited to, the eBay Partner Network.
Hi
i have a UK cl600, 2002 reg. I need new top mounts for the front suspension, but im being told by everyone that they dont exist and I have to buy the whole strutt ! Thats working out at about �700 GBP per strutt !
Any ideas from members on what I can get instead . The top mounts should only be about �50 each, so is there a supplier in the usa who might be able to provide them ?
thanks
Rob
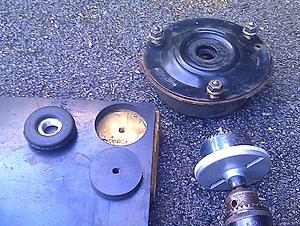
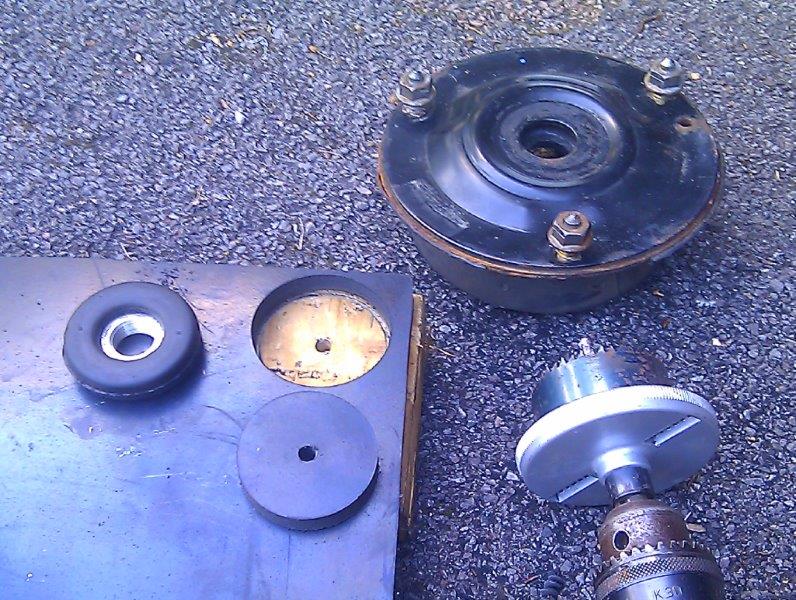
I've just done mine. I cut some small doughnuts out of a 10mm rubber sheet and put them under the top bush nuts. You need a stout 35mm pin spanner. Don't even need to lift the car up - in fact its better if you don't.
The ride is much better now.
You can't do the same trick with rear struts unfortunately.
Nick
Last edited by Welwynnick; Nov 20, 2014 at 05:29 AM.
I have been wondering if this was possible since I have some play in mine as well. You say it can't be done with the rears though? Is it an access issue or by design as I think the worst top bushing on my car is the right rear.
I think most well-used W215's and W220's will suffer from this problem, and it can be easily fixed. The improvement to the ride and handling is really worthwhile on broken surfaces.
On the rear strut, the bush appears to be bonded to the metal mounting. I don't think this causes problems as readily as the front, but the bush can come free due to corrosion or bonding failure. The only solution I found was to replace the strut. Buy a good used one off ebay, and its not too expensive or difficult (as long as the so-called quick-release connector isn't seized).
Nick, Ive just rebuilt my own valve blocks and replaced all four accumulators. I too notice my ABC front struts are broken at the top. That 35mm pin spanner you mention, it that like the half circle C spanners I see or an angle grinder type two pin wrench?
Where do you use it exactly?
The spacer goes in the engine compartment under the nut, or under the body between it and the strut? got any other pics?
Nick, thank you. I got some rubber today so will tackle this tomorrow.
I was admiring your handy work with heat shielding shown on your photo set. Also, you must be an audio nut since you appear to be wanting to reduce the jitter on your CD player - lol. I did the same kind of mods to mine.
Flip through these pages. http://www.hifiloudspeakers.info/Per.../JimNash1.html
I was admiring your handy work with heat shielding shown on your photo set.
So far, I've fitted additional heat shielding to the coil packs, the intercoolers, the IC piping and all the ABC pipes in the engine compartment.
Originally Posted by jnash
Also, you must be an audio nut since you appear to be wanting to reduce the jitter on your CD player - lol.
A nut an a half. Over the last five years I have:
Imported a Sony DA9100ES digital amp from Japan (almost unheard of) and re-engineered the power supply with double the capacity, and to run on 240V. IMHO its the best multi-channel amplifer of all.
I invented and proved a conversion of Meridian surround controllers from switch mode power supplies to linear power supplies. Meridian have since used linear PSU's in all their high-end players and processors.
I was also the retained amplifer reviewer for the UK AVForums.
The last two years have been rather dominated by my S600TT - firstly to get to grips with the IC and ABC systems, and more recently to rebuild the blown turbos. Ouch.
I also fitted a four post hydraulic car ramp in my home garage - something I should have done years ago.
Nick
Last edited by Welwynnick; Jan 2, 2015 at 08:17 PM.
Nick, I just got around to fabricating a pin wrench for those front strut mounts. So far I have turned it 180 degs but its just spinning. Car is on the ground. Any thoughts on how to proceed? I have not soaked the threads yet but that's what I was thinking of doing next.
just curious if you had a trick to share on it.
I have the 10mm thick rubber shim ready to cut out and place under this top rubber edged nut whenever I get it off.
cheers
Jim
The first is that I drilled the pin holes in the nut through to the bush - the holes aren't very deep.
Second, watch out for the main strut mount rotating, which will cause the hydraulic pipe to move round - you don't want that.
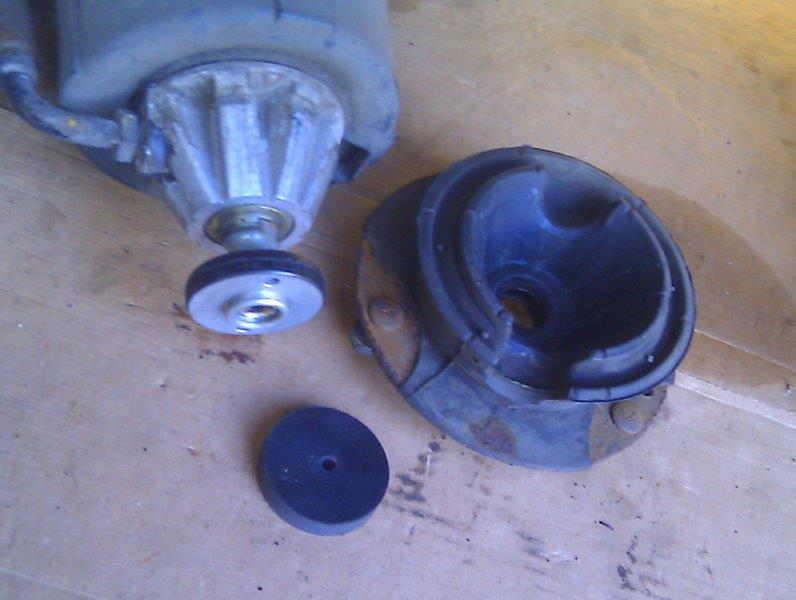
Third, if the nut is difficult to free, you could try tapping a large (size 50?) Torx socket fitting into the top of the strut shaft, where the electrical connector goes. Its like using an Allen wrench on a ball joint. Obviously, make sure you don't go deep and damage the connector. That worked for me.
Alternatively, you could simply try jacking up the wheel at that corner, so it puts more weight on the strut. I didn't try that myself, as I had my struts removed from teh car, but it may help.
SL55, Opel GT, 70 LT-1, BMW 745 turbo, MRoadster, 49 Stude truck, 69 Z/28, Ferrari project
Resurrecting an old thread here. Hopefully, that isn't frowned upon here.
Just figured this was best because the pics are already here.
So, Nick or Jnash, do either of you have pics of this procedure with the struts still on the car? Feel a bit retarded here, but having a hard time seeing how one could do this on the car.
Secondly, where do I find a sheet of 10mm thick rubber?
I need some of that for another project anyway.
Thanks in advance.
Lynn
nick posted that you can just buy some m20 rubber washers
if your hardware store doesn't have them here are some on eBay
item
222401066789
Taking the top nut off can be done with the car on the ground. Although, as I mentioned below, I was never able to unscrew it as the whole strut rotated which is not a good idea.
Once loose, you can jack up the car and let the strut fall out of the top to replace the rubber bushing.
Yes, the best way to loosen the bush nut is with the car on the ground. That means the weight of the car presses the main bush against the underside of the wheel arch mounting, which helps to stop the strut from turning, which you really need to avoid. It helps if you jack up the diagonally opposite corner of the car, so that more weight is pressed onto the front corner that you're trying to undo.
It is a difficult nut to remove. Pin spanners don't actually work very well - certainly not the adjustable ones - and even the fixed ones tend to keep popping out of the holes. The holes in the MB nuts are quite shallow, so I'd definitely recommend drilling the holes deeper, through to the bush itself. Cover the electrical connection, so you don't get swarf in there, and drill slowly.
As long as you can get the nut off, it's a quick, cheap, easy and worthwhile fix. Remove the connector, remove the bush, fit the rubber washer, re-fit the bush and fit the connector. No harder than that.
Nick
Last edited by Welwynnick; Feb 22, 2017 at 03:34 PM.
i really tried hard to remove the nut with a fixed spanner and was unsuccesful. read that someone heated the nut to soften the loctite and that worked. don't know though. haven't tried it myself, but without it the nuts are next to impossible to remove. at least for me.
No, don't heat up the nut as you may weaken or destroy the rubber. What I did, I built a little metal plate w/ 2 guide pins & space them to fit into the 2 holes in the nut. On the back side of the plate, I cut one end of a driver's extension then welded it to the plate. The other end will mate into the impact gun. I have an 02 CL500 & I've also shimmed the rear struts the same way as well but go w/ thinner shims/big metal washers as the gaps are not as wide as the front. The reason the gap is bigger in the front is due to the engine (heavier) so the front top strut mount deformed/compressed more over time w/ age. For the rears, remove the 3 nuts from the top of the strut. Next, loosen up the bottom strut's bolt then lower the LCA so you can swing the top of the strut outside of the wheel housing to get access to the top strut mount. Use the same process w/ the metal plate & impact gun to remove the nut. Don't worry about damaging the hydraulic line's connector which is attached to the strut because the top strut mount has the upside down metal cup, it has a notch in it & will act as a stopper. It's very easy once you get a hang of it.
Last edited by superfast; Feb 24, 2017 at 03:23 PM.
The top strut nut we're talking about consists of metal & rubber. We are adding a rubber and/or metal shim to fill the gap between the top strut nut & the top strut mount so do not destroy it. Here's the metal plate I've made w/ the 2 pins. Measure the diameter of one of the 2 holes on the nut then buy 2 little hi-strength steel screws (also at Home Depot) so they won't twisted or break off while you're removing the top nut.
Last edited by superfast; Feb 25, 2017 at 01:32 AM.
SL55, Opel GT, 70 LT-1, BMW 745 turbo, MRoadster, 49 Stude truck, 69 Z/28, Ferrari project
Tool for removal.
Just did this today, as I had a bit of play in mine, and may sell it to a friend, I wanted to make sure there are NO issues. I hate selling cars to friends.
Anyway, got to thinking, it really doesn't matter if you add material (either hard rubber or metal) on top of the strut mount or below it. By adding on top there is no need to pull the strut out or jack up the car, other than to measure how much slack you want to remove.
I made this tool using three 7/8 inch washers welded together. I used m7 bolts, which are a bit larger than the hole in the strut nut. But the nut is very soft and easy to drill, so I drilled out the two holes to 15/64, si I could use bigger pins. Bigger pins = more strength.
Car drives just as nicely as before, but got rid of some expansion joint "flop flop" noise. Wasn't noisy all the time, just on some roads.
Don't laugh at my ugly welds. Both nuts spun right off with an impact gun on a 1.25" socket.
.
Last edited by LynnBilodeau; Jun 5, 2017 at 09:42 AM.
Mercedes SLR McLaren 722 S Is Extremely Rare Example Modified by McLaren
Slideshow: A one-of-one U.S.-spec Mercedes-Benz SLR McLaren Roadster became even rarer after a factory-backed transformation at McLaren's headquarters.