


DIY: 06+ W251 Radio removal - instructions with pics

Thread Starter
Newbie
Joined: Jun 2007
Posts: 9
Likes: 1
From: Tustin, CA
Blazer, ZX-6R 636
DIY: 06+ W251 Radio removal - instructions with pics
Hi, I've been browsing the forum for a while. I'm working on an 06 R500 (I'm putting in a backup camera to the factory monitor), and i noticed there were no tutorials on this forum. I thought I would take some pics for everyone.
(Click on the picture for a full size image.)
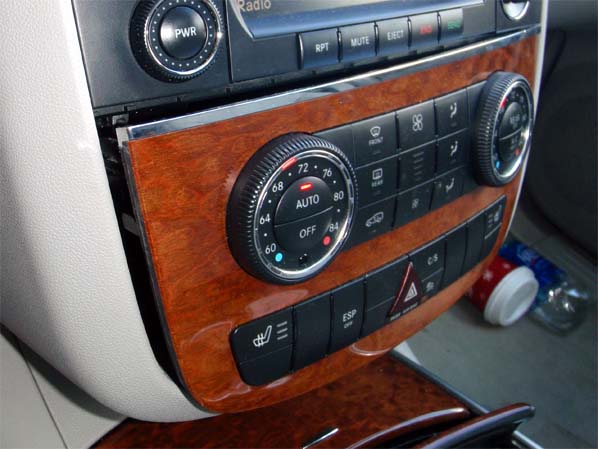
Here is a pic of the unit.

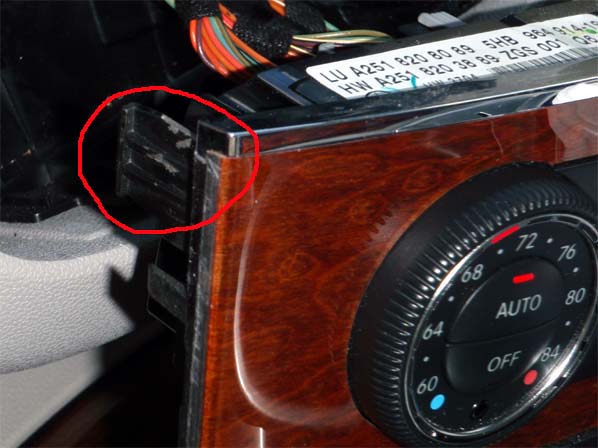
Insert a clean tool (I used a 90� hook tool, but you can use a flat head screw driver). Make sure it's clean, as to not stain the leather. Insert the tool at the location shown in the picture below. There is a clip that will release the HVAC once you press on it. It it easy. No force required.


Do the same for the right side.

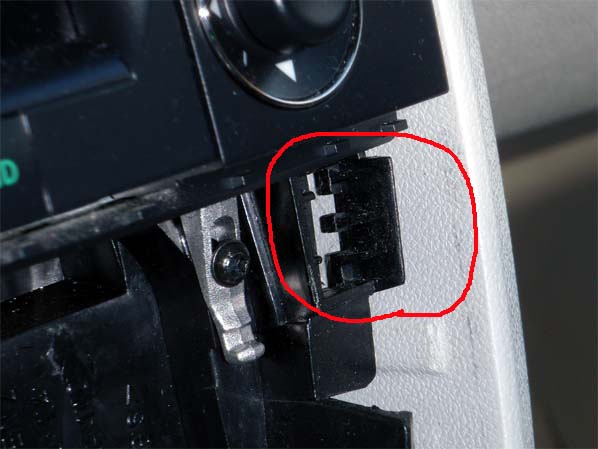
Take out the HVAC, and remove the plugs.


Remove 2 Torx-20 screws (highlighted in red).

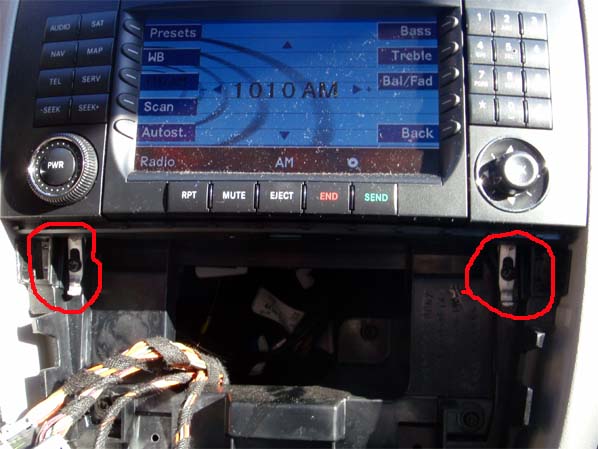
Pull straight down on the 2 silver pieces. This will release the radio. Don't pull too hard as to break the piece, just enough to release the radio.

Here is what the silver piece looks like, and how it works.
This is the piece up.

This is the piece down.

Pull the radio out. It's easy, no force required.


Unplug the radio harness. All the plugs are connected to one main harness. Pinch the clip, and fold it out. This will release the harness. No force required, it is fairly simple.


You're done!
If anyone has any questions, feel free to ask!
-Paul
(Click on the picture for a full size image.)
Here is a pic of the unit.

Insert a clean tool (I used a 90� hook tool, but you can use a flat head screw driver). Make sure it's clean, as to not stain the leather. Insert the tool at the location shown in the picture below. There is a clip that will release the HVAC once you press on it. It it easy. No force required.


Do the same for the right side.

Take out the HVAC, and remove the plugs.


Remove 2 Torx-20 screws (highlighted in red).

Pull straight down on the 2 silver pieces. This will release the radio. Don't pull too hard as to break the piece, just enough to release the radio.

Here is what the silver piece looks like, and how it works.
This is the piece up.

This is the piece down.

Pull the radio out. It's easy, no force required.


Unplug the radio harness. All the plugs are connected to one main harness. Pinch the clip, and fold it out. This will release the harness. No force required, it is fairly simple.


You're done!
If anyone has any questions, feel free to ask!
-Paul
Member

Joined: Mar 2005
Posts: 180
Likes: 2
From: Georgia
2020 S560, 2020 SLC43, 2022 RAM Longhorn Limited, 2025 Genesis GV80 Prestige
Awesome! 
Can you give more detail on the backup camera? I have an '06 with Nav and was told by the dealer that I could not put a camera on it. I really would like to have that camera installed.
Can you give more detail on the backup camera? I have an '06 with Nav and was told by the dealer that I could not put a camera on it. I really would like to have that camera installed.
Thread Starter
Newbie
Joined: Jun 2007
Posts: 9
Likes: 1
From: Tustin, CA
Blazer, ZX-6R 636
I'm using a module that integrates with the factory radio, and a small camera. What the module does is override the video display, and plays any video source (camera, dvd player, etc...).
I'm installing the camera to the left of the third brake light (to be symmetrical to the washer nozzle). I'll post some pics throughout the next few days.
-Paul
Last edited by WhiteBlazer01; Aug 17, 2007 at 12:22 AM.

Newbie
Joined: May 2004
Posts: 4
Likes: 0
94 SL500
Nice pictoral radio removal, but I am really interested in a backup camera solution for my 06 R500. I had a nav unit installed after I got it even though my dealer said it wasn't available so I am reluctant to ask him about a backup camera solution. So... I too am really interested in the outcome of the project.
Thanks
Thanks
Thread Starter
Newbie
Joined: Jun 2007
Posts: 9
Likes: 1
From: Tustin, CA
Blazer, ZX-6R 636
I'm actually going to post info on the backup camera. I plan on finishing up this weekend (possibly Sunday). I'm also working on changing a few other things to the car in the meantime (i.e. amber dash light to white - I'll post pics of that later too).
I'm going to create another thread regarding the camera.
-Paul
I'm going to create another thread regarding the camera.
-Paul
Trending Topics
MBWorld Fanatic!
Joined: Apr 2007
Posts: 2,430
Likes: 12
From: Cleveland Ohio
beater with a heater
Yep, not to mention the vacuum formed vinyl. i seen that and i was like, oh well 100 weekend warriors are going to scratch up their AC bezel
MB World Stories
The Best of Mercedes & AMG

Manual Mercedes? 6 Times Sindelfingen Let Drivers Have All The Fun
Verdad Gallardo
Mercedes SLR McLaren 722 S Is Extremely Rare Example Modified by McLaren
Verdad Gallardo
8 Classic Boxy Mercedes Designs That Have Aged Like Fine Wine
Verdad Gallardo
Flawlessly Restored Mercedes 190E Evo II Heads to Auction
Verdad Gallardo
Electric Mercedes C-Class Unveiled: 11 Things You Need to Know
Verdad Gallardo
Mercedes EQS Gets A Major Update: Everything You Need to Know
Verdad Gallardo
5 Underrated Mercedes-Benz Models That Don't Get the Love They Deserve
Verdad Gallardo
Mercedes 300D Has Pushed Well Past 1 Million Miles and It Ain't Stopping
Verdad Gallardo
10 Most Reliable Mercedes-Benz Models You Can Buy Used
Verdad Gallardo
Newbie
Joined: Aug 2007
Posts: 1
Likes: 0
From: Norwau
2007 MB R320 CDI US model
Problems removing the HVAC
"Insert a clean tool (I used a 90� hook tool, but you can use a flat head screw driver). Make sure it's clean, as to not stain the leather. Insert the tool at the location shown in the picture below. There is a clip that will release the HVAC once you press on it. "
Hi, I really struggle to remove the HVAC, any specuial trick I should know about? Special tool required? I just cant move mine...
Thank you for a nice explanation and pictures!
Lars
Hi, I really struggle to remove the HVAC, any specuial trick I should know about? Special tool required? I just cant move mine...
Thank you for a nice explanation and pictures!
Lars
MBWorld Fanatic!
Joined: Apr 2007
Posts: 2,430
Likes: 12
From: Cleveland Ohio
beater with a heater
Almost a Member!
Joined: Aug 2007
Posts: 27
Likes: 0
R500
Hi, I've been browsing the forum for a while. I'm working on an 06 R500 (I'm putting in a backup camera to the factory monitor), and i noticed there were no tutorials on this forum. I thought I would take some pics for everyone.
You're done!
If anyone has any questions, feel free to ask!
-Paul
You're done!
If anyone has any questions, feel free to ask!
-Paul
Member
Joined: Sep 2007
Posts: 124
Likes: 0
From: Woodbridge, VA
2007 R-500
DIY: 06+ W251 Radio removal - instructions with pics
Paul,
Fantastic job! I look forward to more info on your effort. I want to install a backup camera on my 07 500.
What harness are you using?
What camera are you using?
Are you mounting to the factory spot above the license?
Fantastic job! I look forward to more info on your effort. I want to install a backup camera on my 07 500.
What harness are you using?
What camera are you using?
Are you mounting to the factory spot above the license?
Member
Joined: Mar 2005
Posts: 180
Likes: 2
From: Georgia
2020 S560, 2020 SLC43, 2022 RAM Longhorn Limited, 2025 Genesis GV80 Prestige
I'm using a module that integrates with the factory radio, and a small camera. What the module does is override the video display, and plays any video source (camera, dvd player, etc...).
I'm installing the camera to the left of the third brake light (to be symmetrical to the washer nozzle). I'll post some pics throughout the next few days.
-Paul
I'm installing the camera to the left of the third brake light (to be symmetrical to the washer nozzle). I'll post some pics throughout the next few days.
-Paul
Thanks.

Newbie
Joined: Apr 2008
Posts: 12
Likes: 0
2006 R500 (w251)
Any updates??
Hi All,
I picked up an 06 R500 and looking to do this as well. Please post up the parts (actual part numbers would be great) that everyone is using for the install. Also, does anyone have any updated pics of the install and connections at the command unit? TIA
Don
I picked up an 06 R500 and looking to do this as well. Please post up the parts (actual part numbers would be great) that everyone is using for the install. Also, does anyone have any updated pics of the install and connections at the command unit? TIA
Don

Newbie
Joined: Jul 2008
Posts: 1
Likes: 0
R350
I will shortly be removing the climate control panel to get at the fiber. Now that the pics are no longer available, could someone describe exactly where one needs to insert the wedge to cause the panel to spring loose? Thanks.

Member
Joined: Aug 2007
Posts: 236
Likes: 0
From: Dallas, Texas
R350 4-matic
There is a video on Youtube doing a back-up camera on the new C-class. From what I understand it's the same method, and equipment that the R will need.
http://www.youtube.com/watch?v=6zPLFLK-Wls
http://www.youtube.com/watch?v=6zPLFLK-Wls


Junior Member
Joined: Jun 2008
Posts: 21
Likes: 0
From: Satellite Beach, FL
2017 GLS 450
since these pictures are no longer available, is there anyone that saved them? I am trying to figure out at just which point to insert the tool to remove the hvac and a picture would be priceless. Thanks in advance.
Newbie
Joined: Nov 2008
Posts: 10
Likes: 1
From: Westchester NY
R350; Subaru WRX STi; Subaru WRX; Renault Avantime; Citroen CX GTi & GTi Turbo 2; Judge Dredd 101
Well I too got frustrated at the lack of pics, so after trawling the web and finding none I figured it out and did my own. Hope this helps:

You start by removing the A/C panel. Now I don't actually advise using a Swiss army knife, but it serves to show where you have to go. Insert a slim blade (or even the correct tool!), feel for the clip, push, wiggle, and pry gently...
...and one side pops out. There's an identical clip on the other side, but I didn't have to work on it; just a gentle pull, twist, and wiggle on the A/C panel and the whole thing popped out.
Here's a couple of closeups... above, the clip you're trying to release. Below...
...the moulding it locks into.
With the A/C panel out of the way, you can see the two silver clips that secure the head unit. Loosen the Torx screws just enough to slide the clips gently down, and the head unit will just slide out.
Refitting is the reverse of removal, when refitting the A/C panel it's best to put the bottom in first, and get that aligned before you push the top in and lock the clips.
Hope this helps!
And now some words for the search engines:
R350 R500 R-Class W251 radio head unit head-unit nav screen removal removing ipod integration upgrade
:-)
Mike
Last edited by fireman_mike; Nov 9, 2008 at 09:10 PM.


Newbie
Joined: Nov 2008
Posts: 10
Likes: 1
From: Westchester NY
R350; Subaru WRX STi; Subaru WRX; Renault Avantime; Citroen CX GTi & GTi Turbo 2; Judge Dredd 101

Mike

Newbie
Joined: Jun 2012
Posts: 1
Likes: 0
R350

Newbie
Joined: Jun 2012
Posts: 9
Likes: 0
From: Long Island NY
mrcedes R350 2008
WE Can't see your pictures...?!!!
Hi, I've been browsing the forum for a while. I'm working on an 06 R500 (I'm putting in a backup camera to the factory monitor), and i noticed there were no tutorials on this forum. I thought I would take some pics for everyone.
(Click on the picture for a full size image.)
Here is a pic of the unit.
Insert a clean tool (I used a 90� hook tool, but you can use a flat head screw driver). Make sure it's clean, as to not stain the leather. Insert the tool at the location shown in the picture below. There is a clip that will release the HVAC once you press on it. It it easy. No force required.
Do the same for the right side.
Take out the HVAC, and remove the plugs.
Remove 2 Torx-20 screws (highlighted in red).
Pull straight down on the 2 silver pieces. This will release the radio. Don't pull too hard as to break the piece, just enough to release the radio.
Here is what the silver piece looks like, and how it works.
This is the piece up.
This is the piece down.
Pull the radio out. It's easy, no force required.
Unplug the radio harness. All the plugs are connected to one main harness. Pinch the clip, and fold it out. This will release the harness. No force required, it is fairly simple.
You're done!
If anyone has any questions, feel free to ask!
-Paul
We can not see your pictures!!! ?


