


Help refilling intercooler circuit on CL600 (S600) M275
Thread Starter
Junior Member
Joined: Sep 2013
Posts: 15
Likes: 0
cl600 biturbo
Help refilling intercooler circuit on CL600 (S600) M275
Hi Guys
I hope someone can help. I have an 03 CL600 biturbo I had problems earlier in year with a broken turbo which was replaced with considerable restoration of power. However, the engine gets up to about 100c when in town and I started looking into it thinking that the two could be linked. I read about the intercooler pump failing at around 80K and checked mine out to find it is bust. We took it off and tried to resurrect it with partial success but as it was leaking, have bought the 2010 bosch version and plan to fit it.
Rightly or wrongly, we decided to drain the radiator and circuit and now have to refill it. I am sure I saw a good link with pics explaining how to do it from the bottom of the rad up in order to push the air out the top via the filler cap. Has anybody done this or can you point me to the link?
I could, I think, do it from the filler cap but I think this involves removing the schraeder valves.
Can anyone help me out?
Chris
Thread Starter
Junior Member
Joined: Sep 2013
Posts: 15
Likes: 0
cl600 biturbo
I managed to bleed the intercoler circuit without much difficult. Just ran some water (initially) in the filler cap until it was full, and at that point there was water coming out of the exit port of the new pump. Connected outflow pipe to new pump and turned engine on. As soon as the level started to go down in the filler tube up top, started adding coolant/water mix and kept filling every time level dropped a bit. Initially, the fluid re-entering was slightly frothy but after a while themicrobubbles had pretty much gone and managed to milk out alot of big bubbles by squeezing RH return
Charge air coolers are now cool at idle in garage whereas they were like two recently boiled kettles before!
IMHO, the MB vacuum system for filling the circuit is unnecessary but quick once set up. Doing it this way takes a while as you have to keep topping up as fluid drwan down into rad and air escapes but it seems to do the trick. At rest, any residual air will just slowly rise to top.
Chris

Newbie
Joined: May 2015
Posts: 11
Likes: 0
C230k, ML350, and CL600
Hi Chris,
I'm a newbie to the CL600 too. Just wondering how you knew (Checked) your pump to know that it wasn't working? I'm thinking I have a similar issue.
Also, what fluid did you refill the system with? Again... newbie here.
Glad you got yours going good.
Thanks!
I'm a newbie to the CL600 too. Just wondering how you knew (Checked) your pump to know that it wasn't working? I'm thinking I have a similar issue.
Also, what fluid did you refill the system with? Again... newbie here.
Glad you got yours going good.
Thanks!
Thread Starter
Junior Member
Joined: Sep 2013
Posts: 15
Likes: 0
cl600 biturbo
Hi HRH
Sorry for not getting round to replying to your post. In my case it was really a hunch. It was 10 years old, the intercooler circuit was dry due to a leaking hose up top and when I poured coolant in at the top, it never went anywhere. The radiator at the very front (I think its the very front big one not the very small one) is stone cold in cold weather after a long drive.
When the new pump was in and we turned the engine on and started to pour coolant in, the aluminium intercoolers eventually started to become cold as the stone cold coolant recirculated back up to the top thanks to the pump. Furthermore, the liquid started to bubble and froth up top due to the small amount of air in the liquid. We did not got to the trouble of bleeding the air out using hoses etc. We just repeatedly squeezed the rubber hosing feeding into the filler pipe. Seemed to work pretty well.
The pump change is a definite DIY job in my opinion. Not much can go wrong and it is easy to get to. After changing it for a new one I felt I could hear a definite whine in that area after starting the engine. I presumed that was ow the pump which was actually working.
Good luck and let us know how you get on!

MBWorld Fanatic!


Joined: Jan 2008
Posts: 6,151
Likes: 533
Mercedes
Hi HRH
Sorry for not getting round to replying to your post. In my case it was really a hunch. It was 10 years old, the intercooler circuit was dry due to a leaking hose up top and when I poured coolant in at the top, it never went anywhere. The radiator at the very front (I think its the very front big one not the very small one) is stone cold in cold weather after a long drive.
When the new pump was in and we turned the engine on and started to pour coolant in, the aluminium intercoolers eventually started to become cold as the stone cold coolant recirculated back up to the top thanks to the pump. Furthermore, the liquid started to bubble and froth up top due to the small amount of air in the liquid. We did not got to the trouble of bleeding the air out using hoses etc. We just repeatedly squeezed the rubber hosing feeding into the filler pipe. Seemed to work pretty well.
The pump change is a definite DIY job in my opinion. Not much can go wrong and it is easy to get to. After changing it for a new one I felt I could hear a definite whine in that area after starting the engine. I presumed that was ow the pump which was actually working.
Good luck and let us know how you get on!
Sorry for not getting round to replying to your post. In my case it was really a hunch. It was 10 years old, the intercooler circuit was dry due to a leaking hose up top and when I poured coolant in at the top, it never went anywhere. The radiator at the very front (I think its the very front big one not the very small one) is stone cold in cold weather after a long drive.
When the new pump was in and we turned the engine on and started to pour coolant in, the aluminium intercoolers eventually started to become cold as the stone cold coolant recirculated back up to the top thanks to the pump. Furthermore, the liquid started to bubble and froth up top due to the small amount of air in the liquid. We did not got to the trouble of bleeding the air out using hoses etc. We just repeatedly squeezed the rubber hosing feeding into the filler pipe. Seemed to work pretty well.
The pump change is a definite DIY job in my opinion. Not much can go wrong and it is easy to get to. After changing it for a new one I felt I could hear a definite whine in that area after starting the engine. I presumed that was ow the pump which was actually working.
Good luck and let us know how you get on!
If they are separate is there any good way to check and fill the fluid in the intercooler system without the fancy Mercedes vaccuum tool?
MBWorld Fanatic!
Joined: Jan 2008
Posts: 6,151
Likes: 533
Mercedes
Trending Topics

MBWorld Fanatic!


Joined: Nov 2010
Posts: 2,605
Likes: 343
From: Welwyn, Herts, UK
2006 S600
I thought you knew all this stuff Tusabes, or have you cloned his account?
The 55K has shared systems, and the V12 has separate systems.
If you do an internet search for "refrigeration adapter kit" you should find this, which has just become popular:

The fitting in the bottom left corner is a 7/16 male to 7/16 female adapter, and you can screw that onto the large Schrader valves on top of the IC's. Put a pipe on the adapter, and that will allow you to bleed air and coolant out of the top, without having to remove the valves.
You can bleed the system by running the pump by jumping the switched connections on the IC pump relay socket. The pump relay is the middle of three relays on the inside of the engine compartment partition (on the RHS - on RHD cars at least).
The relay is a typical 4-pin automotive relay. The switched connections are pins 87 and 30, so use a piece of wire to jump them. You don't need the ignition on.

I'm not certain this works perfectly, but many people have done it and been happy with the results.
Nick
The 55K has shared systems, and the V12 has separate systems.
If you do an internet search for "refrigeration adapter kit" you should find this, which has just become popular:
The fitting in the bottom left corner is a 7/16 male to 7/16 female adapter, and you can screw that onto the large Schrader valves on top of the IC's. Put a pipe on the adapter, and that will allow you to bleed air and coolant out of the top, without having to remove the valves.
You can bleed the system by running the pump by jumping the switched connections on the IC pump relay socket. The pump relay is the middle of three relays on the inside of the engine compartment partition (on the RHS - on RHD cars at least).
The relay is a typical 4-pin automotive relay. The switched connections are pins 87 and 30, so use a piece of wire to jump them. You don't need the ignition on.
I'm not certain this works perfectly, but many people have done it and been happy with the results.
Nick
MB World Stories
The Best of Mercedes & AMG

Manual Mercedes? 6 Times Sindelfingen Let Drivers Have All The Fun
Verdad Gallardo
Mercedes SLR McLaren 722 S Is Extremely Rare Example Modified by McLaren
Verdad Gallardo
8 Classic Boxy Mercedes Designs That Have Aged Like Fine Wine
Verdad Gallardo
Flawlessly Restored Mercedes 190E Evo II Heads to Auction
Verdad Gallardo
Electric Mercedes C-Class Unveiled: 11 Things You Need to Know
Verdad Gallardo
Mercedes EQS Gets A Major Update: Everything You Need to Know
Verdad Gallardo
5 Underrated Mercedes-Benz Models That Don't Get the Love They Deserve
Verdad Gallardo
Mercedes 300D Has Pushed Well Past 1 Million Miles and It Ain't Stopping
Verdad Gallardo
10 Most Reliable Mercedes-Benz Models You Can Buy Used
Verdad Gallardo
MBWorld Fanatic!
Joined: Nov 2010
Posts: 2,605
Likes: 343
From: Welwyn, Herts, UK
2006 S600
It's an interesting step, isn't it?
In my first drive in a TT, I felt like I was striding through the countryside on enormous stilts, while everyone else scurried around my feet, with their little legs wiggling backwards and forwards so fast. It was a few years ago now, but I still remember that feeling.
Nick
In my first drive in a TT, I felt like I was striding through the countryside on enormous stilts, while everyone else scurried around my feet, with their little legs wiggling backwards and forwards so fast. It was a few years ago now, but I still remember that feeling.
Nick
MBWorld Fanatic!
Joined: Jan 2008
Posts: 6,151
Likes: 533
Mercedes
It's an interesting step, isn't it?
In my first drive in a TT, I felt like I was striding through the countryside on enormous stilts, while everyone else scurried around my feet, with their little legs wiggling backwards and forwards so fast. It was a few years ago now, but I still remember that feeling.
Nick
In my first drive in a TT, I felt like I was striding through the countryside on enormous stilts, while everyone else scurried around my feet, with their little legs wiggling backwards and forwards so fast. It was a few years ago now, but I still remember that feeling.
Nick
its kind of like the common saying is a lower powered car is more fun to drive Hard .
Super Member
Joined: Jun 2016
Posts: 589
Likes: 60
From: Snowville, ID
W212 E350; W166 GLC300; W164 ML550; W164 ML63; W221 S65; W220 S430; Escalade ESV
My S600 dumped coolant 4 times in the last 3 weeks. No leaks and temperature are normal. Just got puddles over night with low coolant sensor on the dash. What would caused this issue?
Super Member
Joined: Jun 2016
Posts: 589
Likes: 60
From: Snowville, ID
W212 E350; W166 GLC300; W164 ML550; W164 ML63; W221 S65; W220 S430; Escalade ESV
Originally Posted by DrDoe
My S600 dumped coolant 4 times in the last 3 weeks. No leaks and temperature are normal. Just got puddles over night with low coolant sensor on the dash. What would caused this issue?

MBWorld Fanatic!
Joined: Dec 2012
Posts: 2,474
Likes: 439
From: Ball Ground, GA (N of Atlanta)
2003 S500 2007 GL450
Perhaps start a new thread. This one is about how to fill/bleed the intercooler system. It isn't clear whether you are asking about dumping coolant from the intercooler system, the cooler system or the combined system. Much more detail and a clearer description in a new thread will probably get you a quicker and better response.
Super Member
Joined: Jun 2016
Posts: 589
Likes: 60
From: Snowville, ID
W212 E350; W166 GLC300; W164 ML550; W164 ML63; W221 S65; W220 S430; Escalade ESV
My problem ended up belonging to this thread after all as I needed to bleed the system.
For the coolant dump, I bought the S600 in for coolant service at the dealership. Before flushing, they filled it up and noticed small leaks at the radiator and the water pump.
Yes. The leaks slowly drained the system and filled it up with air. Now everything starts to click as the heater starts to work better.
The temperature gauge never went above 90 degrees C and that caused me to not looking into the coolant bleeding.
The dealership gave me a free coolant service check so that was nice. Now I need to look into other ways to avoid the $3k repair job.

MBWorld Fanatic!
Joined: Nov 2010
Posts: 2,605
Likes: 343
From: Welwyn, Herts, UK
2006 S600
Here's a procedure for changing the water pump:
https://mbworld.org/forums/s-class-w...-pictures.html
Nick
https://mbworld.org/forums/s-class-w...-pictures.html
Nick
MBWorld Fanatic!
Joined: Nov 2010
Posts: 2,605
Likes: 343
From: Welwyn, Herts, UK
2006 S600
This is how to change the radiator:
Removing the W220 radiator is surprisingly difficult. Here's how I did it:
Before doing anything, inspect the new radiator and make sure it�s to spec; this is really important.
Now is the time to replace the anti-freeze, the thermostat, the thermostat housing o-ring, the hose connector o-rings, and the hoses and aux drive belt if you feel like it.
Refitting is the reverse of removal, but:
Removing the W220 radiator is surprisingly difficult. Here's how I did it:
Before doing anything, inspect the new radiator and make sure it�s to spec; this is really important.
- Make sure the outside diameter of the hose receptacle is 41.0 to 41.5 mm.
- Make sure you have threaded receptacles for the fan cowl, IC HE, IC pump, AC HE and AC pipe fittings.
- When you remove the old radiator, some of those fittings may be rusted up � test them first, and figure out what you�re going to do.
- There are rubber & plastic mouldings all around the radiator to control airflow, and they take time to remove & refit.
- Establish whether your header tank fills to the RH header tank, or the bottom hose.
- The new radiator may have a �� filler hose receptacle that may need to be blocked off � which can make fitting more difficult.
- Lift the front end of the car onto stands and remove the top and bottom covers.
- Loosen the header tank cap and drain the cooling system. This takes a while.
- Remove the thermostat/top hose housing and disconnect all the hoses (expect spills).
- Disconnect the electric fan.
- Remove the small clips that hold the top of the fan cowl to the radiator flange.
- Remove the two clips that hold the bottom of the fan cowl to the radiator flange.
- Undo the two transmission oil cooler pipes, catch a bit of oil, and cover the pipe ends.
- Undo the two nuts at the top corners of the fan cowl.
- Pull the fan assy up an inch, tilt it back and pull it out upwards (pushing the IC pipes out of the way).
- From underneath, undo the IC pump and its bracket from the radiator.
- Still underneath, remove the bolt that holds the aircon pipes bracket to the radiator.
- Unbolt the top L&R of the aircon condenser from the radiator.
- Unbolt the IC heat exchanger from the radiator, and support it.
- Undo the plastic clamps that hold the top of the radiator.
- Push the top of the radiator back and remove the bleed pipe.
- Remove the plastic brackets that are clipped half-way up each side of the radiator.
- Lift the radiator out.
Now is the time to replace the anti-freeze, the thermostat, the thermostat housing o-ring, the hose connector o-rings, and the hoses and aux drive belt if you feel like it.
Refitting is the reverse of removal, but:
- Check that the top hose assy fits both radiator receptacles before fitting the radiator (ask me why).
- Tape sheets of corrugated card to the front and rear facesof the new radiator, otherwise you�ll make a horrible mess during fitting.
- Make sure the aircon condenser is in about the right position before you push the new radiator forwards into position.
- Make sure all the small hoses and cables are tied away from the moving parts, like the ancillaries and the aux belt.
- The cooling system bleeds itself, but only when the engine is fully warmed-up, and you need patience.
Super Member
Joined: Jun 2016
Posts: 589
Likes: 60
From: Snowville, ID
W212 E350; W166 GLC300; W164 ML550; W164 ML63; W221 S65; W220 S430; Escalade ESV
The radiator was replaced just 18 months ago and it was Behr. Just my lucks!
Thanks for the write up. I used yours procedure to removed it and I could get back on the road with in a day but I decided to tackle the coolant pump and the tandem pump while I'm there.
The leak on the coolant pump is very minor as there are signs of dry coolant. If I can't get the 27mm nut off then I think I'm going to be ok to ignore it.
As for the tandem pump, it sprays hydraulic fluid everywhere so I had no choice. Removing it is relatively easy and I am now thinking about rebuilding it. Ordered the o-rings this AM and I'm in the process of removing all un-used ABC components for weight reduction.
MBWorld Fanatic!
Joined: Jan 2008
Posts: 6,151
Likes: 533
Mercedes
Super Member
Joined: Jun 2016
Posts: 589
Likes: 60
From: Snowville, ID
W212 E350; W166 GLC300; W164 ML550; W164 ML63; W221 S65; W220 S430; Escalade ESV
I got the car running finally after 6 weeks. New radiator and lower cooling hose installed and no leaks. I got heat again but something is still not right as the coolant service message is popping up. Any ideas? Perhaps the refills weren't right? Is there a different coolant service message between coolant for the radiator or the intercooler?
Coolant temperature gets to 190F when the car runs with heater blows and 210F when the car runs with AC blows.
Coolant temperature gets to 190F when the car runs with heater blows and 210F when the car runs with AC blows.
MBWorld Fanatic!
Joined: Nov 2010
Posts: 2,605
Likes: 343
From: Welwyn, Herts, UK
2006 S600
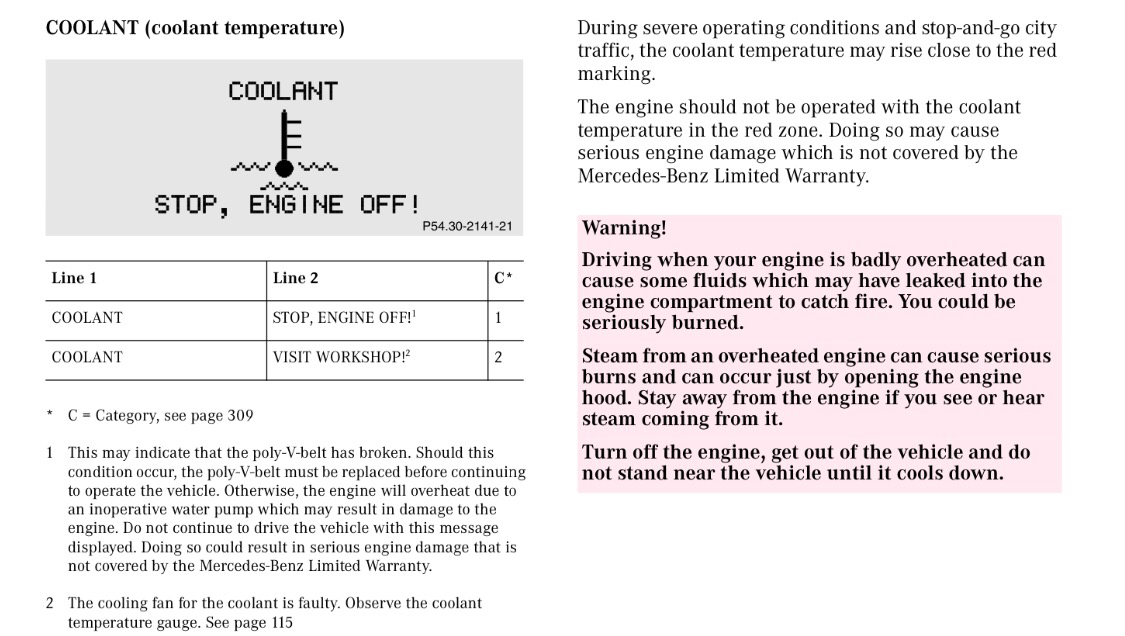
What does the owner's manual say the coolant message means?
Have you got an OBD2 code reader? Every S600 owner should have one of those at least.
Coolant temperature does vary with speed, but are you saying it's different to how it was before? 210F does seem a bit high.
Nick
Have you got an OBD2 code reader? Every S600 owner should have one of those at least.
Coolant temperature does vary with speed, but are you saying it's different to how it was before? 210F does seem a bit high.
Nick
Super Member
Joined: Jun 2016
Posts: 589
Likes: 60
From: Snowville, ID
W212 E350; W166 GLC300; W164 ML550; W164 ML63; W221 S65; W220 S430; Escalade ESV
I got the visit workshop message when AC blows in idle mode. Coolant gauge flickered between 95C to 100C. 
I didn't touch the pump as I couldn't remove the 27mm nut. I'm confused by the workshop message as it seems coolant is pumping. Is it not pumping fast enough?
I topped off both radiator and intercooler reservoirs 3 times after 3 fifteen minutes runs so air is still coming out of the system.
Also confused with the large temperature differences between heat and AC.
MBWorld Fanatic!
Joined: Nov 2010
Posts: 2,605
Likes: 343
From: Welwyn, Herts, UK
2006 S600
Oh that one. That's pretty serious. 210F is as high as you should let it go. Either:
The pump isn't working - only feasible if you didn't re-fit the aux belt correctly.
The fan isn't working - should always run when the AC is on. Is it?
The thermostat isn't working - very unlikely.
The cooling system isn't full - most likely. You need a lot of patience to re-fill.
Nick
The pump isn't working - only feasible if you didn't re-fit the aux belt correctly.
The fan isn't working - should always run when the AC is on. Is it?
The thermostat isn't working - very unlikely.
The cooling system isn't full - most likely. You need a lot of patience to re-fill.
Nick


