


SL55/63/65/R230 AMG: DIY : SL55 HID Replacement
Thread Starter
Junior Member
Joined: Jul 2012
Posts: 54
Likes: 14
From: New Jersey
03 SL55, 07 Acura MDX
DIY : SL55 HID Replacement
This will be a great DIY for anyone upgrading their bulbs or replacing a burnt bulb. I recently updated my factory HID bulbs from 4300k t0 6000k and what I noticed is that it's a pretty daunting task if you don't know what your doing, or what the actual Headlight assembly looks like. So I figured i'd take several pics and give everyone a guide line of what to look for, and how to make the bulb replacement a lot easier for you.
First things first i'll warn you, this is basically a simple and easy process, the driver's side bulb will be a breeze but the passenger side bulb will be the most difficult. My suggestion is to find a friend, or someone with skinny arms and small hands.
Time to complete the job:
Driver's side Bulb can take 5-15mins to complete.
Passenger's side bulb will take longer due to lack of space.
Parts Needed:
1) Sylvania D2S HID bulbs. Stock bulb color is 4300K.
Honestly these bulbs are pretty good, but extremely overpriced. If there is no urgency to purchase them you can get them at a better price through Ebay or elsewhere online. If it is urgent your local dealer or auto parts store will have them in stock. another option would be another brand, just make sure the bulbs are D2S.
Tools needed:
No special tools, just small hands lol.
Step 1:
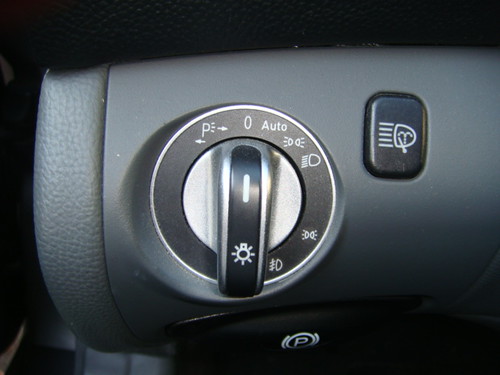
In order to prevent getting electrocuted place lights switch to the off position.
Step 2:
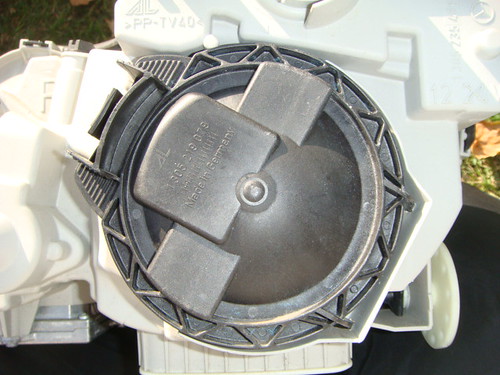
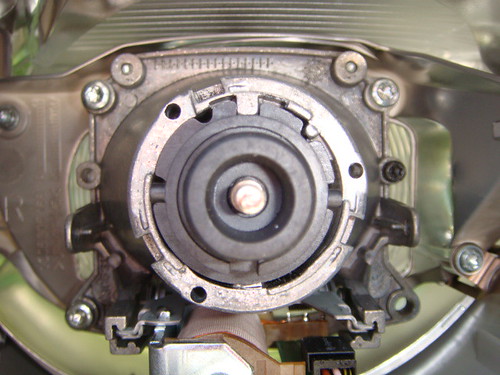
Remove the headlight cover by pressing the clip.
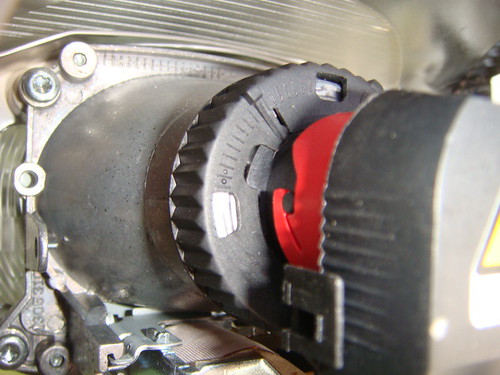
Step 3:
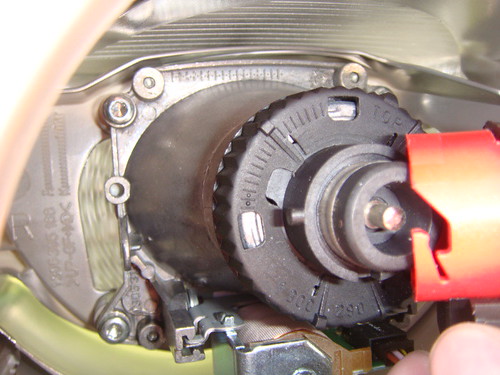
Remove Ignitor (remember Righty tighty, Lefty Loosey! To unlock the ignitor turn the knob to the left.
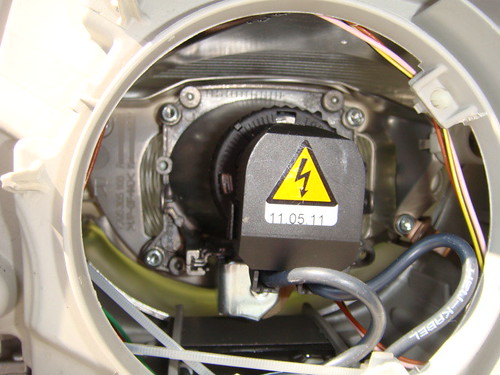
As you can see in the pic the ignitor has a guide that once it's placed in the right position with the pins located on the bulbs it'll either slide "left to unlock"(Counterclockwise), or "Right to lock (clockwise)".
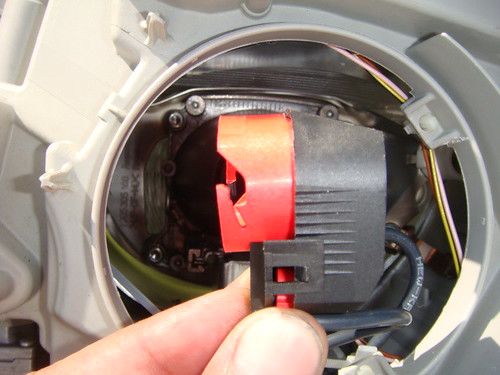
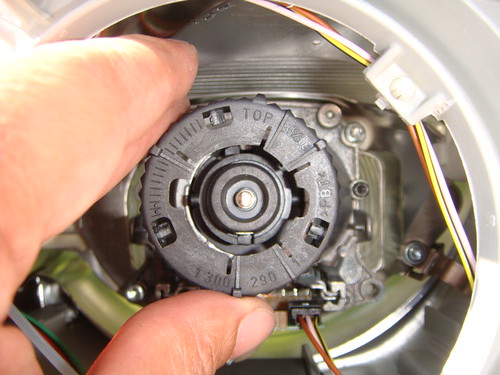
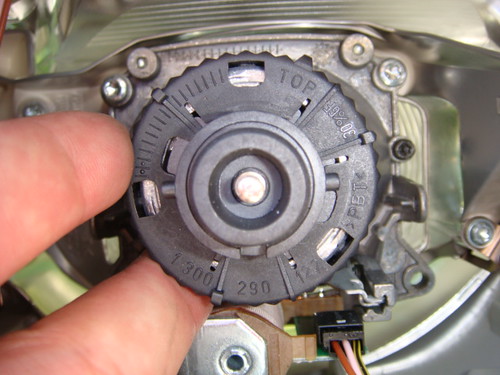
Step 4:
Unlock the Bulb Locking Plate, Again Lefty Loosey. Pay Attention to the position of the locking plate, notice at the top it's labeled "TOP".

Now remove the bulb

Step 5:
Before inserting new bulbs make sure you wipe down the glass portion of the bulbs with alcohol and take extra care to avoid touching the glass portion of the bulb, the oil from your skin will cause the bulbs to Intensify with heat and burn out sooner. Insert new bulb, Pay attention to the gaps and locking positions for the bulb. Also keep in mind that the porcelain porting of the bulb faces down. That is the correct way of installing the bulbs and to make sure that everything closes properly.
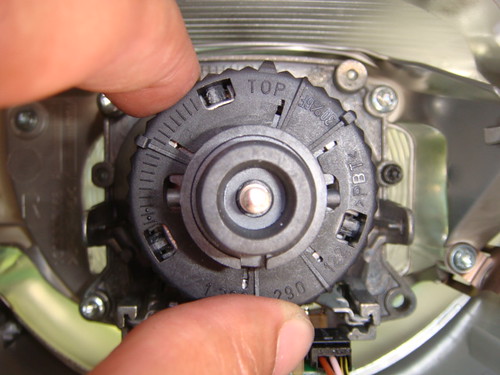
Step 6:
Place the bulb locking plate in the proper place, Notice the same 2 locking pins for the Ignitor has to pass thru 2 perfectly placed gaps on the locking plate, that's how you'll know that everything is going in properly.
On the Locking plate there are 3 tabs that insert and lock into the headlight assembly, if installed properly the only thing left to do is twist the locking plate Clockwise.
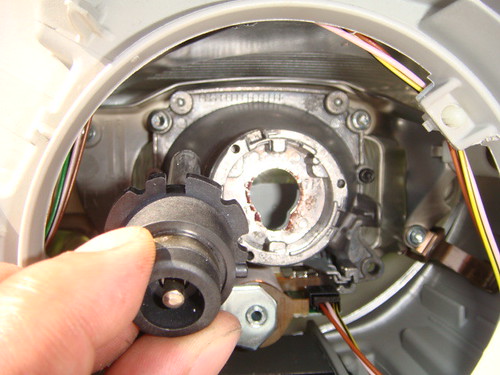
Black tabs in the open (unlocked) position.
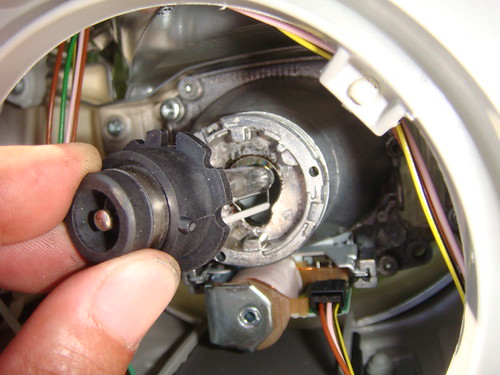
Black tabs in the locked position after turning clockwise.
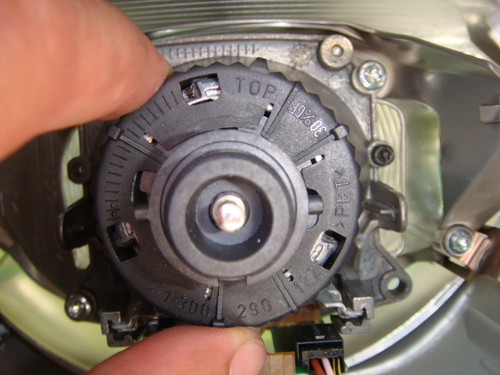
Step 7:
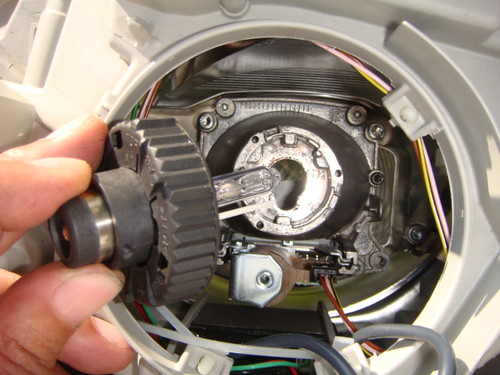
Place Ignitor on the bulb and turn clockwise.

Locked position and your done. Reseal the black headlight cover and enjoy.
First things first i'll warn you, this is basically a simple and easy process, the driver's side bulb will be a breeze but the passenger side bulb will be the most difficult. My suggestion is to find a friend, or someone with skinny arms and small hands.
Time to complete the job:
Driver's side Bulb can take 5-15mins to complete.
Passenger's side bulb will take longer due to lack of space.
Parts Needed:
1) Sylvania D2S HID bulbs. Stock bulb color is 4300K.
Honestly these bulbs are pretty good, but extremely overpriced. If there is no urgency to purchase them you can get them at a better price through Ebay or elsewhere online. If it is urgent your local dealer or auto parts store will have them in stock. another option would be another brand, just make sure the bulbs are D2S.
Tools needed:
No special tools, just small hands lol.
Step 1:
In order to prevent getting electrocuted place lights switch to the off position.
Step 2:
Remove the headlight cover by pressing the clip.
Step 3:
Remove Ignitor (remember Righty tighty, Lefty Loosey! To unlock the ignitor turn the knob to the left.
As you can see in the pic the ignitor has a guide that once it's placed in the right position with the pins located on the bulbs it'll either slide "left to unlock"(Counterclockwise), or "Right to lock (clockwise)".
Step 4:
Unlock the Bulb Locking Plate, Again Lefty Loosey. Pay Attention to the position of the locking plate, notice at the top it's labeled "TOP".
Now remove the bulb
Step 5:
Before inserting new bulbs make sure you wipe down the glass portion of the bulbs with alcohol and take extra care to avoid touching the glass portion of the bulb, the oil from your skin will cause the bulbs to Intensify with heat and burn out sooner. Insert new bulb, Pay attention to the gaps and locking positions for the bulb. Also keep in mind that the porcelain porting of the bulb faces down. That is the correct way of installing the bulbs and to make sure that everything closes properly.
Step 6:
Place the bulb locking plate in the proper place, Notice the same 2 locking pins for the Ignitor has to pass thru 2 perfectly placed gaps on the locking plate, that's how you'll know that everything is going in properly.
On the Locking plate there are 3 tabs that insert and lock into the headlight assembly, if installed properly the only thing left to do is twist the locking plate Clockwise.
Black tabs in the open (unlocked) position.
Black tabs in the locked position after turning clockwise.
Step 7:
Place Ignitor on the bulb and turn clockwise.
Locked position and your done. Reseal the black headlight cover and enjoy.
Last edited by HFELIU; Oct 19, 2013 at 11:57 AM.
Thread Starter
Junior Member
Joined: Jul 2012
Posts: 54
Likes: 14
From: New Jersey
03 SL55, 07 Acura MDX
Trending Topics
Junior Member
Joined: Nov 2013
Posts: 29
Likes: 0
From: Dallas
2008 SL 550
Can anybody give me feedback!
I have 2008 SL, I want to replace the headlamp assembly. Is this easy? Looks like there are just two bolts at the top of the lamp to take out to remove the lamp housing. Can I do this without taking the bumper off? Any help would be greatly appreciated.
Robert
Robert
MB World Stories
The Best of Mercedes & AMG

Manual Mercedes? 6 Times Sindelfingen Let Drivers Have All The Fun
Verdad Gallardo
Mercedes SLR McLaren 722 S Is Extremely Rare Example Modified by McLaren
Verdad Gallardo
8 Classic Boxy Mercedes Designs That Have Aged Like Fine Wine
Verdad Gallardo
Flawlessly Restored Mercedes 190E Evo II Heads to Auction
Verdad Gallardo
Electric Mercedes C-Class Unveiled: 11 Things You Need to Know
Verdad Gallardo
Mercedes EQS Gets A Major Update: Everything You Need to Know
Verdad Gallardo
5 Underrated Mercedes-Benz Models That Don't Get the Love They Deserve
Verdad Gallardo
Mercedes 300D Has Pushed Well Past 1 Million Miles and It Ain't Stopping
Verdad Gallardo
10 Most Reliable Mercedes-Benz Models You Can Buy Used
Verdad Gallardo
Thread Starter
Junior Member
Joined: Jul 2012
Posts: 54
Likes: 14
From: New Jersey
03 SL55, 07 Acura MDX
If I recall correctly, it should be 3 8mm screws that hold each lamp in place. Sorry but the front bumper will have to be removed, don't fret, it's much easier then you think. A. Few screws, 2 bolts, and some plastic tabs is all that's holding it in place.
Junior Member
Joined: Nov 2013
Posts: 29
Likes: 0
From: Dallas
2008 SL 550
Thank you for the feedback. Helps greatly. Not sure if I want to attempt removing the bumper, unless you think its a no brainer! I guess, my only question is how do you pop out the side part of bumper in front where the wheel well is, where the clips are? I gave it a pull but looks like you have to pop out that clip somehow? Can you advise, how to pop those out?
Last edited by robert1; Nov 10, 2013 at 03:59 PM. Reason: more info


Newbie
Joined: Jul 2020
Posts: 1
Likes: 0
From: Summerville, SC
2021 GLE 63S, 2017 C43, 2006 SLK 280
Replace Igniter & Ballast
First off, this is an incredibly helpful thread. Thank you for taking the time to detail it so well! I had the same issue but thanks to large hands had to remove bumper to get to entire fixture only to learn my ballast and/or igniter were faulty. To be safe I picked up both a new igniter & a new ballast. The ballast had an inserted flyer, an affixed sticker, and a cap over the terminal with another sticker proclaiming �ballast tested twice prior to shipment; It is highly suggested you replace the igniter while replacing the ballast�. I called the vendor (from Amazon) who explained frequently ballasts fail due to shorts introduced by defective igniters. Take that for what it is worth.
One item I also want to share...my low miles (50k) SL55 is 17 years old (03) wiring harnesses inside had almost all copper wiring insulation disintegrating. If you plan to do this plan to also have a way to reinsulate most of this wiring. My local auto parts store sells a product you use with a hair dryer (one time). It is just a PITA inside that fixture.
thanks again for great information.


Junior Member

Joined: Apr 2011
Posts: 36
Likes: 5
sl55
Changed the driver side bulb and ballast on my 03 sl55 this morning. Easier than I thought it would be. Thanks for the lamp guide.
After reassembly the lamp did not light up, then after a few tries and high beam/low beam changes, it did. Maybe the ballast needs to charge up or something?
Anyway, if it doesn't work right away, don't give up too soon.
After reassembly the lamp did not light up, then after a few tries and high beam/low beam changes, it did. Maybe the ballast needs to charge up or something?
Anyway, if it doesn't work right away, don't give up too soon.

Super Member


Joined: Sep 2019
Posts: 622
Likes: 212
From: My house
SL55AMG, GL450, SLK, S550, Maserati Coupe
GREAT writeup and pictures for headlight replacement job, thanks. One thing a headlight bulb buyer should know, there are huge numbers of counterfeit light bulbs out there. Apparently it's a crazy and gigantic market and the counterfeiters go to great lengths to grab a market share. Especially buying from eBay or Amazon. I bought a Sylvania replacement headlight bulb from Amazon, for my S-Class and If I recall it was a D2S. It arrived in what looked like genuine Sylvania packaging, with that shiny logo thing and a serial number with a website address to go to, to authenticate the bulb. However, in letters so tiny that I needed magnifying glasses to read, it said Made in China. I went to the website and entered the code and got a reassurance this this bulb is indeed an "authentic genuine Sylvania". Felt good for a moment, then looked up Sylvania's 1-800 number. Called them, and quickly got customer service and they gave me their website address which was quite different from what I'd just been looking at. The people on the phone at Sylvania told me, "You have got a fake!" I returned it to Amazon, and the seller on there argued and argued with me that this was not a fake. I then bought a genuine Sylvania bulb at a cost of about $20 more than the first one, I can't recall whether it was from FCPeuro or AutohausAZ or RockAuto, but it was from one of those. Buying from either of those companies, you are guaranteed to not receive fake parts. After this episode, I don't think I would buy bulbs from Amazon ever again. Those chinese makers even went so far as to have a fake sylvania website to fool you!! Even after verifying authenticity, it would never hurt to get Sylvania's 800-number and call them with questions, they are well aware of the fakers stealing their business and are happy to help with any questions!
Packaging for the new Sylvania bulb looked different and even more genuine, also listed a website to authenticate with a serial number, and Yes it was genuine. And this time, it really WAS Sylvania's website. There is a huge, multimillion dollar market for fake light bulbs. On my S-Class, the new bulb perfectly matched the color, intensity and hue of the other, older light bulb, so I only had to replace the one that had burned out. I had not installed the fake one, but I guess it's possible it would be a little different, and I'd have to replace both bulbs if I wanted them to match and not look trashy, and then I would have chinese fake light bulbs on a $120,000 car. So if you're replacing a headlight bulb, go the extra mile and make damn sure you're not getting a cheap junk knockoff light bulb from the shysters. Even if they provided a "good quality" light bulb, I just don't like being shipped a counterfeit in fake packaging that I'm being told is a genuine quality part. It's pretty highly likely that the fake bulb would not last as long as a real one. I'd rather spend $20 more and know that I got real headlight bulbs and not fakes.
Packaging for the new Sylvania bulb looked different and even more genuine, also listed a website to authenticate with a serial number, and Yes it was genuine. And this time, it really WAS Sylvania's website. There is a huge, multimillion dollar market for fake light bulbs. On my S-Class, the new bulb perfectly matched the color, intensity and hue of the other, older light bulb, so I only had to replace the one that had burned out. I had not installed the fake one, but I guess it's possible it would be a little different, and I'd have to replace both bulbs if I wanted them to match and not look trashy, and then I would have chinese fake light bulbs on a $120,000 car. So if you're replacing a headlight bulb, go the extra mile and make damn sure you're not getting a cheap junk knockoff light bulb from the shysters. Even if they provided a "good quality" light bulb, I just don't like being shipped a counterfeit in fake packaging that I'm being told is a genuine quality part. It's pretty highly likely that the fake bulb would not last as long as a real one. I'd rather spend $20 more and know that I got real headlight bulbs and not fakes.
Last edited by tonylinc; Mar 27, 2025 at 10:17 AM.


