


 ,
, ")

Replaced Motor Mounts Today
Thread Starter
Senior Member
Joined: Apr 2013
Posts: 323
Likes: 17
2002 E55
Replaced Motor Mounts Today
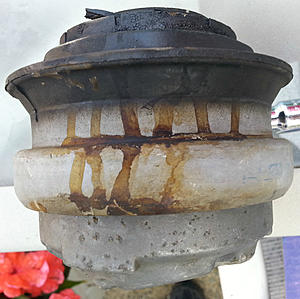
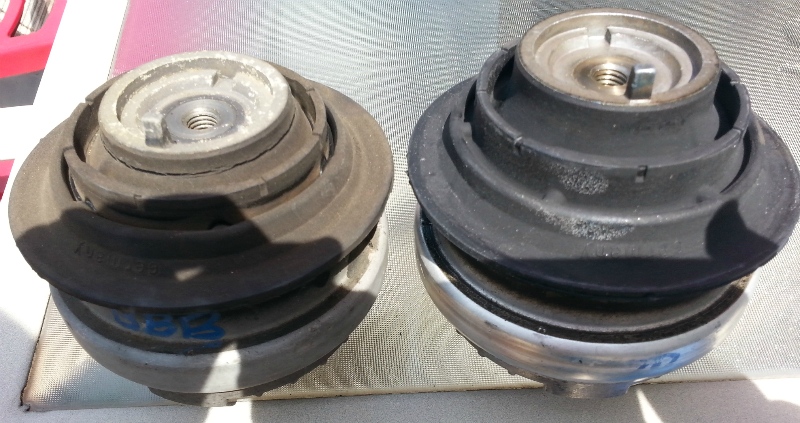
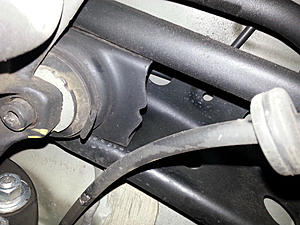
I've read a lot of stories on this forum and elsewhere about E55 motor mounts being trashed. I found mine were the same today with 69,xxx miles. The driver's side was especially bad. The fluid had leaked out and the rubber was really deteriorated.
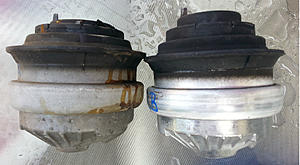
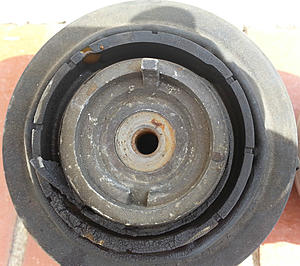
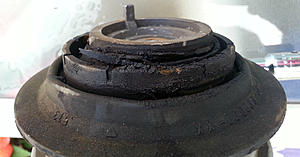
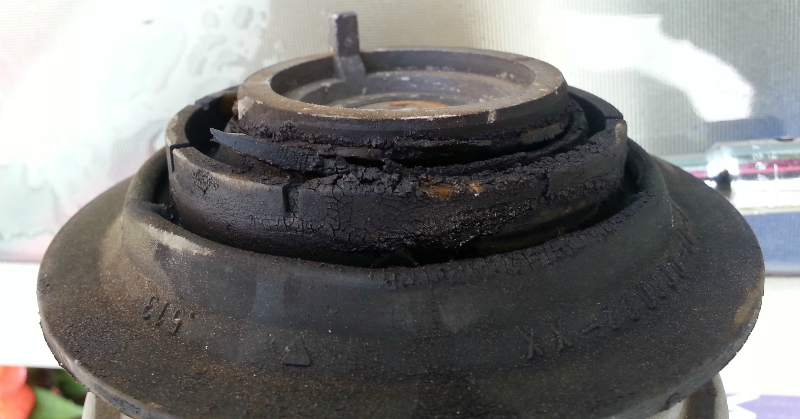
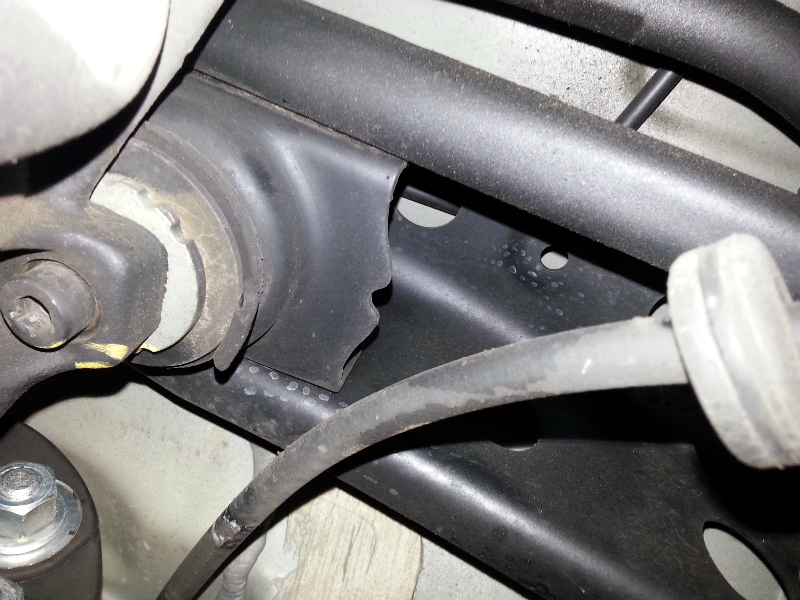
The passenger side hadn't leaked, but the rubber was deteriorated and badly cracked.
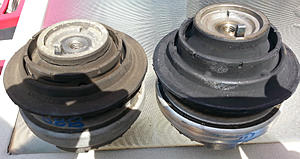
If you haven't checked yours recently, it's worth having a look. If they've leaked, you will see the burnt orange looking fluid on the mount and surrounding chassis.
ddb


The passenger side hadn't leaked, but the rubber was deteriorated and badly cracked.
If you haven't checked yours recently, it's worth having a look. If they've leaked, you will see the burnt orange looking fluid on the mount and surrounding chassis.
ddb

MBWorld Fanatic!


Joined: Aug 2006
Posts: 7,053
Likes: 398
From: A.D., U.A.E
2000 (W202 C200) & 2000 (W202 C55)
Super Member
Joined: Apr 2011
Posts: 998
Likes: 4
From: Central Connecticut
86 190D (Exported to the Nerderlands), 87 300TD (Sold), 82 Ford F150 3spd, 99 E300D (RIP), 02 E55
I might as well take a look into them this weekend as I plan on doing the oil change. Thanks for the pics. BTW, how do you get the pictures to be that size and not the small images that you have to click to see?
Thread Starter
Senior Member
Joined: Apr 2013
Posts: 323
Likes: 17
2002 E55
Yes, I'm experiencing vibrations in the 60-70 mph range. Interestingly, most folks with broken motor mounts report vibrations at, or around idle. I haven't experienced that at all. So I was checking out the suspension, etc. trying to diagnose the vibration problem and easily spotted the broken mount spilled fluid. So I ordered a set and changed them. I haven't found any obvious suspension issues.
Unfortunately, I haven't driven the car to see if the mounts have made a difference. When I feel the 60-70 mph vibrations, they are in the steering wheel and I can feel it in the gear selector area. So that made me think of the front flex disc and the transmission mount. Since those parts aren't that expensive I ordered them and they were scheduled to arrive yesterday. So while I was under the car I removed the transmission mount and front flex plate anticipating the arrival of the new parts. They didn't arrive due to weather delays somewhere. So the car isn't drivable. I expect the parts will arrive today so I will get them on this evening or tomorrow and report back.
I realize I'm breaking troubleshooting rules by doing multiple things at one time and therefore won't know exactly what fixed the problem, if these items solve the vibration issue. My wrenching time is limited so while under the car yesterday it made sense to take the flex disc out. BTW, to my untrained eye the flex disc looked o.k. That is it didn't have any obvious cracks or other problems. I will gladly install a new one. I'm replacing the rear flex disc as well. At least I won't have to worry about them. The transmission mount looked fatigued, so I'm happy to replace it as well.
More to come when I get these parts installed and go for a drive........
Last edited by ddb; Jul 17, 2014 at 06:34 AM.
Thread Starter
Senior Member
Joined: Apr 2013
Posts: 323
Likes: 17
2002 E55
I upload the pictures to a photo sharing site. In my case, photobucket, and insert them into the post as links. It takes a few minutes to do, but my eyes aren't as sharp as they once were as far as reading. The bigger pics are so much easier to see for me and others.
Thread Starter
Senior Member
Joined: Apr 2013
Posts: 323
Likes: 17
2002 E55
Update
Since my last post my parts arrived and I proceeded to install them. While trying to remove my old rear flex disc, I managed to separate the two sections of the driveshaft. Uh-oh, I didn't want that to happen. I had removed the two bolts that hold the driveshaft center support in place to help with dislodging the flex disc. There are cutouts on either side of the center heat shield to easily remove the bolts that hold the driveshaft center support in place. From what I learned researching the work I was doing I knew the driveshaft was balanced as a whole and there were alignment marks on each section. With the center heat shield in place I couldn't see the alignment marks. So in an attempt to see what was going on under the heat shield I removed the four fasteners that hold it in place so I could slide it around. No luck, I couldn't see what I needed to see. I had read in a DIY that the exhaust would have to be dropped to remove the heat shield. I think the DIY was on a W210 E320. I really didn't want to mess with the exhaust. Fortunately I was able to work the heat shield off the car. With the rear section of the driveshaft removed I had just enough room to get it off. I'm not sure if I could have done this if I still had the resonator on the car. Having my narrower x-pipe in place of the big resonator helped, I believe. So now I could see the alignment mark on the front section of the driveshaft and the two marks on the rear section that was now in my hand.
Since I had the rear section of the driveshaft off the car I could easily access the center driveshaft bearing and bearing support. I thought to myself since I've come this far I may as well replace the bearing, bearing support, and the protective rubber boot that goes on the end of the front driveshaft section. So I ordered the parts online. When the parts arrived I decided I didn't want to buy or rent a bearing puller or try to press the new bearing on myself, so I took the rear section of the driveshaft and the new parts to a universal joint/driveshaft business that I knew about. The first thing the guy asked me when he saw the driveshaft was "Mercedes or BMW?" I asked how he knew and he said look at the universal joints, they aren't serviceable. He then proceeded to move the yolk around and said it didn't feel as if it was moving freely. I then checked and could feel what he was talking about. In one axis it felt like there was a detent right in the center of the movement. He said that wasn't normal and could indicate a bad, or failing joint. He said since it isn't serviceable, if it was bad I would have to purchase a new driveshaft. I asked him if he could just remove the old bearing and press the new one on. He did, and didn't charge me anything. Since then I've done some reading online and there are many folks that report the same detent feel in their u-joint. I've read instances on Mercedes and other vehicles. Most people on various forums agree this is a sign of a bad u-joint or a failing u-joint. I read where one guy, who works on a lot of cars, said this was common on many of the driveshaft universals that he removes from cars, and it doesn't necessarily cause any issues. So I don't know what to think about this.
So I installed the driveshaft in the car today and took it on a nice high-speed run. The vibrations that started this whole project are almost gone. It isn't perfect, but it is so much better than before I'm really happy with the outcome. Just to review, I replaced the motor mounts (one was trashed and the other was in poor shape), I replace both flex discs (I couldn't see anything obviously wrong with either), I replaced the transmission mount (the old one looked fatigued), I replaced the center driveshaft bearing, bearing support bracket, and protective boot (I don't know if these items needed replacing but I didn't want to leave them on the car since I had easy access to them).
I think I'm going to remove my front tires/wheels and have them rebalanced next week. Maybe it will help. Depending on the outcome, I may do the same to the rears. It is very possible that something else could be causing the remaining vibrations such as a failing wheel bearing or some other suspension part that I've overlooked. Or, it could be the u-joint failing. If the wheel balancing doesn't get rid of the last bit of vibrations I can now live with the way the car drives at speed since it is so much better than before. If it gets worse I will of course try to figure it out. I will let you know if the wheel rebalancing makes a difference.
ddb
Trending Topics
Thread Starter
Senior Member
Joined: Apr 2013
Posts: 323
Likes: 17
2002 E55
I removed the fronts yesterday and had them rebalanced. The tech said he was able to make them better. So I decided to do the same to the rears, with the same results. I was able to take a nice drive earlier today at a range of speeds and the car feels fantastic. The rebalancing definitely helped.
I still feel the slightest vibration in the steering wheel. Honestly, I'm not sure if it is normal, or if I'm imagining something that really isn't an issue. I'm debating doing a transmission service myself or having an independent do it. If I go the independent route I will get his opinion on the wheel bearings, lower control arm bushings, or anything else that may be worn causing an issue.
I still feel the slightest vibration in the steering wheel. Honestly, I'm not sure if it is normal, or if I'm imagining something that really isn't an issue. I'm debating doing a transmission service myself or having an independent do it. If I go the independent route I will get his opinion on the wheel bearings, lower control arm bushings, or anything else that may be worn causing an issue.
MB World Stories
The Best of Mercedes & AMG

Manual Mercedes? 6 Times Sindelfingen Let Drivers Have All The Fun
Verdad Gallardo
Mercedes SLR McLaren 722 S Is Extremely Rare Example Modified by McLaren
Verdad Gallardo
8 Classic Boxy Mercedes Designs That Have Aged Like Fine Wine
Verdad Gallardo
Flawlessly Restored Mercedes 190E Evo II Heads to Auction
Verdad Gallardo
Electric Mercedes C-Class Unveiled: 11 Things You Need to Know
Verdad Gallardo
Mercedes EQS Gets A Major Update: Everything You Need to Know
Verdad Gallardo
5 Underrated Mercedes-Benz Models That Don't Get the Love They Deserve
Verdad Gallardo
Mercedes 300D Has Pushed Well Past 1 Million Miles and It Ain't Stopping
Verdad Gallardo
10 Most Reliable Mercedes-Benz Models You Can Buy Used
Verdad Gallardo
Thread Starter
Senior Member
Joined: Apr 2013
Posts: 323
Likes: 17
2002 E55
Another Update
I've been reading the thread below on BenzWorld and thought I would give this is a try since it sounds very similar to my situation. I removed the spacer and it made a huge improvement!
It involves removing a spacer that determines the angle of the rear differential and therefore how it mates to the driveshaft. I won't go into many details since it has already been said on the other forum.
ddb
http://www.benzworld.org/forums/w210...on-solved.html

It involves removing a spacer that determines the angle of the rear differential and therefore how it mates to the driveshaft. I won't go into many details since it has already been said on the other forum.
ddb
http://www.benzworld.org/forums/w210...on-solved.html


Senior Member
Joined: Feb 2011
Posts: 312
Likes: 8
From: South, FL
2002 E55 AMG Obsidian Black with Charcoal
I guess I should stop breaking them....


Last edited by cudaized; Aug 12, 2014 at 09:30 PM.
Thread Starter
Senior Member
Joined: Apr 2013
Posts: 323
Likes: 17
2002 E55
I just replaced mine today (again). This pair lasted 3 years 5 months with just under 20,000 miles. I used Lemfoerder OEM mounts both times. I noticed the slight vibration at idle a few months ago, but waited until I was working on the lower control arm bushings to inspect the engine mounts. Sure enough, they were both leaking.
I guess I should stop breaking them....
I guess I should stop breaking them....
How's the LCA bushing work coming along? Tough job? Curious to read your impressions when done.
Thanks,
ddb
Senior Member
Joined: Feb 2011
Posts: 312
Likes: 8
From: South, FL
2002 E55 AMG Obsidian Black with Charcoal

Thread Starter
Senior Member
Joined: Apr 2013
Posts: 323
Likes: 17
2002 E55
I assume you're asking about the motor mount install? If not, my apologies for covering multiple topics in this thread.
When I work on such a project, I don't get in a rush and generally take more time than most, I would guess. It is not unusual for me to leave it alone and resume another day. My car isn't a daily driver so I don't need to finish the project to use the car. So I really don't pay much attention to time. My recollection is it may have taken a couple of hours. Often times it seems I spend just as much time getting the car on jack stands as I spend removing and replacing parts.
I wouldn't characterize the motor mount R&R as intense, nor would I call it easy. I would say it is a moderate project. You basically have to get the front end up on jack stands, remove a bottom and top bolts on each motor mount, jack up the engine to gain enough clearance to remove the old motor mounts, and in my case jack up the motor even further to install the new motor mounts which are taller than the partially collapsed old motor mounts, and then reinstall the upper and lower bolts. Just for clarification, you R&R one side at a time.
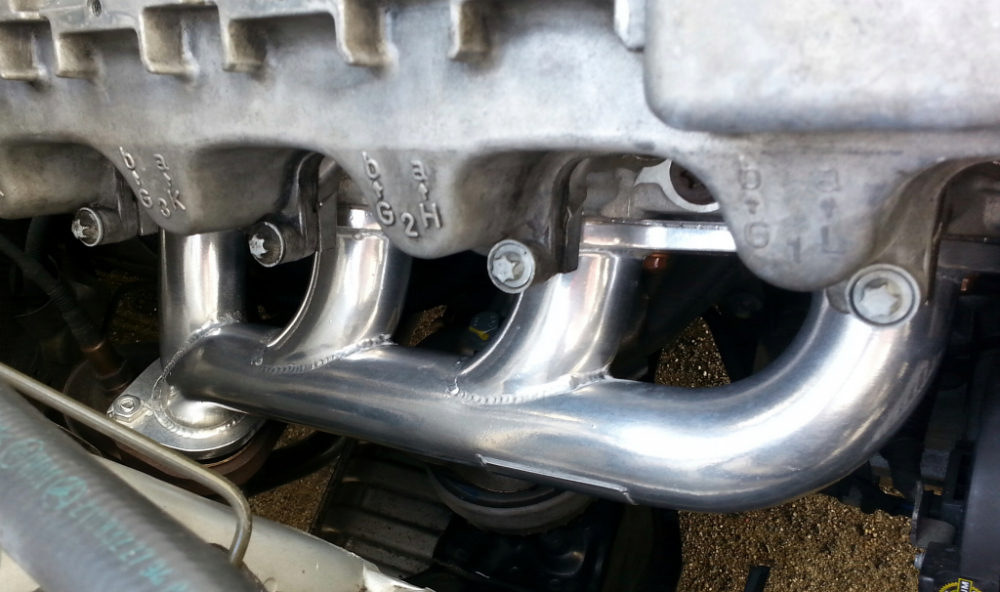
I'm adding a couple of links that I used to help guide me through the process. Just pay attention to the alignment tabs that ensure the motor mount is sitting perfectly in the cradle. The top bolt is known to be difficult to get to. There isn't much room to get a wrench on it and even less room to get the needed torque to loosen the bolt. Fortunately for me I have a set of headers on my car and they have a perfect opening that I used to get to the top bolts with a ratchet, extension, and an articulating socket. This made getting the top bolts a piece of cake. The bottom bolts are easy to access.
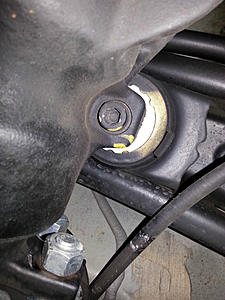
Here is an old picture from when I was installing the headers. I had the coil packs and spark plug wires removed for more access and to reseal the breather boxes on top of the valve covers. You can see the motor mount on the passenger side and the top bolt right through the center opening of the headers. There is yellow inspection paint on top of the bolt.
I would encourage you to try it yourself as long as you have the needed tools and can safely get the car on jack stands. If you have any specific questions just ask.
Best of luck,
ddb
http://www.benzworld.org/forums/w210...mount-diy.html
http://www.pelicanparts.com/techarti...eplacement.htm
Last edited by ddb; Aug 18, 2014 at 10:10 AM.

Member
Joined: Dec 2006
Posts: 118
Likes: 2
From: Los Angeles, CA
Part number for differential shim / spacer?
I've been reading the thread below on BenzWorld and thought I would give this is a try since it sounds very similar to my situation. I removed the spacer and it made a huge improvement!
It involves removing a spacer that determines the angle of the rear differential and therefore how it mates to the driveshaft. I won't go into many details since it has already been said on the other forum.
ddb
http://www.benzworld.org/forums/w210...on-solved.html
Attachment 399603
Attachment 399604
Can you buy different sizes? I think the answer is yes as I have seen other posts describing 3MM shims. Figure they may have 1MM / 2MM / 3MM / 4MM?
I have a 2002 C32 and changed out the motor mounts, and have had a small nagging vibration around 40-50 MPH. Have not been able to figure out if transmission, tire, driveshaft, center bearing, etc. and am going to give this shim a try. I have also replaced the transmission mount and both flex disks.
ok...a few more clicks and found it... all part numbers and such... going to give it a try.
https://www.benzworld.org/forums/w21...ml#post9110329Here are the part numbers for the spacers:
* 1mm, 2103570352
* 2mm, 2103570252
* 3mm, 2103570152
* 4mm, 2103570052
Thanks
Last edited by c32jet; May 23, 2020 at 07:15 AM. Reason: adding info...


