


A qiuck little DIY to shave some heat off IAT's
Thread Starter
MBWorld Fanatic!


Joined: Nov 2009
Posts: 1,564
Likes: 6
AMG Fam
A qiuck little DIY to shave some heat off IAT's
Hey guys, I did this to my motorcycle air box and shaved 5-8 Deg. off my Iat's in identical situations the air box is located right above the valve cover (same as the 55's although completely different platform). Not sure how much it will help with the 55's but I know it cant hurt.
Materials needed:
-T 25 torx (to remove the air box screws)
-Reflective heat resistant ducting tape (Can be found at Lowes, Home depot etc.)
-10-20 mins of your time.
Step 1: Remove the torx screws holding the air boxes down. (If you don�t know how to do this I wouldn't recomend continuing.)
Step 2: Remove the filters
Step 3: Pull up on the black lower air boxes and they will pop right off.
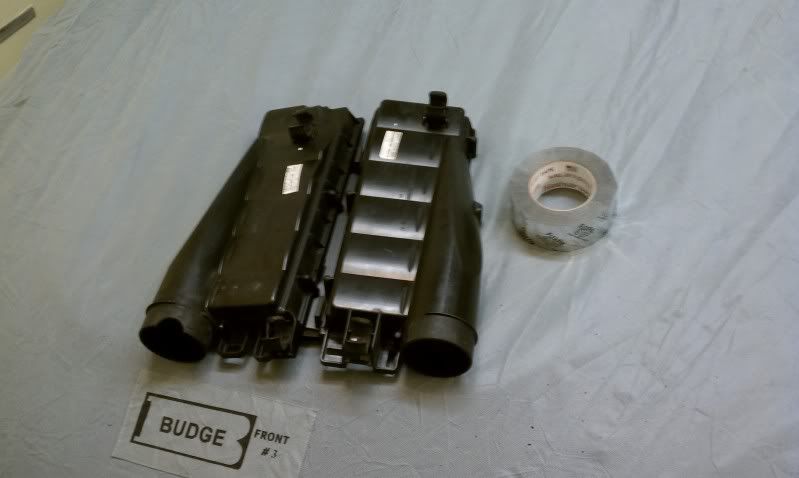
Step 4: Spray them down with degreaser and dry them to prep the surface.
Step 5: Cut the tape to size and apply. Cover the whole bottom surface and repeat i put 3 layers on.
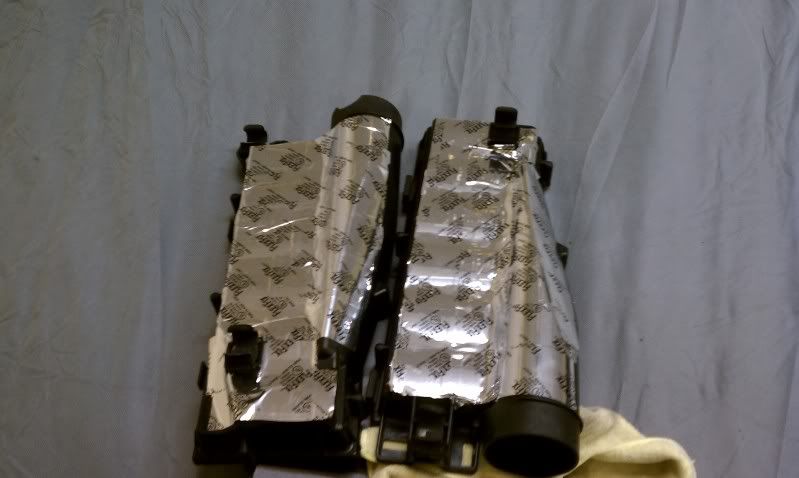
Step 6: Install in reverse order. Your done!!
More to come, My next projects will consist of Wrapping the engine covers in Carbon Fiber wrap, Blacking out the headlights, and wiring a spahl fan to the H/E to a switch in the car. Stay tuned form some more DIY'S!!
And thanks for all the helpfull things I have learned off this Forum over the last year.
Materials needed:
-T 25 torx (to remove the air box screws)
-Reflective heat resistant ducting tape (Can be found at Lowes, Home depot etc.)
-10-20 mins of your time.
Step 1: Remove the torx screws holding the air boxes down. (If you don�t know how to do this I wouldn't recomend continuing.)
Step 2: Remove the filters
Step 3: Pull up on the black lower air boxes and they will pop right off.
Step 4: Spray them down with degreaser and dry them to prep the surface.
Step 5: Cut the tape to size and apply. Cover the whole bottom surface and repeat i put 3 layers on.
Step 6: Install in reverse order. Your done!!
More to come, My next projects will consist of Wrapping the engine covers in Carbon Fiber wrap, Blacking out the headlights, and wiring a spahl fan to the H/E to a switch in the car. Stay tuned form some more DIY'S!!
And thanks for all the helpfull things I have learned off this Forum over the last year.
Trending Topics

Senior Member
Joined: Jan 2007
Posts: 414
Likes: 2
From: Ft Lauderdale, Florida
G63, 360CS, CLK63 BS, 997.2TT, 328D
Thats my old car from like 2 years ago before i sold it to Nick and now i have another one same color combo! Sweet ride enjoy below is when i had it with CCWs the E63 wing and E63 tail lights and lowered i also did the power mods to the car not sure if you have the dyno sheet but it dynoed 488rwhp and 535rwtq i think it was.
Justin
Justin
Last edited by JBFMCAR; Jan 29, 2011 at 02:12 PM.
MB World Stories
The Best of Mercedes & AMG

Manual Mercedes? 6 Times Sindelfingen Let Drivers Have All The Fun
Verdad Gallardo
Mercedes SLR McLaren 722 S Is Extremely Rare Example Modified by McLaren
Verdad Gallardo
8 Classic Boxy Mercedes Designs That Have Aged Like Fine Wine
Verdad Gallardo
Flawlessly Restored Mercedes 190E Evo II Heads to Auction
Verdad Gallardo
Electric Mercedes C-Class Unveiled: 11 Things You Need to Know
Verdad Gallardo
Mercedes EQS Gets A Major Update: Everything You Need to Know
Verdad Gallardo
5 Underrated Mercedes-Benz Models That Don't Get the Love They Deserve
Verdad Gallardo
Mercedes 300D Has Pushed Well Past 1 Million Miles and It Ain't Stopping
Verdad Gallardo
10 Most Reliable Mercedes-Benz Models You Can Buy Used
Verdad GallardoMBWorld Fanatic!


Joined: Sep 2009
Posts: 2,603
Likes: 112
From: LA
W213 E63
Sorry, just to understand the theory: The reflective heat resistant duct tape taped to the bottom of the air box will deflect some of the heat from the motor? Genius!
Is that where most of the heat is heating up the air before it goes into the fryer? When I put my hand on the air boxes after a drive they are HOT.
On another note, how does a heat exchanger work in our cars?
Is that where most of the heat is heating up the air before it goes into the fryer? When I put my hand on the air boxes after a drive they are HOT.
On another note, how does a heat exchanger work in our cars?
Thread Starter
MBWorld Fanatic!
Joined: Nov 2009
Posts: 1,564
Likes: 6
AMG Fam
Sorry, just to understand the theory: The reflective heat resistant duct tape taped to the bottom of the air box will deflect some of the heat from the motor? Genius!
Is that where most of the heat is heating up the air before it goes into the fryer? When I put my hand on the air boxes after a drive they are HOT.
On another note, how does a heat exchanger work in our cars?
Is that where most of the heat is heating up the air before it goes into the fryer? When I put my hand on the air boxes after a drive they are HOT.
On another note, how does a heat exchanger work in our cars?
MBWorld Fanatic!
Joined: Apr 2009
Posts: 1,582
Likes: 1
From: Lafayette, IN
2008 ML63 2009 SL63 2010 Alpha 7 GTR
Thats my old car from like 2 years ago before i sold it to Nick and now i have another one same color combo! Sweet ride enjoy below is when i had it with CCWs the E63 wing and E63 tail lights and lowered i also did the power mods to the car not sure if you have the dyno sheet but it dynoed 488rwhp and 535rwtq i think it was.
Justin
Justin
Whoa..look at this guy posting on the boards!
-Chad


Member
Joined: Jan 2009
Posts: 86
Likes: 0
From: Austin
CLK 500 & E55 AMG
I was going to do this same thing but with reflect a gold and wrap the intake tubes with header wrap.
http://www.designengineering.com/cat...r/reflect-gold
But this duck tape stuff seams a lot cheaper
http://www.designengineering.com/cat...r/reflect-gold
But this duck tape stuff seams a lot cheaper
Thread Starter
MBWorld Fanatic!
Joined: Nov 2009
Posts: 1,564
Likes: 6
AMG Fam
I was going to do this same thing but with reflect a gold and wrap the intake tubes with header wrap.
http://www.designengineering.com/cat...r/reflect-gold
But this duck tape stuff seams a lot cheaper
http://www.designengineering.com/cat...r/reflect-gold
But this duck tape stuff seams a lot cheaper
MBWorld Fanatic!
Joined: Sep 2009
Posts: 2,603
Likes: 112
From: LA
W213 E63
Thanks for the explanation! That gold stuff reflects 80% of the heat?? How about the duct tape?
Also, I wonder what is the biggest source of the heat/ at what point is there the most heating of the air before ignition?
Also, I wonder what is the biggest source of the heat/ at what point is there the most heating of the air before ignition?
Thread Starter
MBWorld Fanatic!
Joined: Nov 2009
Posts: 1,564
Likes: 6
AMG Fam
MBWorld Fanatic!
Joined: Jan 2011
Posts: 1,239
Likes: 17
From: West
E55 AMG
I wonder what the difference in heat actually is between ingress through the external intake port and egress out of the airbox. Depending upon how much time it sits in the airbox would affect the difference.


Banned
Joined: Jan 2011
Posts: 100
Likes: 0
CLS55 AMG
Hey guys, I did this to my motorcycle air box and shaved 5-8 Deg. off my Iat's in identical situations the air box is located right above the valve cover (same as the 55's although completely different platform). Not sure how much it will help with the 55's but I know it cant hurt.
Materials needed:
-T 25 torx (to remove the air box screws)
-Reflective heat resistant ducting tape (Can be found at Lowes, Home depot etc.)
-10-20 mins of your time.
Step 1: Remove the torx screws holding the air boxes down. (If you don�t know how to do this I wouldn't recomend continuing.)
Step 2: Remove the filters
Step 3: Pull up on the black lower air boxes and they will pop right off.
Step 4: Spray them down with degreaser and dry them to prep the surface.
Step 5: Cut the tape to size and apply. Cover the whole bottom surface and repeat i put 3 layers on.
Step 6: Install in reverse order. Your done!!
More to come, My next projects will consist of Wrapping the engine covers in Carbon Fiber wrap, Blacking out the headlights, and wiring a spahl fan to the H/E to a switch in the car. Stay tuned form some more DIY'S!!
And thanks for all the helpfull things I have learned off this Forum over the last year.
MBWorld Fanatic!
Joined: Oct 2007
Posts: 1,717
Likes: 17
From: San Jose, CA
2007 E63 w/P30 and Eurotech CF Diffuser
This was 30ft of 2inch wide tape. Could have used 35ft.
The Y down pipe was the most difficult.
Also, the adhesive does not really get hot enough to cure thoroughly on anything except that near the engine block. So it will tend to lift on tight corners.
Easier than getting my teeth done to look like this.!
The Y down pipe was the most difficult.
Also, the adhesive does not really get hot enough to cure thoroughly on anything except that near the engine block. So it will tend to lift on tight corners.
Easier than getting my teeth done to look like this.!


