


 Jun 17, 2015, 07:22 PM
Last edit by: IB Advertising
See related guides and technical advice from our community experts:
- Mercedes Benz E Class AMG: How to Install Coilovers
Step by step instructions for do-it-yourself repairs

My E55 DIY Coilover install With Step by step
Thread Starter
Member
Joined: Apr 2008
Posts: 113
Likes: 5
From: Nashville TN
2013 GLK 350 2013 GL450
TBH , this is by far the BEST write up for DIY i've ever seen. It's so detailed and organized and full with pics.
I still won't do work like this on my own lol but man amazing job !
Please do other DIY's too, for example Brake and Rotor change in the same form since I think I'd be needing those soon lol
I still won't do work like this on my own lol but man amazing job !
Please do other DIY's too, for example Brake and Rotor change in the same form since I think I'd be needing those soon lol
Newbie
Joined: Sep 2012
Posts: 11
Likes: 0
E55
I love my flippy floppyies!
Arnotts only has the fronts when I spoke to them and they did not have them in stock I would have to send mine in and have them rebuilt. I didn't wanna deal with a compressor going out, or a pump failing, or a rear bag failing in the future. So i just decided to get coils. Besides I like to drive the twisty roads of tennessee and the air ride is a little mushy lol. I paid less then $1000 for them. They retail for $1250. I paid another $150 from Car-part.com for the rear control arms. I bought them used from a salvage yard and cleaned them up and painted them to look good!
Arnotts only has the fronts when I spoke to them and they did not have them in stock I would have to send mine in and have them rebuilt. I didn't wanna deal with a compressor going out, or a pump failing, or a rear bag failing in the future. So i just decided to get coils. Besides I like to drive the twisty roads of tennessee and the air ride is a little mushy lol. I paid less then $1000 for them. They retail for $1250. I paid another $150 from Car-part.com for the rear control arms. I bought them used from a salvage yard and cleaned them up and painted them to look good!
Which one should i choose this is the arms for rear lower and upper ?

Rear Lower Control Arm
Mercedes E Class...(E320 rear RH,LH thrust arm),(Rear RH,LH,E320,spring),(E320 Rear RH,LH track arm)........
Rear Upper Control Arm
Mercedes E Class........(E320 rear ,camber strut guide, LH,RH) and ( E320 rear tension rod guide RH,LH)
Thread Starter
Member
Joined: Apr 2008
Posts: 113
Likes: 5
From: Nashville TN
2013 GLK 350 2013 GL450
Which one should i choose this is the arms for rear lower and upper ?
Rear Lower Control Arm
Mercedes E Class...(E320 rear RH,LH thrust arm),(Rear RH,LH,E320,spring),(E320 Rear RH,LH track arm)........
Rear Upper Control Arm
Mercedes E Class........(E320 rear ,camber strut guide, LH,RH) and ( E320 rear tension rod guide RH,LH)
Rear Lower Control Arm
Mercedes E Class...(E320 rear RH,LH thrust arm),(Rear RH,LH,E320,spring),(E320 Rear RH,LH track arm)........
Rear Upper Control Arm
Mercedes E Class........(E320 rear ,camber strut guide, LH,RH) and ( E320 rear tension rod guide RH,LH)
Use this:
Rear Lower Control Arm
Mercedes E Class...(E320 rear RH,LH thrust arm),(Rear RH,LH,E320,spring),(E320 Rear RH,LH track arm)........
MB World Stories
The Best of Mercedes & AMG

7 Craziest Things AMG Gas Ever Built
Verdad Gallardo
New Electric Mercedes-AMG GT 4-Door Coupe Unveiled: 10 Things You Need to Know
Verdad Gallardo
6 Mercedes Models That Did NOT Age Well (But Are Somehow Still Cool)
Verdad Gallardo
Manual Mercedes? 6 Times Sindelfingen Let Drivers Have All The Fun
Verdad Gallardo
Mercedes SLR McLaren 722 S Is Extremely Rare Example Modified by McLaren
Verdad Gallardo
8 Classic Boxy Mercedes Designs That Have Aged Like Fine Wine
Verdad Gallardo
Flawlessly Restored Mercedes 190E Evo II Heads to Auction
Verdad Gallardo
Electric Mercedes C-Class Unveiled: 11 Things You Need to Know
Verdad Gallardo
Mercedes EQS Gets A Major Update: Everything You Need to Know
Verdad Gallardo
Thread Starter
Member
Joined: Apr 2008
Posts: 113
Likes: 5
From: Nashville TN
2013 GLK 350 2013 GL450
INSTALL THE REARS
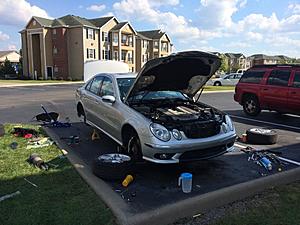
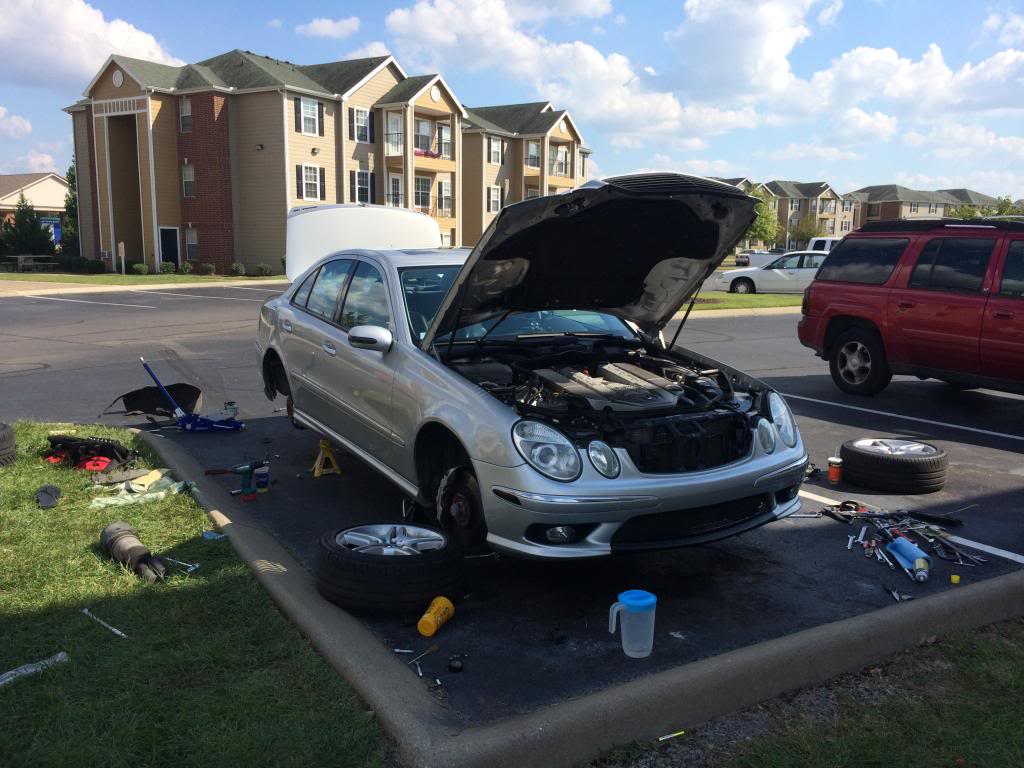
First and foremost! Major apologies to all my friends following this. I have been dealing with weather, work, and lack of time to complete this project as quickly as I anticipated.
However this is not going to be as precise as the previous install. Its simple really, remove everything and reinstall. LOL! I know too easy right? Wrong this was hell and took loads of time. So without further adieu here we go:
As usual break the lug nuts loose with the car on the ground. Chock the front wheels on both sides of the wheel.

Then get the rear end up in the air. The rear is a bit tricky so i suggest you use the factory jack on the jacking points in the rear and lift the car up.
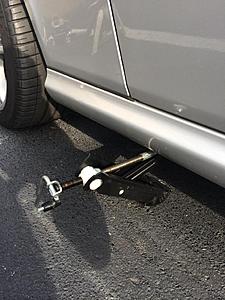
Then slide a proper jack in from behind the car and you will see two big rubber pads on each side of the car infront of the mufflers. These are also jacking points. Place a piece of 2x4 in between the jack and the rubber pads and lift one side at at time untill the rear end is up high enough for the factory jack to fall out of the standard jacking point. Then proceed to install a jack stand in the factory jacking point. Repeat on the other side as well (DO NOT RAISE THE CAR AS HIGH AS THE JACK STAND WILL GO ON THE FIRST LIFT). Make sure you raise each side up a few inches at a time and stagger the lifting process. This will guarantee that the car will not fall off the jack stands but also will be a lot safer .
Once you have accomplished that. Remove the wheels and this is what you should be staring at:
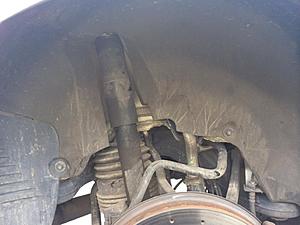
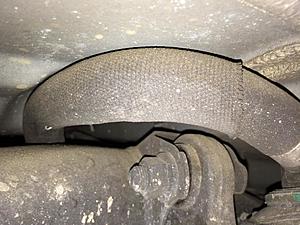
Remove all the nuts holding the inner fender liner from the car. This should allow you to see what kind of carnage you are about to come in contact with.
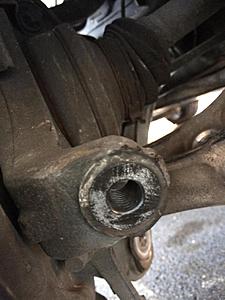
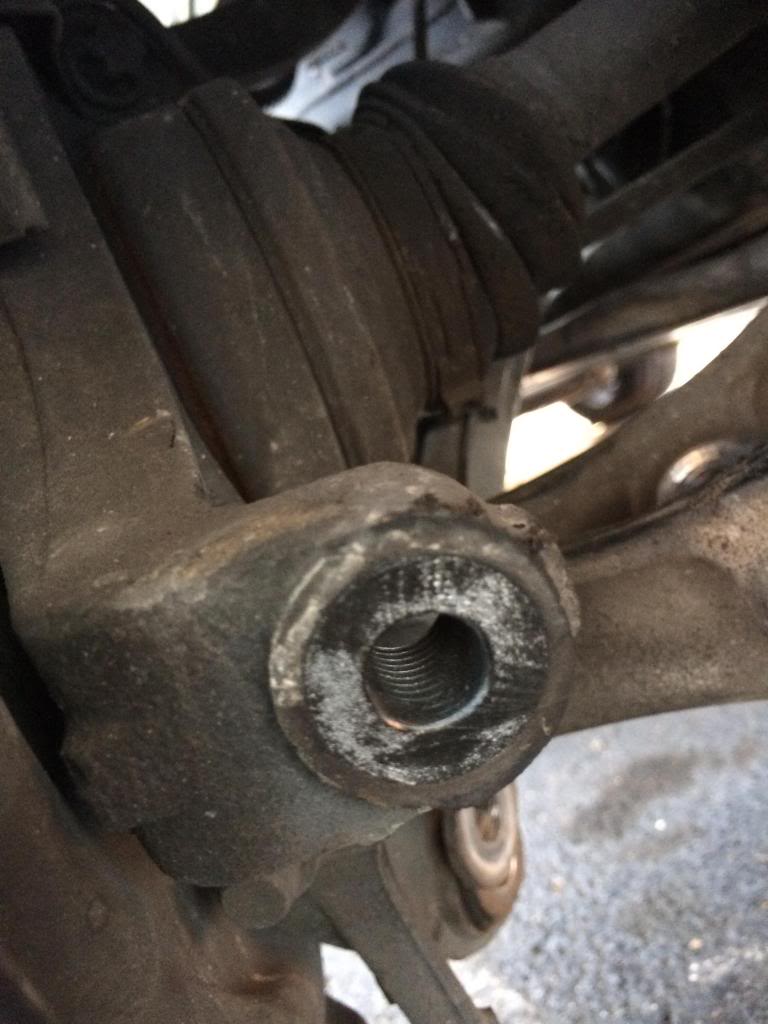
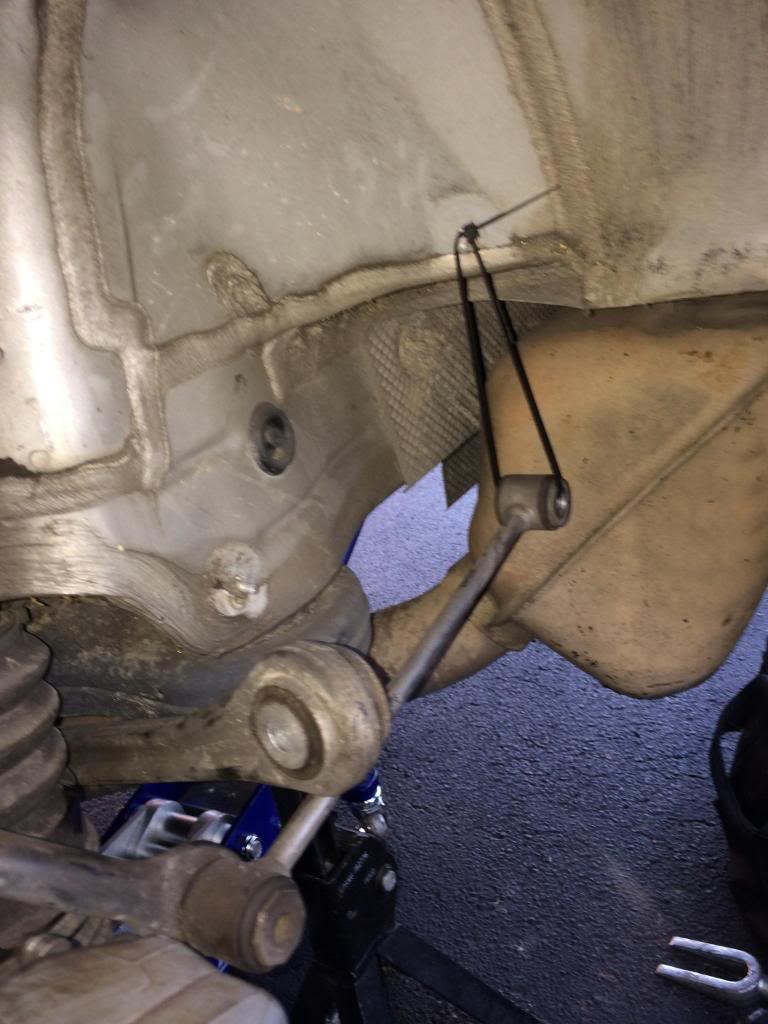
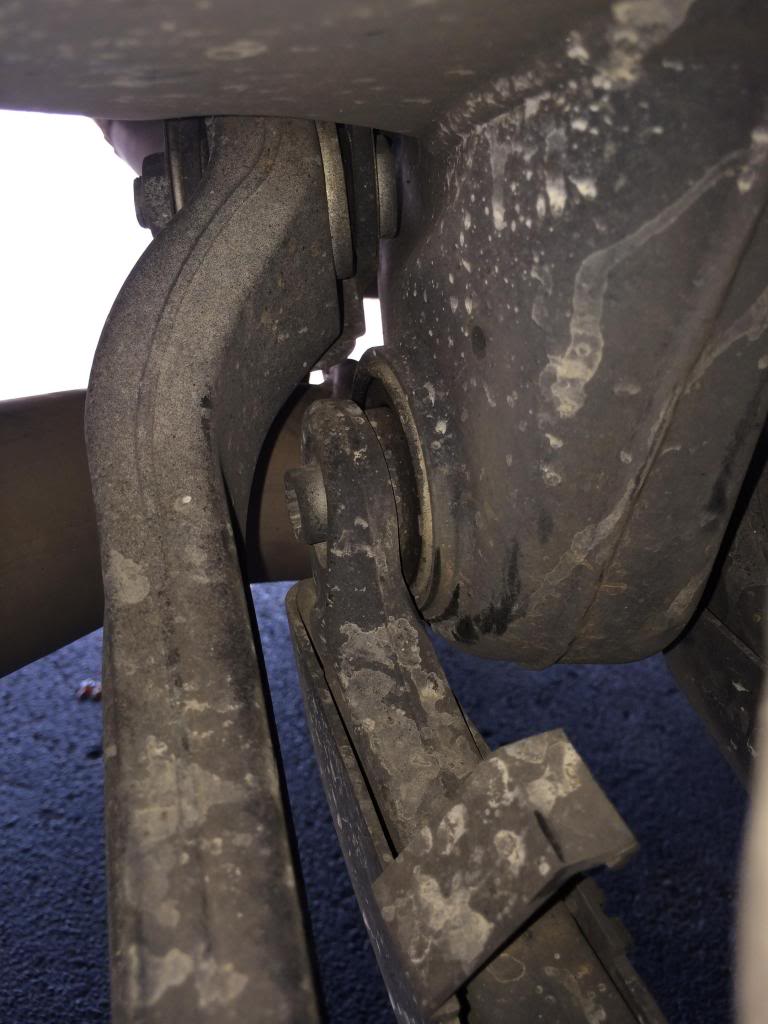
On the back back side of the rear spindle facing the rear of the car will be a connecting arm to the chassis. Disconnect this bolt from the spindle.
Remove the sway bar from the spindle and the camber arm

Now take a zip tire and swing the sway bar mount up and hold the rear toe arm in place with the sway bar mount and a zip tie like so:

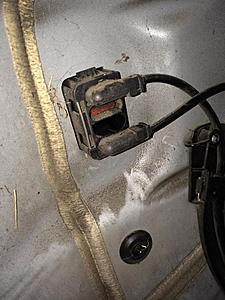
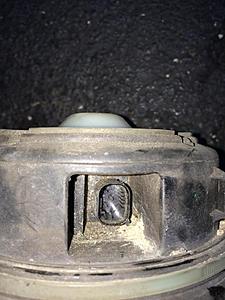
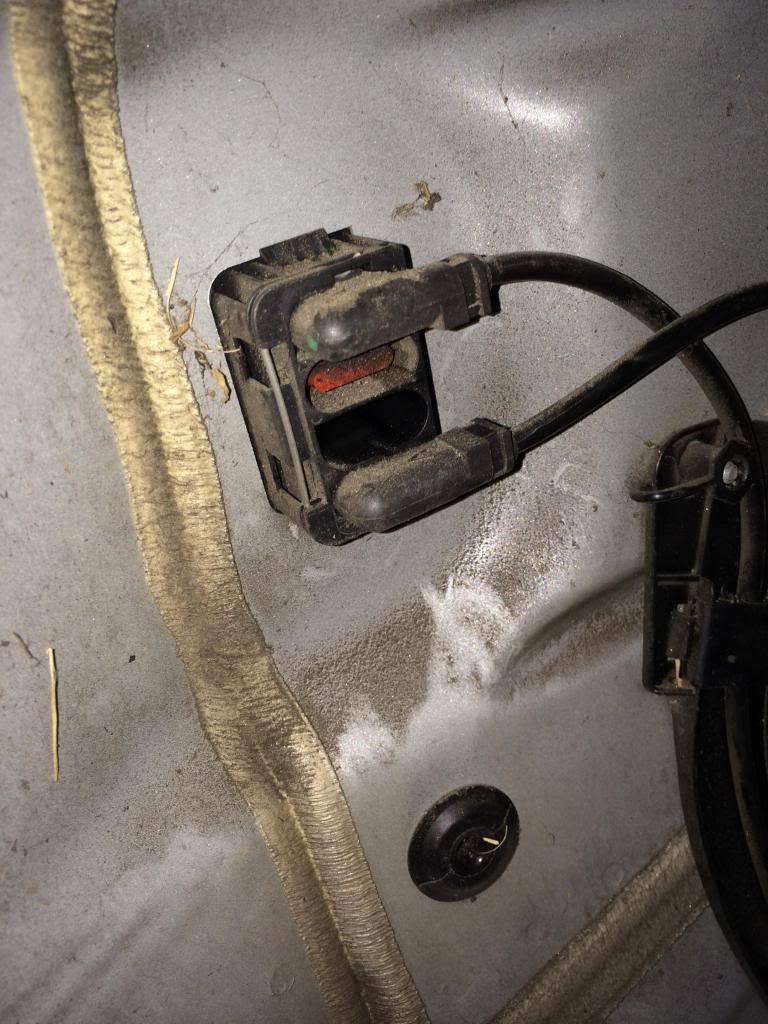
Now trace the line leaving the shock to this junction box. There will be three connections in there. You will remove the middle one. To sever the connection you will see a small metal clip at the top. Simply insert a flat head screwdriver and pry upwards. The clip will slide with ease and you will remove the clip. Then unplug the middle harness clip by pulling with a light tug. Then insert the clip back and press firmly till it clicks in place.
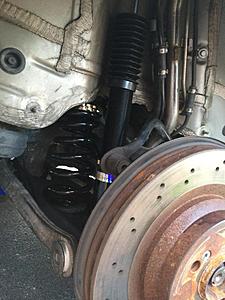
Lets get that pesky shock out! LOL! Remove the bolt from the control arm. Enter your trunk and remove the liner from the same side you are working on and undo the top nut. Compress the shock by hand it should come out easily.
I forgot to take a picture of this step.
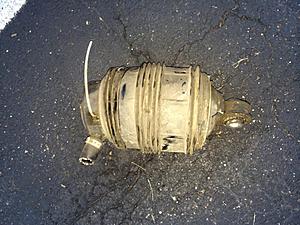
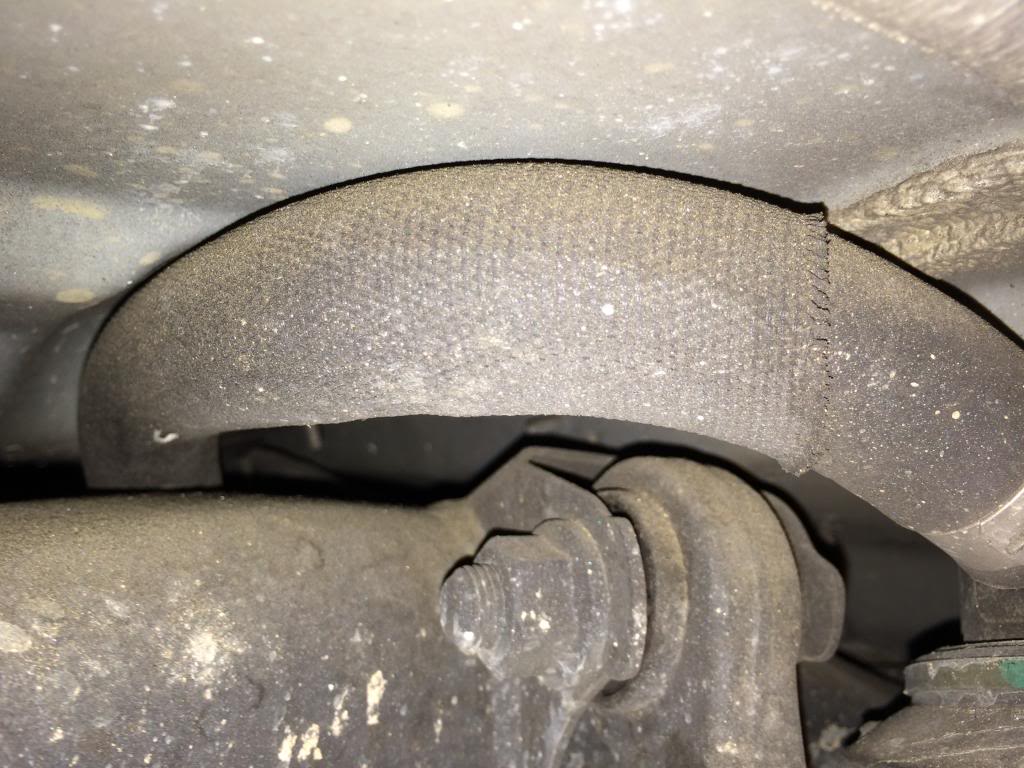
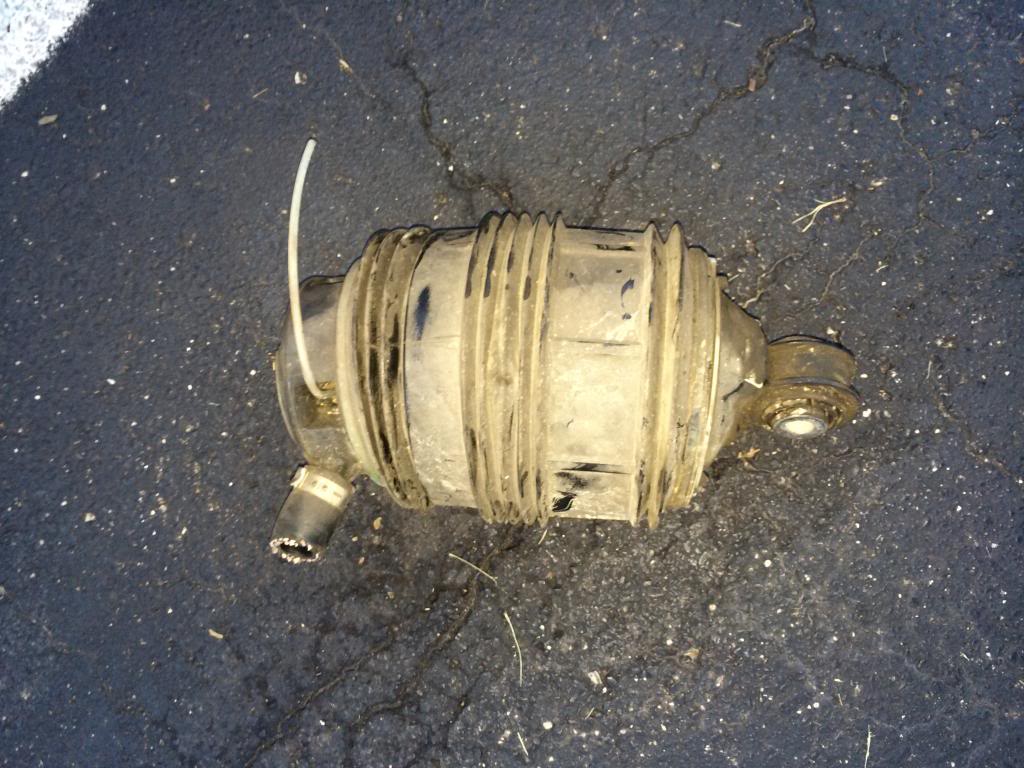
Now lets pull that annoying rear air bladder. The rear air bladder has nothing holding it up top except a centering bulge in the chassis and a dip on the bladders top side to accommodate the bulge. So the best way to remove the air bladder is to cut the main thick rubber hose leading to it. All the air will leak out of the bladder and it will compress like an accordion.
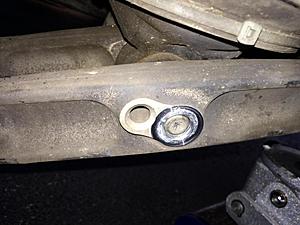
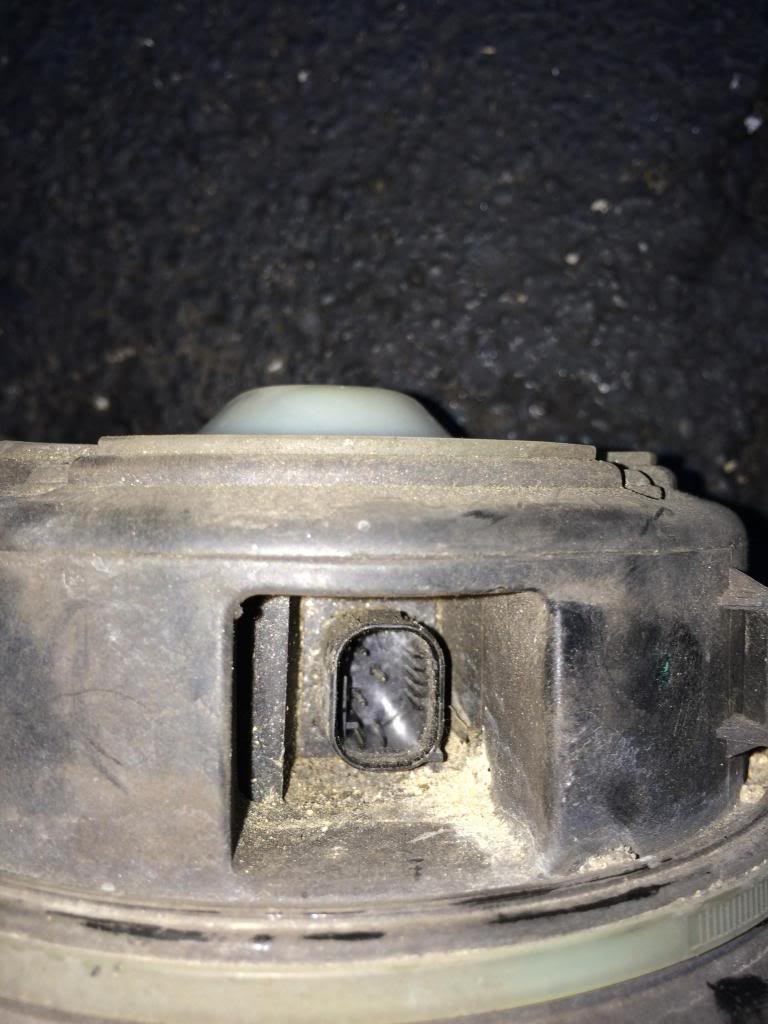
Then remove the lower bolt.
Cut the factory white air feed line:

Unclip the harness:
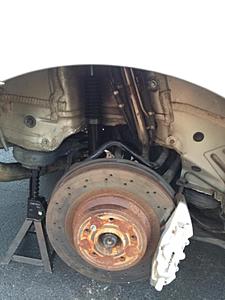
This is what should pop out.
Undo the two bolts holding the brake caliper on.
(sorry no picture)
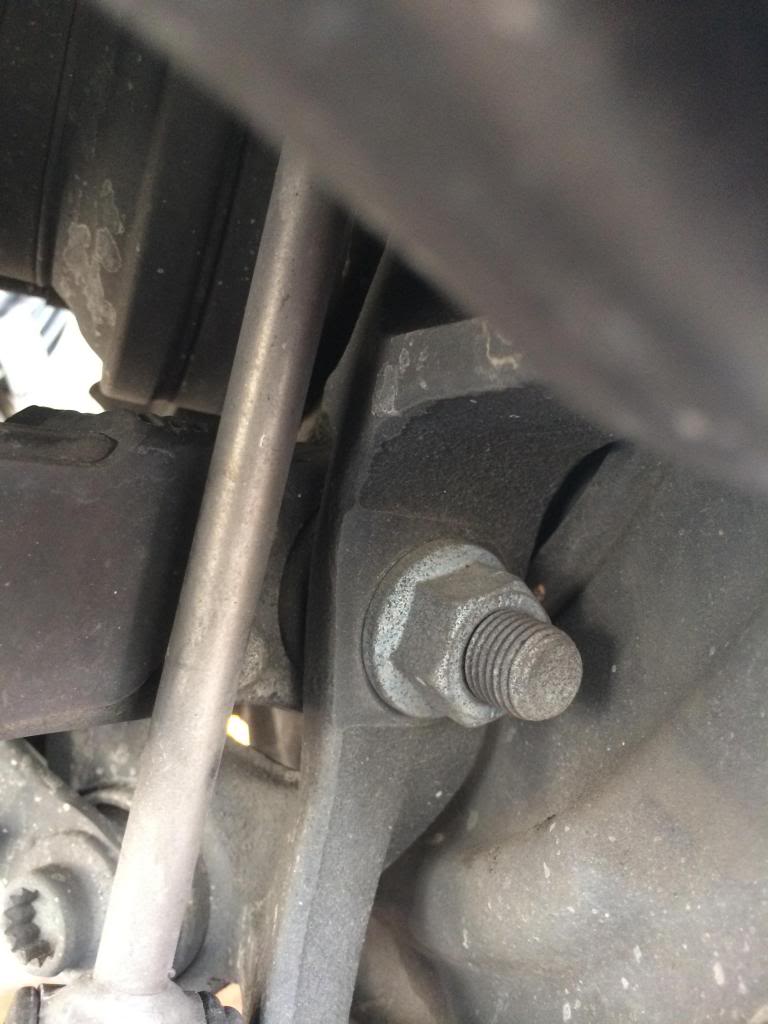
Undo this control arm bolt from the spindle.

Then undo this control arm bolt from the chassis:
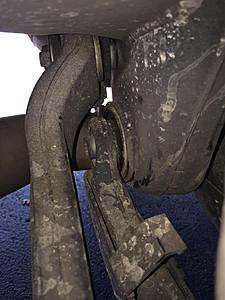
Remove the control arm!
Yay! Go grab a beer/cold drink/water/smoke/or pop a squat! The hard part is over with!
Now reinstallation is the reverse of removal.
1. Insert new control arm with spring cup to spindle and bolt down
2. Seat the spring as per manufacturers instructions and insert rear control arm bolt
3. Feed top of shock through trunk hole and bolt down with proper bushings. Then connect eyelet bolt to the shock and control arm.
4. Install camber arm.
5. Install brake calipers
6. Install rear toe arm.
7. Install sway bar.
8. Install rear fender liner
9. Repeat on the other side.
TADA You are done. My phone battery died so I didn't get to take any more pictures. I feel sad now. Adjust your coilovers as per manufactures instructions!
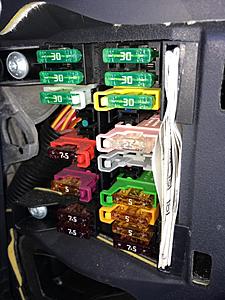
****TO DISABLE AIRMATIC AND AVOID THE WARNINGS ON THE DASH. JUST OPEN THE DRIVER SIDE DASH FUSE BOX. AND PULL FUSE F037 AND ITS DONE. NO MORE AIRMATIC WARNINGS AND NO MORE VISIT WORKSHOP WARNINGS.****
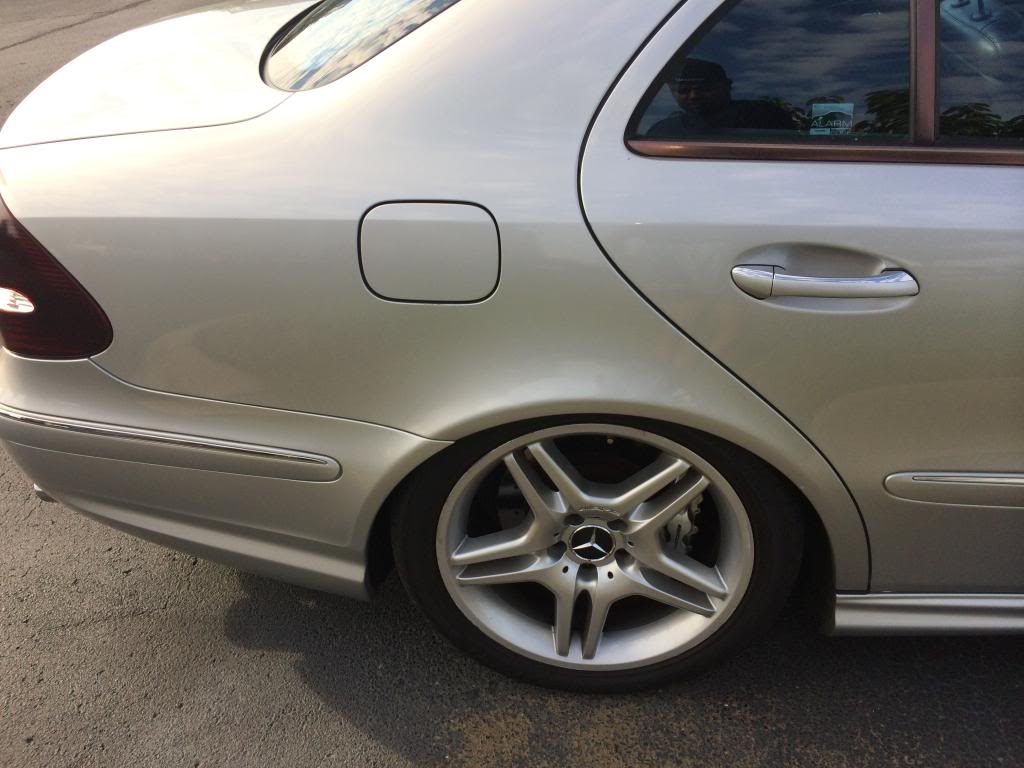
IF YOU WANT TO GO LOW YOU CAN WITH THESE:


The only thing i had to purchase was the control arms to install the BC Racing MBR Type Coilovers. Nothing else.
However this is not going to be as precise as the previous install. Its simple really, remove everything and reinstall. LOL! I know too easy right? Wrong this was hell and took loads of time. So without further adieu here we go:
As usual break the lug nuts loose with the car on the ground. Chock the front wheels on both sides of the wheel.

Then get the rear end up in the air. The rear is a bit tricky so i suggest you use the factory jack on the jacking points in the rear and lift the car up.

Then slide a proper jack in from behind the car and you will see two big rubber pads on each side of the car infront of the mufflers. These are also jacking points. Place a piece of 2x4 in between the jack and the rubber pads and lift one side at at time untill the rear end is up high enough for the factory jack to fall out of the standard jacking point. Then proceed to install a jack stand in the factory jacking point. Repeat on the other side as well (DO NOT RAISE THE CAR AS HIGH AS THE JACK STAND WILL GO ON THE FIRST LIFT). Make sure you raise each side up a few inches at a time and stagger the lifting process. This will guarantee that the car will not fall off the jack stands but also will be a lot safer .
Once you have accomplished that. Remove the wheels and this is what you should be staring at:

Remove all the nuts holding the inner fender liner from the car. This should allow you to see what kind of carnage you are about to come in contact with.

On the back back side of the rear spindle facing the rear of the car will be a connecting arm to the chassis. Disconnect this bolt from the spindle.
Remove the sway bar from the spindle and the camber arm

Now take a zip tire and swing the sway bar mount up and hold the rear toe arm in place with the sway bar mount and a zip tie like so:
Now trace the line leaving the shock to this junction box. There will be three connections in there. You will remove the middle one. To sever the connection you will see a small metal clip at the top. Simply insert a flat head screwdriver and pry upwards. The clip will slide with ease and you will remove the clip. Then unplug the middle harness clip by pulling with a light tug. Then insert the clip back and press firmly till it clicks in place.
Lets get that pesky shock out! LOL! Remove the bolt from the control arm. Enter your trunk and remove the liner from the same side you are working on and undo the top nut. Compress the shock by hand it should come out easily.
I forgot to take a picture of this step.
Now lets pull that annoying rear air bladder. The rear air bladder has nothing holding it up top except a centering bulge in the chassis and a dip on the bladders top side to accommodate the bulge. So the best way to remove the air bladder is to cut the main thick rubber hose leading to it. All the air will leak out of the bladder and it will compress like an accordion.
Then remove the lower bolt.

Cut the factory white air feed line:

Unclip the harness:
This is what should pop out.
Undo the two bolts holding the brake caliper on.
(sorry no picture)
Undo this control arm bolt from the spindle.
Then undo this control arm bolt from the chassis:
Remove the control arm!
Yay! Go grab a beer/cold drink/water/smoke/or pop a squat! The hard part is over with!
Now reinstallation is the reverse of removal.
1. Insert new control arm with spring cup to spindle and bolt down
2. Seat the spring as per manufacturers instructions and insert rear control arm bolt
3. Feed top of shock through trunk hole and bolt down with proper bushings. Then connect eyelet bolt to the shock and control arm.
4. Install camber arm.
5. Install brake calipers
6. Install rear toe arm.
7. Install sway bar.
8. Install rear fender liner
9. Repeat on the other side.
TADA You are done. My phone battery died so I didn't get to take any more pictures. I feel sad now. Adjust your coilovers as per manufactures instructions!

****TO DISABLE AIRMATIC AND AVOID THE WARNINGS ON THE DASH. JUST OPEN THE DRIVER SIDE DASH FUSE BOX. AND PULL FUSE F037 AND ITS DONE. NO MORE AIRMATIC WARNINGS AND NO MORE VISIT WORKSHOP WARNINGS.****

IF YOU WANT TO GO LOW YOU CAN WITH THESE:

The only thing i had to purchase was the control arms to install the BC Racing MBR Type Coilovers. Nothing else.
Thread Starter
Member
Joined: Apr 2008
Posts: 113
Likes: 5
From: Nashville TN
2013 GLK 350 2013 GL450
Would a moderator please combine my install posts with the original first post so this can be concise?
Thanks fellas. Im sure some of you will have questions as well!
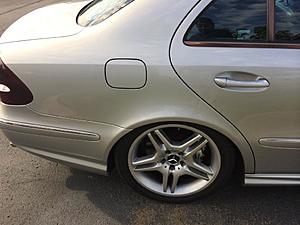
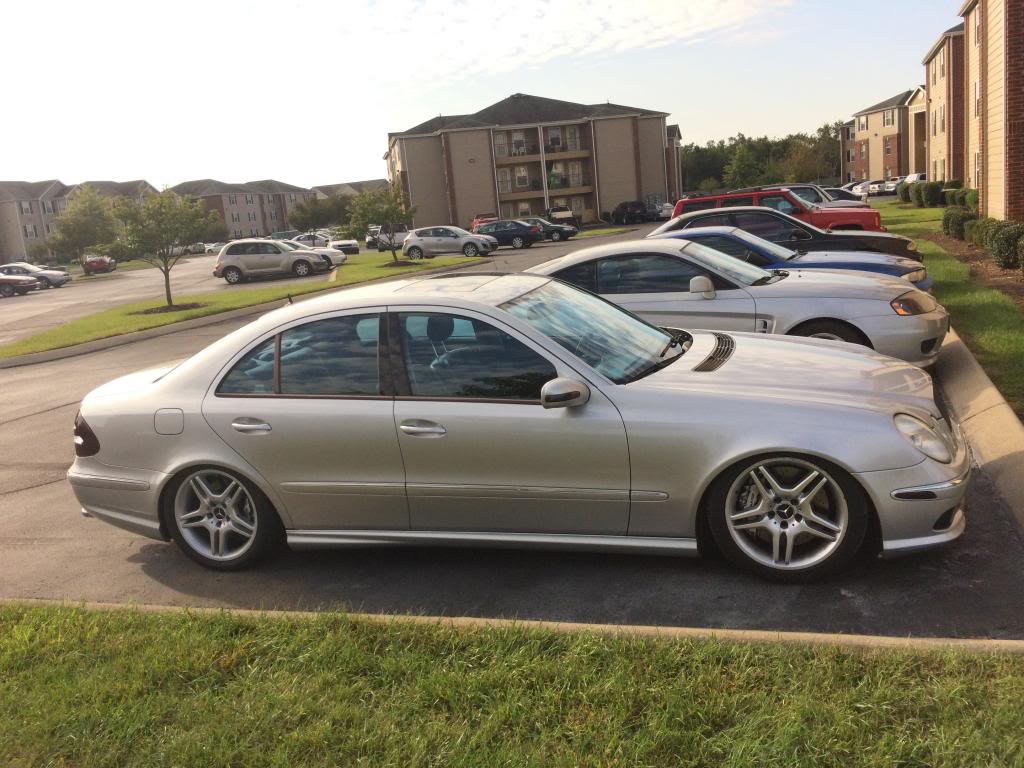
As per the settings I have the front at 15 and the rear at 15 and the car sitting 1 finger above the tires. It sits level and drives great. Go get an alignment after you are done!
Thanks fellas. Im sure some of you will have questions as well!
As per the settings I have the front at 15 and the rear at 15 and the car sitting 1 finger above the tires. It sits level and drives great. Go get an alignment after you are done!


Thread Starter
Member
Joined: Apr 2008
Posts: 113
Likes: 5
From: Nashville TN
2013 GLK 350 2013 GL450
Thanks! 
I know crazy right!?!?! LOL!
Man I have never been afraid to turn wrenches. I have yanked a trans out of a car with rocks as jack stands on the side of the highway to replace a clutch. Hand tools and a set of cojones to try anything helps!
I know crazy right!?!?! LOL!
Man I have never been afraid to turn wrenches. I have yanked a trans out of a car with rocks as jack stands on the side of the highway to replace a clutch. Hand tools and a set of cojones to try anything helps!

Senior Member
Joined: Jun 2004
Posts: 301
Likes: 22
From: Carmichael, CA
2011 G55 + others
Thanks for posting this DIY.
Can you post a brief review of the suspension, now that its installed, and also share with us what the difference is in handling, feel and ride quality as compared to the Airmatic system you removed? This would be really helpful to those out there that are on the fence about going to a coilover system but wonder how that will change the handling and ride characteristics of the car.
Can you post a brief review of the suspension, now that its installed, and also share with us what the difference is in handling, feel and ride quality as compared to the Airmatic system you removed? This would be really helpful to those out there that are on the fence about going to a coilover system but wonder how that will change the handling and ride characteristics of the car.


Thread Starter
Member
Joined: Apr 2008
Posts: 113
Likes: 5
From: Nashville TN
2013 GLK 350 2013 GL450
Thanks for posting this DIY.
Can you post a brief review of the suspension, now that its installed, and also share with us what the difference is in handling, feel and ride quality as compared to the Airmatic system you removed? This would be really helpful to those out there that are on the fence about going to a coilover system but wonder how that will change the handling and ride characteristics of the car.
Can you post a brief review of the suspension, now that its installed, and also share with us what the difference is in handling, feel and ride quality as compared to the Airmatic system you removed? This would be really helpful to those out there that are on the fence about going to a coilover system but wonder how that will change the handling and ride characteristics of the car.
I appreciate it man. I cannot wait for the house to be done so i can have my garage back.
Out Of Control!!
Joined: Dec 2004
Posts: 14,212
Likes: 9
From: Boston, MA
00 MB ML55, 91 Toyota Supra Turbo(sold), 06 E500(gone), 03 BMW M3
I had a set of BR series on my E46 M3 and was pretty happy with them...
So in summary... you need rear control arms(with spring cups), and a set of coilovers. Then uninstall and reinstall as you would do normally with a control arm replacement on the rear.
Pull the fuse for airmatic(or in Star code for no Airmatic)... If I had access to a lift then it would take maybe a long day to do and delete airmatic from the car. I wonder how much weight it would save
Thread Starter
Member
Joined: Apr 2008
Posts: 113
Likes: 5
From: Nashville TN
2013 GLK 350 2013 GL450
I had a set of BR series on my E46 M3 and was pretty happy with them...
So in summary... you need rear control arms(with spring cups), and a set of coilovers. Then uninstall and reinstall as you would do normally with a control arm replacement on the rear.
Pull the fuse for airmatic(or in Star code for no Airmatic)... If I had access to a lift then it would take maybe a long day to do and delete airmatic from the car. I wonder how much weight it would save
So in summary... you need rear control arms(with spring cups), and a set of coilovers. Then uninstall and reinstall as you would do normally with a control arm replacement on the rear.
Pull the fuse for airmatic(or in Star code for no Airmatic)... If I had access to a lift then it would take maybe a long day to do and delete airmatic from the car. I wonder how much weight it would save
It was a good 30 lbs saved after the compressor and airmatic was removed.
MBWorld Fanatic!
Joined: Feb 2011
Posts: 2,841
Likes: 202
From: miami / delray beach
2014 E63s amg 4matic, 2009 C63, 2006 E55 AMG , 2001.5 AUDI S4 stg 3+ w/meth
i would say you save a ton of weight as i just replace one of the front airmatics myself with arnott one and they are heavy as crap! it felt like it was holding up a 45 lb barbell plate with one hand while pushing down on the lower control arm to get the bottom of the strut in...
plus you would eliminate the compressor too which is pretty heavy too
i would think you save 20lbs on each corner plus whatever the compressor weighs
Thread Starter
Member
Joined: Apr 2008
Posts: 113
Likes: 5
From: Nashville TN
2013 GLK 350 2013 GL450
I never got a chance to weight the whole setup coming out of the car. But i did weight the setup of the car going in and it was significantly ligther than what i pulled out


