When you click on links to various merchants on this site and make a purchase, this can result in this site earning a commission. Affiliate programs and affiliations include, but are not limited to, the eBay Partner Network.
OK, so I've been told (and totally agree) that in order to replace the ABC pump, you need to disconnect the front bolts of the front subframe and lower it so that you can access the bottom banjo bolt with a straight ratchet. Having removed the old pump without doing this, I can see why it's necessary. I was able to disconnect the various clamps holding the ABC lines and then went to unbolt the motor mounts. However, the top bolt on each of the mounts seems to be turning as well, and there's not enough room (shocker) to get a wrench up there to hold the bolt steady. What am I doing wrong? Also, how many bolts are there holding the subframe in place? I've been told to remove the front ones but only loosen the ones in the back sufficiently to allow the subframe to be dropped down enough so that I can reach the banjo bolt with a straight ratchet. Looks like a combination of hex bolts and torx bolts .....
There are four large E-torx bolts that hold the sub-frame, mounted in each corner.
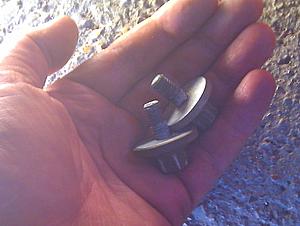
The engine mounts are bolted to the sub-frame from below, Each mount has a single, hex-head bolt. They're quite small, only need a 1/2" socket IIRC. These bolts screw into threaded holes in the metal mount frame. There's no nut to spin, as such.
There are three bolts at the top of each mount that secure the engine arms to the mounts. On the BiTurbos, these are obstructed by the turbos, which is why people say remove the engine to change them. Not necessary.
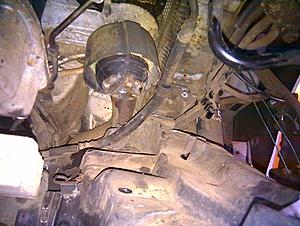
Removing the single engine mount bolts from underneath is trivially easy. They're mounted slightly ahead of the steering rack on the W215 & W220. These are the bolts:
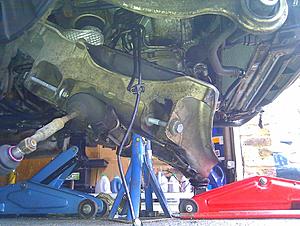
Here, the front of the sub-frame is fully lowered (requires the steering rack to be disconnected, but shows what's possible. Basically you can see the engine block and everything attached to it, like the turbos, the engine mounts, the knock sensors, starter motor, alternator, ABC pump, AC compressor, and the infamous ABC line that goes from the pump to the regulator/accumulator).
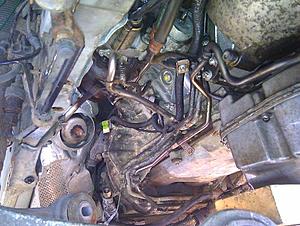
Top left, you can see the RHS engine mount. In the middle, you can see two cables dangling down. These run down the wheel arch and connect to the steering rack and the ABC regulator. They're clipped to the side of the sub-frame, and you have to be aware of them when you drop the sub-frame.
The only other thing to be aware of is the PAS return hose that runs down the middle of this picture of the LHS of the engine, as seen from the front. That pipe is clipped to both the chassis and sub-frame, so you need to make sure you don't damage that if you lower the subframe.
It could have been a lot more difficult than that. Build and removal procedures consist of EITHER hoisting the engine and transmission in and out of the engine compartment with the sub-frame in position, OR dropping the engine and transmission together with the sub-frame. There is no provision for a different assemble / dismantle procedure like remove/refit the sub-frame with the engine in situ, so there's every reason to suppose that the sub-frame can only be installed with the engine out of the car.
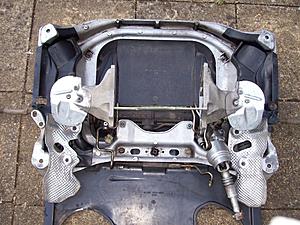
With the exception of that hose and cable, that's not the case. So as long as you unscrew the ABC pipe mounts that conveniently run around the periphery of the sub-frame (and support the engine, obviously) there's very little reason not to lower the sub-frame. Removing it completely is a different matter, as you have to disconnect the lower suspension arms and steering rack, but then you get everything:
Nick
Last edited by Welwynnick; Oct 3, 2016 at 06:36 PM.
The red jack is supporting the front of the sub-frame.
The blue jack is supporting the rear of the sub-frame.
The blue stands are supporting the engine sump using a large wooden block (wide enough to cover the sump, but narrow enough to fit between the sub-frame.
Yes, you can remove the engine mounts that way, though its still not easy. The turbos are very close to the heads of the bolts on the top of the mounts. I guess if you had a very slim rung spanner you might be able to undo them directly.
What I did was remove the support arms, but accessing the forward-most bolt on the LHS mount was difficult. Its hidden by the turbo, the ABC pump and the AC compressor.
Iif you're going to attempt that, I would get a good quality set of fine-tooth ratchet E-torx ring spanners.
Hey, Nick. Yeah, turns out that the bolts I was talking about when I started this thread weren't the motor mounts (duh). Went out this afternoon with the benefit of your excellent tutelage and supported everything in the same way you did, made sure the hose clamps were all disconnected, removed the hex nuts from the motor mounts (which was as easy as promised), loosened the rear e-torx subframe bolts and removed the ones in the front. The subframe dropped some, but not all that much. Certainly not enough to get the clearance I'll need to get the banjo bolt back onto the bottom of the pump, but enough to see that I'll need to replace a couple of ABC lines. Figured what the heck, may as well remove the subframe altogether. Managed to get the lower control arms off easily enough but will have to get a tool to slip the ball joint hubs out of their home. Haven't yet figured out how to disconnect the steering rack. Any pointers there? Any idea why the subframe wouldn't drop all that much? I'm worried that since this is the case, it will still be hung up after completely removing the (now only loose) rear subframe e-torxbolts and steering. After re-reading one of your posts above, I think I need to make sure that the PAS return hose is free. You also mention a cable?
I've replaced both of the hoses that come from the pump without dropping the sub frame. Just use a long extension and go through one of the holes between the lower control arm and the sub frame. It doesn't look like you can because of a plastic cover that blocks the direct access, but the plastic cover slides right out of the way when you try to push a socket/extension through it. It requires a wobble socket, but it is nearly a straight line to the banjo bolt.
The subframe dropped some, but not all that much. Certainly not enough to get the clearance I'll need to get the banjo bolt back onto the bottom of the pump, but enough to see that I'll need to replace a couple of ABC lines.
The weight of the suspension pivots about the ball joint at the bottom of each strut, and uses the lower arms as levers to push the subframe upwards.
So if you PUSH the subframe down (taking care that the ABC pipes are out of the way) you'll see the suspension hub/upright/brake move upwards. They're heavier than the subframe, so they win the see-saw battle.
Also, the two lower arms have bushes that you have to twist to lower the subframe, so you have to work against those as well.
If you want to remove the subframe, you can either drop the rack first, or remove it with the subframe (which then becomes quite heavy - the subframe is only 23 lbs on its' own).
Removing the rack is a little more difficult. You have to detach:
4 rack mounting bolts
2 track rod ends
2 hydraulic hoses
one steering column coupling
one electrical connector
The rack mounting bolts have upward facing nuts that you have to stop spinning with an 18mm spanner, held in-between the subframe and the engine sump, which is awkward.
If you remove the rack, two words of warning:
1. Be sure to leave the UPPER steering column coupling alone - that's difficult to refit, as the column keeps disappearing into the cabin.
2. DO NOT TURN THE STEERING WHEEL.
I've replaced both of the hoses that come from the pump without dropping the sub frame. Just use a long extension and go through one of the holes between the lower control arm and the sub frame. It doesn't look like you can because of a plastic cover that blocks the direct access, but the plastic cover slides right out of the way when you try to push a socket/extension through it. It requires a wobble socket, but it is nearly a straight line to the banjo bolt.
Hmmmmmm ..... I looked every which way, and that really doesn't seem to be possible on my particular year and model, but I have so much work to do under there that (at least) dropping and (likely) removing the subframe should make everything much easier -- to clean as well as to fix. "Easier" being a relative term, of course. Been quite an odyssey thus far Thanks for your input just the same. Much appreciated,
I've replaced both of the hoses that come from the pump without dropping the sub frame. Just use a long extension and go through one of the holes between the lower control arm and the sub frame. It doesn't look like you can because of a plastic cover that blocks the direct access, but the plastic cover slides right out of the way when you try to push a socket/extension through it. It requires a wobble socket, but it is nearly a straight line to the banjo bolt.
"If you want to remove the subframe, you can either drop the rack first, or remove it with the subframe (which then becomes quite heavy - the subframe is only 23 lbs on its' own).
Removing the rack is a little more difficult. You have to detach:
4 rack mounting bolts
2 track rod ends
2 hydraulic hoses
one steering column coupling
one electrical connector
The rack mounting bolts have upward facing nuts that you have to stop spinning with an 18mm spanner, held in-between the subframe and the engine sump, which is awkward. "
Nick - Two questions, as I still haven't made much progress.
First, by "track rod ends" are you referring to the ball joints? I rented a tool to do this, as I know they are very difficult to remove, but (shocker) I think I need one that's specific to MB, as the one I have is of no help at all.
Second, assuming I do manage to drop the rack and get the subframe completely free, how would I get it out from under the car like you did? I have a jackstand under the oil pan (cushioned by a wooden block to distribute the load), so it will be in the way if I want to the subframe out from under the car.
I'm starting to think that the fact I have to ask such things indicates that I'm in over my head, but I'm so far into this that I don't see how I have any choice but to soldier on
Many (many, many, many) thanks for your input (to say nothing of your patience).
- Christopher
Last edited by booesq; Oct 10, 2016 at 12:30 PM.
Reason: Clarifying quote to which I'm responding, as I didn't want to include the whole thing
Everyone will always encourage you ask questions here. It help to frame the answers.
By track rod ends, I mean the ball joints at the end of the steering track rods. These are the smaller, more straightforward ball joints. Standard ball joint splitters should do. I have both direct acting and lever arm splitters, and I think both work OK.
The other main ball joints are the ones at the bottom of the suspension uprights, and at the end of the lower controller arms. These are the arms that the suspension struts are mounted to, so they bear the weight of the car. Those ball joints need a special Mercedes ball joint press tool, and are difficult to remove.
If you want to drop the whole sub-frame, I would probably just leave it where it is. I took mine out completely out of curiosity, but it's probably not necessary. I used an engine crane to support the engine for a minute.
Yes, you can remove the engine mounts that way, though its still not easy. The turbos are very close to the heads of the bolts on the top of the mounts. I guess if you had a very slim rung spanner you might be able to undo them directly.
What I did was remove the support arms, but accessing the forward-most bolt on the LHS mount was difficult. Its hidden by the turbo, the ABC pump and the AC compressor.
Iif you're going to attempt that, I would get a good quality set of fine-tooth ratchet E-torx ring spanners.
Nick
Finally got caught up enough today to start this. Dropped the full subframe with knuckles and steering rack, just removed the brakes, two lower bolts in the abc strut and the upper control arm joint, and everything lowered down without too much fuss.
I'm doing the 3 enigine bay ABC lines, all 4 accumulators, both mounts, diverter valves (old ones looked ok, but whatever, i'm in there), and turbo coolant line o-rings. Also doing plugs and valve cover gaskets once I get it back on the wheels. Even at employee cost i'm seeing almost 2k in parts right now.
The engine mount support arms are a major PITA, no doubt there. I was able to come up with interesting combinations of extensions, swivels, etc and my electric ratchets are a life saver for this work.
In the future, if I have to do a job of this scope on a customer car, I would drop the entire powertrain down or pull the trans back and lift the engine up and out. It's such a mess to fight all this stuff around everything, I could have had the entire power unit out in the same or less work. It's a learning experience for sure though.
In the future, if I have to do a job of this scope on a customer car, I would drop the entire powertrain down or pull the trans back and lift the engine up and out. It's such a mess to fight all this stuff around everything, I could have had the entire power unit out in the same or less work. It's a learning experience for sure though.
By the time I finished doing what I was doing last year (rebuilding the turbos) it seemed that all the work I did was comparable with removing the engine. However, when you sit down and compare sub-frame and engine removal for any lesser jobs, the latter looks hard work.
This is a list of all the things that you DON'T have to undo when just removing the sub-frame:
Engine covers
Air filters
Fan Bulkhead Wiring Cooling Heating Air con Charge cooling Oil cooling Transmission cooling Alternator cooling ABC Exhaust Propshaft Transmission
EDIT: I forgot some little things:
Transmission selector
TCU connector
You don't even need to open the hood. I thought that was quite a compelling list.
Nick
Last edited by Welwynnick; Oct 26, 2016 at 05:22 AM.
Good point, but as I do the job, I realize that there's still no space with the subframe out, and it isn't easy to drop. I removed fully from the car BTW.
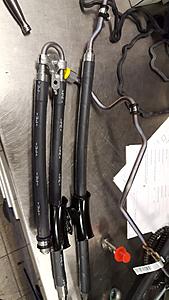
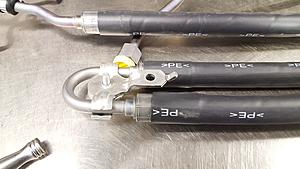
Interesting thing with the new MB hoses, they have an extra cover. I'm sure, over the years, they realized that the stock design was too fragile, and added an extra layer to help handle the abuse. My stock lines were 14 years old before they let go, if the new ones last half of that i'm sure I'll have the engine out before they go bad again.
I also like how they come with all new brackets and carriers, bolts, etc. Makes install simple, and cost is not cheap but not horrible, it was ~$350 for the front two lines (the dead end u-turn line and the one that connects to the back), and about ~$180 for the rear section, from that front line to the first valve block by the transmission.
Before I throw them out, does anyone want the old lines? They would be great to have rebuilt, it's a former california car, zero rust, just had the rubber fail after 14 years. I would let them go for shipping + a couple dollars, otherwise I can't keep them on top of my toolbox forever lol. I have all 3 engine bay lines, the two on the pump and the one going from the first line to the primary valve block.
I have changed the ABC pump 4 times. (brand new factory lines kept going bad)
Never dropped the sub frame. Changed driver side motor mount too, didnt drop sub for it either.
2 hours to pull ABC, 3 to replace it.
I use a special wrench for the banjo bolt the I had to grind to work perfectly.
Replaced the dealer lines with one I had made, never had a bad line again.
That dead-head line ALWAYS went bad on me even when the car was just sitting at idle!
Hello everybody,
This is a personal point of view after my subframe lowering experience
The incredible method invented by Welwynnick WORKS
But I want to warn all of you, It's really scary, and you have to take care removing a bolt on the left inside of the sub frame (facing the engine) that is hold by one end on the sub frame and one side on the chassis. the bolt is a 8mm from below the sub frame.
I replcaced both valves on the turbo
BUT, if you dream of replacing your engine mounts, FORGET IT WITHOUT COMPLETELY REMOVING THE SUBFRAME ! (mine where like new anyway)
Also, on the picture, I have created a method to easily bolt on the valves without struggling with the spring pressure. just make a little hose closed on one side, press the valve and it stays together for bolt on.
Well one Peter, and good idea about stopping off the diverter valve port. It's tricky to fit otherwise.
For anyone wondering, the inclined wooden sticks aren't supporting any great weight. They simply lift the wheel hubs up, allowing the subframe to drop down. Otherwise the track control arm acts a lever, and the hubs and brakes push the subframe upwards.
Peter, did you leave the REAR subframe bolts installed loose, so that the subframe simply pivoted downwards at the front?
Great stuff, Nick
Last edited by Welwynnick; Dec 10, 2016 at 08:44 AM.
> did you leave the REAR subframe bolts installed loose, so that the subframe simply pivoted downwards at the front?
No, that might work but the risk to bend them was to much to me, the force on the back is multiplied to much
I used a Axle stand
lift the wheel hubs up IS VERY IMPORTANT, because it doesn't look like but your subframe won't drop without doing that
also, personally I didn't unbolt any of the hoses running on the side of the subframe
you can bend them slightly away from the frame. (yes I might be a lazy ***)
only hose to disconnect is the one fixed with a bracked to the subframe with 2 small torx
I also did not disconnect wires to the steering.
nothing went wrong, tested the car out this morning
Last edited by pmercury; Dec 10, 2016 at 07:07 AM.
On the 2002 CL500, is it possible to replace the A/C compressor once the subframe is dropped without disturbing the ABC pump? I will bring it to the shop, and the mechanic will put it up in the air with a car-lift. It could be just the o-ring that is bad and the compressor doesn't need to be replaced. Thanks.
Mercedes SLR McLaren 722 S Is Extremely Rare Example Modified by McLaren
Slideshow: A one-of-one U.S.-spec Mercedes-Benz SLR McLaren Roadster became even rarer after a factory-backed transformation at McLaren's headquarters.


 Thanks for your input just the same. Much appreciated,