
 06-10-2015, 12:13 PM
Last edit by: IB Advertising
See related guides and technical advice from our community experts:
- Mercedes Benz E Class How to Replace Brake pads/calipers/rotors
Step by step instructions for do-it-yourself repairs

W211 DIY Brake Job
10-27-2006, 03:19 AM
#76
Newbie

Join Date: Oct 2006
Location: spain
Posts: 2
Likes: 0
Received 0 Likes
on
0 Posts
sorry i own a volvo but saving for a merc
what did i do wrong
i live in spain and getting any information from mb is imposible.
i have a small fast fit center and when i had to change pads on a w211 i did it the normal way...took wheels of and pushed calipers back refitted pads..
then came the scary part,i moved the car and the pedal just went to the floor.
i left the car for about 15 min and then everything was ok.
so my question is ...when you disconect the sbc then reconect it do you have to wait for the breaks to ajust themselves ?
 10-28-2006, 07:39 AM
#77
Senior Member

Join Date: Apr 2004
Location: Georgia, USA
Posts: 274
Likes: 0
Received 1 Like
on
1 Post
Honda Accord
points, see my post in this thread https://mbworld.org/forums/e-class-w211/168130-05-cdi-brake-job.html
There is a link to another thread at tech.bentleypublishers.com that has a pdf file describing the correct procedure for initializing the new pads. It is good because it reminds you to lower the brake fluid before you lock up the car. It worked on my 03 E320, but I don't know if that will work on later versions though.
There is a link to another thread at tech.bentleypublishers.com that has a pdf file describing the correct procedure for initializing the new pads. It is good because it reminds you to lower the brake fluid before you lock up the car. It worked on my 03 E320, but I don't know if that will work on later versions though.
12-26-2006, 08:39 PM
#79
Super Member
Join Date: May 2004
Location: Rhode Island
Posts: 911
Likes: 0
Received 1 Like
on
1 Post
Debadged 6-Speed '05 C320 Sports Coupe
The GiroDisc caliper spreader from Zeckhausen Racing is an excellent tool when changing pads. It is very easy to bottom-out the pistons.
This was used on my recent rear brake job, with lots of images attached.

This was used on my recent rear brake job, with lots of images attached.
12-26-2006, 09:44 PM
#80
Super Member

no need for such a gaget. I just finished doing my rear brake pads using just a large wood clamp. my C clamp was too small. 
I couldn't get my darn rotors out since I didn't have the 8mm screw long enough to drive it out so I just did the pad. My rotors looks just as thick as the new one which really raise a question if I really needed to do my rotors. Works fine and warning lights are off. I might just go return the rotors and save myself a hundred bucks and do slotted/cross later on all 4.
I couldn't get my darn rotors out since I didn't have the 8mm screw long enough to drive it out so I just did the pad. My rotors looks just as thick as the new one which really raise a question if I really needed to do my rotors. Works fine and warning lights are off. I might just go return the rotors and save myself a hundred bucks and do slotted/cross later on all 4.
 03-24-2007, 07:01 PM
#82
Newbie

Join Date: Mar 2007
Posts: 1
Likes: 0
Received 0 Likes
on
0 Posts
This was the easiest brake job I have EVER done (less than 20 minutes)...and I've done quite a few on different autos. And the cost to do this yourself is astounding ($102 vs $530 dealership quote). Here is a series of photos that may help others in their attempt.
1. Apply the parking brake, pull the hood lever, exit the car and set the key aside.
2. Open the hood a locate the SBC connector
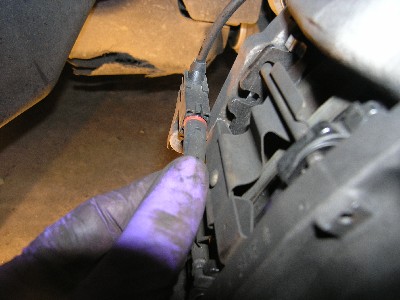
3. Pull up the SBC Clip to unlock the connector

4. Pivot the connector backward to disengage and set aside

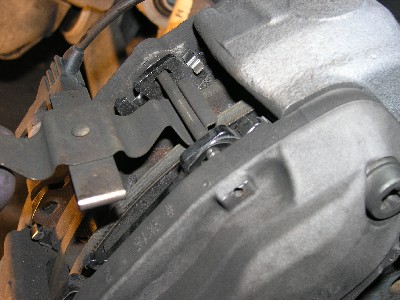
5. Lift car and remove tire. This is the before shot

6. Unplug Brake Pad connector and sensor


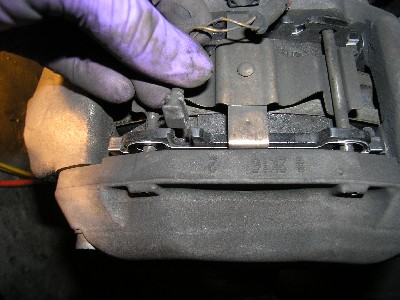
7. Tap out holding pins (I used a thin drill bit and a hammer to do this)

8. Remove pad holder

9. Compress piston using c-clamp or carefully with pliers (Not much force needed). DO THIS WHILE OLD PADS ARE STILL IN THE ASSEMBLY

10. Remove pads

11. Insert new pads

12. Re-insert pins

13. Hook pad holder under first pin then press down and insert second pin
14. Replug sensor and connector. I had to used the old one since Mercedesshop did not send that sensor for this side...even though this one is still unbroken I will replace tomorrow after purchase locally
15. All Done

Hope this helps someone!
1. Apply the parking brake, pull the hood lever, exit the car and set the key aside.
2. Open the hood a locate the SBC connector
3. Pull up the SBC Clip to unlock the connector
4. Pivot the connector backward to disengage and set aside
5. Lift car and remove tire. This is the before shot
6. Unplug Brake Pad connector and sensor
7. Tap out holding pins (I used a thin drill bit and a hammer to do this)
8. Remove pad holder
9. Compress piston using c-clamp or carefully with pliers (Not much force needed). DO THIS WHILE OLD PADS ARE STILL IN THE ASSEMBLY
10. Remove pads
11. Insert new pads
12. Re-insert pins
13. Hook pad holder under first pin then press down and insert second pin
14. Replug sensor and connector. I had to used the old one since Mercedesshop did not send that sensor for this side...even though this one is still unbroken I will replace tomorrow after purchase locally
15. All Done
Hope this helps someone!
 04-21-2007, 04:59 PM
#84
Burkett,
I dont know if your active on this board anymore as this is a very old thread but I wanted to thank you for your photos.. I changed out my front pads on my CLS today with Porterfields and your photos made it very easy..
thx,
Htown
p.s. by the way you dont have to disconnect the SBC while doing just a pad change if you dont want too.. Just open the hood and dont allow anyone to open any doors or trunk while you are working on the car.. more importantly your fingers should never be in front of the pistons anyway.. Pull the old pads out by the top of them and hold the new ones in the same place.. your fingers will never go past the top of the caliper.. don't forget to squeeze the pistons closed while you still have the old brake pads in with clamps or regular plyers and you should be good!
Last edited by Htowncls; 04-21-2007 at 05:05 PM.
04-21-2007, 05:10 PM
#85
MBWorld Fanatic!
04-25-2007, 03:01 PM
#86
Junior Member

Join Date: Aug 2004
Posts: 67
Likes: 0
Received 0 Likes
on
0 Posts
I did my brake and rotor last weekend on a 2004 E320 and it was a piece of cake. Took me about 1hour to do both front and back. What I learn:
1. If you change brake pads before on any car, then its the same procedure
2. You don't have to unplug your SBC or whatever they called it
3. Go to your local autoparts store and buy the vice to push your calipers so that it will fit your new pad.. cost $9.99 makes the job WAYYYY easy.
4. Leave your old pad on when you use the vice
5. Brake cleaner everything (except the new pad) this way everything is nice and clean.
04-25-2007, 03:21 PM
#87
MBWorld Fanatic!
05-17-2007, 07:01 PM
#88
Super Member
I just got off the phone with the parts guy @ MB he told me that the front brakes actually have 2 sensors? A 50% sensor and a replace now sensor. Sound about right?
05-17-2007, 08:25 PM
#89
Junior Member

Join Date: May 2007
Location: yay area
Posts: 17
Likes: 0
Received 0 Likes
on
0 Posts
2006 E350
any pictures of rear brake diy??
hello everyone ... i'm trying the change the rear pads only,, i assume i have to remove the calipper by 2 bolts,, is this right??
...also anyone got pixs of a rear brake DIY??
all the pictures on burketts album helped alot. i did the both fronts in 30 mins(thanks burkett!!) ..
is this right?? ...also anyone got pixs of a rear brake DIY??
all the pictures on burketts album helped alot. i did the both fronts in 30 mins(thanks burkett!!) ..
05-17-2007, 08:36 PM
#90
Junior Member
Join Date: May 2007
Location: yay area
Posts: 17
Likes: 0
Received 0 Likes
on
0 Posts
2006 E350
 05-25-2007, 10:50 AM
#92
MBWorld Fanatic!
your question in the W210 section.
07-09-2007, 11:45 PM
#93
Newbie

Join Date: Jul 2007
Location: LONG BEACH, CA
Posts: 3
Likes: 0
Received 0 Likes
on
0 Posts
2003 e320 sedan
brake job
Thanks everyone, thanks to this post I was able to have no problem with an oil change, air filter change and brakes on all wheels for my 03 E320....
07-10-2007, 08:38 AM
#94
MBWorld Fanatic!
Join Date: Mar 2006
Location: Louisiana
Posts: 3,254
Likes: 0
Received 12 Likes
on
12 Posts
03 E500 and Corvette
 Just had to say that
  )
)Jim
07-15-2007, 12:31 AM
#95
Newbie

I just completed front and rear pad replacement on an '05 W211 CDI. 76000 miles on the vehicle. Euro deliver in July '04.
For those of you considering a DIY pad replacement on an 05 CDI, note that the front caliper does NOT have the 2 pins.
It's actually easier.
-Disconnect wear sensor
-Remove two bolts on back of caliper, one on the top, one on bottom of caliper.
-Lift up caliper.
-Pull out pads.
Reverse the steps to R&R
That's all there is to it. I've done the same job on a W210, with the pins, and a pad replacement on my 211 was easier without the pins. It takes about 15 minutes per wheel- and the dealer charges something like an hour per wheel.....
Make sure you disconnect the brake module- and have at it....
I didn't replace the rotors because they didn't need it.....
Good Luck!
08-03-2007, 10:13 PM
#96
Junior Member

Rear Caliper "Secret Bolts"
I was replacing the rear pads on my 2005 E500 Sport yesterday. I couldn't figure out how to lift up the caliper to get the old pads out. The rear calipers didn't seem to have bolts at all. Just a rubber hose knob at each end that felt like it covered a straight pin with no head for turning with a wrench.
I called my mechanically inclined friend over to come and stand baffled next to me. He took one look at it and knew that I needed a Torx screwdriver to remove those two bolts.
Yup inside those two rubber pieces is a size T-40 bolt that needs to be unscrewed in order to be removed. After, finding that out... the job takes 10 minutes per side for pad replacement. Uggh!
08-14-2007, 03:07 PM
#97
MBWorld Fanatic!
Join Date: Mar 2006
Location: Louisiana
Posts: 3,254
Likes: 0
Received 12 Likes
on
12 Posts
03 E500 and Corvette
How in the !##@$!@#$ Sam hill do you get the black plug off. I saw the tap on the top, pulled it and the top of the plug came out, but no way no how could I get the bottom off. I left the top and plugs disconnected then changed the pads. After the pads I plugged it back in. Learned something. I went through the MB brake disable prodecure in addtion to un pluging.
WARNING. the window was down and door locked. So smart me without key fob decides to reach in unlock door to get in and pump brakes.
Didn't know the alarm was so loud,, wow.
But for the first break job all went well. Rotors had .050 more wear in them good for 1 set of pads. Unfortunately the MB supplier sent me 2 right sensors for the pads. So I did the installation and put in the right sensor. Will be a day or so before the other arrives. Could drive it w'o sensor would be like driving with sensor I removed. But too much effort to install tire then pull a second time so I will wait until the Left sensor arrives.
So my summary:
About the easiest brake pad change ever.
Basically
As Chiltons woulds reverse removal to install.
I did get a red christmas tree when I put the key in. I started the car, depressed the brake, Shut it off, then repeat the step 1 more time and the alarms cleared.
I am sure I will have to bed the pads in carefully for the first few miles but otherwise it worked out well at least so far. Jim


WARNING. the window was down and door locked. So smart me without key fob decides to reach in unlock door to get in and pump brakes.
Didn't know the alarm was so loud,, wow.
But for the first break job all went well. Rotors had .050 more wear in them good for 1 set of pads. Unfortunately the MB supplier sent me 2 right sensors for the pads. So I did the installation and put in the right sensor. Will be a day or so before the other arrives. Could drive it w'o sensor would be like driving with sensor I removed. But too much effort to install tire then pull a second time so I will wait until the Left sensor arrives.
So my summary:
About the easiest brake pad change ever.
Basically
- disable brake system,
- unplug sensor,
- remove lock pins,
- compress calipers (I opened the bleed screw to let the fluid out vs pushing it back into the system).
- Then remove pads.
As Chiltons woulds reverse removal to install.
I did get a red christmas tree when I put the key in. I started the car, depressed the brake, Shut it off, then repeat the step 1 more time and the alarms cleared.
I am sure I will have to bed the pads in carefully for the first few miles but otherwise it worked out well at least so far. Jim
08-15-2007, 06:42 PM
#98
MBWorld Fanatic!
Join Date: Mar 2006
Location: Louisiana
Posts: 3,254
Likes: 0
Received 12 Likes
on
12 Posts
03 E500 and Corvette
Ok, front brakes are complete. POC,, easy job rate it 2 on 10 scale.
Most difficult part was jacking and taking wheels off.
Kept the rotors on due to being within factory spec and not needing replacement. Used new pads and sensors.
Red lights everywhere when I powered back up until I got the pads out to the rotor. Brakes worked well.
Now the question. Haven't checked the rears yet, they only have 10,000 miles on them. I still have the + in the FSS indicating brake replacement issue. Is there a reset for the FSS on this brake pad change? thanks Jim
12-18-2007, 12:20 AM
#99
Member
Join Date: Aug 2007
Location: Las Vegas
Posts: 121
Likes: 0
Received 0 Likes
on
0 Posts
E500
Some PDF's for the thread
In the interest of keeping all possible resources in one spot in the thread here are the PDF's mentioned in one of the links.
I looked at them quick and they have a decent step by step format.
I have not tried these so I can not back them. If they are not good for any reason, let me know soon and I will delete my post.
I looked at them quick and they have a decent step by step format.
I have not tried these so I can not back them. If they are not good for any reason, let me know soon and I will delete my post.
Last edited by lasvegas99; 12-18-2007 at 12:28 AM.
12-18-2007, 09:42 AM
#100
Super Member
Join Date: Nov 2007
Location: NY
Posts: 612
Likes: 0
Received 2 Likes
on
2 Posts
'12 Mustang 5.0, '89 Supra Turbo, C55,
I realize this is an old post, but I want to thank everyone for this DIY project.
MB owners doing DIY. Who would have thought it!? I love it!! Thanks again!
MB owners doing DIY. Who would have thought it!? I love it!! Thanks again!


