When you click on links to various merchants on this site and make a purchase, this can result in this site earning a commission. Affiliate programs and affiliations include, but are not limited to, the eBay Partner Network.
Order a set of OEM style running board from ebay. DIY install.
took about 4 hours.
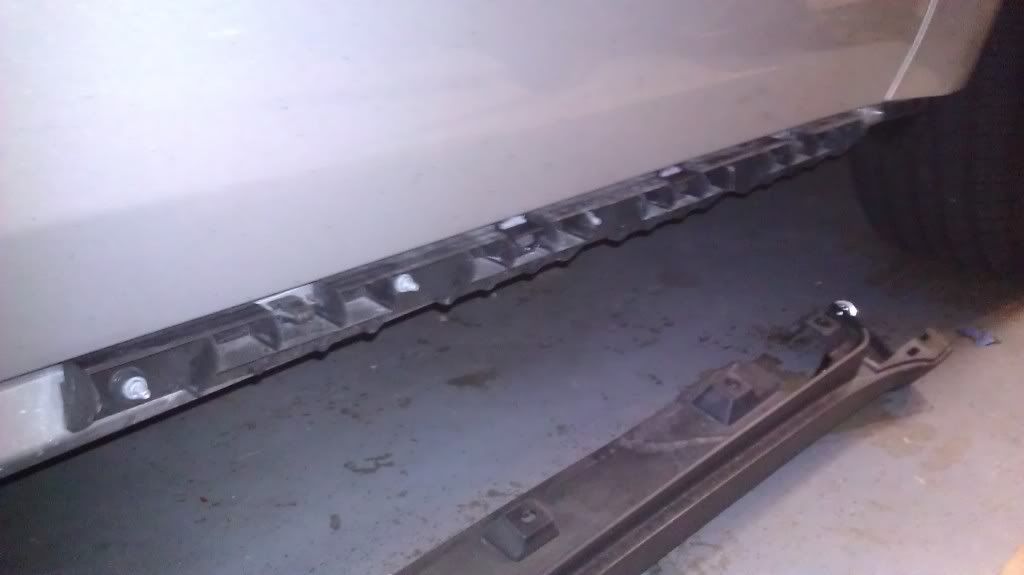
1. remove the lock pins form tire well, pry the center lock pin out then remove the rest. there are 3 at front and 2 at rear.
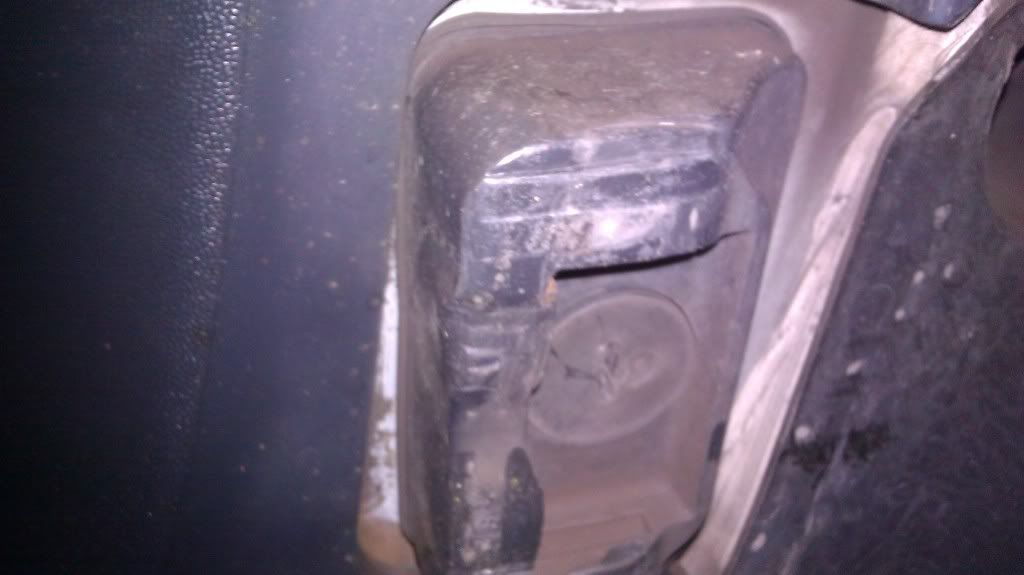
2, remove the jack pad with larger screw driver.
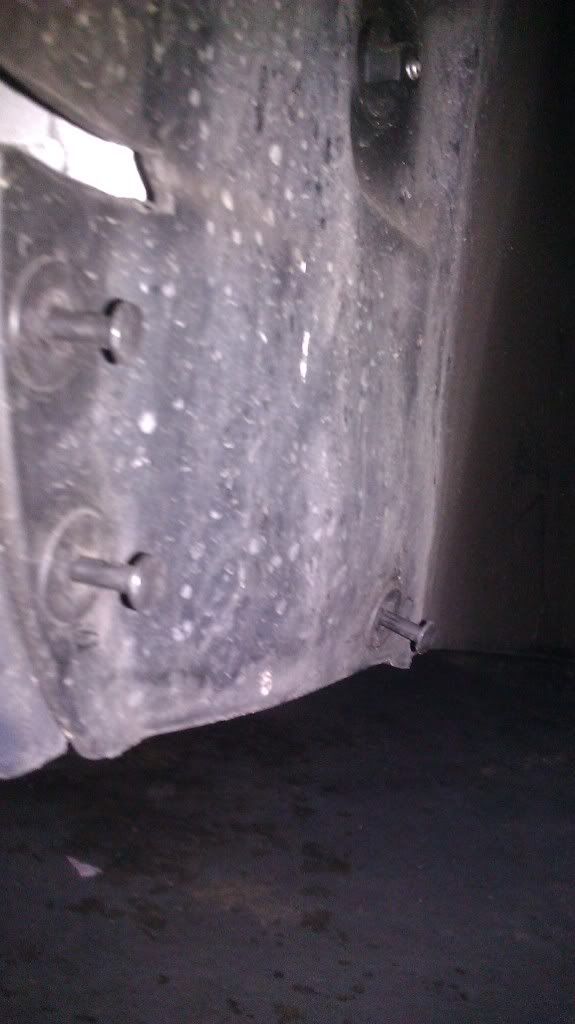
3. remove 10mm plastic fastener under body. there is about 8 or them didnt count . couldnt get a good picture.
4. peel the bottom rocker panel away form the stud for the plastic fastener.
starting in the rear first seem to work better.
5. unlock the rocker panel away from body. doors open, Use a flat screw driver to poke and unlock the panel.. flash light will help locate the lock
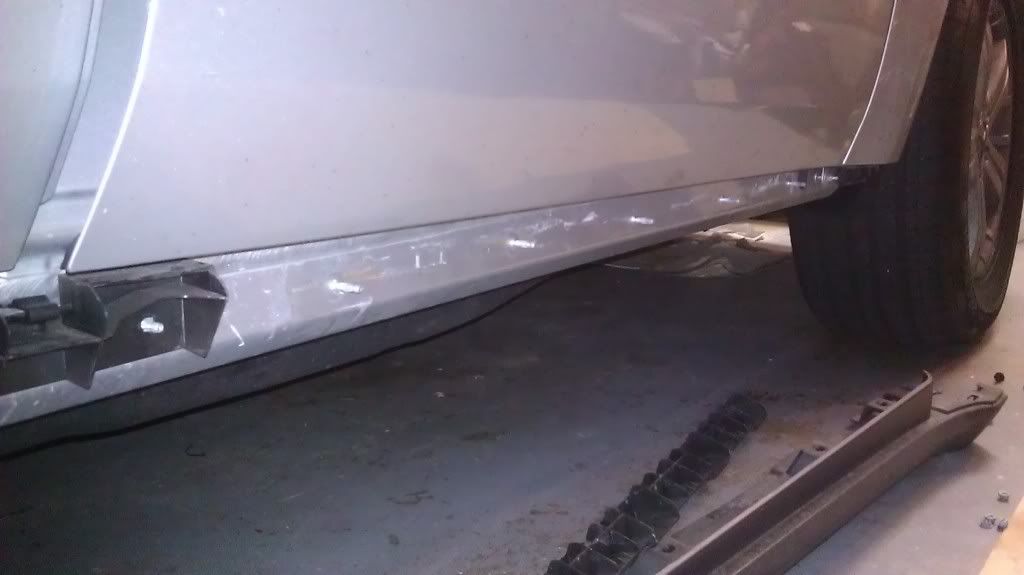
6. remove the bolts to remove the locking molding.
7. bolt on the metal assemble for the new running board. use supplied new bolts.
My assemble didnt fit like a glove. need some adjustment to get all the studs that is pointing downwards.
horizontal studs were perfect fit.
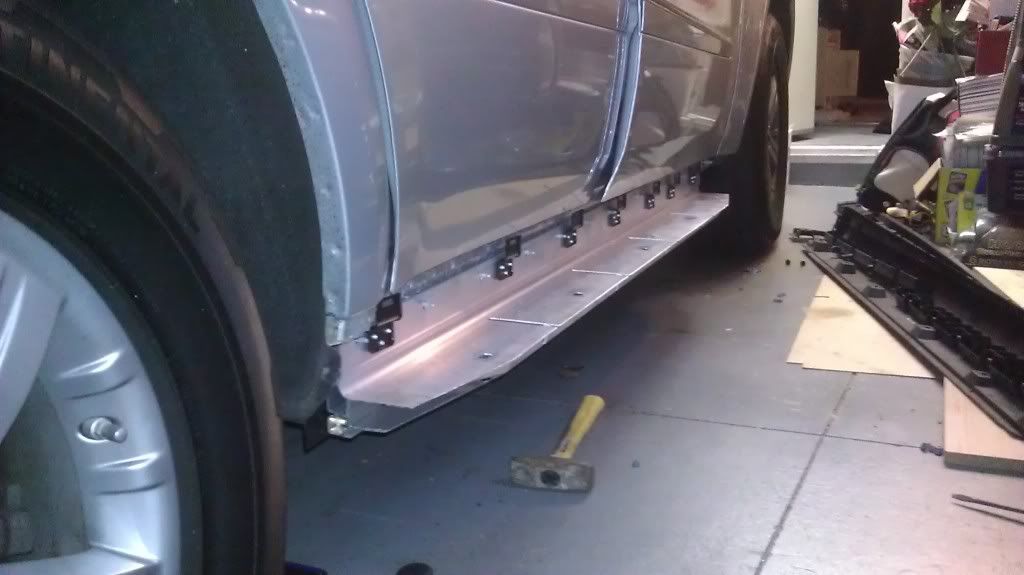
8. install the supplied lower cover. mine needed a little bit of cutting. attached it with the plastic bolt that came off the rocker panel from disassembly.
9 install the jack pads. I used the old ones they seem to get back on easier and tighter than the new ones.
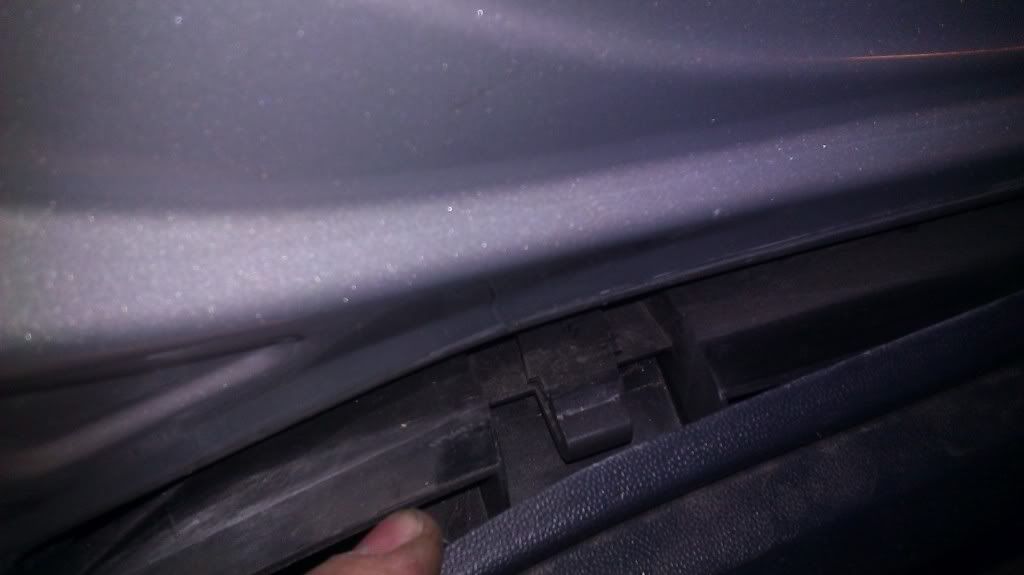
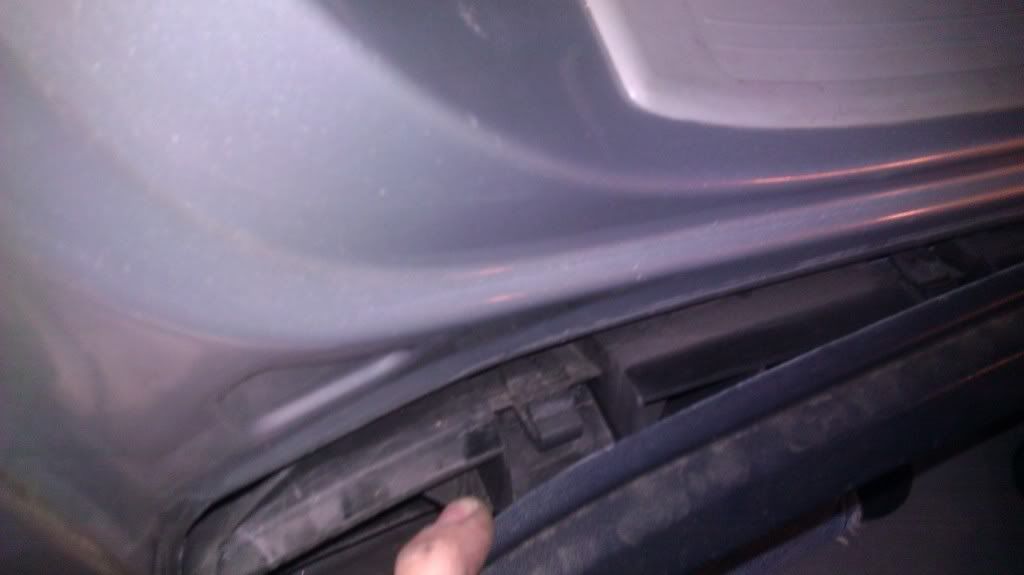
10. install the plastic / aluminum cover for the running board. there are 7 snap clips that fastens to the black clip slots. some may be difficult to lock on..
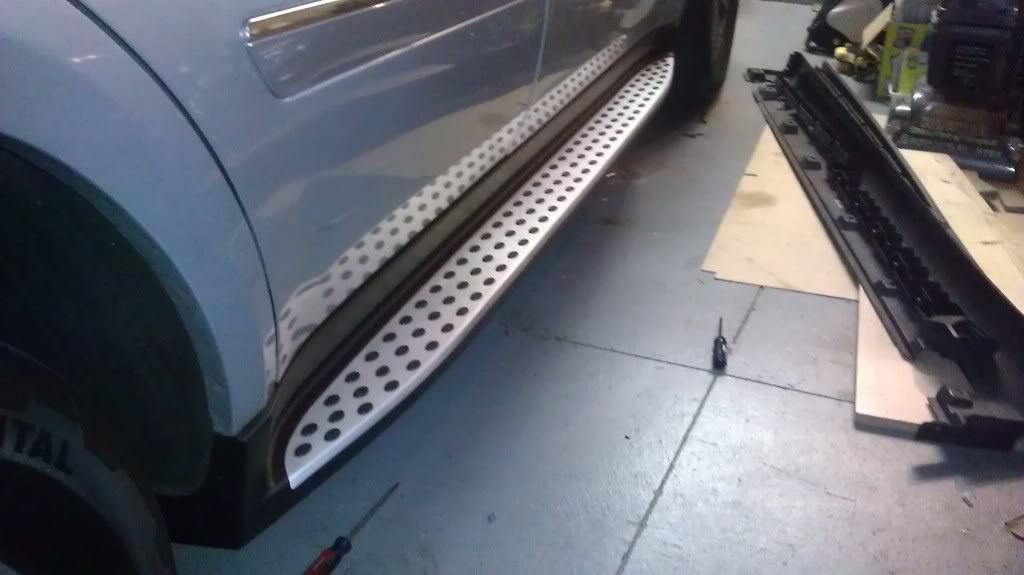
11. install the plastic oval screw retainer and screw in the running board cover to the assembly. The retainer and screw act as a clamp to the aluminum structure.
12. install the push lock pin back in the wheel wells.
done. That took about 2 hours now do the other side.
I suppose if can be done faster but there are just a lot of bolts and snaps to deal with carefully. powered tools wont really help actually may not be wise to use for this installation.
Nice write up! I need to find this set on e-bay too. I've searched and all I can find is the dorky nerf bars. Our old ML had the OEM step sides and we miss them in our GL now.
2025 Range Rover, 2022 BMW M850 , 2017 MB E400 Coupe
Originally Posted by RCorney17
Nice write up! I need to find this set on e-bay too. I've searched and all I can find is the dorky nerf bars. Our old ML had the OEM step sides and we miss them in our GL now.
Order a set of OEM style running board from ebay. DIY install.
took about 4 hours.
1. remove the lock pins form tire well, pry the center lock pin out then remove the rest. there are 3 at front and 2 at rear.
2, remove the jack pad with larger screw driver.
3. remove 10mm plastic fastener under body. there is about 8 or them didnt count . couldnt get a good picture.
4. peel the bottom rocker panel away form the stud for the plastic fastener.
starting in the rear first seem to work better.
5. unlock the rocker panel away from body. doors open, Use a flat screw driver to poke and unlock the panel.. flash light will help locate the lock
6. remove the bolts to remove the locking molding.
7. bolt on the metal assemble for the new running board. use supplied new bolts.
My assemble didnt fit like a glove. need some adjustment to get all the studs that is pointing downwards.
horizontal studs were perfect fit.
8. install the supplied lower cover. mine needed a little bit of cutting. attached it with the plastic bolt that came off the rocker panel from disassembly.
9 install the jack pads. I used the old ones they seem to get back on easier and tighter than the new ones.
10. install the plastic / aluminum cover for the running board. there are 7 snap clips that fastens to the black clip slots. some may be difficult to lock on..
11. install the plastic oval screw retainer and screw in the running board cover to the assembly. The retainer and screw act as a clamp to the aluminum structure.
12. install the push lock pin back in the wheel wells.
done. That took about 2 hours now do the other side.
I suppose if can be done faster but there are just a lot of bolts and snaps to deal with carefully. powered tools wont really help actually may not be wise to use for this installation.
Can you please let me have a pic of the jack pad fitted, Thanks
2013 Land Cruiser, 2007 GL450 [SOLD], 2007 Toyota Tundra Double Cab 4x4 Limited, 2009 Corolla LE
This write came in handy yesterday when I installed the factory running boards. They fit very good. I had trouble installing new jack point that came with the running board. I end up installing the old ones. Thanks.
Just completed the installation of my running boards last night. The instructions above were a big help--I'm sure they saved me a lot of head scratching. Was able to knock it out in about 3 hrs. A few comments/observations:
1) I scratched me head a little while on the rubber jack pads. The factory running board kit has new pads, and confusingly, they fit inside of the metal box that is part of the bracket at the end of the running board mount. I was thinking that they must go inside, until I found the rubber plugs that are designed to plug the original hole in the body, then I knew that the new pad was supposed to go under the bracket, just similar to the original installation.I didn't have much luck trying to screw the plastic plug into the jack pad, but found that tapping them in with a hammer worked just fine.
2) I bought factory running boards from OE discount parts online. They had the best price I saw anywhere, came to about $850. I saw some aftermarket "OE style" ones on ebay that looked to have an almost identical design for half the price. I wasn't just blown away by the fit and finish of the OEM parts, would be very curious how the after market ones compare.
Adding on to this old thread. Aftermarket made in China X164 running boards are being blown out right now on ebay. I bought a set for $150 + $50 shipping. There are multiple sellers, but all are based out of Walnut, CA or Kentucky, so presume it's the same place. The ones I bought were from Kentucky, but shipped from California FWIW.
Fitment is probably 95% of factory kit. A little gap front at each end of them where they wrap around the edge of the body. Don't see a way of getting around that. Might not be the best if you have salted winter roads, as it would be a place for the rust gremlins to take hold.
Thanks to @fkong777 for the directions. Pretty easy install, other than having to take the individual push clips off and install them ahead of time. I didn't know what to do with those extra rubber plugs, now its obvious I need to go back and plug the frame holes from the original jack pads. Hopefully able to do it after the fact!
any commentary on the quality and durability of the chinese knock off running boards? At $200, if the quality is reasonable, I think "why not" - a very different cost/benefit equation than $1,000 for the OEM running boards....
any commentary on the quality and durability of the chinese knock off running boards? At $200, if the quality is reasonable, I think "why not" - a very different cost/benefit equation than $1,000 for the OEM running boards....
I think it's a great addition for $200. Took me about four hours to get the job done, but mainly as I couldn't get the clips to slip in and catch. A little learning curve. Or pay a shop $200 to mount them and you're still way ahead.
As to quality, the materials used are very high. Solid plastic, just the right amount of flex. The attachment base you see in my photo above is aluminum, and finished roughly in places, but won't be seen. Fitment is the only negative area. The outer cover fits almost good enough. I'd say it's 3-5mm short on each end, and the fender well trim pieces don't attach up just right. But again, at 1/5 OEM price, I'm not complaining. I think they will age will, and won't look bad with use. My wife loves them and uses them. They also let me access the roof for bike racks, something that was a complete hassle previously.
If you live where there is snow and the roads are salted, I think the gap will let in moisture and slush/slurry that could lead to body rust. But you probably have to deal with that anyway, so maybe not an issue.
tl;dr Right now great prices, I think a good upgrade.
Thanks for the feedback. My wife is pregnant and I was thinking of getting some running boards to make it easier for her to get in and out. I think I found the ones you are talking about on ebay for around $200 after shipping. Would you mind snapping a few photos of what they look like installed?
Last edited by mefferso; Feb 28, 2017 at 04:09 PM.
Thanks for the feedback. My wife is pregnant and I was thinking of getting some running boards to make it easier for her to get in and out. I think I found the ones you are talking about on ebay for around $200 after shipping. Would you mind snapping a few photos of what they look like installed?
Sure! I'm 6" and don't benefit from them that much. My wife is 5'9" and she likes them a lot for entering/exiting.
They look great to me. And for $200, I can certainly live with those minor fitment issues. No one will ever notice that. My wife is only 5'3", so she will definitely get good use out of them. Thanks so much for the pictures and ebay link.
They look great to me. And for $200, I can certainly live with those minor fitment issues. No one will ever notice that. My wife is only 5'3", so she will definitely get good use out of them. Thanks so much for the pictures and ebay link.
At that price, you can't go wrong! If you don't like 'em, just put them on CL and re-sell easily!
FWIW, I plugged the frame holes this evening. Had to remove the end pieces of the assembly to access them, but was pretty easy. Maybe 45 minutes including getting tools and everything. Next time I'll put them in first!!!!
I bought the chinese knock offs and am installing them as we speak. The guide above is extremely helpful. It's a very quick process, except for the snap clips, which I'm really struggling with.
As far as the install goes, I temporarily loosened the bolts that attach the steel sections that hold the jack points to the main aluminum sections of the running board frame to get everything under the truck to line up perfectly. I did not need to trim anything.
Both of the bottom plastic covers were broken during shipping - one was cracked in half, the other had a chunk cracked out of it. The vendor is sending me replacements. The good news is they can bolt on after the rest of the assembly is installed.
I'm finding it impossible to get the push clips that attach the main covers to the aluminum frame to snap in. What did you guys do to work around this? I can get one or two of them, but I can see the rest of the internal receptacles bending inward, which is causing the remaining clips to not click in. Thoughts?
I'm finding it impossible to get the push clips that attach the main covers to the aluminum frame to snap in. What did you guys do to work around this? I can get one or two of them, but I can see the rest of the internal receptacles bending inward, which is causing the remaining clips to not click in. Thoughts?
I had to sit down with a small screwdriver and pry the clips off of the inserts individually. Very sore fingers by the time I was done! I then re-bent the teeth in a little bit, and snapped them into the metal frame. I then carefully lined up the outer cover, adjusted the clips to line up, and pushed in the tabs to the clips/frame. Otherwise it wouldn't grab at all. What is this two weeks in, and it's holding fine! I still haven't installed the bottom plastic piece. Not sure what purpose it would serve.
I have noticed that the aluminum skin is really thin, and dents easily. I'm sure it won't hold up as well as OEM, but at 1/5 the cost for a 10 year old vehicle, no complaints.
Last edited by StradaRedlands; Mar 16, 2017 at 10:21 PM.
Strada I used your technique - remove the clips first before trying to install the running board covers.
When I did this on the drivers side, which I hadn't messed around with already - it was very easy - the new running board popped right on. Perhaps an hour total on this side.
I think I must have bent the clips on the passenger side trying to do it the "right way" - it was still pretty much a nightmare but I got it done in the end. Probably spent four hours struggling with it all in all.
Running boards are now installed and look good. Definitely some small funky fit issues here and there, but all in all for $200, I cannot complain...
Good to know. What about a few missing black rubber circles on the running boards? Is there a way to get just a few?
I don't think so. My understanding is that there are a couple per side that are screw covers and might be replaceable, but the rest are part of a one piece membrane that spans the entire length and is sandwiched between the other parts. Can anyone else who has fixed this confirm?
Mercedes SLR McLaren 722 S Is Extremely Rare Example Modified by McLaren
Slideshow: A one-of-one U.S.-spec Mercedes-Benz SLR McLaren Roadster became even rarer after a factory-backed transformation at McLaren's headquarters.