


BAD IC pump? check my test please
Senior Member
Joined: Apr 2014
Posts: 290
Likes: 3
SL65
You shouldn't need to unscrew the circuit board, everything can be accessed from the top. I was up all night doing exhaust on my car, but I will try and get you some pics and information later about exactly what measurements I took on my dead coil to pinpoint the bad cylinders.
oh and I knew I was right about that shield being wrong, here look that shield is there to keep the hot intercooler pipe away. If anything the shield you designed might have the opposite effect and trap heat in

Last edited by SL65MONSTA; Feb 20, 2016 at 12:16 PM.

MBWorld Fanatic!


Joined: Nov 2010
Posts: 2,605
Likes: 343
From: Welwyn, Herts, UK
2006 S600
Damn, I wrote a long response to this, and my application crashed. Humpf.
Short version: The circuit boards come out easily if you disconnect the coil wires and remove the torx screws. Having said that, there's not much point. You get to find out for yourself that the coil pack chassis is actually quite robust, but that's about it.
To replace a coil you need to remove the three small wire/foil connections. The connections appear to be welded or brazed, and are quote robust, but I found they're best removed by twisting them off with point-nose pliers. Twist them about the axis of the coil pin.
Yes, the coil pack might be good. Misfires are often caused by bad plugs, and people often change both (because it makes sense) to fix the problem. Only use NGK IFR6Q-G or Bosch FR7KI332S.
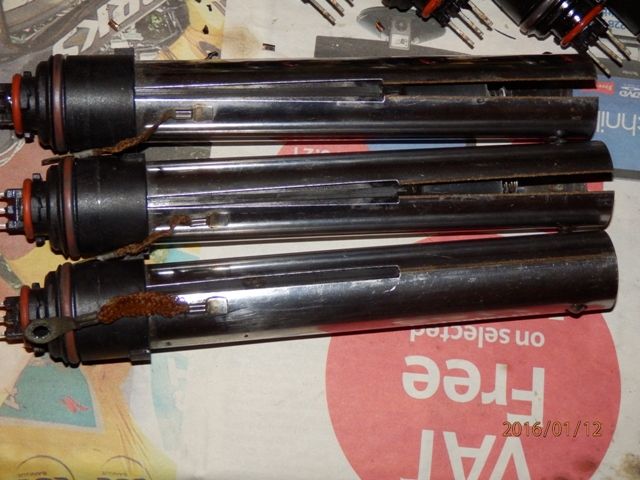
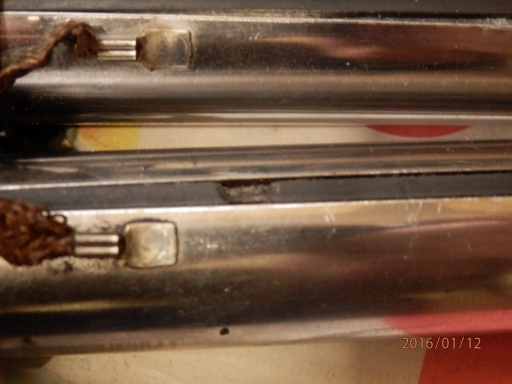
Identifying a bad coil is difficult. I couldn't find any electrical measurements that worked (and I'm an EE graduate). The only method that worked for me was visual inspection. This is what some of my bad coils looked like:
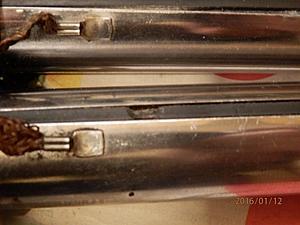
Sorry about the picture. The failure mode seems to be overheating within the coil, half-way up and close to the earth tag. Many of my coils showed varying degrees of overheating once I took the metal cylinders off (surprisingly difficult). The overheating causes the insulator to expand and split the cylinder along its welded seam. Some times the split can be very narrow, but its often the only indication of a fault. The coil still measures about 0.3 ohm on each leg.
Nick
Short version: The circuit boards come out easily if you disconnect the coil wires and remove the torx screws. Having said that, there's not much point. You get to find out for yourself that the coil pack chassis is actually quite robust, but that's about it.
To replace a coil you need to remove the three small wire/foil connections. The connections appear to be welded or brazed, and are quote robust, but I found they're best removed by twisting them off with point-nose pliers. Twist them about the axis of the coil pin.
Yes, the coil pack might be good. Misfires are often caused by bad plugs, and people often change both (because it makes sense) to fix the problem. Only use NGK IFR6Q-G or Bosch FR7KI332S.
Identifying a bad coil is difficult. I couldn't find any electrical measurements that worked (and I'm an EE graduate). The only method that worked for me was visual inspection. This is what some of my bad coils looked like:
Sorry about the picture. The failure mode seems to be overheating within the coil, half-way up and close to the earth tag. Many of my coils showed varying degrees of overheating once I took the metal cylinders off (surprisingly difficult). The overheating causes the insulator to expand and split the cylinder along its welded seam. Some times the split can be very narrow, but its often the only indication of a fault. The coil still measures about 0.3 ohm on each leg.
Nick
Senior Member
Joined: Apr 2014
Posts: 290
Likes: 3
SL65
could you possibly take a photo a little further back (not as close) a few would be good please. So more or less you changed what looked to be fouled ? none of my plugs look split or discoloured in anyway
Senior Member
Joined: Apr 2014
Posts: 290
Likes: 3
SL65
wow they look completely stuffed ! how the hell did they fit into the actual heads ? you must of had a lot of difficulty removing them, they have expanded so much. Mine look nothing like this at all, and very clean.

Super Member
Joined: May 2015
Posts: 554
Likes: 37
2004 S600
Super Member
Joined: May 2015
Posts: 554
Likes: 37
2004 S600
$5,000? Do you have the stealership do all your work, or what? I paid $1,233 shipped through FCP Euro for the assembly I replaced, and they put a lifetime warranty on everything they sell. It's a genuine factory part dropshipped direct from Mercedes-benz USA. Took about an hour to change.
MB World Stories
The Best of Mercedes & AMG

Manual Mercedes? 6 Times Sindelfingen Let Drivers Have All The Fun
Verdad Gallardo
Mercedes SLR McLaren 722 S Is Extremely Rare Example Modified by McLaren
Verdad Gallardo
8 Classic Boxy Mercedes Designs That Have Aged Like Fine Wine
Verdad Gallardo
Flawlessly Restored Mercedes 190E Evo II Heads to Auction
Verdad Gallardo
Electric Mercedes C-Class Unveiled: 11 Things You Need to Know
Verdad Gallardo
Mercedes EQS Gets A Major Update: Everything You Need to Know
Verdad Gallardo
5 Underrated Mercedes-Benz Models That Don't Get the Love They Deserve
Verdad Gallardo
Mercedes 300D Has Pushed Well Past 1 Million Miles and It Ain't Stopping
Verdad Gallardo
10 Most Reliable Mercedes-Benz Models You Can Buy Used
Verdad GallardoSenior Member
Joined: Apr 2014
Posts: 290
Likes: 3
SL65
"import them", thats what would have to happen, however they usually take weeks to arrive, and depending on the sender how they package them, they can be stepped on in back of trucks or have heavy boxes put on them.
Moreover, at the moment there is no use importing an item that might not be the problem I have , was hoping to do IGN test, get Eurocharged to check my data log, and test my coils, to make sure I am definetely not just throwing money away
Moreover, at the moment there is no use importing an item that might not be the problem I have , was hoping to do IGN test, get Eurocharged to check my data log, and test my coils, to make sure I am definetely not just throwing money away
MBWorld Fanatic!
Joined: Nov 2010
Posts: 2,605
Likes: 343
From: Welwyn, Herts, UK
2006 S600
I imported my coil packs from the US, and that went fine. That's why I recommended it. I don't guess solutions.
Nick
Nick
Last edited by Welwynnick; Feb 22, 2016 at 03:40 PM.
Super Member
Joined: May 2015
Posts: 554
Likes: 37
2004 S600
Ok, I have the pinout of the coils and the "ECI Ignition system power pack". I saved it as an HTML file so I am not sure if you guys will be able to open it or if I will have to figure out how to print/scan it or screenshot it, but I have attempted to attach it.
It doesn't look like there is any way to measure the primary coil resistance externally. It looks to me like all the power pack (in the center of the engine) does is supplies 180V to the ignition drivers within each coil pack, and 23V for the ion current sensing, as well as battery voltage and ground. The remaining wires all connect to the main engine computer. Two channels of ion current signal wires, one ground wire for those, the 6 trigger wires for the coils, and two mystery wires labeled "ignition offset" and "ignition change" presumably for timing control or something.
It doesn't look like there is any way to measure the primary coil resistance externally. It looks to me like all the power pack (in the center of the engine) does is supplies 180V to the ignition drivers within each coil pack, and 23V for the ion current sensing, as well as battery voltage and ground. The remaining wires all connect to the main engine computer. Two channels of ion current signal wires, one ground wire for those, the 6 trigger wires for the coils, and two mystery wires labeled "ignition offset" and "ignition change" presumably for timing control or something.

Senior Member
Joined: Sep 2015
Posts: 367
Likes: 36
From: Dawesville, West Australia
2006 E55, 2006 SL55, 2006 LS7 Ute
No you don't. It isn't much different from the S and CL classes. What many don't say is that bleeding is SUPER critical with a stock system. I would remove the intercooler pump relay and install a jumper to keep the pump on for bleeding the system. On an SL, the relay is under the false floor of the rear interior passenger side storage compartment. I have seen stock systems bleed in 15 minutes cold, and have had them take an hour and a half too with no changes in procedure. Remember, the cooling system needs to be completely cold to properly bleed the system.
Nick
Nick
Last edited by trabots; Jan 3, 2017 at 10:17 PM. Reason: clarification
Senior Member

Joined: Jan 2017
Posts: 470
Likes: 25
2006 W220 S65 AMG
Can the coil pack still be reinstalled even if the cylinders have split at the seams?
I'm going to replace the driver side plugs soon, but when I replaced my failing passenger side coil pack, I noticed one of the seams had split. Since the entire pack was being replaced, I didn't think much of it.
Now the driver's side coil pack on my S65 is still fine with no misfires, but if I pull it out and the cylinders have split, can I still reuse the coil pack after replacing the plugs?
MBWorld Fanatic!
Joined: Nov 2010
Posts: 2,605
Likes: 343
From: Welwyn, Herts, UK
2006 S600
Getting the coil pack in and out isn't easy at the best of times, and split cylinders will make it more difficult, but not impossible.
A split cylinder is a pretty bad sign. Coils will misfire and still have intact cylinders, so splits are pretty solid indicator of a burnt coil. But if it's that, or not being able to drive the car at all, then you can re-fit.
Replacing individual coils is DIY-feasible, but not easy. Getting the plastic covers off is difficult, it takes a lot of care and patience.
Nick
Senior Member
Joined: Jan 2017
Posts: 470
Likes: 25
2006 W220 S65 AMG
Getting the coil pack in and out isn't easy at the best of times, and split cylinders will make it more difficult, but not impossible.
A split cylinder is a pretty bad sign. Coils will misfire and still have intact cylinders, so splits are pretty solid indicator of a burnt coil. But if it's that, or not being able to drive the car at all, then you can re-fit.
Replacing individual coils is DIY-feasible, but not easy. Getting the plastic covers off is difficult, it takes a lot of care and patience.
Nick
A split cylinder is a pretty bad sign. Coils will misfire and still have intact cylinders, so splits are pretty solid indicator of a burnt coil. But if it's that, or not being able to drive the car at all, then you can re-fit.
Replacing individual coils is DIY-feasible, but not easy. Getting the plastic covers off is difficult, it takes a lot of care and patience.
Nick
Would I be able to solder the cylinder back together using led solder?
MBWorld Fanatic!
Joined: Nov 2010
Posts: 2,605
Likes: 343
From: Welwyn, Herts, UK
2006 S600
Never tried it, and I wouldn't be inclined to do so. The cylinder splits due to due internal pressure from the burning coil expanding, and pushing the insulation outwards. I think it's unlikely that you be able to get it back together, and solder is weak anyway.
The split cylinder isn't the problem itself - it's the over-heated coil inside.
Nick
The split cylinder isn't the problem itself - it's the over-heated coil inside.
Nick


