When you click on links to various merchants on this site and make a purchase, this can result in this site earning a commission. Affiliate programs and affiliations include, but are not limited to, the eBay Partner Network.
C207 W204 W212 Rear Wheel Carrier Bushing from Hell
Allow me to once again share with you my lowest mechanical moment and why :
A.) I am an idiot
B.) Why no one shares/discusses extensive, detailed work on the rear suspension of these cars
C.) What disgust/impatience leads to
D.) The result of engineers going out of their way to make serviceable wear items very difficult to service.
So far, I've done rear end links, shocks, springs, entire subframe, regular alignments, Conti DWS Extreme Contacts all around and the rear end is still laughable at best. (ALL front suspension including entire sway bar, engine & gearbox mounts are also fresh.) It's pathetic and has me fed up with the car. Is it the pano roof? Absence of B pillars? (2010 C207 E350, 132k mi). All I know is I can't sell the car the way it feels, but after doing so much work (too much to list), I debate if I should just keep it, especially given this tariff nonsense.
So, special tool ordered (W202 589 00 43 00) as well as OE bushings (204 352 00 27) for the spring control arm to rear wheel carrier. New hardware as needed, and ready to go. Driver side went well & confirmed these otherwise impossible to inspect bushings are done. The MB tool presses out the bushings in less than 2 minutes, but reinstall is a different story.
There is NO visibility on the inside of the new bushing (facing the wheel carrier), & the MB tool only works one way. You press the bushing out 1 way & new one goes in 1 way. Previous chassis such as 201's, or 210's have all the room one would need to easily line things up, but by the time of 207's, 204's, & 212's the rear suspension is perfectly made to be as special tool dependent as possible. Needing to drop a subframe to do control arms is a bad joke made in poor taste imo.
Wrap it up, man!! Driver side went in straight regardless of not knowing 100% if it would, passenger side looked & felt like it was, but I let my newfoundland disgust get the best of me & didn't back off when I knew I should've. I got the breaker bar to finish, and I broke alright. Broke the tool & bushing not fully in.
Tons of back & forth, etc....managed to get the crooked bushing out & have a beautiful looking (74k mi) used wheel carrier on its way. Replacement of a wheel carrier instead of just a bushing & car off the road for over a wk. Learn from my idiocy, folks. This post may sound bitter, but the truth is I do still love this car & will always love MB more than the rest. I'm just very disappointed & disgusted with everything regarding the rear end. When I was a music school college student many moons ago, I used to push my then '89 Camry to the absolute limit across every Canyon Rd around LA that I knew of & it NEVER felt as disconnected from the rest of the car as my 207 does which I've put endless love into. This car is at its limits going 20 mph on an off ramp. That, my friends, is math which simply does not add up correctly.
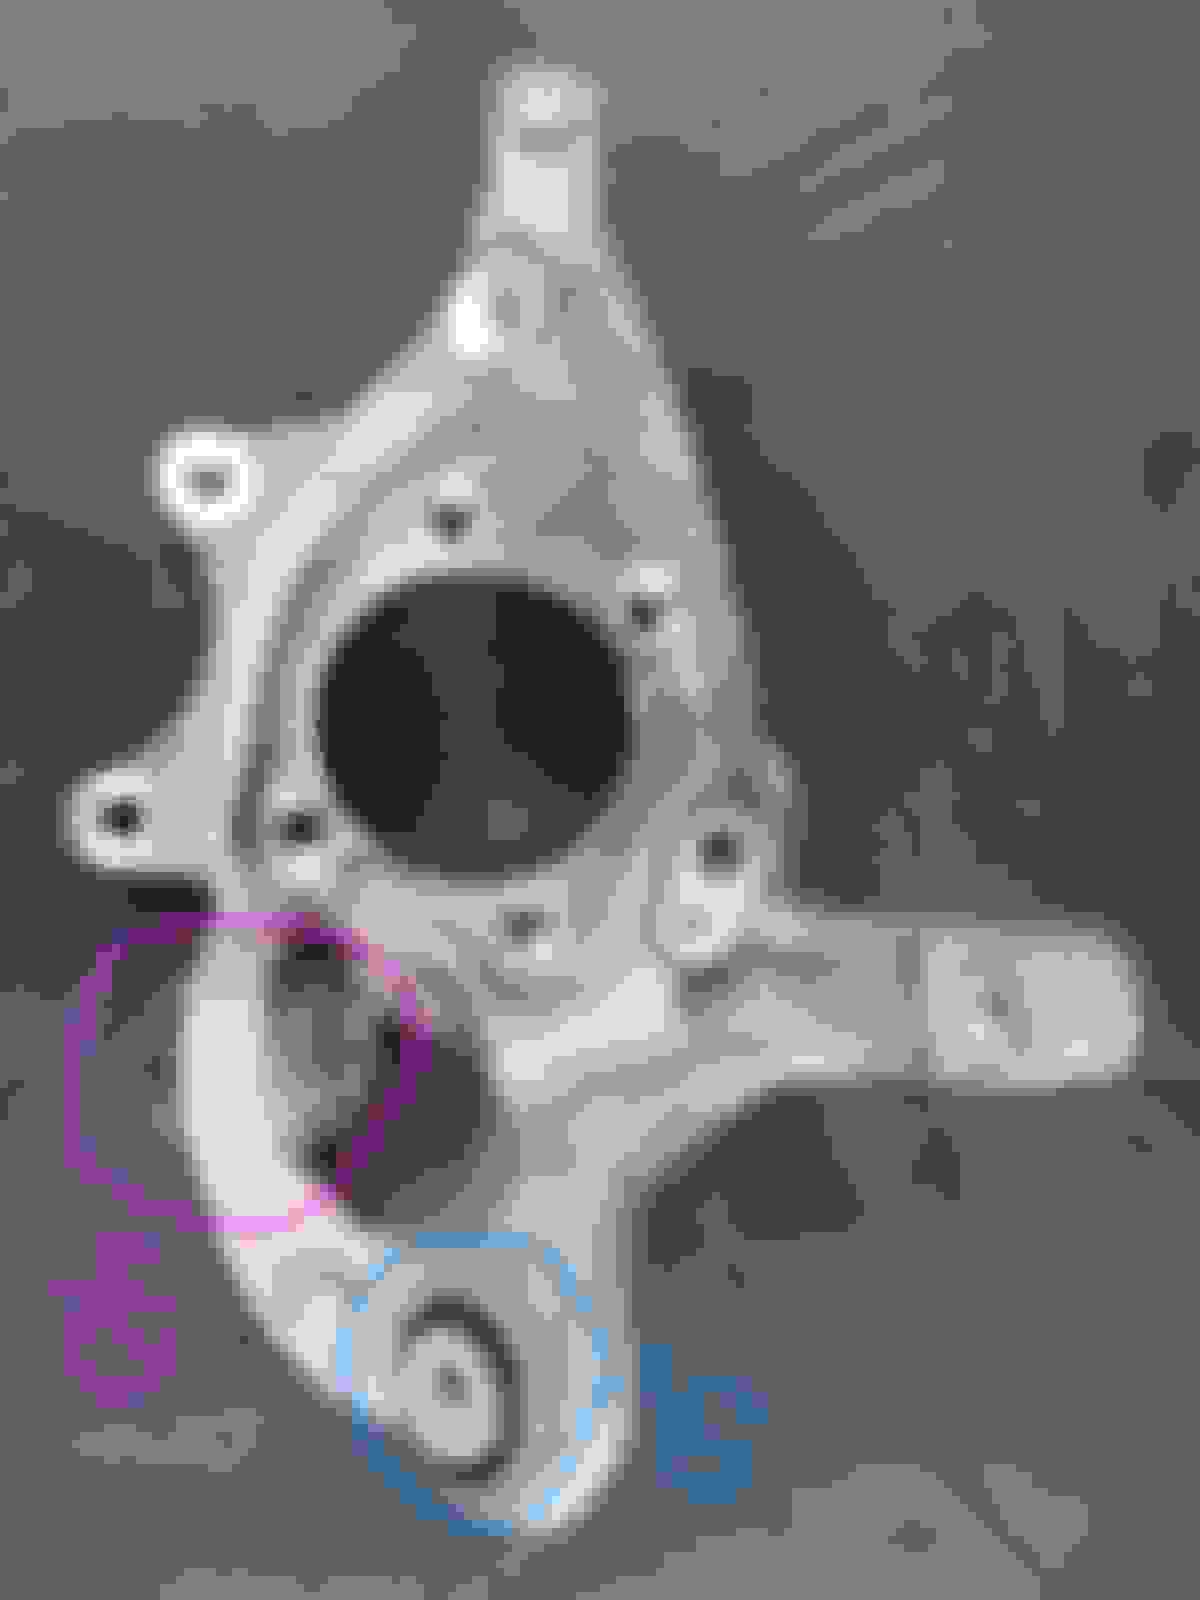
New bushing and "pushing cup" ready for install. This side went well. Receiving cup w/ viewing window to ensure new bushing is flush. Problem bushing. Looks straight, right? Well, it's not straight at all. Nearly impossible to fully inspect. Evidence of the carnage. My fault for not checking things after every turn. Again, disgust and impatience led to this ignorance on my part.
Majority of this carnage is from how I had to get the stuck bushing out. Temped to just press my backup new bushing in, but this wheel carrier is now compromised. So much for that. This, along with the cups from the MB tool got the stuck bushing out. My Benz indy uses this tool to do this job, but from the rear facing side, where the MB tool presses in/out from the front facing side of the wheel carrier.....the side with NO visibility. They press out the bushing, air chisel the "race" out of the wheel carrier, then press in new bushing from the rear facing side of the wheel carrier where there is actually room & visibility to insure things are 100% lined up.
You had the nerves to get this done, two thumbs up for that! The carrier has a few battle scars but it's not cracked... the new bushing should stay put as expected: A-okay!
> REAR end...
I don't know yet exactly what link is used to weaken the rear multi-link setup. It's a real fancy setup with arms galore.
I believe the answer is a combination of 2+ links holding the toe angle when the wheel travel up/down under load.
Camber is literally messed up by the weak springs getting old.
Besides the big front/rear subframe 8x bushings interact to soften precise adjustments.
> FRONT end...
On the front axle the German style is everything must go!
Suspensions benefit from a parts kit because each component shares multiple forces.
Replacing only one part sends the weaknesses over to the next part.
> F/R... NO BOUNCING !!
The suspension setup is so precise that the F/R stabilizer bars are what make the chassis bouncy side to side and bouncy front to back, not shocks.
Stab bars are small interactive torsion springs acting on behalf of the big coils.
When the links work poorly, bouncing is the result. We all know that.
What's weird is the interaction between front and rear stab blinks.
The rear stab links are as important as the front stab links for side to side + front/back de-bouncing.
Front or back links are not enough because they share the balance work.
A lot of ppl replace struts/shocks to cure bounciness: nope!
Shocks do end up wasted by too much traveling but do little to hold unstable chassis.
Shocks oil gets hot from non-stop working and wirk even less.
When chassis is unstable: shocks can't stop it from bouncing the way 4x cheap stab. bars do.
Last edited by CaliBenzDriver; May 3, 2025 at 02:38 PM.
Sucks, but thanks for sharing your knowledge. Was that the tool where there was a warning not to use an impact wrench?
Thanks Jetta. Certainly hope it helps anyone who might come across this thread. I believe so. I didn't use an impact on it, but a large breaker bar.
My other mistake was once the bushing was close to flush, I only observed from the top as opposed to checking from every angle. (Head cramped in the wheel well.) This is when I grabbed the breaker bar as I thought I was in the clear & up til then was just using a 1/2" ratchet.
It's the tool at the bottom of this document. Tool 202 589 00 43 00
Thank you very much for that detailed reply, Cali! Much appreciated, along with a bit of needed support. I do have all new rear arms, new subframe hardware, thread chaser for the holes in the frame floor, and was also thinking of picking up a new rear sway bar as there's no other time to do it then when the subframe is dropped. This video intrigued me to the point I thought I'd see what these bushings will do on their own before I touched the rest
I can at least confirm that both of these spring control arm to wheel carrier bushings were TOAST! With all else disconnected, the control arm flopped in the breeze & bushing was EASILY movable with 1 finger. The new bushing had the control arm firm, stable, and new bushing is impossible to move with fingers alone. Even the bushing in my replacement carrier which just arrived has 0% play by hand.
After what I've done, I'm more hesitant to lower the subframe! WIS documents are clear enough, but properly torquing the arms given I'm on jackstands in a relatively small garage still has me left with plenty of thinking to do.
I may do just as you've said for now & clean up the mating area inside my current wheel carrier and install the new bushing. The combo of tools I now have might damage my replacement carrier & I'd like to have the new bushing in the replacement carrier if/when it goes in. I'm also not 100% sure if my new axle nut (Febi 01841) is self locking or not. I know it is zinc lamella coated, but I understand that's for corrosion protection alone? It doesn't appear to be self locking (to my understunderstanding) & given the large difference in torque values for self locking and non, I may leave that for the near future.
I think you're on to something as far as the rear toe & camber links also. They seem to have the most play (& present physical wear) when agitated with a pry bar. My tire wear doesn't tell of any woeful tales yet. The car is very good as far as rebound/up & down movement, but a small road disturbance or specific turn in angles make the rear axle feel extremely disconnected laterally.
Thank you very much for that detailed reply, Cali! Much appreciated, along with a bit of needed support. I do have all new rear arms, new subframe hardware, thread chaser for the holes in the frame floor, and was also thinking of picking up a new rear sway bar as there's no other time to do it then when the subframe is dropped. This video intrigued me to the point I thought I'd see what these bushings will do on their own before I touched the rest https://youtu.be/joxk0L3qG-k?si=nAMh-D0-5uyhY6eo
I can at least confirm that both of these spring control arm to wheel carrier bushings were TOAST! With all else disconnected, the control arm flopped in the breeze & bushing was EASILY movable with 1 finger. The new bushing had the control arm firm, stable, and new bushing is impossible to move with fingers alone. Even the bushing in my replacement carrier which just arrived has 0% play by hand.
After what I've done, I'm more hesitant to lower the subframe! WIS documents are clear enough, but properly torquing the arms given I'm on jackstands in a relatively small garage still has me left with plenty of thinking to do.
I may do just as you've said for now & clean up the mating area inside my current wheel carrier and install the new bushing. The combo of tools I now have might damage my replacement carrier & I'd like to have the new bushing in the replacement carrier if/when it goes in. I'm also not 100% sure if my new axle nut (Febi 01841) is self locking or not. I know it is zinc lamella coated, but I understand that's for corrosion protection alone? It doesn't appear to be self locking (to my understunderstanding) & given the large difference in torque values for self locking and non, I may leave that for the near future.
I think you're on to something as far as the rear toe & camber links also. They seem to have the most play (& present physical wear) when agitated with a pry bar. My tire wear doesn't tell of any woeful tales yet. The car is very good as far as rebound/up & down movement, but a small road disturbance or specific turn in angles make the rear axle feel extremely disconnected laterally.
That sounds like your rear is loose enough to get toe'ed-out... then rear goes sideways over any bumps.
Normally biased to stay centered with toe-in value.
Throw new parts at it: let the "parts-canon" refresh your rear suspension.
I'd say you're spot on, Cali. I will mention that these small yet critical bushings have made a massive difference, even given the lowly state of the rest of my rear suspension. Not quite night and day, but certainly night and very late afternoon, if you will.
I am in South Jersey outside of Philly, previous owner from North Jersey outside of NYC. Philly roads are atrocious, but NYC roads are worse. This is my only sane logic as to why at 100k mi these arms were gone enough to notice & at 130k mi are unbearable. I guarantee there are w123's and W124's in Morocco on stock rear suspension out performing my C207 without even trying.
I came across this German video which confirms my initial issue. If you press these bushings in the (wrong imo) way that the Benz tool has you do, there is only visibility on 50% of the bushing to ensure it is pressed in 100% straight. This video shows a tool being used which pressed the bushing in the logical and sane direction.....the side which allows visibility all around. This is how I got my replacement bushing in my old wheel carrier which will hold me until I fit the non battle scarred one.
This is the tool used. Availability in the US?? Who knows. Immensely superior to the Benz tool. In the Benz tool, the "pushing" & receiving" cups do fit on either side of the bushing, yet the threaded stud only fits one way & can only be turned with a socket/wrench on the receiving cup side. There is no room whatsoever for this on the inside of the wheel carrier. An abhorrent and laughable situation to replace a wear item.
I'm not sure how much of a conclusion this is, but I notice the endless ocean of unresolved threads on this forum. I hope to resolve every thread I start and at the least provide a solution regardless of how simple, paired with the real world experience of having done (or at least tried it.)
So, Benz tool W202 589 00 43 00? Good luck. Get many mirrors, x -ray vision, and re check orientation after EVERY turn. Press new bushing (204 352 00 27) in from the OPPOSITE side as the Benz tool has you do? Instant success. Do these small bushings make a large difference in rear lateral handling and behavior? YES. Is it ludicrous that on cars that are not Super, Exotic, or Hyper that you must drop the entire rear subframe the change out wear and tear suspension arms? YES. A thread on that coming (hopefully) soon as there is absolutely 0% true detailed, hands on, step by step info on that arduous task as of yet. There are mentions, but in the plethora of things that could go wrong, I'd expect much more.
I hope this helps at least 1 person.
Thank you for this contribution, very interesting
That rear spindle bushing in the video seems to control only lateral motion and not toe because factory bushing has a lot of toe angle play. One would say a better bushing would have none of that freeplay to help toe control.
That means something else is controling the toe opening angle, right?
Indeed, only a certain degree of lateral instability has been resolved by these bushings. My original plan was to do these 1st to see what impact they alone would give while planning how exactly to go about handling all other remaining rear arms.
The Benz specific indy shop I deal with for large things like alignments are a wonderful resource. They're more than happy to let me hang around and pick their brains like a curious child, which I am eternally thankful for. They did my rear subframe (which MBUSA via my local dealership) reimbursed me for. They do many of them, and without hesitation one of the techs told me it's nearly impossible to drop that subframe on jackstands by myself in a small garage and do all the arms. The main problem being lining it all back up while also jacking the entire subframe back up during reinstall.
This was my biggest concern in that job and in the few fragments of videos or mentions of DIY subframe removal/replacement, there is no mention of this obviously most dangerous & difficult step whatsoever.
I'm at a loss over this one. Pay the indy 6 hrs in labor? Get myself stuck in a much larger predicament than these little bushings did when the subframe doesn't play nice during reinstall? The awkwardness of supporting the subframe & wheel carrier while torquing new arms out of the car? Sell it to someone who doesn't notice the rear end basically isn't part of the rest of the car anymore, if such a person exists? (My sister?! Hahaha)
This level of needless complexity on a car which has the most fragile rear suspension I've ever imagined or experienced has me ready to sell to get into a (imo) much more desirable chassis such as a W124, R129 (or even an M113K or M156 car where this trouble would be worth it!), but I can't sell it like this. As for the toe, I'm not sure if it's the "tie rods" alone where the eccentric bolts & washers are, or if all arms working in concert are all carrying near equal roles. I hope to have an answer soon, as this is intolerable and leaning towards going to the indy w/ tail in between my legs to have a drivable car again. I can't "un" recommend a C207 enough, unless you only drive it on roads made of cotton candy, or sell it at 90k mi before you have to overhaul the entire rear suspension.
Allow me to once again share with you my lowest mechanical moment and why :
A.) I am an idiot
B.) Why no one shares/discusses extensive, detailed work on the rear suspension of these cars
C.) What disgust/impatience leads to
D.) The result of engineers going out of their way to make serviceable wear items very difficult to service.
So far, I've done rear end links, shocks, springs, entire subframe, regular alignments, Conti DWS Extreme Contacts all around and the rear end is still laughable at best. (ALL front suspension including entire sway bar, engine & gearbox mounts are also fresh.) It's pathetic and has me fed up with the car. Is it the pano roof? Absence of B pillars? (2010 C207 E350, 132k mi). All I know is I can't sell the car the way it feels, but after doing so much work (too much to list), I debate if I should just keep it, especially given this tariff nonsense.
So, special tool ordered (W202 589 00 43 00) as well as OE bushings (204 352 00 27) for the spring control arm to rear wheel carrier. New hardware as needed, and ready to go. Driver side went well & confirmed these otherwise impossible to inspect bushings are done. The MB tool presses out the bushings in less than 2 minutes, but reinstall is a different story.
There is NO visibility on the inside of the new bushing (facing the wheel carrier), & the MB tool only works one way. You press the bushing out 1 way & new one goes in 1 way. Previous chassis such as 201's, or 210's have all the room one would need to easily line things up, but by the time of 207's, 204's, & 212's the rear suspension is perfectly made to be as special tool dependent as possible. Needing to drop a subframe to do control arms is a bad joke made in poor taste imo.
Wrap it up, man!! Driver side went in straight regardless of not knowing 100% if it would, passenger side looked & felt like it was, but I let my newfoundland disgust get the best of me & didn't back off when I knew I should've. I got the breaker bar to finish, and I broke alright. Broke the tool & bushing not fully in.
Tons of back & forth, etc....managed to get the crooked bushing out & have a beautiful looking (74k mi) used wheel carrier on its way. Replacement of a wheel carrier instead of just a bushing & car off the road for over a wk. Learn from my idiocy, folks. This post may sound bitter, but the truth is I do still love this car & will always love MB more than the rest. I'm just very disappointed & disgusted with everything regarding the rear end. When I was a music school college student many moons ago, I used to push my then '89 Camry to the absolute limit across every Canyon Rd around LA that I knew of & it NEVER felt as disconnected from the rest of the car as my 207 does which I've put endless love into. This car is at its limits going 20 mph on an off ramp. That, my friends, is math which simply does not add up correctly.
You should come to W212 forum and ask me. , we can share pain and good stuff.
I very rarely come to this section of the forum.
These two bushings are now easy for me, of course the #40 ( steel body ) is MUCH more difficult than #50 ( alu body).
Version 1 bushing tool result for #40 bushing.
Later I made version2 bushing tool for #40. Not the greatest but decent and I done for a friend W204, a 100% the same wheel carrier bushig #40 with ease
if you haven't already done the bushing #40 partner in crime, the one at subframe, do so.
.
.
If you want to replace your 4 big subframe bushing, and the front small one is the 76mm version, this tool is what I got. Not in action yet, soon I will use it.
So just using MB tool 202598004300 does not work for installation of the new spring arm bushing?
Did the MB tool break? Should have at least a 1yr warranty on it.
The manual shows two separate tools, 202589004300 for removal and then 204589024300 for install.
This is why I bought the Gedore tool since it shows it working for removal and install. The cups look shaped differently, may even be a bit shorter to fit the tight space. Though I bought it in March and still waiting for it to ship from Germany. I was told end of May so should be any time now.
I also want to replace the rear thrust arms so the two forward subrame bolts have to come out to drop the stop plates. I figured while they are out I can lower the front of the subframe a bit and get the track/tie rods out also. According to the manual its showing just the front bolts being removed and says to lower the front half, rear bolts shouldnt have to come out.
You wrote: I also want to replace the rear thrust arms so the two forward subrame bolts have to come out to drop the stop plates.
W204 C200 below. My friend's. Good thing I have all the bolts for my W212. Simply due to the thrust arm bolt wont come out fully, ...... being blocked by front subframe bushing stop plate
.
.
.
.
.
Looking at the big bolt and the 2 smaller bolts and their tightening torque, they do not qualify as one time use bolts....but I use new one anyway as per WIS.
New Thrust Arm. W204 C200
Just make sure you tighten + troqued the thrust arm bolt at its ride height, the subframe side and the wheel carrier side. That red line on thrust arm bolt above is the ride height at subframe side.
The motor bike jacks (2) very useful for ride height setting. This is my cousin small workshop, doing my friend's C200 W204, thus I helped him with my tools.
If wheel carrier/knuckle is removed. Therefore all arms at subframe side and wheel carrier side mut be torqued at ride height.
I hate THE MOST this part of the job, fighting 400+ kg of spring power. I am afraid of 400kg+ of spring power.
I have to bring over my DIY wheel stands as a safe ride height platform for all other 3 wheels.
I finally looked thru the W204 manual and it appears only the front of the rear subframe has to be lowered to replace the control arms and even the sway bar. In the instructions for the Camber strut, Radius rod, Tie rod and sway bar, and even the two front subframe bushings they only say to lower the front of the subframe.
To replace the spring control arm nothing else has to be touched. As already noted to replace the thrust arm the stop plates have to be removed.
For some reason I was under the impression the entire subframe has to be lowered to at least replace the two topmost control arms.
Lowering the front of the subframe while the rear is still bolted seems risky, is there that much flex in the subframe bushings to allow this? I guess you dont have to lower it that much to just allow the bolts to clear.
The instructions are all basically the same so ill just post the Camber strut. Red circles is all the parts that can be removed when lowering the front.
Instructions for lowering the front of the subframe (axle carrier) was buried in the Transmission and Drivetrain section and took some searching.
When you lower partially only the front side of rear subframe, you need to also remember that the propeller shaft from tranny to DIFF will need to "extend out" and do downward angle.
The propeller shaft is a 2 piece shaft and at middle bearing its where they got "married" , they have a bit of room for such movement/extension. but not much.
See here the estimated length, psot #9: https://mbworld.org/forums/e-class-w...ml#post8822118
Make sure you pay attention to the two piece propeller shaft.
You should come to W212 forum and ask me. , we can share pain and good stuff.
I very rarely come to this section of the forum.
These two bushings are now easy for me, of course the #40 ( steel body ) is MUCH more difficult than #50 ( alu body).
Version 1 bushing tool result for #40 bushing.
Later I made version2 bushing tool for #40. Not the greatest but decent and I done for a friend W204, a 100% the same wheel carrier bushig #40 with ease
if you haven't already done the bushing #40 partner in crime, the one at subframe, do so.
.
.
If you want to replace your 4 big subframe bushing, and the front small one is the 76mm version, this tool is what I got. Not in action yet, soon I will use it.
I would love to come to the W212 forum! Being a C207 owner, I feel the W204 & 212 forums are more active & in depth than the dedicated 207 forum & the topics almost always directly apply. I do have a rich condition saga I'm still working out & was planning on posting about it soon in the 212 forum for these reasons. (3.5L M272). I want to be 100% sure I can resolve it. Far too many "Running Rich" and/or "Running Lean" threads that end in juicy cliffhangers and nothing else.
Just like @CaliBenzDriver , I've been admiring your knowledge throughout MBWorld long before joining and your post here is no different. Many thanks! I took advantage of the "subframe warranty" that eventually made it's way to the US a few years back and have a new rear subframe, so all bushings there thankfully are addressed. At the time I was searching for subframe bushing tools, I found (maybe?) the tool you shared here (or one similar) & it was the only one I could find with little to no info whatsoever on the job beside one other mention of someone making their own tool which didn't address the metal sleeves the subframe bushings live in. Aforementioned proper tool was over $500 USD before tax/shipping and was coming from Malaysia I believe? Good God above! New subframe it was, reimbursed by MBUSAand life carried on.
This stage of the nightmare is thankfully over now & #40 bushings are in. One with ease, the other with a serious fight and unwillingness to be installed. Mistakes were certainly learned the hard way.
The current battle is the remaining arms (minus the spring control arm) which I'm not sure can be done solo in my relatively small 1 car garage. The driveway is tempting, but getting stuck is less tempting. I must assume the previous owner :
A. Drove constantly in NYC
B. Redlined the engine from a dig at every single red light he hit
C. Took the coupe off roading
D. All of the above
The 4 big subframe bushings were actually the reason I had the entire subframe done. The previous owner miraculously managed to brutalize everything in the rear enough so that by 100k mi, it was all over. I've owned the car since 75k mi, now at 130k mi. 5 years and a few months. I drive it like the E350 it is, not the E55, E63, or C63 I wish it was. At 100k mi, I was in denial of what I saw & felt. I've never experienced or heard of 80% of all bushings being dead that early on a rear suspension of a car that isn't making serious power &/or being beaten on constantly. The Benz indy shop I keep close to for big stuff like alignments, etc has literally never done these jobs on 204's, 212's, or 207's. Only on 203's & 209's.
I look forward to the sharing of pain & good stuff alike!
So just using MB tool 202598004300 does not work for installation of the new spring arm bushing?
Did the MB tool break? Should have at least a 1yr warranty on it.
The manual shows two separate tools, 202589004300 for removal and then 204589024300 for install.
This is why I bought the Gedore tool since it shows it working for removal and install. The cups look shaped differently, may even be a bit shorter to fit the tight space. Though I bought it in March and still waiting for it to ship from Germany. I was told end of May so should be any time now.
I also want to replace the rear thrust arms so the two forward subrame bolts have to come out to drop the stop plates. I figured while they are out I can lower the front of the subframe a bit and get the track/tie rods out also. According to the manual its showing just the front bolts being removed and says to lower the front half, rear bolts shouldnt have to come out.
The 202 589 00 43 00 tool does work for removal and install, it's just very difficult to ensure that the new bushing and "pushing cup" are 100% straight during install. The driver side went in with minimal effort. Maybe 5 minutes of slow cranking of the ratchet while periodically checking orientation.
If I hadn't lost my patience like a stubborn fool, the same would've went for the passenger side. At that point I had become fed up with the job and upon feeling serious resistance, I got out the breaker bar instead of backing off and rechecking my work like I should have. The bushing was so close to flush & had given no trouble until the very last set of turns, I still did think it was going in straight.
I believe it's a 2 yr warranty if not 1 yr as you said, but I assumed my Silverback Gorilla tactics voided it. Worth asking, I suppose. The breaker bar indeed lived up to it's name I'm afraid.
I was told that tool 204 589 02 43 000 is for the thrust arm bushings at wheel carrier by the gentleman in the parts dept at the dealership I ordered 202 589 00 43 00 from. (MB of Covington, LA), but he was only 90% sure. Not local to me, but best direct prices I've ever seen.
I do wish I ordered the Gedore tool. I have a feeling it allows you to install the new bushing from what I call "the correct side" aka pressing in from the rear of the car forward which provides all the visibility one would need. This is how it's done in the German DIY video I posted earlier in this thread
I hope the Gedore tool allows install this way. It's a partially blind job otherwise. Perhaps @S-Prihadi has the right idea in removing the wheel carrier altogether and doing everything as it appears in those pictures.
Quite a carefree approach compared to what WIS has to say. Disconnecting the exhaust downstream of secondary cats and prop shaft/driveshaft at the diff flex disc paired with the aforementioned flexing of subframe bushings has this making more sense and seeming more approachable.
Mr Prihadi's use of the bike jacks at the wheel carriers are the areas where I was truly unsure of best course of action. Bottle jacks? Additional smaller 1.5 ton jacks? I was also toying with the idea of this Daytona cross beam for lowering/raising the subframe, as it seems dimensions are a good match. Perhaps it's not needed at all & jack underneath diff will suffice as it appears in Mr Prihadi's pictures? Is central support enough? Given the rearward bolts are left installed, I suppose it's less an issue than if all 4 bolts had to come out.
I would love to come to the W212 forum! Being a C207 owner, I feel the W204 & 212 forums are more active & in depth than the dedicated 207 forum & the topics almost always directly apply. I do have a rich condition saga I'm still working out & was planning on posting about it soon in the 212 forum for these reasons. (3.5L M272). I want to be 100% sure I can resolve it. Far too many "Running Rich" and/or "Running Lean" threads that end in juicy cliffhangers and nothing else.
Just like @CaliBenzDriver , I've been admiring your knowledge throughout MBWorld long before joining and your post here is no different. Many thanks! I took advantage of the "subframe warranty" that eventually made it's way to the US a few years back and have a new rear subframe, so all bushings there thankfully are addressed. At the time I was searching for subframe bushing tools, I found (maybe?) the tool you shared here (or one similar) & it was the only one I could find with little to no info whatsoever on the job beside one other mention of someone making their own tool which didn't address the metal sleeves the subframe bushings live in. Aforementioned proper tool was over $500 USD before tax/shipping and was coming from Malaysia I believe? Good God above! New subframe it was, reimbursed by MBUSAand life carried on.
This stage of the nightmare is thankfully over now & #40 bushings are in. One with ease, the other with a serious fight and unwillingness to be installed. Mistakes were certainly learned the hard way.
The current battle is the remaining arms (minus the spring control arm) which I'm not sure can be done solo in my relatively small 1 car garage. The driveway is tempting, but getting stuck is less tempting. I must assume the previous owner :
A. Drove constantly in NYC
B. Redlined the engine from a dig at every single red light he hit
C. Took the coupe off roading
D. All of the above
The 4 big subframe bushings were actually the reason I had the entire subframe done. The previous owner miraculously managed to brutalize everything in the rear enough so that by 100k mi, it was all over. I've owned the car since 75k mi, now at 130k mi. 5 years and a few months. I drive it like the E350 it is, not the E55, E63, or C63 I wish it was. At 100k mi, I was in denial of what I saw & felt. I've never experienced or heard of 80% of all bushings being dead that early on a rear suspension of a car that isn't making serious power &/or being beaten on constantly. The Benz indy shop I keep close to for big stuff like alignments, etc has literally never done these jobs on 204's, 212's, or 207's. Only on 203's & 209's.
I look forward to the sharing of pain & good stuff alike!
Lucky u guys in USA, free subframe with crazy 25 years warranty ??? and probably you get the 86mm front bushing, older one like mine is 76mm version.
The previous owner miraculously managed to brutalize everything in the rear enough so that by 100k mi, it was all over.
Sounds like me, but me 50% less brutal hahahah
Bushing made of rubber is for comfort. No choice if its service life is not very long.
Even engine mounts both 2 and 1 of tranny mount is for me 25,000KM life, I mean maximum comfort life and I am now on my 3rd set of mounts ( counting MB day 1 set as #1 ).
I am only at 43,300KM today. My front stabilizer long links gave up at 22,000KM ish, due to track use of +-20 laps x 4KM or so the circuit. Rubber boot torn, ball joint inside it still okey but loose.
The suspension arm L shaped ball joint also already "easy to turn by hand", so I renewed.
The camber arm needed camber correction bolt.
Dang, 80KM of hard driving on tarmac and not gravel... ha ha ha.
.
.
.
Tires front all gone up to its cord. Rear tires rubber track became so rough.... it made noise like crazy at 100MPH or more on highway, so buy new one too. All 4.
Due to -1.5 degrees built in camber on the rear suspension, rear tires out-side did not get eaten up like front one.
.
.
Thus I know how these W212 suspension arm's bushing are not the strongest, but indeed comfy. Its a good compromise
Win some and loose some.
I would love to come to the W212 forum! Being a C207 owner, I feel the W204 & 212 forums are more active & in depth than the dedicated 207 forum & the topics almost always directly apply. I do have a rich condition saga I'm still working out & was planning on posting about it soon in the 212 forum for these reasons. (3.5L M272). I want to be 100% sure I can resolve it. Far too many "Running Rich" and/or "Running Lean" threads that end in juicy cliffhangers and nothing else!
Mercedes SLR McLaren 722 S Is Extremely Rare Example Modified by McLaren
Slideshow: A one-of-one U.S.-spec Mercedes-Benz SLR McLaren Roadster became even rarer after a factory-backed transformation at McLaren's headquarters.