


 Jun 24, 2015, 01:45 PM
Last edit by: IB Advertising
See related guides and technical advice from our community experts:
- Mercedes Benz E Class AMG: How to Install Throttle Body
Step by step instructions for do-it-yourself repairs

90mm Throttle Body install with parts/pics
Thread Starter
MBWorld Fanatic!
Joined: Oct 2011
Posts: 2,279
Likes: 27
From: A to the Z (the state)
'06 E55
It definitely fits, but it's a tight squeeze depending on how you do it. I have not dyno'ed yet, but the ***-dyno tells me it did pick up a really good amount up top. Here's the deets:
First, get a BBK 90mm TB for a 2005-2011 Chrysler Hemi:

Pretty sure you can get it at Jegs. I got mine from ExoticMetal.
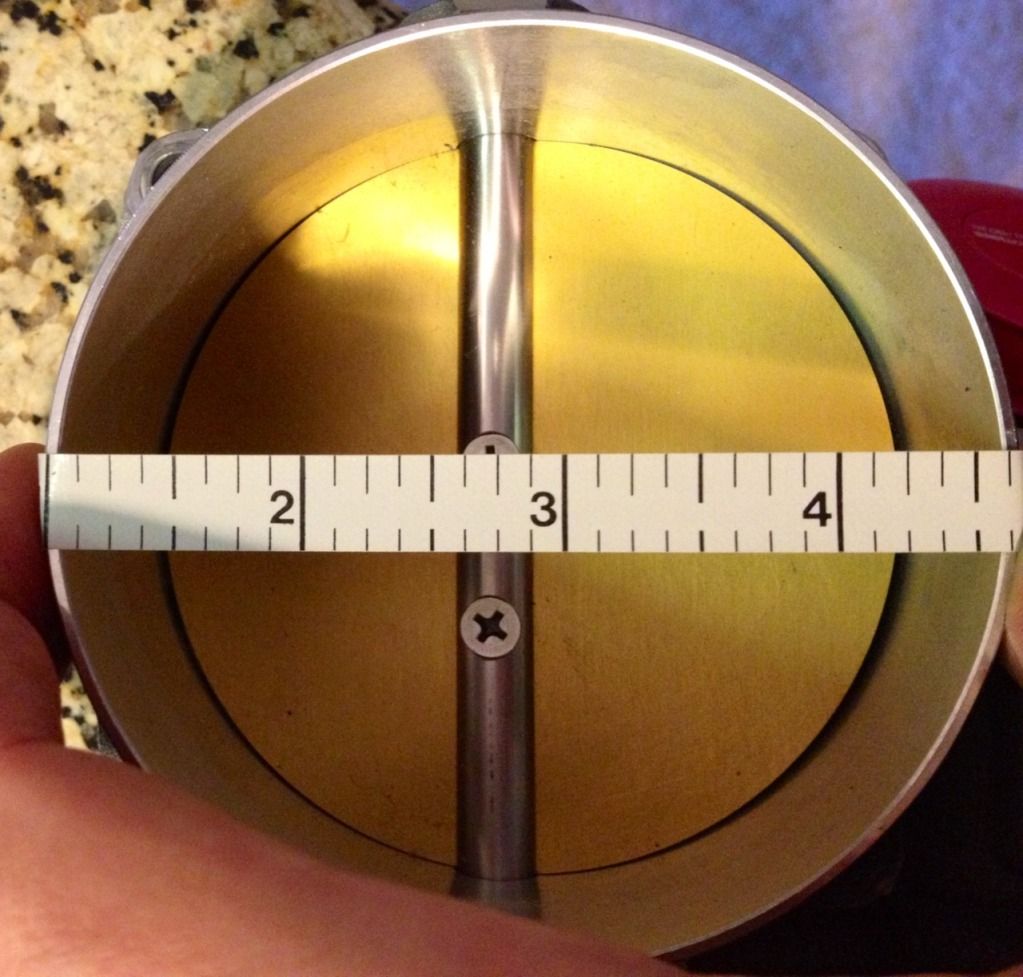
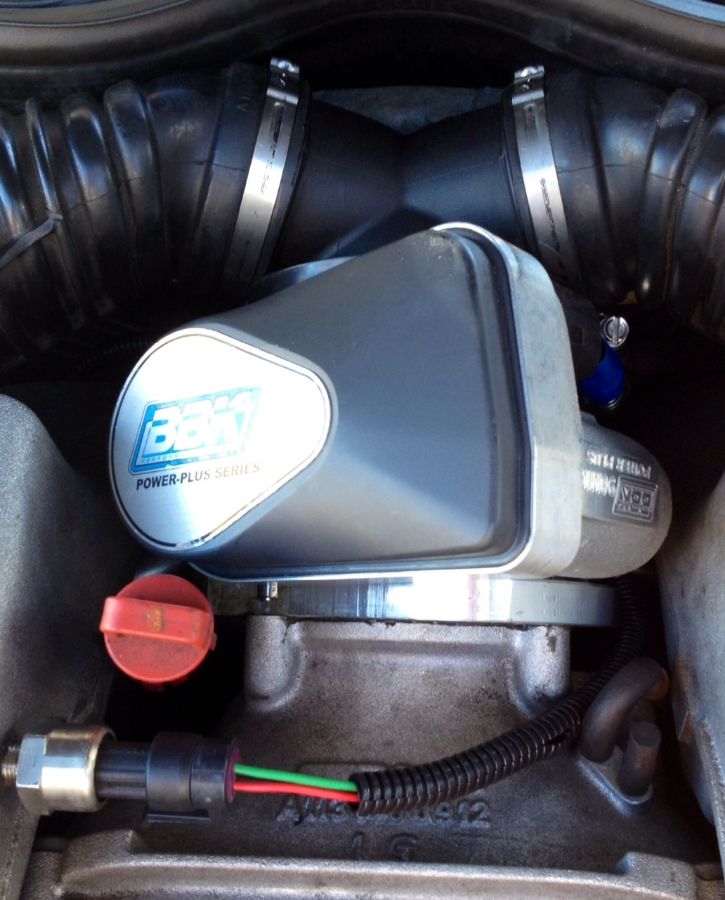
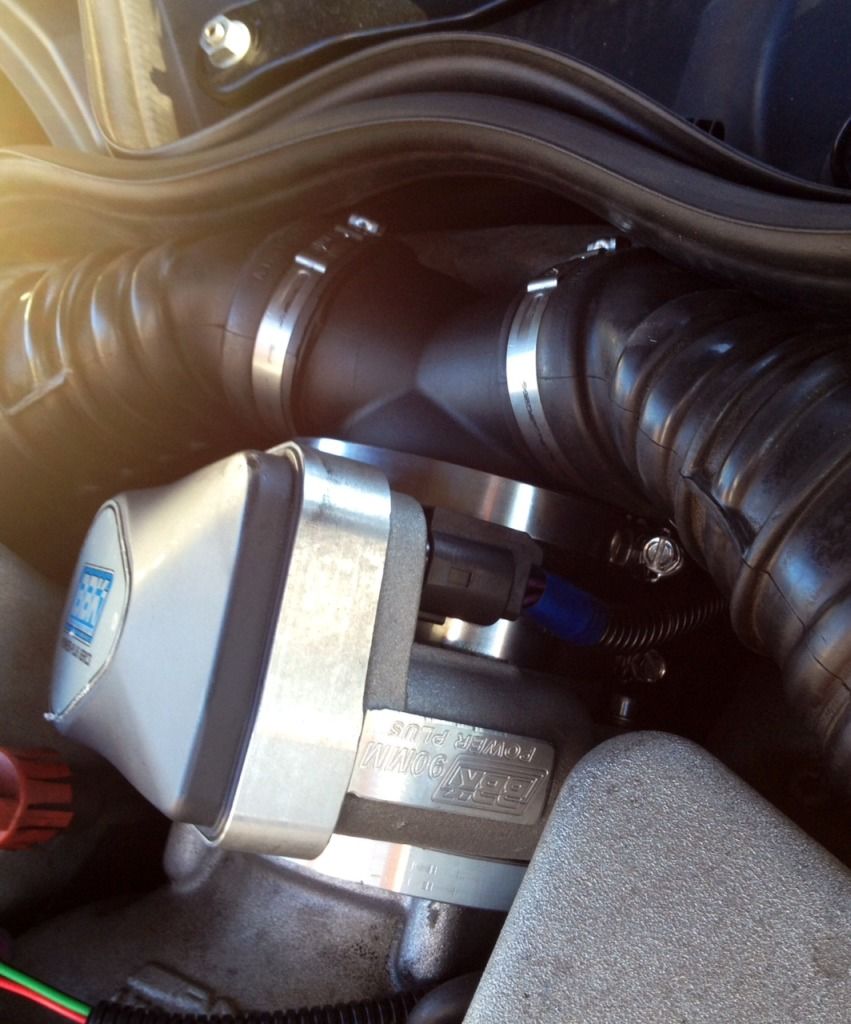
Here's a good shot of the part that mates to the Y-pipe. NOTE: My measurement started at the 1" mark on that tape. It's a little over 3.5":
I was able to find a silicone 3.5"-4" boot and was able to snoodle the TB to the Y-pipe. I used a utility knife to trim the boot to make the two parts as close together as possible as there is very little room behind the TB (thanks to the firewall). Two hose clamps ensured an excellent seal.
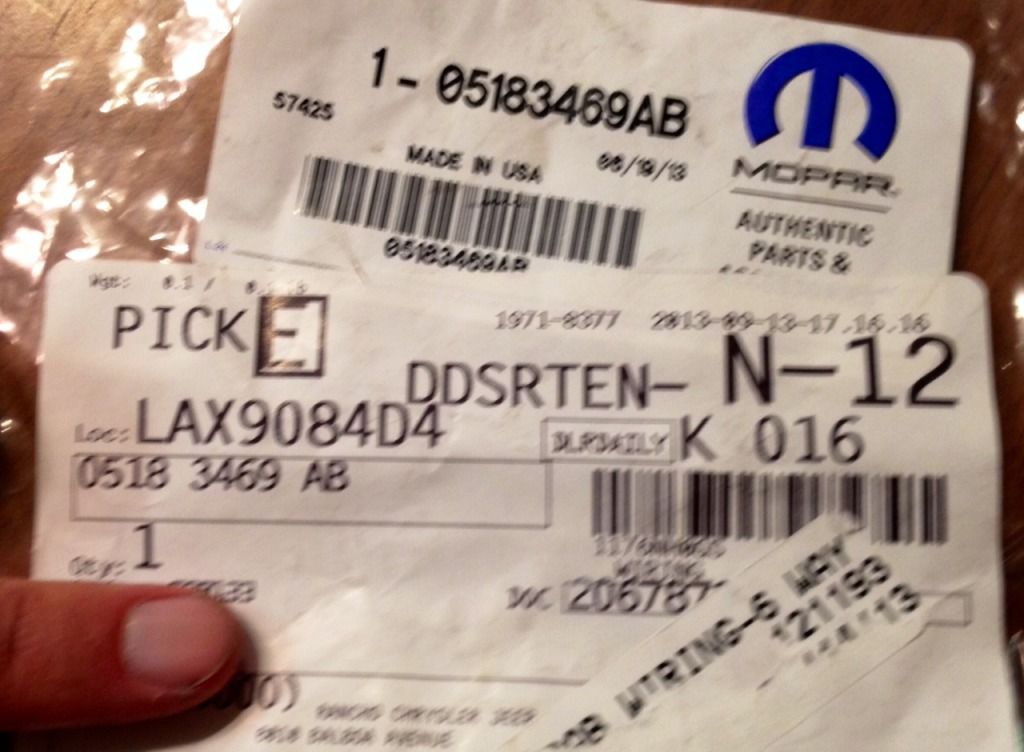
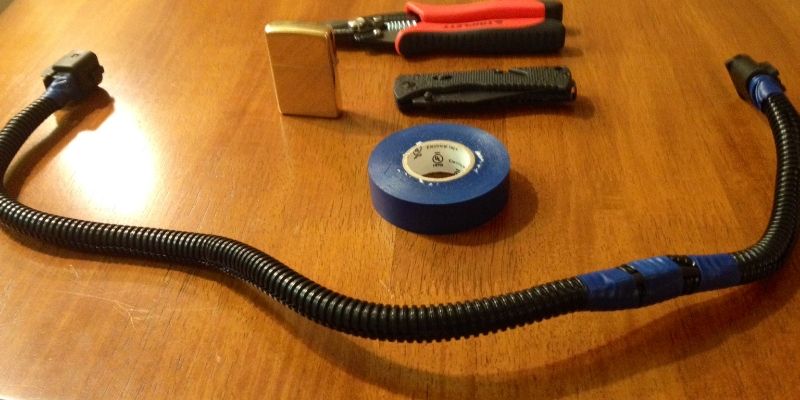
You will need this connector kit from Chrysler. I got it after convincing the parts guy that their throttle bodies do indeed require a connector. They call it a throttle body plug. Here's what I ordered:
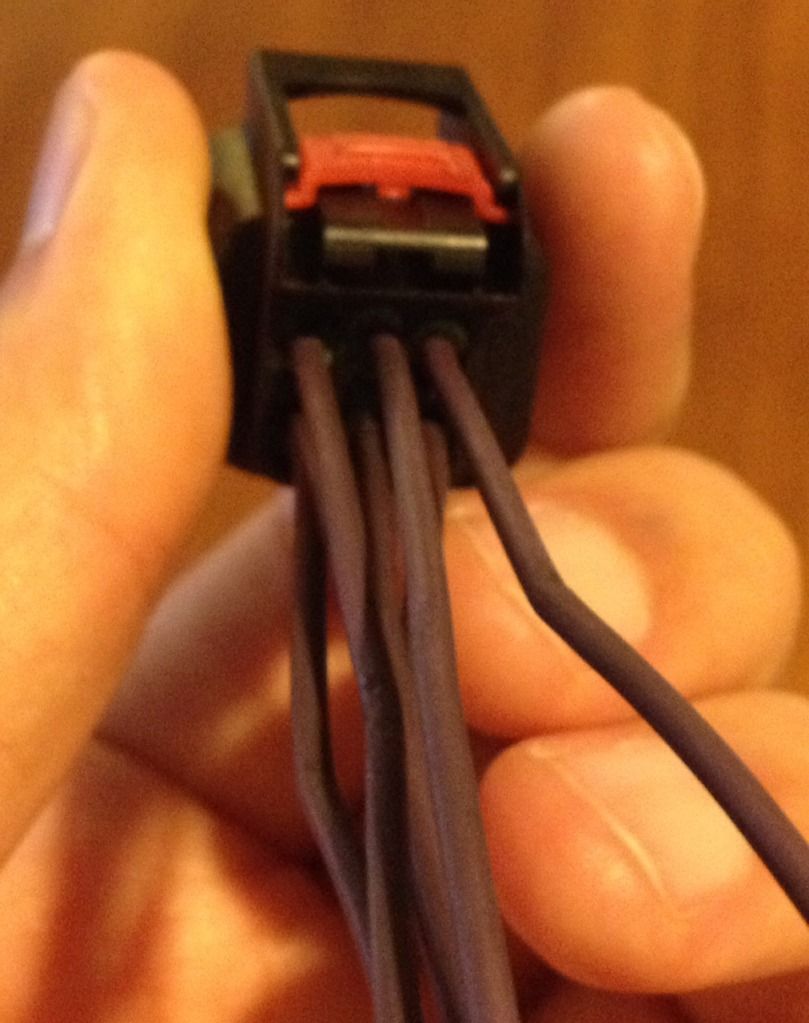
It's a plug with six pre-pinned wires and some extra pins. You don't need the extra pins. This connector requires a special tool to disassemble it. My local Econo Lube N' Tune was able to put the pins in it for me as they had the tool.
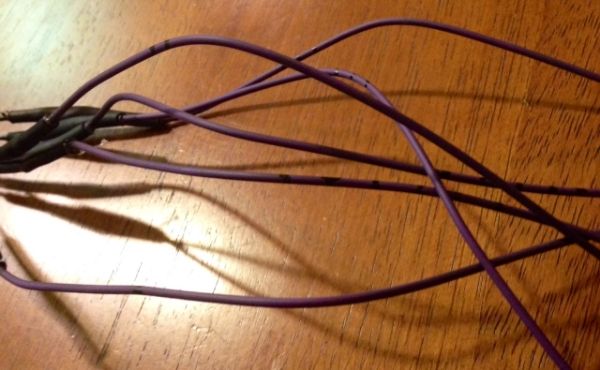
The pin numbers are actually inside the connector on the throttle body. They read really weird: bottom to top, left to right (logically). Be sure to read them before you put it on the car. I numbered 1,2,5,6 on the face of the plug with a Sharpie just in case. You will need to splice this connector with the stock Benz cable. You can buy a new one from the dealer for around $100, or you can fully dedicate yourself to the project and use your existing one. The stock one plugs in at the TB and the other end plugs in at the loom down behind the engine. There is enough slack that you can pull the cable up to make it easy to unplug. Gut that beeotch right down the middle and discard the old wire wrap (that black tubing stuff).
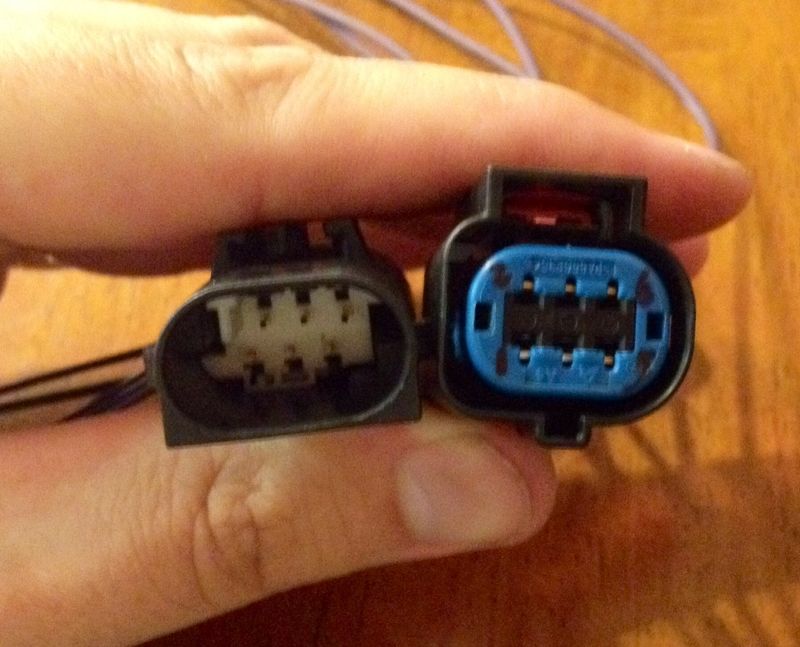
Here is what the two plugs on your new cable will look like: MB on the left, Mopar on the right:
There are six wires from each connector that will need to be spliced. The MB plug is numbered at each wire, which makes it easy. Credit goes to Forrest Gump 9 for figuring out the MB to Mopar pinout. It goes:
MB --> Mopar
1-->3
2-->2
3-->6
4-->5
5-->4
6-->1
Since the wires in the Mopar kit are all the same color, I striped each wire to match its pin number. NOTE: put the shrink wrap tubing (included in the kit) on the wires before you make your connections, or you will feel hurr-durr. Unless you don't want to use it. You can solder, use crimp connectors, or the tried-and-true backyard mechanic method of twisting them sum*****es (dang this swear filter!) together and wrapping them in tape. Be sure to double and triple check before you get it all closed up.
Note the stripes I put on there:
Get you some wire tubing/wrap stuff to make it look nice and professional:
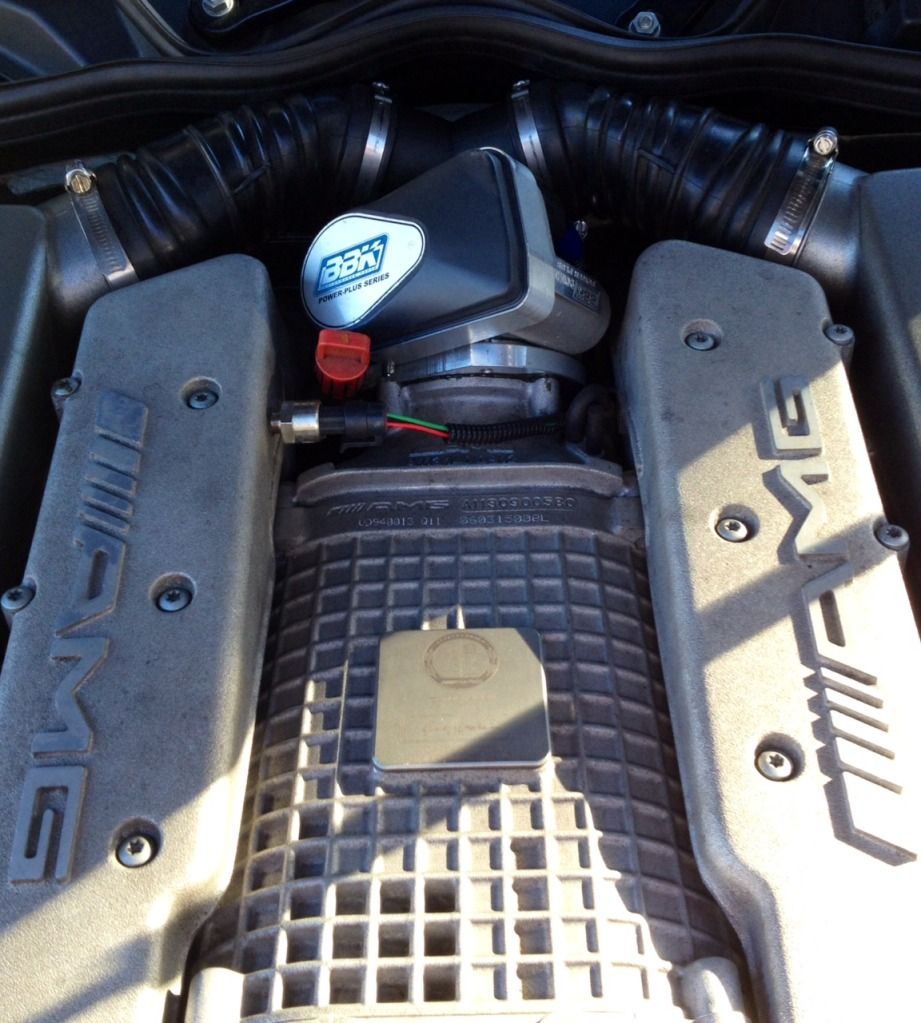
Now, for the mounting of the throttle body, you will have to work something out. I have seen two other methods, both different than mine. I am using the OEM (not stock E55) supercharger snout. Mine is hogged out a little to allow for some more airflow. I have a custom machined adapter that tapers from 90mm to 82mm (Thanks, Exotic!).
First, I did a dry run to make sure everything would fit. I used some PermaTex between the snout and the adapter to make a good seal and bolted down the adapter. Then, I used PermaTex between the adapter and TB to make another good seal and bolted the TB to the adapter. NOTE: the bolt holes on the TB do NOT match up to the holes on the snout. Also, the lower two holes on the snout are closer together than the upper two holes.
The other way of doing this is taking the snout (while off the supercharger, obviously) and having it hogged out as much as possible and then mated to the TB either by welding or Elmer's glue (don't use Elmer's).
The silicone boot I had on the TB is really tight. I put it in some hot water for a few minutes to make it soft and pliable to get it on the TB easily. I actually had it on the TB before I mounted it. Make sure the hose clamp will be accessible while TB is mounted.
Then, I had to manhandle the Y-pipe into place. With the adapter making this huge TB even thicker, it means there is very little space between the TB and firewall. If you weld the TB to the snout, you should have a little more room. My airboxes wanted to stay a good inch aft of their normal place. You can get by using the OEM parts, but this setup is just begging for a custom setup. I am using the OEM (not stock E55) Y-pipe and airbox connectors for the 82mm TB until I can get something better going on. I am also considering taking a ball peen hammer to that thin part of the firewall that curves in there at the Y-pipe. It's really crowding the space and doesn't do too much as it is. I've heard some people have used tin snips to clear some space with little to no problems.
Here are the pics:
After you get it all hooked up, perform the throttle body reset:
-Reset ECU with a scan tool.
-Unplug throttle body.
-Turn key to position 2 (right before cranking the engine over) and wait 20 seconds.
-Turn key to position 1 (one click counter-clockwise) and plug in throttle body.
-Turn key to position 2 and wait 3 minutes. You will hear the TB clicking and stuff like that if you keep your mouth shut.
-Start car from position 2.
Going from the 82mm to the 90mm is definitely noticeable and the car pulls even harder up top. If you have a proper intake up to the TB, it should be even more pronounced. Also, my observed fuel economy is up slightly. I mod my car because I am environmentally conscious and eco-friendly, and you should be, too.
First, get a BBK 90mm TB for a 2005-2011 Chrysler Hemi:
Pretty sure you can get it at Jegs. I got mine from ExoticMetal.
Here's a good shot of the part that mates to the Y-pipe. NOTE: My measurement started at the 1" mark on that tape. It's a little over 3.5":
I was able to find a silicone 3.5"-4" boot and was able to snoodle the TB to the Y-pipe. I used a utility knife to trim the boot to make the two parts as close together as possible as there is very little room behind the TB (thanks to the firewall). Two hose clamps ensured an excellent seal.
You will need this connector kit from Chrysler. I got it after convincing the parts guy that their throttle bodies do indeed require a connector. They call it a throttle body plug. Here's what I ordered:
It's a plug with six pre-pinned wires and some extra pins. You don't need the extra pins. This connector requires a special tool to disassemble it. My local Econo Lube N' Tune was able to put the pins in it for me as they had the tool.
The pin numbers are actually inside the connector on the throttle body. They read really weird: bottom to top, left to right (logically). Be sure to read them before you put it on the car. I numbered 1,2,5,6 on the face of the plug with a Sharpie just in case. You will need to splice this connector with the stock Benz cable. You can buy a new one from the dealer for around $100, or you can fully dedicate yourself to the project and use your existing one. The stock one plugs in at the TB and the other end plugs in at the loom down behind the engine. There is enough slack that you can pull the cable up to make it easy to unplug. Gut that beeotch right down the middle and discard the old wire wrap (that black tubing stuff).
Here is what the two plugs on your new cable will look like: MB on the left, Mopar on the right:
There are six wires from each connector that will need to be spliced. The MB plug is numbered at each wire, which makes it easy. Credit goes to Forrest Gump 9 for figuring out the MB to Mopar pinout. It goes:
MB --> Mopar
1-->3
2-->2
3-->6
4-->5
5-->4
6-->1
Since the wires in the Mopar kit are all the same color, I striped each wire to match its pin number. NOTE: put the shrink wrap tubing (included in the kit) on the wires before you make your connections, or you will feel hurr-durr. Unless you don't want to use it. You can solder, use crimp connectors, or the tried-and-true backyard mechanic method of twisting them sum*****es (dang this swear filter!) together and wrapping them in tape. Be sure to double and triple check before you get it all closed up.
Note the stripes I put on there:
Get you some wire tubing/wrap stuff to make it look nice and professional:
Now, for the mounting of the throttle body, you will have to work something out. I have seen two other methods, both different than mine. I am using the OEM (not stock E55) supercharger snout. Mine is hogged out a little to allow for some more airflow. I have a custom machined adapter that tapers from 90mm to 82mm (Thanks, Exotic!).
First, I did a dry run to make sure everything would fit. I used some PermaTex between the snout and the adapter to make a good seal and bolted down the adapter. Then, I used PermaTex between the adapter and TB to make another good seal and bolted the TB to the adapter. NOTE: the bolt holes on the TB do NOT match up to the holes on the snout. Also, the lower two holes on the snout are closer together than the upper two holes.
The other way of doing this is taking the snout (while off the supercharger, obviously) and having it hogged out as much as possible and then mated to the TB either by welding or Elmer's glue (don't use Elmer's).
The silicone boot I had on the TB is really tight. I put it in some hot water for a few minutes to make it soft and pliable to get it on the TB easily. I actually had it on the TB before I mounted it. Make sure the hose clamp will be accessible while TB is mounted.
Then, I had to manhandle the Y-pipe into place. With the adapter making this huge TB even thicker, it means there is very little space between the TB and firewall. If you weld the TB to the snout, you should have a little more room. My airboxes wanted to stay a good inch aft of their normal place. You can get by using the OEM parts, but this setup is just begging for a custom setup. I am using the OEM (not stock E55) Y-pipe and airbox connectors for the 82mm TB until I can get something better going on. I am also considering taking a ball peen hammer to that thin part of the firewall that curves in there at the Y-pipe. It's really crowding the space and doesn't do too much as it is. I've heard some people have used tin snips to clear some space with little to no problems.
Here are the pics:
After you get it all hooked up, perform the throttle body reset:
-Reset ECU with a scan tool.
-Unplug throttle body.
-Turn key to position 2 (right before cranking the engine over) and wait 20 seconds.
-Turn key to position 1 (one click counter-clockwise) and plug in throttle body.
-Turn key to position 2 and wait 3 minutes. You will hear the TB clicking and stuff like that if you keep your mouth shut.
-Start car from position 2.
Going from the 82mm to the 90mm is definitely noticeable and the car pulls even harder up top. If you have a proper intake up to the TB, it should be even more pronounced. Also, my observed fuel economy is up slightly. I mod my car because I am environmentally conscious and eco-friendly, and you should be, too.
Trending Topics
Thread Starter
MBWorld Fanatic!
Joined: Oct 2011
Posts: 2,279
Likes: 27
From: A to the Z (the state)
'06 E55
Thanks, dudes.
Ummm... 3 tanks of gas? Ha, I might exaggerate a little when I try to justify my mods. But for real, on my drive in to work this morning, from cold start, exiting my garage, sitting at one stop light, and then about 12 miles of highway, I was at an average of 24.4 mpg on the computer. A longer trip might have seen it go higher, too. Disclaimer: I have larger injectors, so this may not be accurate, but I can still use it as a relative measurement and see if something increases or decreases. Doing the heads and the headers also helped when I did them.
Throttle body is ~$450 from Jegs. The plug from Chrysler is about $60. I don't recall how much the snout is off the top of my head, but I want to say it was kinda expensive, around $200 or so. If you get the TB cable from MB, that's almost $100, but that is not needed. The bigger Y-pipe and airbox connectors is also a nice chunk of change, too. Snout and Y-pipe part numbers can be found with a search as they are the same used for the 82mm upgrade. Add a few more bucks for little odds and ends like some nice stainless steel hex bolts, Perma-tex, etc.
Oh, and yes, I still get that forking hiccup! It still happens at the exact same spot on my daily commute. At least I have ruled out the 82mm TB as the cause. It is something else. Maybe getting too choked up with that stock intake.
Oh, and yes, I still get that forking hiccup! It still happens at the exact same spot on my daily commute. At least I have ruled out the 82mm TB as the cause. It is something else. Maybe getting too choked up with that stock intake.
MB World Stories
The Best of Mercedes & AMG

Manual Mercedes? 6 Times Sindelfingen Let Drivers Have All The Fun
Verdad Gallardo
Mercedes SLR McLaren 722 S Is Extremely Rare Example Modified by McLaren
Verdad Gallardo
8 Classic Boxy Mercedes Designs That Have Aged Like Fine Wine
Verdad Gallardo
Flawlessly Restored Mercedes 190E Evo II Heads to Auction
Verdad Gallardo
Electric Mercedes C-Class Unveiled: 11 Things You Need to Know
Verdad Gallardo
Mercedes EQS Gets A Major Update: Everything You Need to Know
Verdad Gallardo
5 Underrated Mercedes-Benz Models That Don't Get the Love They Deserve
Verdad Gallardo
Mercedes 300D Has Pushed Well Past 1 Million Miles and It Ain't Stopping
Verdad Gallardo
10 Most Reliable Mercedes-Benz Models You Can Buy Used
Verdad GallardoPLATINUM SPONSOR

Joined: Jun 2008
Posts: 3,834
Likes: 65
From: Texas
2003 CL55
Nice job and looks almost stock
__________________

E63 Biturbo, UPD Cold Air induction kit, UPD performance crank pulley and UPD adjustable rear suspension with ride height adjustment.
CL55 UPD Cold Air Boost kit, UPD 3000 stall converter, UPD 77mm SC clutched pulley and beltwrap kit, Custom long tubes, UPD crank pulley , UPD suspension kit, UPD SC pulley, Aux. HE, Trunk tank w/rule 2000 pump, Mezeire pump, UPD 5pc idler set, Aluminum rotor hats.
www.ultimatepd.com
instagram @ultimate_pd
facebook.com/ultimatepd
MBWorld Fanatic!
Joined: Jun 2009
Posts: 4,429
Likes: 61
From: Cypress, TX
'06 E55, '15 Jeep SRT8, '94 Mustang GT
Ummm... 3 tanks of gas? Ha, I might exaggerate a little when I try to justify my mods. But for real, on my drive in to work this morning, from cold start, exiting my garage, sitting at one stop light, and then about 12 miles of highway, I was at an average of 24.4 mpg on the computer. A longer trip might have seen it go higher, too. Disclaimer: I have larger injectors, so this may not be accurate, but I can still use it as a relative measurement and see if something increases or decreases. Doing the heads and the headers also helped when I did them.


Super Member
Joined: Dec 2009
Posts: 848
Likes: 6
From: New Cumberland, PA
ML63
I wish I knew how to get rid of this damn hiccup.
I'm ready to just to go back to a 74
I have a few more things to try before I do that.
Have you guys at EC come up with anything I'm sure you have heard of this issue?
I'm ready to just to go back to a 74
I have a few more things to try before I do that.
Have you guys at EC come up with anything I'm sure you have heard of this issue?

Super Member
Joined: Mar 2007
Posts: 946
Likes: 1
From: Bay Area
03 C32 gone, 06 CLS55, 16 Tesla X
 : I would love to see before/after number? Also is the increasing mpg because you are now running more air (leaner)? Do you log the af ratio? If that is the
 case, then it should be retune.


Thread Starter
MBWorld Fanatic!
Joined: Oct 2011
Posts: 2,279
Likes: 27
From: A to the Z (the state)
'06 E55
I'm on the EC tune. I'm monitoring my AFR like a hawk. Last time I was at the track on my 82mm, I saw it go as rich as 9.6, so there was plenty of fuel for the 90.
I'l let the bidding start at tree fiddy

I'l let the bidding start at tree fiddy

MBWorld Fanatic!


Joined: May 2010
Posts: 1,027
Likes: 55
05 E55 AMG, E320 CDI, Turbo E46 M3,IS300 2JZGTE,VQ35 Turbo Maxima, Mercedes 300D
Thanks for sharing the details ...
How on earth do you get 24+ mpg? I can't get up to 19! I have 550cc injectors!
You can do mpg adjustment of up to 25% to compensate using DAS.
$60 for a plug? That's robbery.
Hiccup? Some had the theory that the hiccup was due to 82mm Audi TB rotating the opposite way from Mercedes. Does this one open same or opposite way I wonder.
... I was at an average of 24.4 mpg on the computer. ... Disclaimer: I have larger injectors, so this may not be accurate,
... The plug from Chrysler is about $60. ...
Oh, and yes, I still get that forking hiccup! It still happens at the exact same spot on my daily commute. At least I have ruled out the 82mm TB as the cause. It is something else. Maybe getting too choked up with that stock intake.
... The plug from Chrysler is about $60. ...
Oh, and yes, I still get that forking hiccup! It still happens at the exact same spot on my daily commute. At least I have ruled out the 82mm TB as the cause. It is something else. Maybe getting too choked up with that stock intake.
Thread Starter
MBWorld Fanatic!
Joined: Oct 2011
Posts: 2,279
Likes: 27
From: A to the Z (the state)
'06 E55
I believe my old one is an Audi unit. I had to swap pins on the connector to make it open the "correct" way.
When I got my car, I never got over 19.x mpg. MBH headers and midsection added a lot. I drove it up to get tuned after installing them (before adding a TB, rail, injectors, etc) and I got around 23mpg driving up to LA. The ported heads with larger valves helped a lot, also.
When I got my car, I never got over 19.x mpg. MBH headers and midsection added a lot. I drove it up to get tuned after installing them (before adding a TB, rail, injectors, etc) and I got around 23mpg driving up to LA. The ported heads with larger valves helped a lot, also.

Thread Starter
MBWorld Fanatic!
Joined: Oct 2011
Posts: 2,279
Likes: 27
From: A to the Z (the state)
'06 E55


