When you click on links to various merchants on this site and make a purchase, this can result in this site earning a commission. Affiliate programs and affiliations include, but are not limited to, the eBay Partner Network.
PFL205.064 with M276.823 (Oil pump solenoid defeated)
Originally Posted by CaliBenzDriver
You know you could simply cut one of the two solenoid wires and be done under 5mn .... unless your ECU is the type that pop the CEL on dash then you may prefer an optional "dummy load" replacement coil, plugged-in or soldered to pigtails.
Of course! Why didn't I think of that, you are right, the simpliest solutions are often the best! Thank you : )
I do have a few questions if I proceed, if I cut it but for any reason need it again in the future for whatever reason (no I am not plugging it in again as you never know if this thing jams opened), do I need to replace the entire wiring harness? If so, is there a way to cut it so the wires are safe and I can somehow weld or install another plug to the wire in the future so the wire is still reusable? How should I cut this, do it from the top or from the bottom where the actual connector is? How should I protect the wire after cutting the plug?
I understand this is a terrible question but what should I use to cut it? Scissors? Wire cutters? Where should I cut?
Okay, best questions get best answers, right?
If i were you I'd cut a single solenoid wire INSIDE THE ECU CONNECTOR COVER up engine crown.
It's a lot easier to work on engine top than near crank pulley location. Leave the solenoid thingy undisturbed. It has a direct homerun to ECU.
If you need dummy load, strip the coil to install it inside the ECU connector cover or nearby where all necessary wires are accessible.
If case you want to back-track then splice wires back together with a crimp or solder connector. Feel free to power down chassis before dealing with harness.
ALSO as far as soldering don't do it while a charger is connected because they may have different "mains" reference.
Electronic solder with AC power is fine but preferably with nothing else AC connected to chassis.
Use a gas fired solder iron as you see fit. RadioShack rebranded Chinese gas iron
Above iron makes quick soldering simple.
Nice and easy now?
++++ Double check wiring color using a diagram by VIN as all year, model engines, chassis.... are unique.
If that's easier follow harness to cut solenoid wire near crank pulley. That's a fool proof identification by sighting.
Last edited by CaliBenzDriver; 04-22-2024 at 05:08 PM.
Reason: problem with many solutions
2015 SL400 (M276 Turbo), 2014 C350 Sport (M276 NA), 2004 SL500 (M113), 2004 Audi TT225 (BEA)
I would cut the engine wiring harness as a last resort. WRT the clip coming off, you can still try to squeeze the connector and pull it off.
When you tried to reach the plug from above, did you remove the air intake that snaps to the front of the grill? I'm not sure of the layout of your engine bay, but I had to remove the air intake on the passenger side of both my cars.
PFL205.064 with M276.823 (Oil pump solenoid defeated)
Originally Posted by CaliBenzDriver
Okay, best questions get best answers, right?
If i were you I'd cut a single solenoid wire INSIDE THE ECU CONNECTOR COVER up engine crown.
It's a lot easier to work on engine top than near crank pulley location. Leave the solenoid thingy undisturbed. It has a direct homerun to ECU.
If you need dummy load, strip the coil to install it inside the ECU connector cover or nearby where all necessary wires are accessible.
If case you want to back-track then splice wires back together with a crimp or solder connector. Feel free to power down chassis before dealing with harness.
ALSO as far as soldering don't do it while a charger is connected because they may have different "mains" reference.
Electronic solder with AC power is fine but preferably with nothing else AC connected to chassis.
Use a gas fired solder iron as you see fit. RadioShack rebranded Chinese gas iron
Above iron makes quick soldering simple.
Nice and easy now?
++++ Double check wiring color using a diagram by VIN as all year, model engines, chassis.... are unique.
If that's easier follow harness to cut solenoid wire near crank pulley. That's a fool proof identification by sighting.
Thanks so much, I apologize for so many questions and I do indeed appreciate your detailed response, because I am not very technical with things and I hate to mess up something in the ECU (ie. Cut the wrong wire, short circuit, etc.) I will need to do some more thorough research on the ECU wiring amd its diagram if I proceed with this method. Just to clarify things, can you ELI5 to me every step to take when you have time please? Thank you!
Originally Posted by JettaRed
I would cut the engine wiring harness as a last resort. WRT the clip coming off, you can still try to squeeze the connector and pull it off.
When you tried to reach the plug from above, did you remove the air intake that snaps to the front of the grill? I'm not sure of the layout of your engine bay, but I had to remove the air intake on the passenger side of both my cars.
Thank you as well to you forum member JettaRed : ) amd guiding me along the way. That too is a great advice. Yes i did remove the passenger side air intake and yes I believe the layout should be very similar to yours, I do have 4matic though so not sure if it does complicate things?
I tried pulling that connector off from the bottom when the sliding pin/clip fell off and it wouldn't budge. I was worried about causing damage to the actual connector on the crankcase, as I remember reading this: https://mbworld.org/forums/w212-amg/...ml#post8939109
I am still catching up on this entire thread and half way to go.
Am I really worried for nothing? Meaning I can use all my force to try to pull it off? Is there a specific technique to get it off in the case of the missing sliding pin? Or it is all about tilting the connector and pulling?
As my understanding this clip has two locks/latches. One is the sliding pin that slid off (in my hand right now), the other is the grey one on the rear which the sliding pin would had kept it in place, with so little clearance, I had trouble getting my tool to the back there when doing it from the bottom.
From the top, like how forum member JettaRed was able to do it, I did feel the connector but sadly my arm was too short to reach enough to unplug it, from the bottom, the water pump hoses, coolant lines and of course the aftercooler were blocking, the subframe wasn't helping either. Now I even pulled the sliding pin off so the only way to do this is to find a way to get a tool in there again and attack from the back.
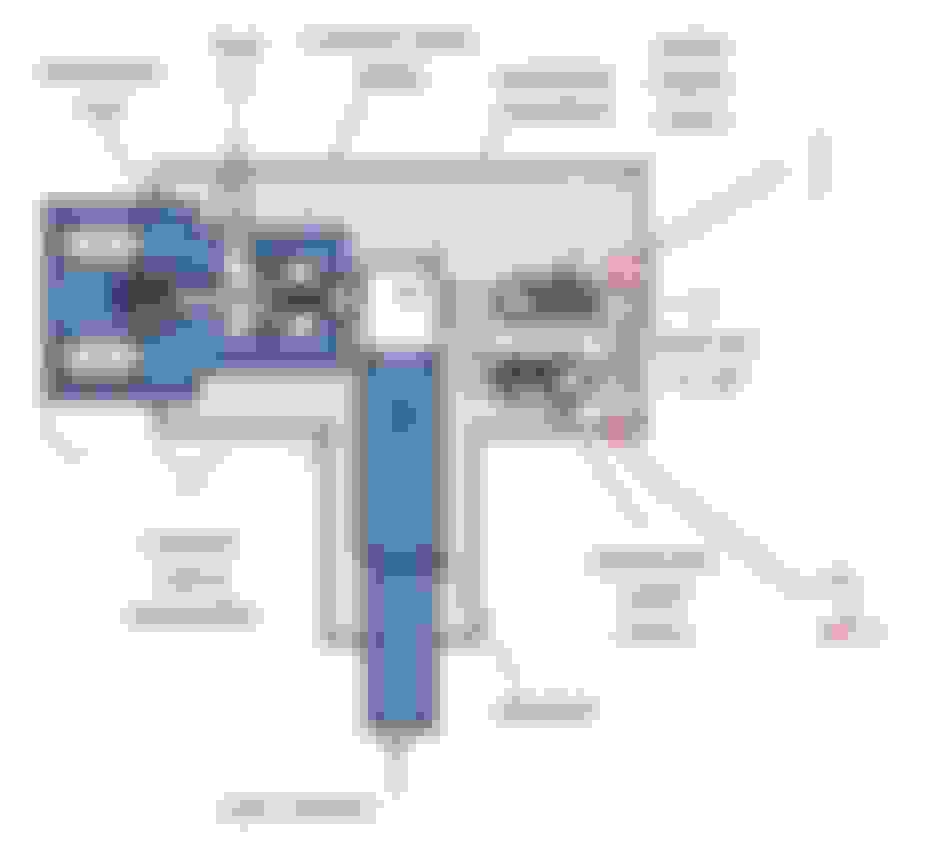
Practice with the very same connector family at your intake manifold absolute pressure sensor ( MAP).
Example is my engine :
The grey clip A is only a secondary LOCK, to prevent Lock B from lifting up and disengaged.
Below are the same connectors family, but one without the grey clip.
.
.
The way to do this with ease if the connector is dirty, is first to blow clean the connector. You can also use contact cleaner to drive debris away.
Second is to always remember to NOT PULL connector when pushing down black plastic B.
When you pull connector out, the lip of black plastic B get stuck at its notch.
So push in and press black plastic B, when it has lifted out out of its notch at sensor , only then you can pull out the connector.
Since you have the grey plastic A, when it has unlock itself by popping out 3mm backwards, pressing down Gray A is also pressing down Black B.
But Grey A must first move backward aka unlocked.
Practice at the easy MAP connector first.
This connector is Hicshmann brand. MLK1.2 variant. MB uses plenty of it.
PFL205.064 with M276.823 (Oil pump solenoid defeated)
Originally Posted by S-Prihadi
Practice with the very same connector family at your intake manifold absolute pressure sensor ( MAP).
Example is my engine :
The grey clip A is only a secondary LOCK, to prevent Lock B from lifting up and disengaged.
Below are the same connectors family, but one without the grey clip.
.
.
The way to do this with ease if the connector is dirty, is first to blow clean the connector. You can also use contact cleaner to drive debris away.
Second is to always remember to NOT PULL connector when pushing down black plastic B.
When you pull connector out, the lip of black plastic B get stuck at its notch.
So push in and press black plastic B, when it has lifted out out of its notch at sensor , only then you can pull out the connector.
Since you have the grey plastic A, when it has unlock itself by popping out 3mm backwards, pressing down Gray A is also pressing down Black B.
But Grey A must first move backward aka unlocked.
Practice at the easy MAP connector first.
This connector is Hicshmann brand. MLK1.2 variant. MB uses plenty of it.
PFL205.064 with M276.823 (Oil pump solenoid defeated)
Originally Posted by thesaintusa
That is an incredibly clear and concise video.
Nice.
Fully agree thanks again for this video, will try again : ) Main problem is the clearance and me figuring out how do I get my hand and the tool inside to both push down on the grey clip (I thought it was a white clip, my eyes deceived me) and then push from behind to release, given that the grey clip is already off the connector now I need to some how push from the back or lift the rear clip.
again really appreciate the video, concise and helpful!
I have much respect for several on here like yourself and @S-Prihadi . He does a lot of great ground work, and many of his conclusions are proper. Sometimes we can over think this stuff when most of the time it's simple and physics can't be re-invented or changed.
The oil pressure measured depends on the quality and calibration of the gauge. Not knocking yours, but in my experience I've seen Snapon gauges vary as much as 10 psi brand new. That, coupled with different oil viscosity, the more miles oil has the lower the viscosity, plus ambient temps, it all plays a part in having a difference in oil pressures.
All oil pumps are linear, because they are mechanically driven by the engine. The pressure relief will also vary, albeit not by but a couple psi. mileage, region, and oil change intervals, spring tension of the pressure relief valve, they play a roll in observed pressures. It's why there is a test for the pressure spring to ensure it remains in the optimal range so pressure is not compromised. I wouldn't worry too much unless your gauge is showing below Xentry oil pressure test parameters, even then I'd acquire a precision gauge and retest. I'm reading in Xentry max pressure should be between 50 and 70 psi.
Also, I think you hit the nail on the head, many somehow think unplugging creates more oil pressure, it's not physically possible. The pump is what creates the pressure, the solenoid is on a port from the main pump gear, it diverts some of that pressure to the oil pan, when it closes pump pressure is resumed.
pumps don�t make pressure, restriction makes pressure. Pumps move volume.
solenoid open, less resistance because it�s dumping back to tank, equals less pressure.
however in this scenario, at idle it isn�t much pressure loss.
vane and gear pumps gain volume with RPM, the rise in volume will create more pressure due to more resistance in the system. This is where a relief comes into play to ensure there isn�t too much pressure.
oil squirters are never a bad idea in a rotating assembly.
This system is purely designed for fuel efficiency.
pumps don�t make pressure, restriction makes pressure. Pumps move volume.
That is a major statement. It is not the first time you make an emphasis on such a difference. It is very different from how I learned at school, but since I do not work pumps only these days perhaps vocabulary has changed. It is also different from what I am used to hearing from engineers who design (not select), and manufacture (not install) pumps for business.
That is a major statement. It is not the first time you make an emphasis on such a difference. It is very different from how I learned at school, but since I do not work pumps only these days
Maybe I am old but I actually learned pumps the same way as his statement. A pump of air into a non-enclosed chamber is simply a fan...pressure created by atmosphere. A pump into a closed loop has far more pressure than into an open hose.....
Maybe I am old but I actually learned pumps the same way as his statement. A pump of air into a non-enclosed chamber is simply a fan...pressure created by atmosphere. A pump into a closed loop has far more pressure than into an open hose.....
It is exactly as that. A pump will move say oil all day long on day a 3�outlet, to a system relief that has a pairing setting for max or a pressure regulating valve based on requirement for control of pressure. This is an over simplified version.
basic point is that pumps don�t marke pressure. It�s the restrictions. That make pressure.
for example, I hade mechs on one of my ship change liner wash Wands in a system that was 1/4� tubing water pumps. They increased the tubing to 3/8� to try to get more cooling. However when they went with the larger pipe, velocity slowed and pressure dropped. So it wasn�t able to do its job any more. So balance is important.. my point is that in this scenario that the pump and nothing else changed other than the restriction.
Hey Guys
Yesterday I was unplugging the oil pump solenoid on my 2015 CLS 500 4-Matic with 9G-Tronic and M278.
After that, the engine was cold and I was driving for a bigger tour. What I can tell you is, that the car is much more alive, it revs better, the shifts are smoother at cold Engine and cold Transm.
I will keep this mod anyway and test it. But I can say, that oil pressure is for me the importest thing on healthy engines.
Thank you so much for these inputs here and from the first post and the Video from the guy with the red E63 (Exotic Car DIY).
Thanks for the link. That is the set of tools I have, not the exact one, mines have a thinner handle, the one you linked I also have half a set and the handle makes it impossible to fit through due to clearance. That said, despite the thinner handle one I have, it didn't work out for me.
PFL205.064 with M276.823 (Oil pump solenoid defeated)
Originally Posted by slobo
Hey Guys
Yesterday I was unplugging the oil pump solenoid on my 2015 CLS 500 4-Matic with 9G-Tronic and M278.
After that, the engine was cold and I was driving for a bigger tour. What I can tell you is, that the car is much more alive, it revs better, the shifts are smoother at cold Engine and cold Transm.
I will keep this mod anyway and test it. But I can say, that oil pressure is for me the importest thing on healthy engines.
Thank you so much for these inputs here and from the first post and the Video from the guy with the red E63 (Exotic Car DIY).
Best regards from Switzerland
Slobo
Excellent, glad to hear that the mod is treating you and the car well, thanks for posting your impressions.
Hey Guys
Yesterday I was unplugging the oil pump solenoid on my 2015 CLS 500 4-Matic with 9G-Tronic and M278.
After that, the engine was cold and I was driving for a bigger tour. What I can tell you is, that the car is much more alive, it revs better, the shifts are smoother at cold Engine and cold Transmission.
I will keep this mod anyway and test it. But I can say, that oil pressure is for me the most important thing on healthy engines.
Thank you so much for these inputs here and from the first post and the Video from the guy with the red E63 (Exotic Car DIY).
Best regards from Switzerland
Slobo
That is a very interesting feedback with an M278.
You have the pulse of how well your engine + tranny are running.
The way things have improved already is a good sign your ECU benefits from normal oil pressure.
Right now your pistons rings are decarboning burned oil residues to then seal with fresh oil.
This will help balance your cylinders little by little simply by driving
You're about to enjoy precise mixtures and Gear 1+2+3 gradually transforming slow pick-ups into a hummingbird from 900.RPM.
At some point the engine idle music will begin to switch over to amazingly reactive GDI injection. All by itself when the conditions are stacked right.
Enjoy your journey step by step !
++++ Canceling chaos ++++
I realize this is quite unusual for engines to self-improve to that extent. Normally performance goes downhill with busy repairs focused on consequences.
It is genuine relief to know that experimenters may now have a winning hand for normal longevity.
At this point we see proof that dry-pistons turbos do benefit from normal oiling.
Last edited by CaliBenzDriver; 04-24-2024 at 04:06 PM.
Reason: dry-piston turbos
Hi. I have also M278 engined car with M157 turbos etc. Today the car was on custom dyno session and I think that mod did help the engine also. Tuner did get out 707hp and 1178nm from engine.
I did bring this topic to the CLS coupe forum (In my project topic) to let the people know what this mod can be done to your cars. Thank you all the pioneers here and all that have wrote here. S-Prihadi and Cali to mention a few! I have learn a lot! I did unplug also and I can tell that my car under hood temps drop really much (even garage temperature did go up a lot when I park the car there and pop the hood open.) Now its crazy when that don't happen. I think the oil smell is gone too. Also car runs smoother and engine noise when idle is music to my ears.
I hope the smell of oil from the engine compartment of my car goes away soon, it has always annoyed me a lot.
I used to have that nasty burnt oil smell in the garage after a spirited run, Italian tuneup , it went away as soon as I changed to Motul 5W40 and more frequent oil change intervals -> 5K miles. Was it the weight, the brand, or the OCI? I honestly do not know, but I am too busy to figure it out at the moment. After 3 oil changes the smell has not come back not even once.
With the mod, the engine seems cooler in the garage as well. Quieter, and as you clearly stated -> ALIVE when taking off from the traffic light.
Perhaps you are just one "oil change" away from getting rid of the nasty smell.
Im not sure is this all ready mention here, but tuner can take that silent code off after disconnecting the solenoid. My tuner did this today to my car. And also he did make sure that silent code is not trying to give alert also for some other issue, not only the solenoid. And it didn't. So now no code for me.
PFL205.064 with M276.823 (Oil pump solenoid defeated)
Originally Posted by PekkaH
Hi. I have also M278 engined car with M157 turbos etc. Today the car was on custom dyno session and I think that mod did help the engine also. Tuner did get out 707hp and 1178nm from engine.
I did bring this topic to the CLS coupe forum (In my project topic) to let the people know what this mod can be done to your cars. Thank you all the pioneers here and all that have wrote here. S-Prihadi and Cali to mention a few! I have learn a lot! I did unplug also and I can tell that my car under hood temps drop really much (even garage temperature did go up a lot when I park the car there and pop the hood open.) Now its crazy when that don't happen. I think the oil smell is gone too. Also car runs smoother and engine noise when idle is music to my ears.
That is awesome : )
Originally Posted by PekkaH
Im not sure is this all ready mention here, but tuner can take that silent code off after disconnecting the solenoid. My tuner did this today to my car. And also he did make sure that silent code is not trying to give alert also for some other issue, not only the solenoid. And it didn't. So now no code for me.
That sounds magical, "Now you see me now you don't"


 04-22-2024 | 02:41 PM