


View Poll Results: What color calipers?
Gold


15
7.18%
Red


66
31.58%
White


5
2.39%
Gunmetal


20
9.57%
Silver


60
28.71%
Black


43
20.57%
Voters: 209. You may not vote on this poll
BRAKE Pad, Rotors, & Calipers Discussion Thread (OEM, aftermarket, etc...)

Junior Member
Joined: Mar 2006
Posts: 70
Likes: 0
From: Boston
2006 C280 4Matic
You know what would be handy??? A sticky on how to change pads, rotors, & sensor. I know there are threads on this already, but a step by step, with part numbers, place of purchase, price, etc. A true tutorial.
Just a thought.
Just a thought.
Administrator


Joined: Sep 2002
Posts: 15,769
Likes: 37
From: www.Traben-Trarbach.de
MPG+ ROLFCOPTER

MBWorld Fanatic!
Joined: Nov 2001
Posts: 1,480
Likes: 1
From: Central NJ
C230K Coupe/Orion/C4/C5/CD/AMG Spoiler/V60/TeleAid, 2 MGB's
here ya go....sedans are very similar
Contact Jerry at ForMyMercedes.com for the parts
https://mbworld.org/forums/c-class-w203/101893-replacing-brakes-2002-c230-sportscoupe.html
Oh, yeah...by the way....this is in a sticky at the top of the site called Aftermarket & OEM Modifications DIY/FAQ
Contact Jerry at ForMyMercedes.com for the parts
https://mbworld.org/forums/c-class-w203/101893-replacing-brakes-2002-c230-sportscoupe.html
Oh, yeah...by the way....this is in a sticky at the top of the site called Aftermarket & OEM Modifications DIY/FAQ
Last edited by Rick; Oct 19, 2006 at 06:04 PM.
Junior Member
Joined: Mar 2006
Posts: 70
Likes: 0
From: Boston
2006 C280 4Matic
That's a great writup.
Again, I think a permanent sticky of all the brake jobs would be helpful. People could list the different types of pads & rotors they've used plus where they bought them and the price in one handy place.
Brakes are probably the one maintenance item that many people can do themselves (they just don't know how) and can save a boatload of money versus the dealer. I mean, the dealer charges what, about a grand to put in new pads, replace the sensors and turn the rotors? It looks like you can do it yourself with aftermarket parts (and probably superior parts, at least as far as dust is concerned) for under $500.

Member
Joined: May 2006
Posts: 217
Likes: 0
From: boston
2003 c240
now i heard through a brake company that if all you want out of brake pads is less dust then your best off with a factory pad becuse it has some type of organic mixture.... all the other aftermarket pads are good for performance quiter and so on.... anyone know if this is true?
MBWorld Fanatic!
Joined: Nov 2001
Posts: 1,480
Likes: 1
From: Central NJ
C230K Coupe/Orion/C4/C5/CD/AMG Spoiler/V60/TeleAid, 2 MGB's
Nope...not true at all.
Sure, the added benefits of the Porterfield's are quieter operation, better stops, less fade and longer life. But I bought them because they are virtually dust free compared to OEM.
Look at your front wheels after two weeks without a wash. I'd bet you a cold, frosty mug of ale that mine are cleaner.
MB World Stories
The Best of Mercedes & AMG

6 Mercedes Models That Did NOT Age Well (But Are Somehow Still Cool)
Verdad Gallardo
Manual Mercedes? 6 Times Sindelfingen Let Drivers Have All The Fun
Verdad Gallardo
Mercedes SLR McLaren 722 S Is Extremely Rare Example Modified by McLaren
Verdad Gallardo
8 Classic Boxy Mercedes Designs That Have Aged Like Fine Wine
Verdad Gallardo
Flawlessly Restored Mercedes 190E Evo II Heads to Auction
Verdad Gallardo
Electric Mercedes C-Class Unveiled: 11 Things You Need to Know
Verdad Gallardo
Mercedes EQS Gets A Major Update: Everything You Need to Know
Verdad Gallardo
5 Underrated Mercedes-Benz Models That Don't Get the Love They Deserve
Verdad Gallardo
Mercedes 300D Has Pushed Well Past 1 Million Miles and It Ain't Stopping
Verdad GallardoMBWorld Fanatic!
Joined: Nov 2001
Posts: 6,211
Likes: 2
From: Laguna Niguel, CA
A typical dealer marks up parts about 20% over list, then you get 15% off, I guess that's a good deal, haha. If I'm lucky, I can talk them into discounting the parts to list price and that doesn't happen all the time. On the other hand they do give me free car washes.
Anyhooo, FWIW, list price for 2003 C240 MB pads is $73, my dealer charges $88 when I asked, Duval's online price is $54.75, Vivid's 15% off price ???
Anyhooo, FWIW, list price for 2003 C240 MB pads is $73, my dealer charges $88 when I asked, Duval's online price is $54.75, Vivid's 15% off price ???

Super Member
Joined: Nov 2005
Posts: 673
Likes: 0
From: SoCal
F10
do we need to replace the sensor everytime we replace pads? what if the sensor hasn't gone off yet, can we re-use it? I know on some bmw cars you don't need to replace the sensor if it hasn't gone off by the time you replace the pads.

Member
Joined: Apr 2006
Posts: 167
Likes: 0
PepBoys DURALAST Brake Pads - Hole for Sensor?
I just ordered Autozone pads (Duralast - MKD872) for my C230 after seeing some posts recommending them - https://mbworld.org/forums/showthrea...light=duralast ; https://mbworld.org/forums/showthrea...one+brake+pads. This is the first time I've changed the pads myself so I don't personally know where I should find the hole/fitting for the sensor. After opening the box and taking a look at them I couldn't find a hole in the pad for the sensor. However, there is like a metal tab extended from middle edge of the pad.
For anybody who has experience with these pads, did your's have the hole in the pads for the sensor which I don't have, or is it the metal tab I mentioned above?
(I know I can find locate them from my old pads but I want the right pads before I start disassembling anything )
)
I'll try to get a picture up shortly...
Thanks for your help.
For anybody who has experience with these pads, did your's have the hole in the pads for the sensor which I don't have, or is it the metal tab I mentioned above?
(I know I can find locate them from my old pads but I want the right pads before I start disassembling anything
)I'll try to get a picture up shortly...
Thanks for your help.
Last edited by govertime; Oct 20, 2006 at 07:06 AM.

MBWorld Fanatic!

Joined: Jul 2005
Posts: 3,221
Likes: 11
From: Sydney, Australia
W203 slightly modified
The inside pad wears out at a different rate to the outside pad. That is the 80 / 50 rule for pad wear. Hence the alternate sensor locations relating to physical position.
Last edited by benzmodz; Oct 20, 2006 at 07:51 AM.
Admin Alumni
Joined: Nov 2001
Posts: 8,143
Likes: 19
See Garage
There must be two spacings. One spacing is closer to the metal and one spacing is farther out into the pads themselves. This is to satisfy two possible sensor configurations (not on the same car).
The inside pad wears out at a different rate to the outside pad. That is the 80 / 50 rule for pad wear. Hence the alternate sensor locations relating to physical position.
The inside pad wears out at a different rate to the outside pad. That is the 80 / 50 rule for pad wear. Hence the alternate sensor locations relating to physical position.
MBWorld Fanatic!
Joined: Jul 2005
Posts: 3,221
Likes: 11
From: Sydney, Australia
W203 slightly modified
Some cars take the outer reading, some cars take the inner. Some cars take only front readings and others take one reading front and one rear. This is only for W203. I bet there are even more variants I am not aware of.
Member
Joined: Apr 2006
Posts: 167
Likes: 0
Ok, I just snapped a few (blurry) pictures of the pad.
Arrow 1 shows a small hole on the side which is on 2 of 4 pads in the set.

Arrow 2 is the medal tab I referred to in the previous post.
Arrow 3 is where I thought the hole would be be (drilled through the pad from the back to the front)

Is arrow 1 the hole which holds the sensor? It appears it is drilled into the edge of the pad, parallel to the surface of the pad. Orginally I imagined it as a hole which goes through the the back to the front of the pad surface.
Senior Member
Joined: Mar 2006
Posts: 274
Likes: 0
From: rochester, MI
2002 C230 K, 6 speed
The sensor goes in hole 1. It would be fixed and attached to the pad using hole 2 as well since that is where thw plastic part of the sensor goes into.
It is not hard at all. As soon as you take the caliper off the disc and then the pads off the calliper it will all make sense to you. Make shure you depress the calliper pistons before you take them of. Use a screwdriver. Have fun.
It is not hard at all. As soon as you take the caliper off the disc and then the pads off the calliper it will all make sense to you. Make shure you depress the calliper pistons before you take them of. Use a screwdriver. Have fun.
Super Member
Joined: Jul 2006
Posts: 731
Likes: 0
From: Markham, Canada
C320 Coupe
stay away from the dealership, get aftermarket brake pad and have someone else install for you. It's simple work, and the dealership can't void ur warranty becuz u have someone change ur brake pad.
I use Porterfield brake pad, very nice, brake dust is less than the back wheel
I use Porterfield brake pad, very nice, brake dust is less than the back wheel
Admin Alumni
Joined: Nov 2001
Posts: 8,143
Likes: 19
See Garage
Govertime, go buy the sensors and it will all become clear. As cla 1000 notes, the sensor goes in the hole noted by your arrow #1. So, it lays parallel to the pad surface. The metal bits you show as arrow #2 are the mounting clips that hold the sensor in place.
Also, read the detailled instrictions. The pads (at least the ones I bought) are unidirectional. The pads with the sensor holes are the inboard pads. The other two pads (without sensor holes) are the outer ones.
Also, read the detailled instrictions. The pads (at least the ones I bought) are unidirectional. The pads with the sensor holes are the inboard pads. The other two pads (without sensor holes) are the outer ones.
Admin Alumni
Joined: Nov 2001
Posts: 8,143
Likes: 19
See Garage
I don't see any reason why you can't reuse the sensor, as long as it hasn't been exposed to the wear surface.
MBWorld Fanatic!
Joined: Nov 2001
Posts: 6,211
Likes: 2
From: Laguna Niguel, CA
Member
Joined: Apr 2006
Posts: 167
Likes: 0
Success
Thanks guys, it all made sense once I removed the old ones and had the sensor in my hand.
Did the front and back. The back pads, in case any body in the future references this, are held entiry in place by the spring clip. So once the pin is tapped out the smaller square pads will slide right out - no need to remove any bolts or anything. Its real easy.
Oh yeah, unlike the DIY Brake Pad instructions written for an 02 C230, the bolts to remove the front caliper require a 18mm socket not 17mm.
Super Member
Joined: May 2004
Posts: 911
Likes: 1
From: Rhode Island
Debadged 6-Speed '05 C320 Sports Coupe
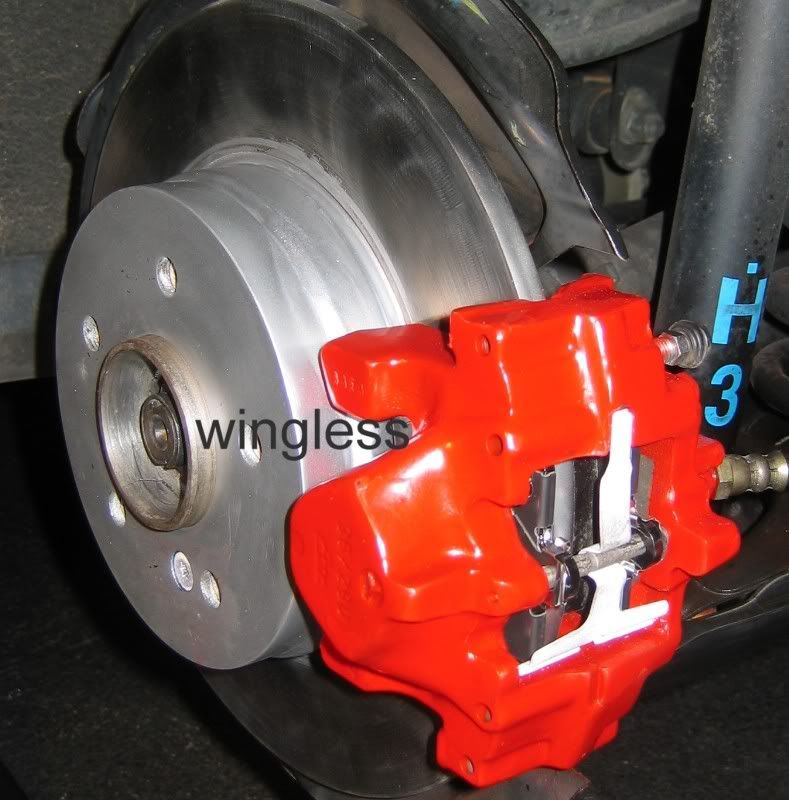
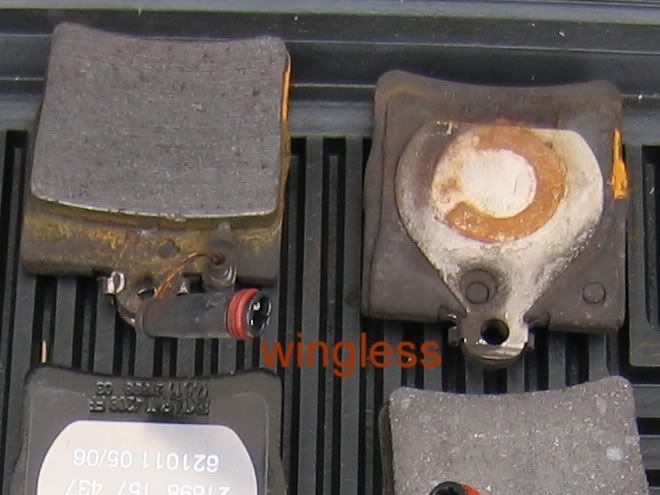
Rear Brake Job - Caliper / Rotor Refinishing
Well, I finally got to swapping the rear brakes. It was a nice day today.
The information is presented as reference only. This information is not an instruction guide.
The vehicle has about 76k miles. There�s probably another 5k on the pads, more if winter weren�t coming.
The polishing was with a right angle die grinder and the woven mesh pads.
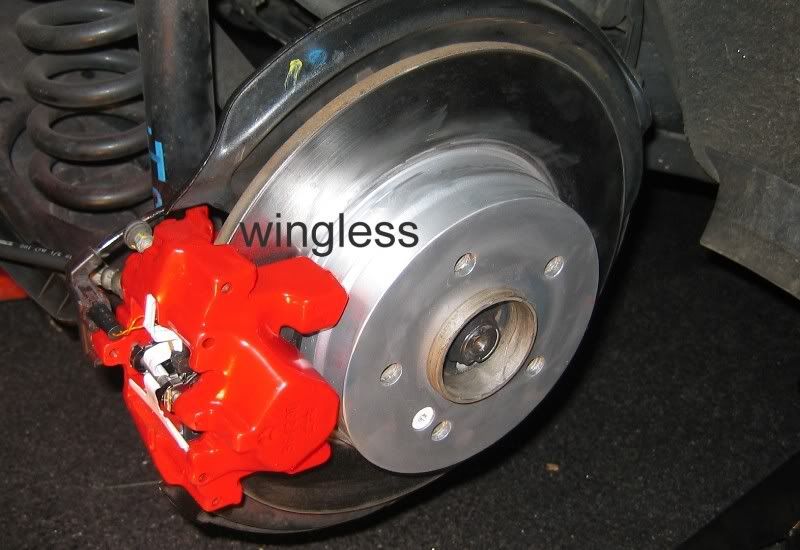
Removing the rotors was a pain in the butt. Using a propane torch, I heated the drum, but not the hub. It wasn�t going anywhere. Then I shot the joint with WD-40 and heated the drum again. It popped right off. I got identical results on both sides.
Do not polish either side of the machined surfaces where the caliper is bolted to the knuckle.
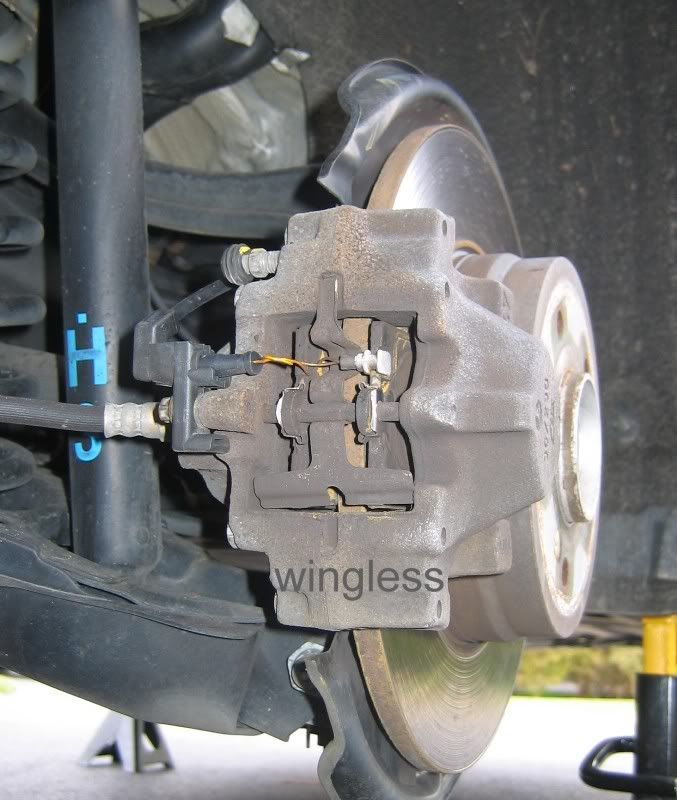
The caliper remained connected. Do not allow it to hang by the hose. The caliper was not split.
The GiroDisc caliper spreader from Zeckhausen Racing is an excellent tool. It is very easy to bottom-out the pistons.
The hubs were painted without masking the rotor. I just buffed the paint off the rotor after drying.
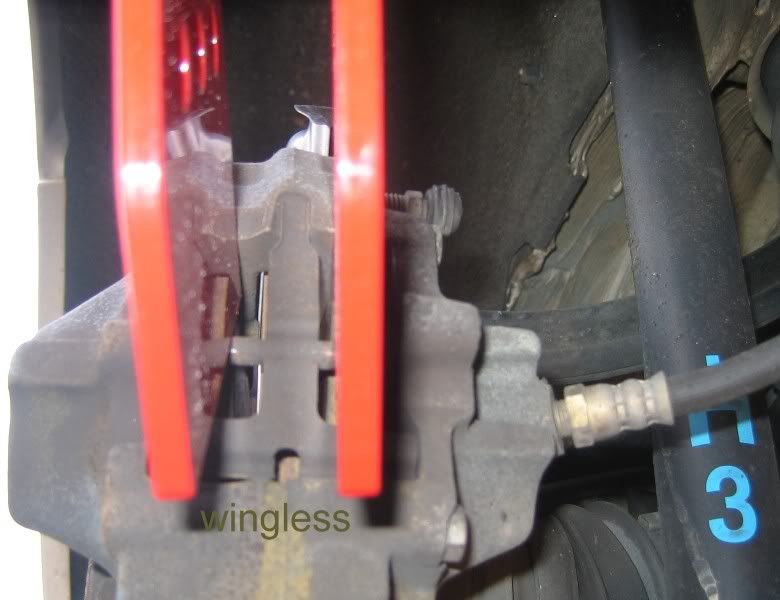
All bolts got Loktite blue. The pin got anti-seize.


The information is presented as reference only. This information is not an instruction guide.
The vehicle has about 76k miles. There�s probably another 5k on the pads, more if winter weren�t coming.
The polishing was with a right angle die grinder and the woven mesh pads.
Removing the rotors was a pain in the butt. Using a propane torch, I heated the drum, but not the hub. It wasn�t going anywhere. Then I shot the joint with WD-40 and heated the drum again. It popped right off. I got identical results on both sides.
Do not polish either side of the machined surfaces where the caliper is bolted to the knuckle.
The caliper remained connected. Do not allow it to hang by the hose. The caliper was not split.
The GiroDisc caliper spreader from Zeckhausen Racing is an excellent tool. It is very easy to bottom-out the pistons.
The hubs were painted without masking the rotor. I just buffed the paint off the rotor after drying.
All bolts got Loktite blue. The pin got anti-seize.


