


DIY: M112 Spark Plug R&R

MBWorld Fanatic!


Joined: Nov 2001
Posts: 5,851
Likes: 196
From: Huntington Beach, Ca.
'17 Jaguar XF
http://www.harborfreight.com/ tool # 37909-3VGA
Super Member
Joined: Mar 2006
Posts: 545
Likes: 0
From: Northeast
e300d
OK, I'll order those. (I went to Sears Tool store this afternoon and they didn't have anything long enough, but did have a set of the bent jaw needle nose pliers).
I've ordered from HF before and need to figure out how they ship stuff. I've ordered from them in the past and they seem to use Parcel Post which is a friggin' disaster to the East Coast...
I've ordered from HF before and need to figure out how they ship stuff. I've ordered from them in the past and they seem to use Parcel Post which is a friggin' disaster to the East Coast...
Moderator Alumni
Joined: Apr 2006
Posts: 3,255
Likes: 22
From: Seattle
w203 m112
Thanks again to splinter for the info....
I recently changed my spark plugs and I can feel the difference at idle - my car's idle is MUCH more stable (the RPMs do not change at all). Furthermore, I have definitely been getting gas mileage similar to when I first got the car. This task is well worth it!
I did not use any of the tools listed in this thread, but I did use a 17mm deep socket wrench to remove and reinstall the wires. As for the plugs, they just took some time and I can see how the tool that splinter posted would be very beneficial for people w/ larger hands working on the rear plugs.
MBWorld Fanatic!
Joined: Apr 2007
Posts: 6,171
Likes: 16
300E a couple 1994 w124wagon E320 Wagon/,1971MGB Track/Rally, MG Midget Autocross ,2000 E320 wagon.
TruTaing
Just took part in a tutorial Spark plug session we had last week.The tool I had him use is the same one the dealers use,no damage to the wires and simple leverage to get the boot off the plug.17mm boot removal tool.
pm me for tips,those pliers make the job so much harder and on the C320 Getting into the boot TruTaing would still be trying to finish the job
m112 and m113 non sc engines use NGK 7090 plugs oe specs and only about $2.75 each.
ohlord
one more addition .Never use anti seize on the new plugs they are plated at the factory and no anti seize is required anymore.
Last edited by ohlord; May 30, 2008 at 07:17 PM.

Newbie
Joined: Jun 2007
Posts: 15
Likes: 0
I changed my spark plugs today in my 02 C320 and ran into some problems. The check engine light came on and a malfunction saying ESP not available. The engine seems to be slightly vibrating at idle and when I get close there seems to be some sort of burnt smell. Anyone have any ideas what I could have done wrong? I followed the directions step by step and all seemed to go well.
MB World Stories
The Best of Mercedes & AMG

Manual Mercedes? 6 Times Sindelfingen Let Drivers Have All The Fun
Verdad Gallardo
Mercedes SLR McLaren 722 S Is Extremely Rare Example Modified by McLaren
Verdad Gallardo
8 Classic Boxy Mercedes Designs That Have Aged Like Fine Wine
Verdad Gallardo
Flawlessly Restored Mercedes 190E Evo II Heads to Auction
Verdad Gallardo
Electric Mercedes C-Class Unveiled: 11 Things You Need to Know
Verdad Gallardo
Mercedes EQS Gets A Major Update: Everything You Need to Know
Verdad Gallardo
5 Underrated Mercedes-Benz Models That Don't Get the Love They Deserve
Verdad Gallardo
Mercedes 300D Has Pushed Well Past 1 Million Miles and It Ain't Stopping
Verdad Gallardo
10 Most Reliable Mercedes-Benz Models You Can Buy Used
Verdad Gallardo
Member
Joined: Nov 2008
Posts: 80
Likes: 0
From: Bay Area
'01 c320
Just newbie questions.
1. Can C320 2001 using Iridium IX for the spark plugs replacement? Or I better to stick with the original one?
2. Do I need to change the sensor when I change the plugs?
Thanks
1. Can C320 2001 using Iridium IX for the spark plugs replacement? Or I better to stick with the original one?
2. Do I need to change the sensor when I change the plugs?
Thanks
MBWorld Fanatic!
Joined: Nov 2001
Posts: 5,851
Likes: 196
From: Huntington Beach, Ca.
'17 Jaguar XF
No sensors need replacement with a plug change.
Super Moderator

Joined: Jun 2008
Posts: 19,942
Likes: 192
From: Llandudno, Cape Town, South Africa
late 2009 CLK 350 Coupe Elegance, '65 Jaguar S Type wires


Newbie
Joined: Nov 2008
Posts: 2
Likes: 0
c320 coupe 2003
The C240/320 are fitted with twelve (two per cylinder) of either:
Bosch F 8 DPER,
Beru 14 FGH 8 DPUR X 2, or
NGK IFR 5 D 10
MB part number is 004 159 94 03
The C32 has NGK IFR 6 D 10 as original equipment.
MB part number is 003 159 97 03
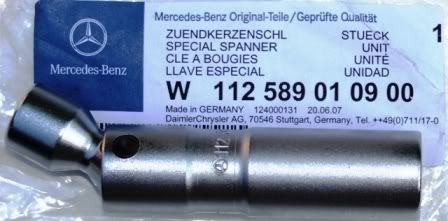
MB�s spark plug socket, 112 589 01 09 00, helps to make the task easier.
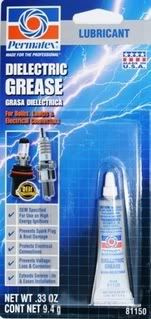
Have available some anti-seize lubricant and dielectric grease.

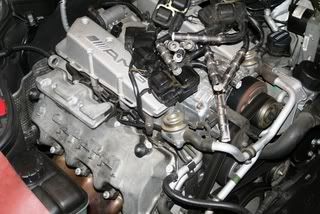
Raise the hood to its full vertical position. Remove the engine cover and air filter assembly...https://mbworld.org/forums/showthread.php?p=1227088
Remove the coil packs. Each is secured with a single #27 TORX fastener.
[
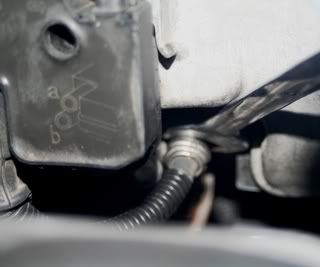
Use an 18mm open-end wrench on the spark plug wire connector, leveraged against the cam cover, to pull it free of the plug. It helps to reduce the force required by slightly rotating the connector before removing it. Do not place any undue stress on either the sparkplug wires, or the coil pack wires themselves.
Lay them on the intake manifold.
The plugs are now as accessible as they will ever be. To get them in and out is done mostly by feel, rather than sight.
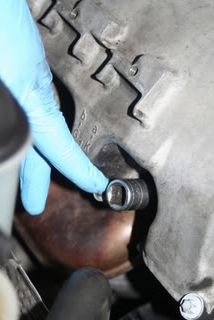
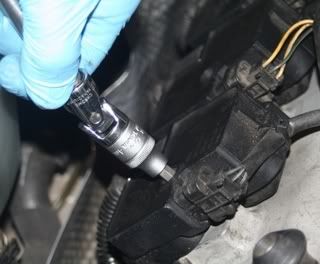
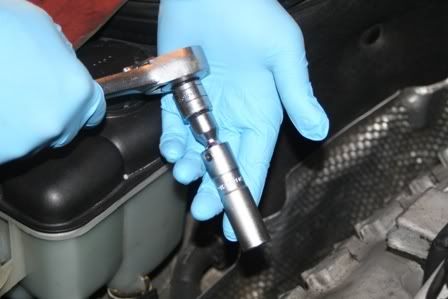
Here's the ratchet, extension, and socket combination used to reach all twelve plugs. YMMV. The plugs nearest the firewall necessitated fitting the socket to the plug first, and then connecting the ratchet.
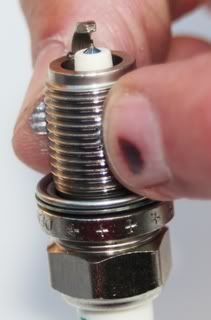
Use compressed air to blow any residual debris from each plug recess. Remove the old plugs.
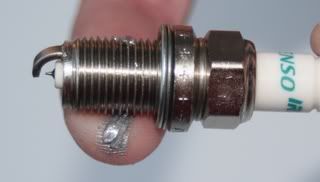
Prepare your new plugs for installation by first verifying their gap. Specification is 1.0 mm/.039 inch. While some may argue with the anti-seize step, I�ve used it successfully for three decades. The rationale is merely to lubricate the respective threads. Because the steel plug is threading into aluminum, it�s obvious which is the stronger of the two. No reason to turn a pleasant plug swap into a Heli-coil repair job.
Rub a very modest portion into the threads. Keep it well away from the firing tip so as not to cause misfires. The washer area of the plug should remain uncoated as well, so that it can properly conduct away its heat, thereby helping to avoid pre-ignition.
Nevermind about the 'nail!
Place a dollop of dielectric grease on the tip to improve conductivity, and help inhibit corrosion.
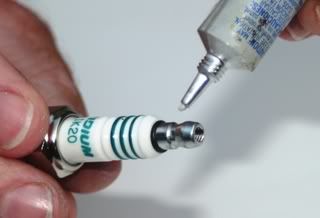
Thread the new plugs initially by hand to avoid any chance of cross-threading. Because you�ll be compressing a new washer, just get them fully seated on the first attempt. Torque them to 15-22 ft.lbs./20-30 Nm. It will require ~� to � additional turn to yield the proper reading.
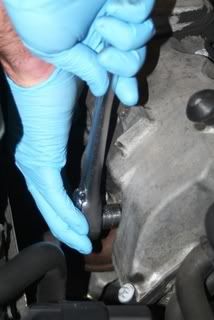
I like to get them snug, then go back to gently sneak up on the correct torque. Go around on all twelve again to establish their final torque and verify your work.
Bosch F 8 DPER,
Beru 14 FGH 8 DPUR X 2, or
NGK IFR 5 D 10
MB part number is 004 159 94 03
The C32 has NGK IFR 6 D 10 as original equipment.
MB part number is 003 159 97 03
MB�s spark plug socket, 112 589 01 09 00, helps to make the task easier.
Have available some anti-seize lubricant and dielectric grease.
Raise the hood to its full vertical position. Remove the engine cover and air filter assembly...https://mbworld.org/forums/showthread.php?p=1227088
Remove the coil packs. Each is secured with a single #27 TORX fastener.
[
Use an 18mm open-end wrench on the spark plug wire connector, leveraged against the cam cover, to pull it free of the plug. It helps to reduce the force required by slightly rotating the connector before removing it. Do not place any undue stress on either the sparkplug wires, or the coil pack wires themselves.
Lay them on the intake manifold.
The plugs are now as accessible as they will ever be. To get them in and out is done mostly by feel, rather than sight.
Here's the ratchet, extension, and socket combination used to reach all twelve plugs. YMMV. The plugs nearest the firewall necessitated fitting the socket to the plug first, and then connecting the ratchet.
Use compressed air to blow any residual debris from each plug recess. Remove the old plugs.
Prepare your new plugs for installation by first verifying their gap. Specification is 1.0 mm/.039 inch. While some may argue with the anti-seize step, I�ve used it successfully for three decades. The rationale is merely to lubricate the respective threads. Because the steel plug is threading into aluminum, it�s obvious which is the stronger of the two. No reason to turn a pleasant plug swap into a Heli-coil repair job.
Rub a very modest portion into the threads. Keep it well away from the firing tip so as not to cause misfires. The washer area of the plug should remain uncoated as well, so that it can properly conduct away its heat, thereby helping to avoid pre-ignition.
Nevermind about the 'nail!
Place a dollop of dielectric grease on the tip to improve conductivity, and help inhibit corrosion.
Thread the new plugs initially by hand to avoid any chance of cross-threading. Because you�ll be compressing a new washer, just get them fully seated on the first attempt. Torque them to 15-22 ft.lbs./20-30 Nm. It will require ~� to � additional turn to yield the proper reading.
I like to get them snug, then go back to gently sneak up on the correct torque. Go around on all twelve again to establish their final torque and verify your work.
great post
thank you !


Junior Member
Joined: Mar 2010
Posts: 37
Likes: 0
2008 VW Rabbit
Hi,
As a newbie here and a potential MB buyer, the last thing I want to do is come across as a smart a$$, but I must comment on the use of dielectric grease to "improve conductivity." It won't - it's completely non-conductive. I've used it when changing spark plugs for years, but on the boots (spreading it around with a thin screwdriver), not the plugs, to keep them from sticking to the plugs and to make removing the boots the next time easier.
I'm also very careful about anti-seize on plug threads, as the OP mentioned, it's controversial. The problem arises when torquing steel threads into an aluminum head. Torque specs may be exceeded dangerously when lubricated, causing damage to the aluminum head. It doesn't sound like you can get a torque wrench down there, so it probably doesn't matter in this case, but I understand Bosch plugs are pre-coated with anti-seize and anti-corrosion so probably don't need it. (FWIW, anyway; I've never used Bosch plugs in the other cars I've owned.)
Again, I don't wish to cause offense, and I certainly don't know everything there is to know about DIY car repairs.
Thanks,
MBWorld Fanatic!


Joined: Feb 2006
Posts: 6,213
Likes: 8
LET C32 2002
Hi,
As a newbie here and a potential MB buyer, the last thing I want to do is come across as a smart a$$, but I must comment on the use of dielectric grease to "improve conductivity." It won't - it's completely non-conductive. I've used it when changing spark plugs for years, but on the boots (spreading it around with a thin screwdriver), not the plugs, to keep them from sticking to the plugs and to make removing the boots the next time easier.
I'm also very careful about anti-seize on plug threads, as the OP mentioned, it's controversial. The problem arises when torquing steel threads into an aluminum head. Torque specs may be exceeded dangerously when lubricated, causing damage to the aluminum head. It doesn't sound like you can get a torque wrench down there, so it probably doesn't matter in this case, but I understand Bosch plugs are pre-coated with anti-seize and anti-corrosion so probably don't need it. (FWIW, anyway; I've never used Bosch plugs in the other cars I've owned.)
Again, I don't wish to cause offense, and I certainly don't know everything there is to know about DIY car repairs.
Thanks,
As a newbie here and a potential MB buyer, the last thing I want to do is come across as a smart a$$, but I must comment on the use of dielectric grease to "improve conductivity." It won't - it's completely non-conductive. I've used it when changing spark plugs for years, but on the boots (spreading it around with a thin screwdriver), not the plugs, to keep them from sticking to the plugs and to make removing the boots the next time easier.
I'm also very careful about anti-seize on plug threads, as the OP mentioned, it's controversial. The problem arises when torquing steel threads into an aluminum head. Torque specs may be exceeded dangerously when lubricated, causing damage to the aluminum head. It doesn't sound like you can get a torque wrench down there, so it probably doesn't matter in this case, but I understand Bosch plugs are pre-coated with anti-seize and anti-corrosion so probably don't need it. (FWIW, anyway; I've never used Bosch plugs in the other cars I've owned.)
Again, I don't wish to cause offense, and I certainly don't know everything there is to know about DIY car repairs.
Thanks,
TY

MBWorld Fanatic!
Joined: Sep 2010
Posts: 1,089
Likes: 6
From: Salt Lake City, UT
2010 Mercedes-Benz E350
I've found that the best piece of equipment in my toolbox is a torque wrench! Those torque specs are there for a reason (found that out the hard way when I built my Camaro back in high school). Jaywalker is right about dielectric grease, but it is very helpful to keep the contacts from pulling out of your plugwires the next time you go to change plugs!
Great writeup! Thanks for the effort.
Mike
Great writeup! Thanks for the effort.
Mike

Newbie
Joined: Nov 2009
Posts: 9
Likes: 0
2003 Mercedes C320 4matic wagon; 1968 Mercedes 280sl
Hi, I replaced the sparks on my C320 wagon yesterday and this thread was very helpful (used the 18 mm wrench to pull the connectors).
For me the hardest part was to put the connectors back and be sure they were in all the way. Had to use the same 18 or 17 mm wrench and tapped on it with anything that could fit the narrow space. Big pain in the neck...
Nobody commented on this part so I'm wondering if there was a trick I didn't know.
Thanks
Luca

Junior Member
Joined: Feb 2009
Posts: 52
Likes: 0
2002 C320 Wagon
Did the plugs and air filter change on the Panzer today. Followed the instructions, used the tools that i already have. Other than clearance issues with the rear plugs it went pretty straightforward, took me about 3-4 hours while taking my time  I installed NGK platinums:

http://www.oreillyauto.com/site/c/de...3435&ppt=C0334
Thanks for the helpfu FAQ Will post results after a few weeks of 
I installed NGK platinums:http://www.oreillyauto.com/site/c/de...3435&ppt=C0334
Thanks for the helpfu FAQ
Will post results after a few weeks of

Junior Member
Joined: Jul 2010
Posts: 59
Likes: 0
From: Austin, Texas
2003 Mercedes C240, 2009 Audi Q5
Is the MB spark plug socket required? Or can we just use a generic swivel spark plug socket? If we need the MB one, what's the price and anyone find it online?
Thanks!
Thanks!

Junior Member
Joined: Jul 2010
Posts: 59
Likes: 0
From: Austin, Texas
2003 Mercedes C240, 2009 Audi Q5


