


Valentine One Hardwire Install Thread
Thread Starter
MBWorld Fanatic!
Joined: Aug 2004
Posts: 1,905
Likes: 1
From: Atlanta
03 C32 AMG
Valentine One Hardwire Install Thread
This weekend and next weekend I will be doing a V1 radar detector hardwire on my C32 and my father's 550i (visiting home for mother's day).
After lots of searching, I have found plenty of BMW install guides (M5Board, DTM Power, etc) but have not found a very substantial, detailed write-up on MB World for hardwiring a V1 radar detector. There are some old ones out there, but most have pictures with links that are no longer valid.
I think i have most of what I need to do the install. However, to help out others looking to do the same I want to create an install guide with pictures and instructions. To do so, I need a couple of answers.
1) Is there a wire in the front of the car (Preferably in the center console or the overhead console) that I could tap for intermittant power (i.e. so the detector will turn on with the car)?
2) Has anyone ever ordered headliner material separate from the headliner itself? I'm considering making a casing that looks like part of the headliner but could still mount in the optimal position to the right of the rear view mirror.
3) I have a few ideas on where to put the remote display, but would appreciate any suggestions on locations for it and the remote audio display as well.
Thanks for the help, hopefully this will be a good addition to the forum as it gets built out more.
Out Of Control!!
Joined: Nov 2001
Posts: 10,067
Likes: 11
From: Westwood, NJ
2004 Civic Si. FWD for the Win!
Now, I didn't do the install, but I believe that they tapped into the cigarrette lighter directly.
My concealed display is in the gauge stack, covering up the "160" in the speedo; I don't think I'll ever go down a cliff steep enough to make that a problem. Just a little drilling on the bottom of the little "shelf" in front of the speedo to bring the wiring in for the concealed display, and a couple of 3M two-sided adhesive squares, and it mounts nicely in there.
You might want to think about a remote mute button also, while you're doing the wiring - it's a convenient way to put a mute button near you (people have put them on the backside of the turn signal stalk). I'll be doing that in my other car soon; they're cheap on ebay (not directly from V1 - need a splitter to split the feed going to the concealed display). Why are you getting the remote audio?? That seems a bit of overkill, unless you're going to be using so much fabric to cover up the V1 unit that you think it will muffle the sound too much. I've got the V1 unit on the passenger's sunvisor and just live with it there.
Super Member

Joined: Sep 2006
Posts: 685
Likes: 5
From: Philly
N/A
Thread Starter
MBWorld Fanatic!
Joined: Aug 2004
Posts: 1,905
Likes: 1
From: Atlanta
03 C32 AMG
Some BMW guys have actually put the VI itself IN the headliner and just opt to lose the laser detection feature. I've even seen a few installs done in the rear headrest. Since I have two for the time being, I might try to put one in the headliner this weekend and put the other on the windshield to see how much of a difference it makes.

MBWorld Fanatic!

Joined: Mar 2004
Posts: 2,073
Likes: 27
From: North NJ
2002 C32 AMG, 2013 GLK 350/4, 2015 E63S AMG Wagon
You might want to think about a remote mute button also, while you're doing the wiring - it's a convenient way to put a mute button near you (people have put them on the backside of the turn signal stalk). I'll be doing that in my other car soon; they're cheap on ebay (not directly from V1 - need a splitter to split the feed going to the concealed display).
Thread Starter
MBWorld Fanatic!
Joined: Aug 2004
Posts: 1,905
Likes: 1
From: Atlanta
03 C32 AMG
looked at the overhead panel, no way its fitting inside there. The casing for the back of the dome lights goes right up against the metal. Looks like I'll be pulling apart the center console tomorrow to tap the cigarette lighter.
Trending Topics
MBWorld Fanatic!
Joined: Jul 2007
Posts: 1,013
Likes: 0
From: Livingston, California.
2002 c32 AMG 2012 c250 Coupe
how much does one of these radar detectors cost..? the K40 radar detector was already installed on my c32 when i bought it and so far i love it, but all i hear is the Valentine..
MB World Stories
The Best of Mercedes & AMG

Manual Mercedes? 6 Times Sindelfingen Let Drivers Have All The Fun
Verdad Gallardo
Mercedes SLR McLaren 722 S Is Extremely Rare Example Modified by McLaren
Verdad Gallardo
8 Classic Boxy Mercedes Designs That Have Aged Like Fine Wine
Verdad Gallardo
Flawlessly Restored Mercedes 190E Evo II Heads to Auction
Verdad Gallardo
Electric Mercedes C-Class Unveiled: 11 Things You Need to Know
Verdad Gallardo
Mercedes EQS Gets A Major Update: Everything You Need to Know
Verdad Gallardo
5 Underrated Mercedes-Benz Models That Don't Get the Love They Deserve
Verdad Gallardo
Mercedes 300D Has Pushed Well Past 1 Million Miles and It Ain't Stopping
Verdad Gallardo
10 Most Reliable Mercedes-Benz Models You Can Buy Used
Verdad GallardoMBWorld Fanatic!
Joined: Nov 2004
Posts: 1,027
Likes: 1
From: Taipei Taiwan
'10 E63 Obsidiant Black; '06 R350 Alabaster White; 05 C55 Obsidiant Black (sold)
I tapped in mine at the dome light. I believe its blue and grey for positive and brown for negative. I'm not sure though, but i think the info is somewhere in the forum.
MBWorld Fanatic!
Joined: Nov 2005
Posts: 5,692
Likes: 5
none
I used it on a recent trip to the Tail of the Dragon
Got every cop every time way before they could see me
really saved my a**
MBWorld Fanatic!
Joined: Jul 2007
Posts: 1,013
Likes: 0
From: Livingston, California.
2002 c32 AMG 2012 c250 Coupe
nice.. same with the K40, it has saved me tons of times. Im definitely installing one on my next car..
Thread Starter
MBWorld Fanatic!
Joined: Aug 2004
Posts: 1,905
Likes: 1
From: Atlanta
03 C32 AMG
Alright, as promised, here is my write-up. After considering multiple possible configurations and locations for both the v1 detector and the remote display, I went with the detector on the windshield and the remote display in the ashtray. I have not yet incorporated the audio relocator, not sure if I will but if I do I’ll post about it.
Disclaimer: I am not an MB mechanic and took the risk of messing my car up by doing this install. Do this at your own risk. I’m also not claiming that this is the easiest way to do this install, you could probably do it much quicker and easier but I thought this was the most thorough.
Tools Needed:
T20 torx screw driver (using an actual screwdriver instead of a muli-function screw driver with adapter tips will really help here since you need to get the screwdriver into some pretty tight spots)
Flat and Phillips screw drivers
Dremmel tool or drill for modifying ashtray for remote display
Needle nose pliers, wire cutters
Zip ties, electrical tape
Flashlight
Patience and plenty of time
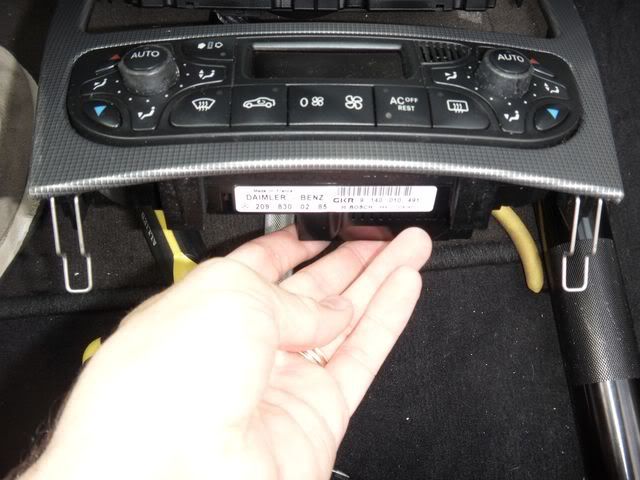
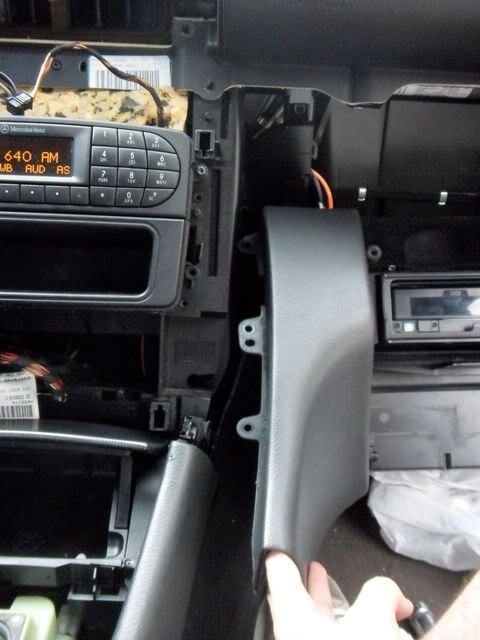
Step 1: Remove the center console trim around the radio.
Great instructions on how to do this can be found here: https://mbworld.org/forums/c-class-w...tructions.html
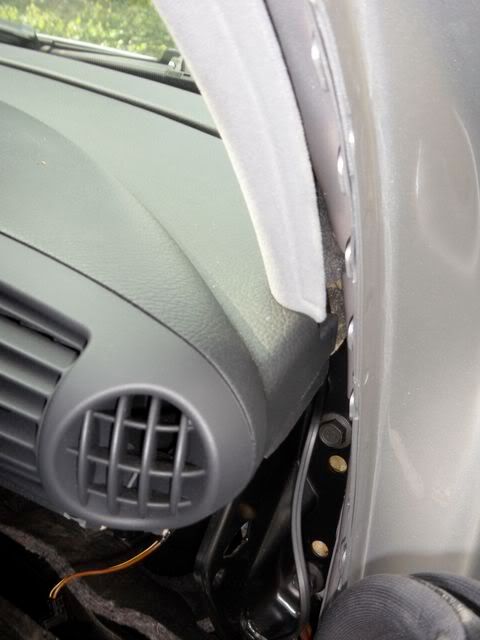
Only thing I would add to these instructions is the following picture of the “teeth” that hold on the top of the center AC vents, just for clarification on what you need to do after removing the torx bolts. Also, make sure to note the wire connections during disassembly so that you can reassemble easily.
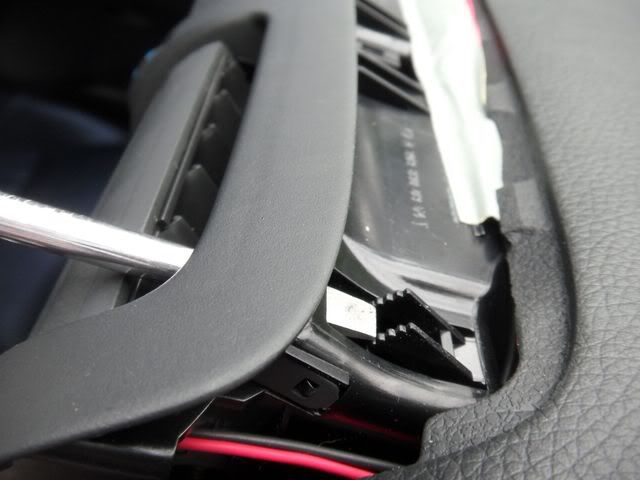
Also, here are the silver hinges you need to pry down (described in the link above)
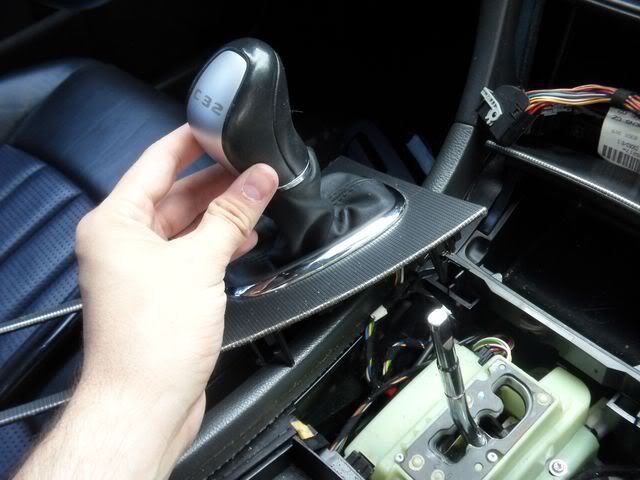
Step 2 (can be done without removing the radio trim): Remove the trim around the shifter. The trim that runs around the shifter can be removed easily by pulling up firmly on the front edge of the trim (the part that matches up with the front of the ashtray).
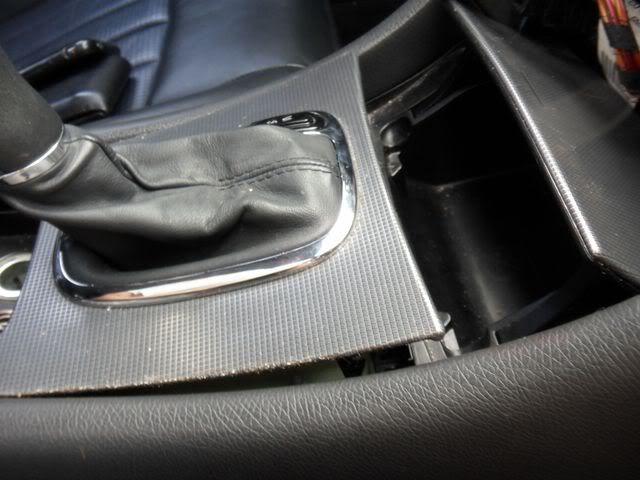
Once you have the font lose, you can pull the trim toward the radio to slide the back of the trim plate out from underneath the small black plate where the center console box starts.
You will then need to lift the console up toward the ceiling of the vehicle, pulling the shifter knob through the chrome gear selector surround, so that you can access the lock that keeps the shifter knob on. Turn the upside down plastic cone that is inside the shift boot to release the lock that keeps on the shifter knob. No worries if the plastic cone comes off, you can easily put it back on.
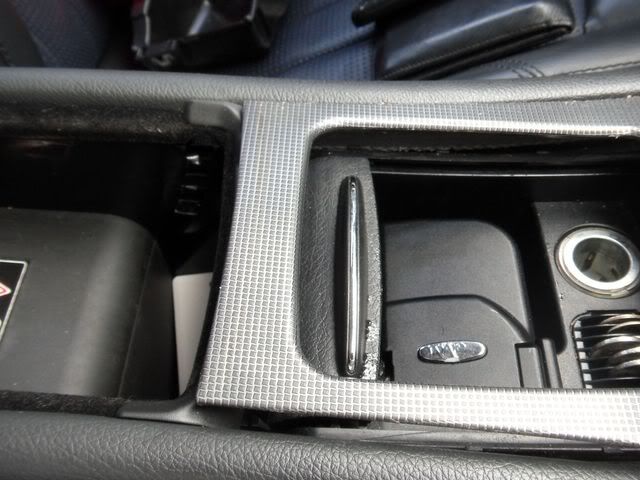
Step 3 (can be done without removing the radio trim): Remove the ashtray. The ash tray is held in place by two clips in the front of the tray. Use a flat head screwdriver to gently pry them toward the rear of the car, then slide the ashtray out.
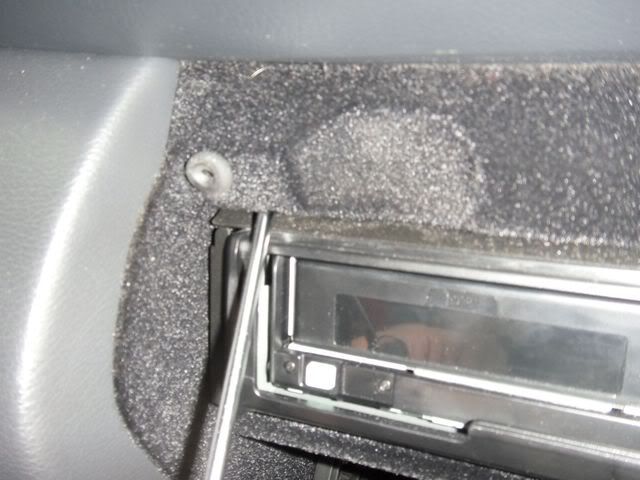
Step 4: Remove the trim plate to the right of the glove box. Easily done, pries of as shown below.
Disclaimer: I am not an MB mechanic and took the risk of messing my car up by doing this install. Do this at your own risk. I’m also not claiming that this is the easiest way to do this install, you could probably do it much quicker and easier but I thought this was the most thorough.
Tools Needed:
T20 torx screw driver (using an actual screwdriver instead of a muli-function screw driver with adapter tips will really help here since you need to get the screwdriver into some pretty tight spots)
Flat and Phillips screw drivers
Dremmel tool or drill for modifying ashtray for remote display
Needle nose pliers, wire cutters
Zip ties, electrical tape
Flashlight
Patience and plenty of time
Step 1: Remove the center console trim around the radio.
Great instructions on how to do this can be found here: https://mbworld.org/forums/c-class-w...tructions.html
Only thing I would add to these instructions is the following picture of the “teeth” that hold on the top of the center AC vents, just for clarification on what you need to do after removing the torx bolts. Also, make sure to note the wire connections during disassembly so that you can reassemble easily.
Also, here are the silver hinges you need to pry down (described in the link above)
Step 2 (can be done without removing the radio trim): Remove the trim around the shifter. The trim that runs around the shifter can be removed easily by pulling up firmly on the front edge of the trim (the part that matches up with the front of the ashtray).
Once you have the font lose, you can pull the trim toward the radio to slide the back of the trim plate out from underneath the small black plate where the center console box starts.
You will then need to lift the console up toward the ceiling of the vehicle, pulling the shifter knob through the chrome gear selector surround, so that you can access the lock that keeps the shifter knob on. Turn the upside down plastic cone that is inside the shift boot to release the lock that keeps on the shifter knob. No worries if the plastic cone comes off, you can easily put it back on.
Step 3 (can be done without removing the radio trim): Remove the ashtray. The ash tray is held in place by two clips in the front of the tray. Use a flat head screwdriver to gently pry them toward the rear of the car, then slide the ashtray out.
Step 4: Remove the trim plate to the right of the glove box. Easily done, pries of as shown below.
Last edited by King320; May 3, 2010 at 01:00 AM.
Thread Starter
MBWorld Fanatic!
Joined: Aug 2004
Posts: 1,905
Likes: 1
From: Atlanta
03 C32 AMG
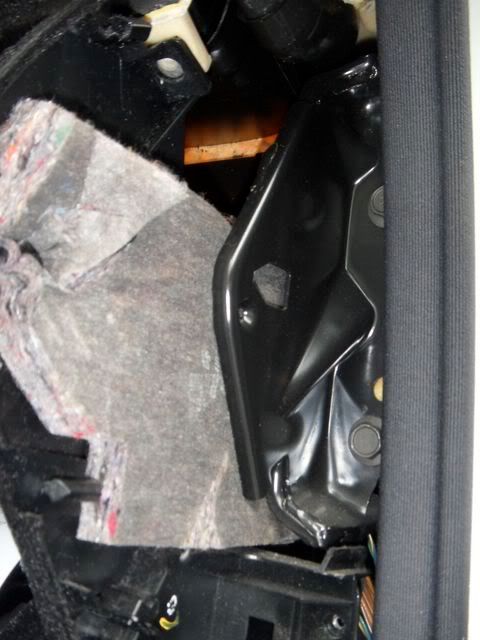
Step 5 (Optional): Remove the glove box. This was the most difficult part of the install and was by far the most time consuming and frustrating. If you can find a way to run the wires without removing the glove box, do it, but I wanted to make sure that they would be properly secured by using as much factory wire ducting as possible to prevent rattling, so I went with this route. Not even sure I did this the easiest way, so as above, do this at your own risk.
Remove two screws on side of glove box (beneath the panel you removed in step 4). Removed at top left and bottom right of this picture
Open Glove box. Push in on the left side of the lower part of the open glove box to unset the hinge mechanism, this will let the box open all the way to the floor, and slide out of the upper portion of the box.
Remove the cd changer by removing the one short Phillips screw to the right side of the changer. The entire changer can then be easily pulled out in one piece.
Remove the three screws at the top of the upper compartment of the glove box. Two shown below, third is on the right side and easy to see.
Remove the two screws on the bottom of the glove box
Remove one screw holding in the leather piece between the bottom of the glove box and the radio
Remove two screws holding on the leather trim piece between the radio and the glove box
After all of these screws are removed, you should be able to pull out the glove box, along with the leather trim piece all together. The leather trim piece is connected to the left side of the glove box by trim pieces that hook into the glove box with three plastic tabs, so there is no way that I can see to remove the glove box without removing this trim piece.
Warning. This thing is bad to get out, but it is 10x worse to reinstall. You might be better off trying to run the wire down the driver�s side and over the driver�s foot well.
Step 6: Have a drink and ask forgiveness for the stream of obscenity you produced while trying to remove that freaking glove box.
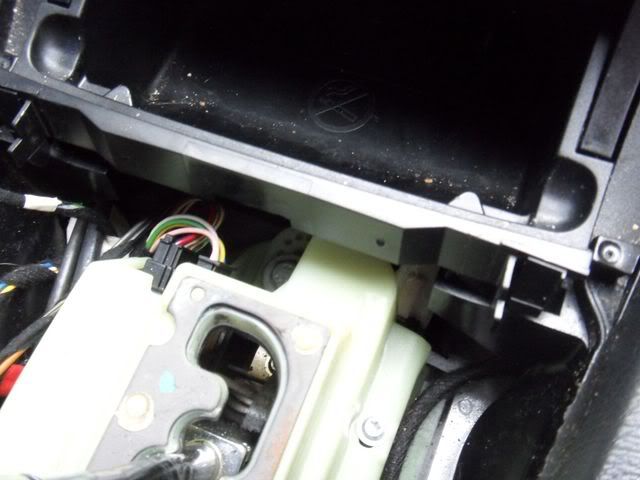
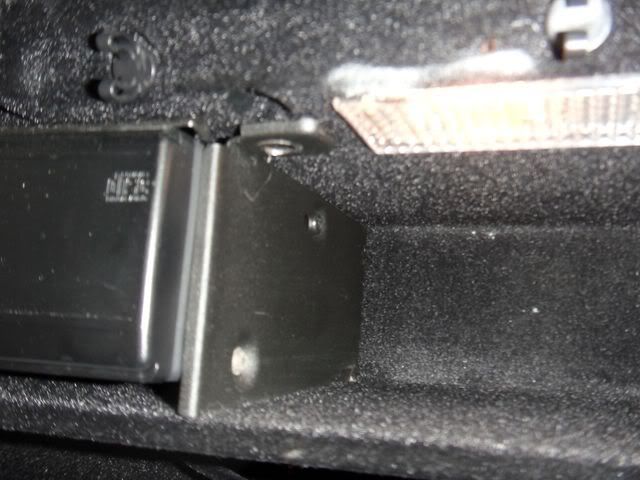
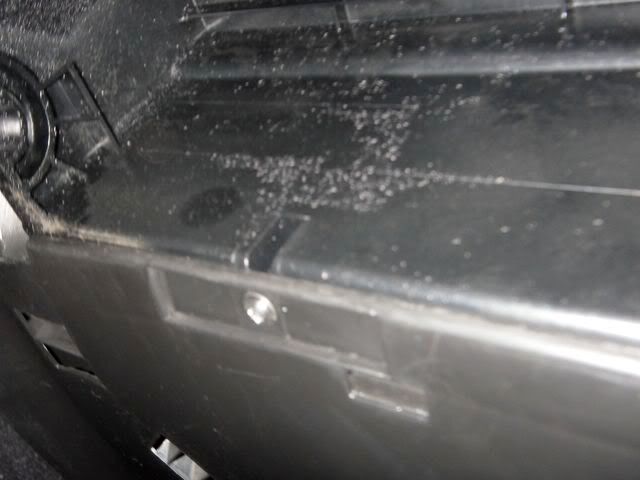
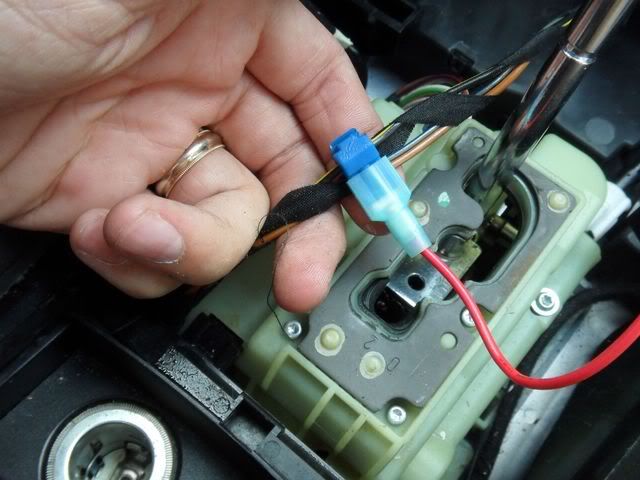
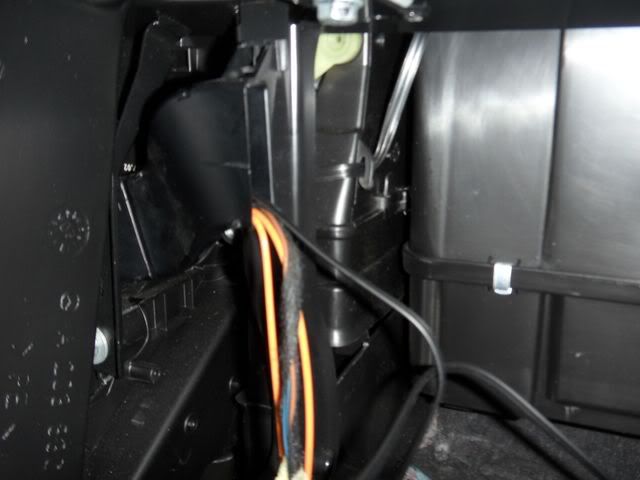
Step 7: Tap power from the cigarette lighter (which is a switched power line, so the radar detector will power on and off with the car). The cigarette lighter�s power supply runs to the left of the shifter assembly as shown below. There are three wires: brown, gray/blue, and black/yellow. Use the wire tap provided to tap the black/yellow line. Connect the V1 wiring relay as shown. Zip tie the excess wiring together to keep it neat.
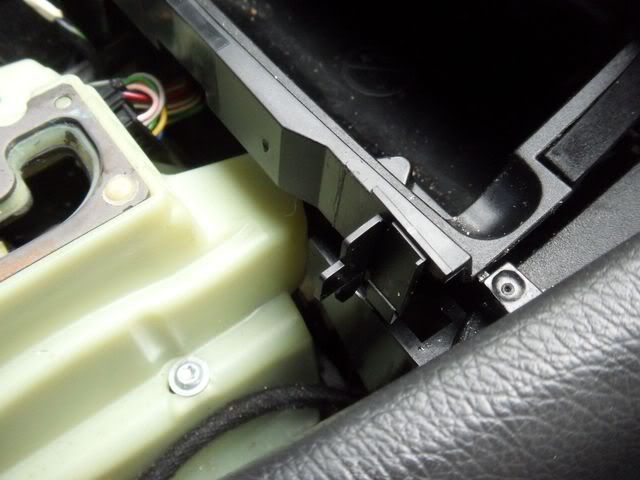
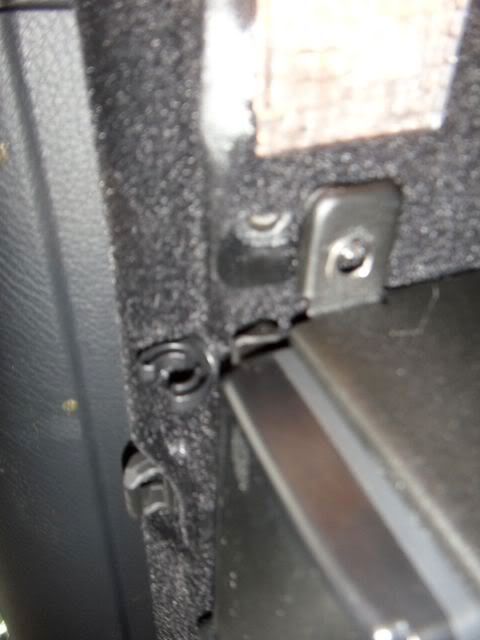
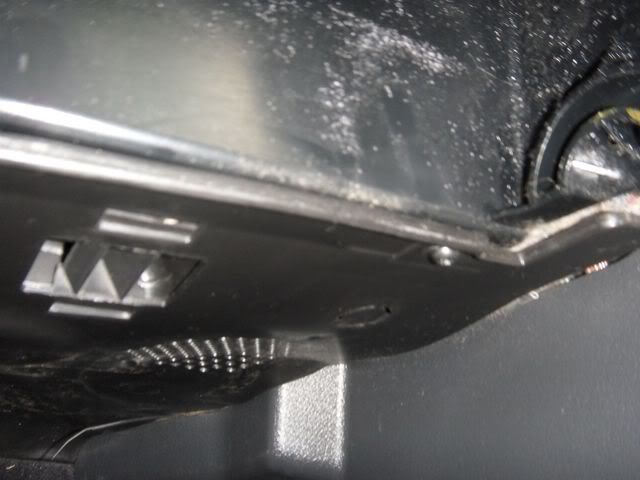
Step 8: Ground the V1 wiring relay. There is a great factory wiring ground behind the glove box, you can see a lot of factory wires grounded out here. I used an allen wrench to loosen the bolt holding the factory ground wire in, slid the V1 wire on top, and tightened the bolt back down.

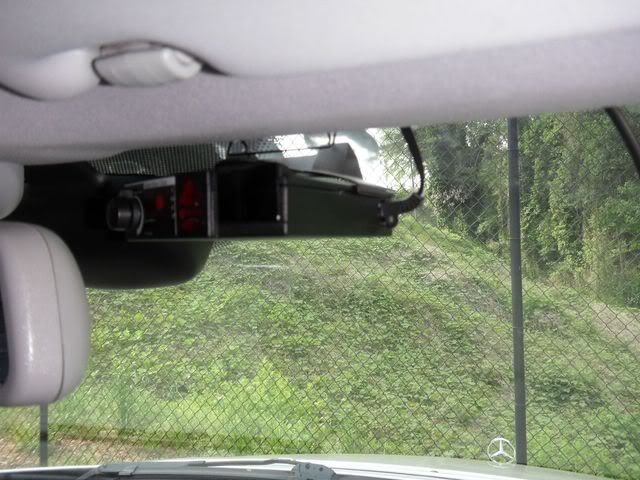
Step 9: Run the wire from the radar detector to the wiring relay. I decided to mount my V1 high on the windshield as recommended by Mike Valentine. I switched to the largest suction cups and mounted the detector just outside the black dots on the windshield (these weaken the suction of the cups and will make the thing keep falling off).
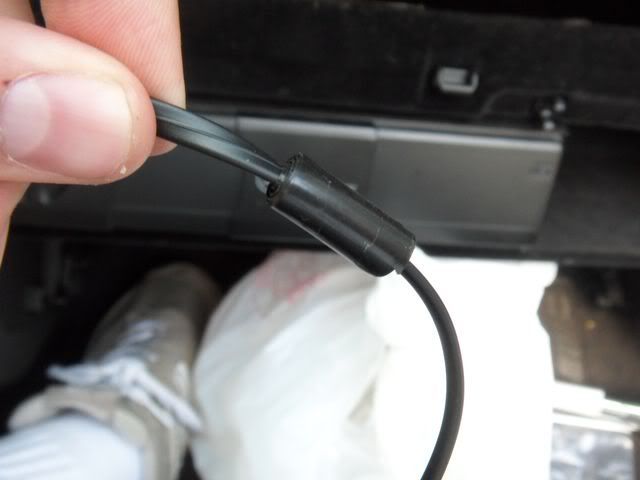
Running the wire is simple, but to keep it from coming out I wrapped some electrical tape around the portion of the wire that would be sitting just inside the headliner to keep it from coming out if I were to tug on it later to adjust the V1�s position.
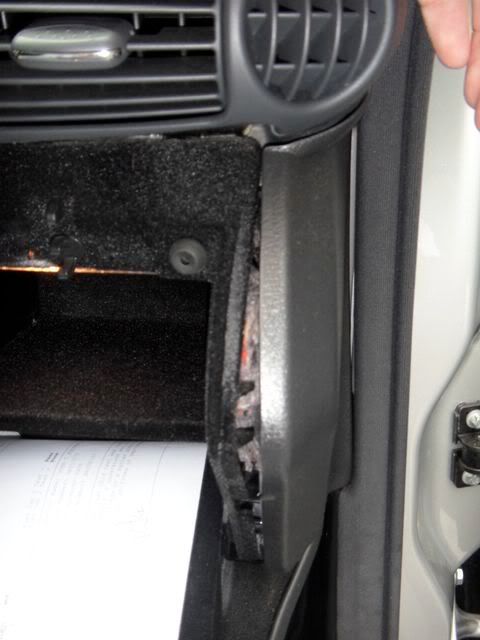
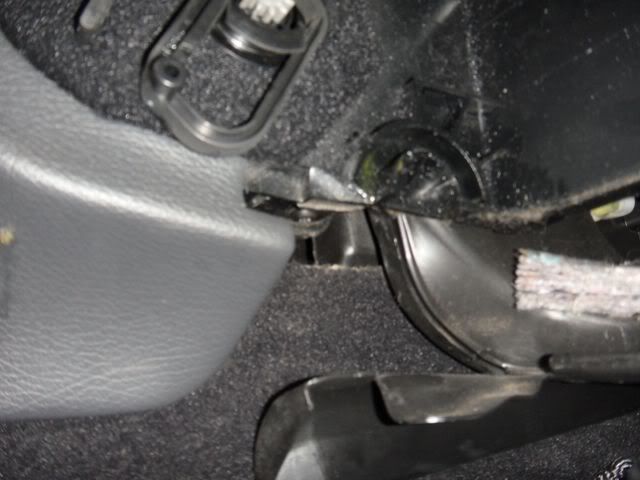
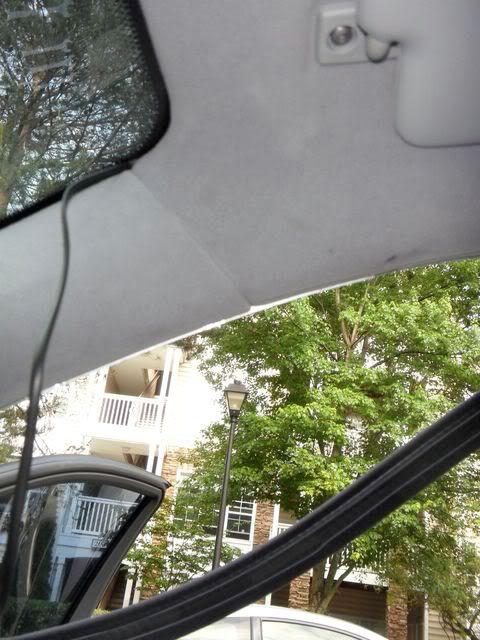
Push the wire into the headliner, run it to the passenger side of the car, into the door pillar covers. It helps if you pull down the weather stripping here. It should come out at the panel you removed in step 4.
Next, run it along the factory wires, using zip ties to secure it, and use a coat hanger to run it through the factory wire ducting for the cd changer and into the radio compartment. From there, run it to the wiring relay�s MAIN port.
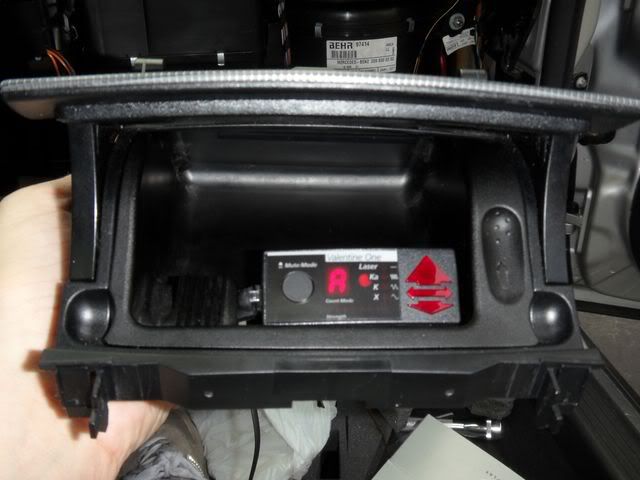
Step 10: Modify the ash tray to accept the remote display. I chose to put the remote display in the ash tray to the right of the raised portion, which I guess is intended as a cigarette rest. The display fits perfectly here.
I drilled a hole in the back, bottom, driver�s side of the ash tray, and drilled out the side of the raised area inside the ash tray insert.
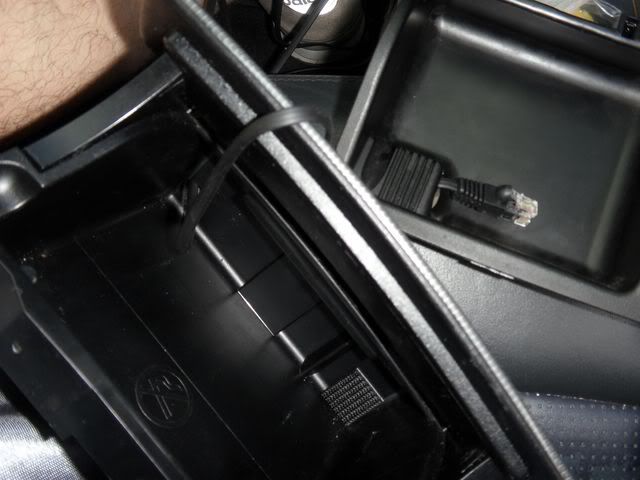
The wire easily fits between the ash tray itself and the insert.
Used double stick tape (not the stuff provided by Valentine) to secure it in place. And reinstall the ashtray.
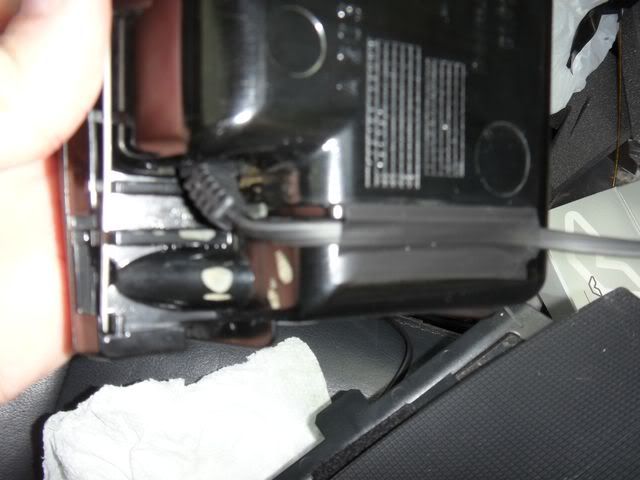
Step 11: Connect the remote display to the ACC port on the wiring relay
Step 12: Rattle prevention. Since I planned to stash the V1 wiring relay between the shifter assembly and the plastic wall of the center console, I tore off some of the foam padding that the V1 came in, and wrapped it around the wiring relay to prevent rattling. Simple step now that might save your sanity later.

Step 13: Put it all back together in the following order
1) Ashtray
2) Shifter Trim
3) Glove box (you have to put the glove box and leather piece back in at the same time as a unit. This is very difficult. To prevent marking up the leather where the leather trim piece meets the leather to the right of the shifter you might want to put tape over the latter piece because you are going to have to jam this thing back on.
4) Lower portion of glove box, line up the tracks at the bottom of the box, and close the box slowly, you should hear a pop as the guide on the left side of the upper glove box assembly slides back into the slot on the left side of the lower glove box assembly. This piece is what makes the glove box open slowly instead of just dropping open.
5)Radio trim and center vents.
Remove two screws on side of glove box (beneath the panel you removed in step 4). Removed at top left and bottom right of this picture
Open Glove box. Push in on the left side of the lower part of the open glove box to unset the hinge mechanism, this will let the box open all the way to the floor, and slide out of the upper portion of the box.
Remove the cd changer by removing the one short Phillips screw to the right side of the changer. The entire changer can then be easily pulled out in one piece.
Remove the three screws at the top of the upper compartment of the glove box. Two shown below, third is on the right side and easy to see.
Remove the two screws on the bottom of the glove box
Remove one screw holding in the leather piece between the bottom of the glove box and the radio
Remove two screws holding on the leather trim piece between the radio and the glove box
After all of these screws are removed, you should be able to pull out the glove box, along with the leather trim piece all together. The leather trim piece is connected to the left side of the glove box by trim pieces that hook into the glove box with three plastic tabs, so there is no way that I can see to remove the glove box without removing this trim piece.
Warning. This thing is bad to get out, but it is 10x worse to reinstall. You might be better off trying to run the wire down the driver�s side and over the driver�s foot well.
Step 6: Have a drink and ask forgiveness for the stream of obscenity you produced while trying to remove that freaking glove box.
Step 7: Tap power from the cigarette lighter (which is a switched power line, so the radar detector will power on and off with the car). The cigarette lighter�s power supply runs to the left of the shifter assembly as shown below. There are three wires: brown, gray/blue, and black/yellow. Use the wire tap provided to tap the black/yellow line. Connect the V1 wiring relay as shown. Zip tie the excess wiring together to keep it neat.
Step 8: Ground the V1 wiring relay. There is a great factory wiring ground behind the glove box, you can see a lot of factory wires grounded out here. I used an allen wrench to loosen the bolt holding the factory ground wire in, slid the V1 wire on top, and tightened the bolt back down.
Step 9: Run the wire from the radar detector to the wiring relay. I decided to mount my V1 high on the windshield as recommended by Mike Valentine. I switched to the largest suction cups and mounted the detector just outside the black dots on the windshield (these weaken the suction of the cups and will make the thing keep falling off).
Running the wire is simple, but to keep it from coming out I wrapped some electrical tape around the portion of the wire that would be sitting just inside the headliner to keep it from coming out if I were to tug on it later to adjust the V1�s position.
Push the wire into the headliner, run it to the passenger side of the car, into the door pillar covers. It helps if you pull down the weather stripping here. It should come out at the panel you removed in step 4.
Next, run it along the factory wires, using zip ties to secure it, and use a coat hanger to run it through the factory wire ducting for the cd changer and into the radio compartment. From there, run it to the wiring relay�s MAIN port.
Step 10: Modify the ash tray to accept the remote display. I chose to put the remote display in the ash tray to the right of the raised portion, which I guess is intended as a cigarette rest. The display fits perfectly here.
I drilled a hole in the back, bottom, driver�s side of the ash tray, and drilled out the side of the raised area inside the ash tray insert.
The wire easily fits between the ash tray itself and the insert.
Used double stick tape (not the stuff provided by Valentine) to secure it in place. And reinstall the ashtray.
Step 11: Connect the remote display to the ACC port on the wiring relay
Step 12: Rattle prevention. Since I planned to stash the V1 wiring relay between the shifter assembly and the plastic wall of the center console, I tore off some of the foam padding that the V1 came in, and wrapped it around the wiring relay to prevent rattling. Simple step now that might save your sanity later.
Step 13: Put it all back together in the following order
1) Ashtray
2) Shifter Trim
3) Glove box (you have to put the glove box and leather piece back in at the same time as a unit. This is very difficult. To prevent marking up the leather where the leather trim piece meets the leather to the right of the shifter you might want to put tape over the latter piece because you are going to have to jam this thing back on.
4) Lower portion of glove box, line up the tracks at the bottom of the box, and close the box slowly, you should hear a pop as the guide on the left side of the upper glove box assembly slides back into the slot on the left side of the lower glove box assembly. This piece is what makes the glove box open slowly instead of just dropping open.
5)Radio trim and center vents.
Member
Joined: Jun 2008
Posts: 154
Likes: 11
From: Phx, AZ
N/A
Nice job on the picture documentation and install.
I prefer it to be stealth and hidden from outside the car, yet visible only to the driver inside the car.
Like integrating it into the factory mirror. RENNtech offers a kit to do this.

RENNtech Video
Valentine One Radar Mercedes Integration by RENNtech
Other Videos
Valentine One radar in rearview mirror
Mercedes Benz S55 Valentine One in factory rearview mirror
I prefer it to be stealth and hidden from outside the car, yet visible only to the driver inside the car.
Like integrating it into the factory mirror. RENNtech offers a kit to do this.
RENNtech Video
Valentine One Radar Mercedes Integration by RENNtech
Other Videos
Valentine One radar in rearview mirror
Mercedes Benz S55 Valentine One in factory rearview mirror

Thread Starter
MBWorld Fanatic!
Joined: Aug 2004
Posts: 1,905
Likes: 1
From: Atlanta
03 C32 AMG
Yeh those mirror integrations are nice, but they are very pricey (approx $400 for the BMW versions) and all the ones I have seen only integrate the remote display, not the detector itself, so you still have to mount the detector itself somewhere. Also, your readings are visible to the cars behind you, which could be a police cruiser considering pulling you over.

MBWorld Fanatic!
Joined: Jun 2006
Posts: 2,359
Likes: 2
From: California
06 C55, 09 E350
Thanks for the info guys I ended up putting it up top by my mirror, I know it wont do great against laser, but the cops have your speed anyways once they tag you with a laser.

Junior Member
Joined: Mar 2011
Posts: 33
Likes: 0
From: lakewood,ca.
03.5 c230
tap from cig. lighter
Do you 2 cigarette lighter? I'm wondering because mine is near where you put the quarters and that's the only cigarette lighter that I can use and I do not know how to go under it ! how did you remove the gear shift ? is'nt there a plug on the gear shift? anyway nice write up and I'm going to use some of your instructions. I 'm putting a 2 din radio/gps/dvd with a MB harness already but with other wires that I do not know how to connect like the a/v rca connectors and the steering wheel wires.


