When you click on links to various merchants on this site and make a purchase, this can result in this site earning a commission. Affiliate programs and affiliations include, but are not limited to, the eBay Partner Network.
Hello Forum, it has been a while, I have been busy on several home projects.
My 2012 E350 with 95,000 miles on it now started to have a fuel vapor smell by the driver side rear tire but no sign of a leak. I pulled the back seat and removed the fuel filter cover and found a small puddle of fuel. No more than a tablespoon full.
After cleaning I see spider cracks over the top of what I thought would be the fuel filter location. Turns out this is called the Suction Jet Pump. Part # A2184700194
I believe the Jet pump helps keep the fuel level in both sides of the tank?
The actual fuel pump is located behind the passenger seat, this Jet pump is behind the driver seat.
The factory plastic body of this pump has failed allowing a small leak.
I found this part available from Mercedes priced under $400. Rock Auto shows this pump available from another source for less than $100.
I am curious if others had to replace this part and what new part they chose to install.
It is in my mind that the factory pump failed due to bad plastic so I am not opposed to a new brand.
The pump works fine so far but it developed the leak. The part in the picture is a Radiator Cap???
I have a fuel leak at the pump.
I have thought about sealing the leaks with Hylomar and then covering that with JB Weld to protect the Hylomar. Hylomar is known to seal gasoline very well but it offers no protection, not sure if it ever hardens so it would need a cover.
Last edited by Westlotorn; Dec 10, 2024 at 06:13 PM.
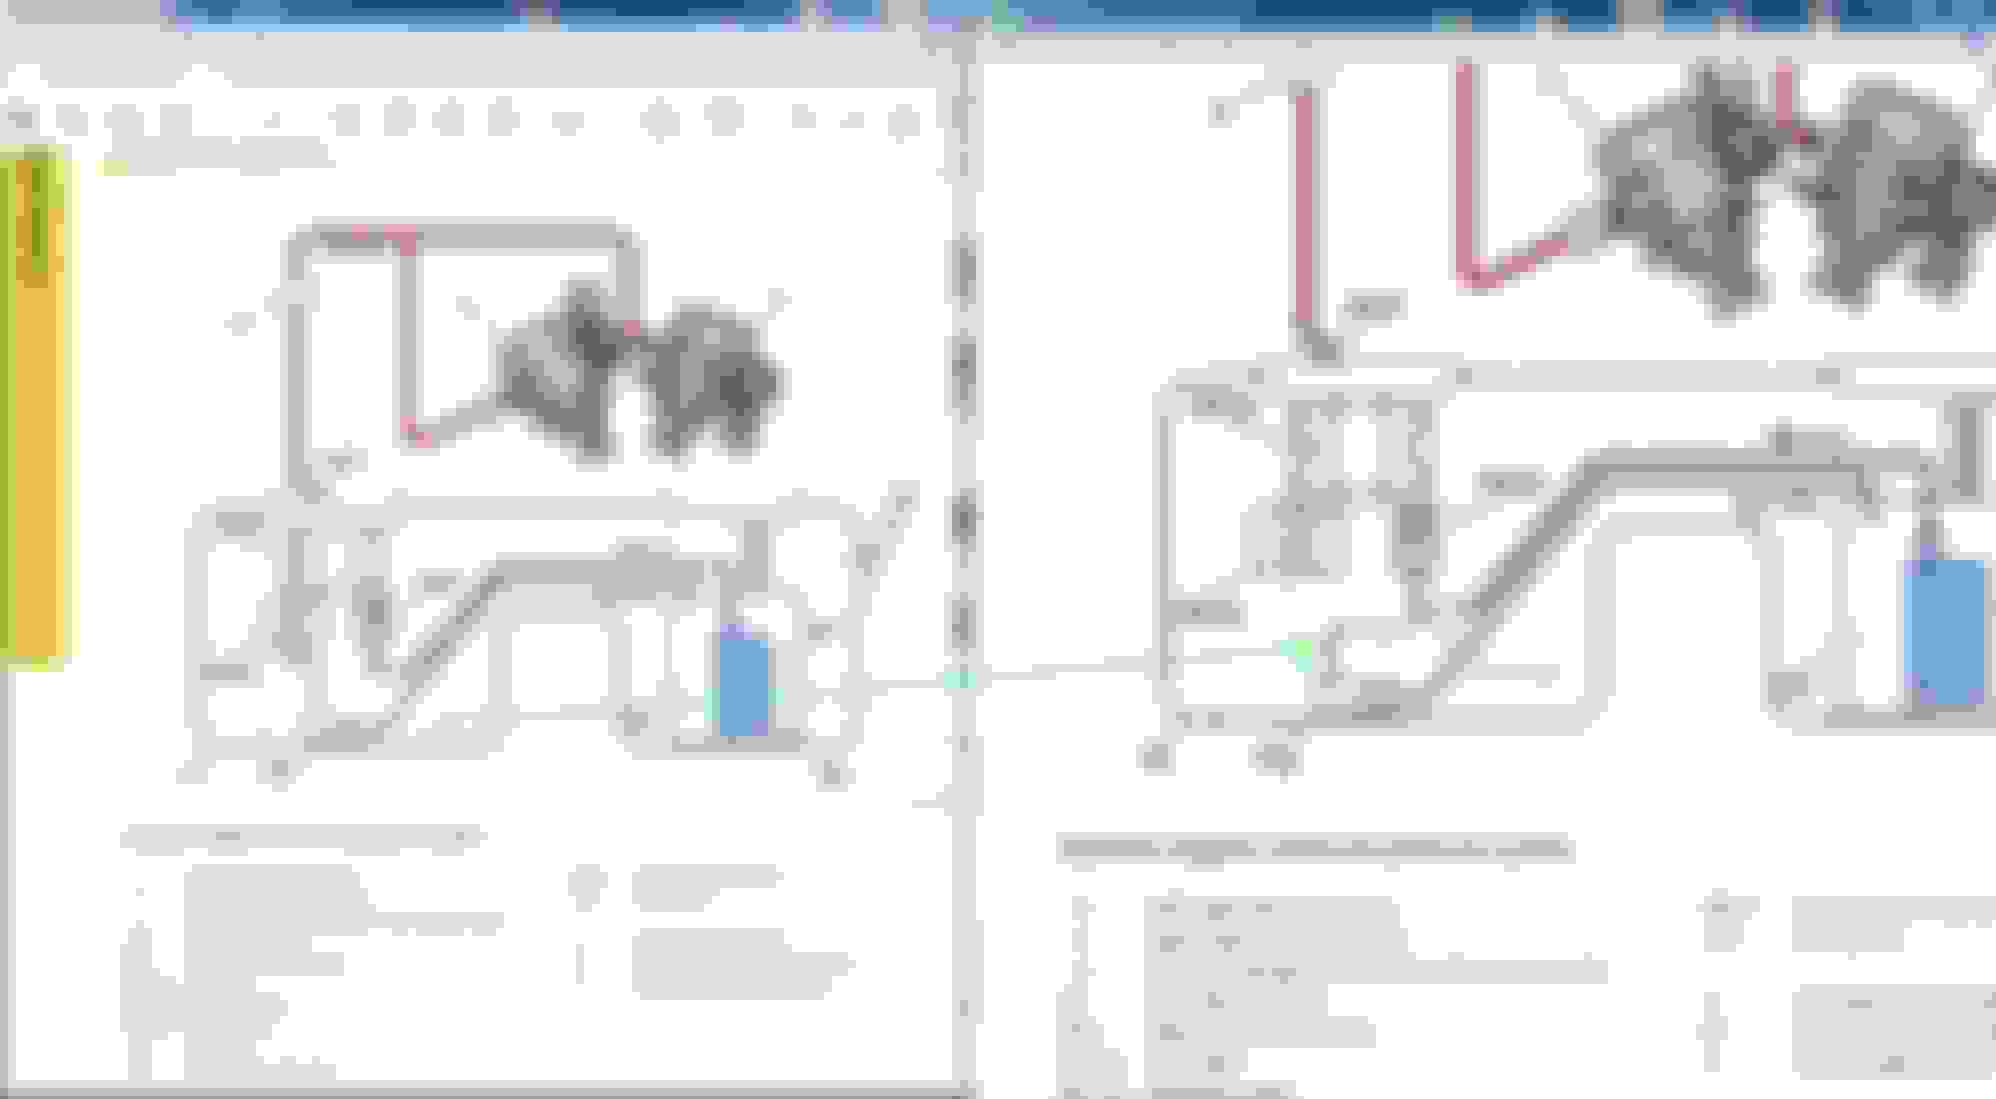
The name of Suction Jet Pump is actually misleading in some way, it should be first and foremost called FUEL FILTER, with Suction Jet Pump as its secondary function.
Yes, this FUEL FILTER has the function to send back fuel from LEFT SIDE TANK to RIGHT SIDE TANK where the fuel pump is at.
So 1 hose as input for FUEL FILTER from FUEL PUMP, is then split with a Tee ( Y ) to be : one for fuel filter to serve engine and second for the venturi effect Suction Jet Pump with a hose
back to fuel pump.
Mr Prihadi you are always on it. Thanks for the detail. I ordered a Pump/filter and will install when it comes in. Maybe 1 week? Christmas may get in the way. I was very surprised to see all the spider cranks in the top of the filter housing. That is not safe. I hope they used better plastic on the fuel pump side/passenger side.
I have a 2012 E350 and I replaced mine 2 weeks ago. The fuel filter on the drivers side had a crack. It's not hard to replace it. I'll guide you how to do it.
Mr Prihadi you are always on it. Thanks for the detail. I ordered a Pump/filter and will install when it comes in. Maybe 1 week? Christmas may get in the way. I was very surprised to see all the spider cranks in the top of the filter housing. That is not safe. I hope they used better plastic on the fuel pump side/passenger side.
Well, the fuel filter housing is under 5 BAR constant pressure when engine is running, so it does have stress load to it. Plastic too
You will notice the crack/s is on top, which is logical for pressure vessel of such shape.
Round/pipe shape is best for pressure, but the filter top region is a 90 degrees corner, the weaker region.
In the old days when fuel filter work in suction mode and lift pump is at engine, life was easier .
One of the companies I worked for was Carter Fuel Pumps and Carburetors. In the 2000s we came out with fuel filters for in tank fuel pumps that were 10 micron filters and lasted 150,000 miles in cars routinely. The filter you cut apart in your write up looked like a simple oil filter cartridge. I bet 25 micron particles could pass through it? On the 2008 PZEV car I owned I replaced the fuel pump and used a pump with the 10 micron filter. Yep, had to cut the tank open to do that task but it worked out fine. I may have been the first to cut open a tank and put it back in use with one of the PZEV tanks. I did this to avoid the cost of the $2000 PZEV fuel tank with the new fuel pump in it. If fixed it for about $300 but the labor was quite a bit.
Thanks for all the tips and help. Zeemob I ordered the tool. I have yet to need one but it looks like it will help. To date I have always been able to use a driver and hammer to remove this type lock ring but since the tool is only $17 I ordered it and it might save the day.
Probably 25 microns is what MB/VDO chooses for the fuel filter element.
I hate the stupid design, on how poor the sealing is actually .
On yachts I use 10 microns for diesel engines as 1st layer filter ( secondary ), king kong size Racor FG1000 dual unit, so I can replace filter while engine is running,
no need air bleeding yada yada.
On the engine it was 10 microns when oldie 200 BAR non-common rail injector and 2 microns now for crazy high pressure common rail ones.
I will keep my fuel filter maximum service life at 25,000KM or 5 years, whichever comes first.
My engine is GDI, so HP fuel pump and its injectors are very delicate device.
Yours is M272 port injection or M276 GDI ? Year 2012 could be either one...right ?
Mine is the Direct Injected V6. Fuel pressure at the rail is up to 1500 PSI, less at idle. this a USA car so no idea if it came Direct Injected and Port injected.
That Marine Filter is crazy with 2 microns. Wow, technology has passed me by. The fuel pressures on those direct injected diesels is up to 30,000 PSI + now and they are making insane amounts of HP and Torque.
The new full size Diesel trucks have 1000 plus pounds of torque and some have near 500 HP.
A friend has the new Ford F250 6.7L power stroke Diesel truck.
He thought he was having a transmission issue and floored it to see how it shifted under load. The tires kept spinning till it hit 4th gear. It is either an 8 or 10 speed tranny. He said he want back and looked at the tire marks and they were over 100 yards long. He just got back from a trip camping, towed a light duty travel trailer. He got 18.5 MPG on the trip towing a small trailer. The new technology is amazing. ( as is the cost of the new trucks). In the 1970's the very high horsepower cars modified might have made 500 HP but they also only got 5-7 MPG. Have to love the new technology for power and economy.
Ok, so yours is M276 direct injection. The 60-75 PSI is the port fuel injected M272, no HP fuel pump at the Bank 1 camshaft.
New common rail diesel is awesome-ly high torque.
I used to maintain a 680HP V8 MAN marine engine of the 90s and in 2017 I maintained its upgrade, same V8 but with common rail and computer controlled injectors, 900HP now.
The beauty is not 680HP to 900HP, but the low torque at 1,300 RPM is so good now and much higher, the yacht can plane with ease even highly loaded and in bad weather.
This is a 2,300 RPM max rated engine and yachts engine load is set at the propeller size and pitch and engine loading is 80% all the time for pleasure yachts, and 90ish % all the time for ferry.
Only forward and reverse gear, single speed tranny with reduction usually 1 : 2.0
Its like hauling a trailer and going on an endless hill climb in 1st gear, that is how the engine is living its life on marine vessel at cruise speed of 1,900 RPM.
Fuel burn is also much better with common rail, impressive efficiency at approx 0.45 statue miles to a US Gallon for twin 900 HP pushing a 55 footer yacht at 23 - 24 knots 1,900 ish RPM.
Here is my log from 2018 yacht delivery. 1,800 HP combined power, 55 footer size. Weight approx 29 metric ton or 63,000 lbs.
Above yacht top speed approx 32 knots, if at 2,300 RPM.
Look at the HULL SPEED column. Planing is the process where the yacht breakaway from Hull speed 1.0 , to about 1.3 to 1.5 and this jump needs about 300%- 400% more horsepower,
thus you see the MPG is very bad once at hull speed 2.0 ish vs 0.88 hull speed.
When we want to see and learn of fuel filtration, spend time on a yacht with more than 1,200 combined horsepower, by 200th engine hours , the fuel filter replacement in
country like mine will be really plenty. Today and after 2018 and up is better, in the 90s to mid 2000s...., OMG our diesel fuel is so bad.
Wow, very interesting to me. I have never had the finances to play with 60 foot yachts. My first 20+ years working I was on the Automotive side of the business but my last 8 years working I supplied parts to the heavy duty diesel engine market. FP Diesel parts was our brand name. Mostly class 8 truck engines but also covered all the popular industrial engines so your information is very interesting to me.
I switched to HD because the pay was better and I found it interesting. We did some Marine business, mostly Detroit diesels but they were getting phased out in the US due to smog laws, it was still the #1 industrial engine in the world, the USA was just banning them as a dirty engine.
In the US my best seller was the Cummins engine parts followed by the newer Detroit Series 60 and then CAT engines. FP Diesel had Pistons, Engine Bearings, and nearly every part to rebuild these engines. Did not have Turbo's.
Last edited by Westlotorn; Dec 12, 2024 at 01:06 PM.
I have a sense that I will need to replace one of the in-tank modules under the rear seat soon. The sense is coming from my nose...
Hopefully it's the filter unit because I already have a new one which I got because my "fuel pressure is implausible". Either the filter has too much backpressure, or the integrated pressure sensor is flaking out...
If I have to replace both sides, it's not a big deal.
I think you're onto something... backpressure messing up tank plastic caps.
Normally EVAP works using plenum vacuum, right?
what if we got enough blowby in the intake then tank gets.... pressurized.
I have a sense that I will need to replace one of the in-tank modules under the rear seat soon. The sense is coming from my nose...
Hopefully it's the filter unit because I already have a new one which I got because my "fuel pressure is implausible". Either the filter has too much backpressure, or the integrated pressure sensor is flaking out...
If I have to replace both sides, it's not a big deal.
Fuel pump only goes kapoot usually when one like to run tank below 1/4 level, as such not enough liquid cooling to the fuel pump motor.
Next is plugged fuel filter causing fuel pump to work harder than necessary to maintain the 5 BAR minimum read by the fuel pressure sensor sitting above the fuel filter housing.
In my car there was zero smell of gas inside the car. I only smelled it if close to the rear tire outside the car. My leak was driver side so I smelled it by the driver rear tire. Once the pump cover was removed inside the car behind the driver seat you could see a small amount of gasoline on top of the Filter/Pump housing.
My new pump arrived today about 1 PM, I got started on the install around 3 pm. Went to go fill the tank with the new parts installed by 6:15. Filled the tank with the rear Seat and covers still removed. Drove it a few miles to shake up the full tank and drove home for a leak inspection. All good, no leaks, car runs great.
I only replaced the driver side pump and filter assembly but to do this job you need to remove the actual fuel pump on the passenger side since the driver side filter sends two hoses over to connect on the passenger side. Don't forget to disconnect the battery before starting this job and have your windows rolled down. Bleed the fuel pressure from the fuel rail at the driver side intake manifold or you will have pressurized fuel spray over your back seat area. Before opening the fuel tank I raised the rear of the car up 8" and put the rear on jack stands. This kept me from working down on the ground the whole time and leveled the fuel tank a little. My tank had just under 1/4 tank of gas and this set up made it easy with no gas spill issues.
Couple tips to share. Use the Tool as recommended above. The $17 charge is no big deal and it will save time and frustration. As far as the rings being hard to remove? The tool has a 1/2" drive attachment. The tool is heavy duty so I just grabbed my 24" breaker bar and with that it was still a good hard pull to pop the ring off and to install it after the job was completed.
I did use a little grease on the passenger side to hold the new Oring in place. I used a little grease on the lock ring to help it slip into place. Again I used the 24" breaker bar which made it go in to the lock position with moderate effort. Before you go pulling on the breaker bar make sure the lock ring is in place and all of the lock tabs are in place to rotate properly.
With the tool this job was 30 seconds off on each side and the same to install. Great tip on buying this tool. Thank You
The string trick works well to snake the new pump lines through from the driver side to the passenger side inside the tank. I made the mistake of tying the string about 4" back from the front of the new lines. Did not work this way. I had to tie my string to the very front of the lines which allowed the new lines to snake into the proper path and go through the tank to the passenger opening. By feeding the lines with one hand and pulling gently on the passenger side string the lines slipped right through and the rest of the job is just plugging in the wires and hooking up the fuel lines. Not a bad job at all just need to pay attention.
Could this have been done faster, yep, but if you make a mistake it can cost a lot of time and money later so go slow and work smart. BTW: I used the Hella Brand new filter. Less than $100. Works quietly and the fuel gauge reading was same as the OEM unit removed. Good so far and I was hoping to find a better producer of plastic than the OEM provider that sells short life plastic that caused my failure.
So full tank, No leaks, car runs great, everything back together again. Final note: Driving to get gas, 5 mile trip the car was amazingly noisy with the rear seat out and the tank pump covers removed. You could hear every bit of tire and traffic noise. Put the covers and seat back in and everything is quiet again. Nice. I did not want to close it all up before I witnessed no leaks with a full tank and a working fuel gage.
Last edited by Westlotorn; Dec 15, 2024 at 12:26 AM.
Congrats on a well-done job! I�ve done the passenger side pump replacement on my m278 and did NOT acquire the correct lock-ring tool ahead of time. It is a real PITA without it. I also struggled with the hose connections in between units. Bravo on the research and prep!
Mercedes SLR McLaren 722 S Is Extremely Rare Example Modified by McLaren
Slideshow: A one-of-one U.S.-spec Mercedes-Benz SLR McLaren Roadster became even rarer after a factory-backed transformation at McLaren's headquarters.